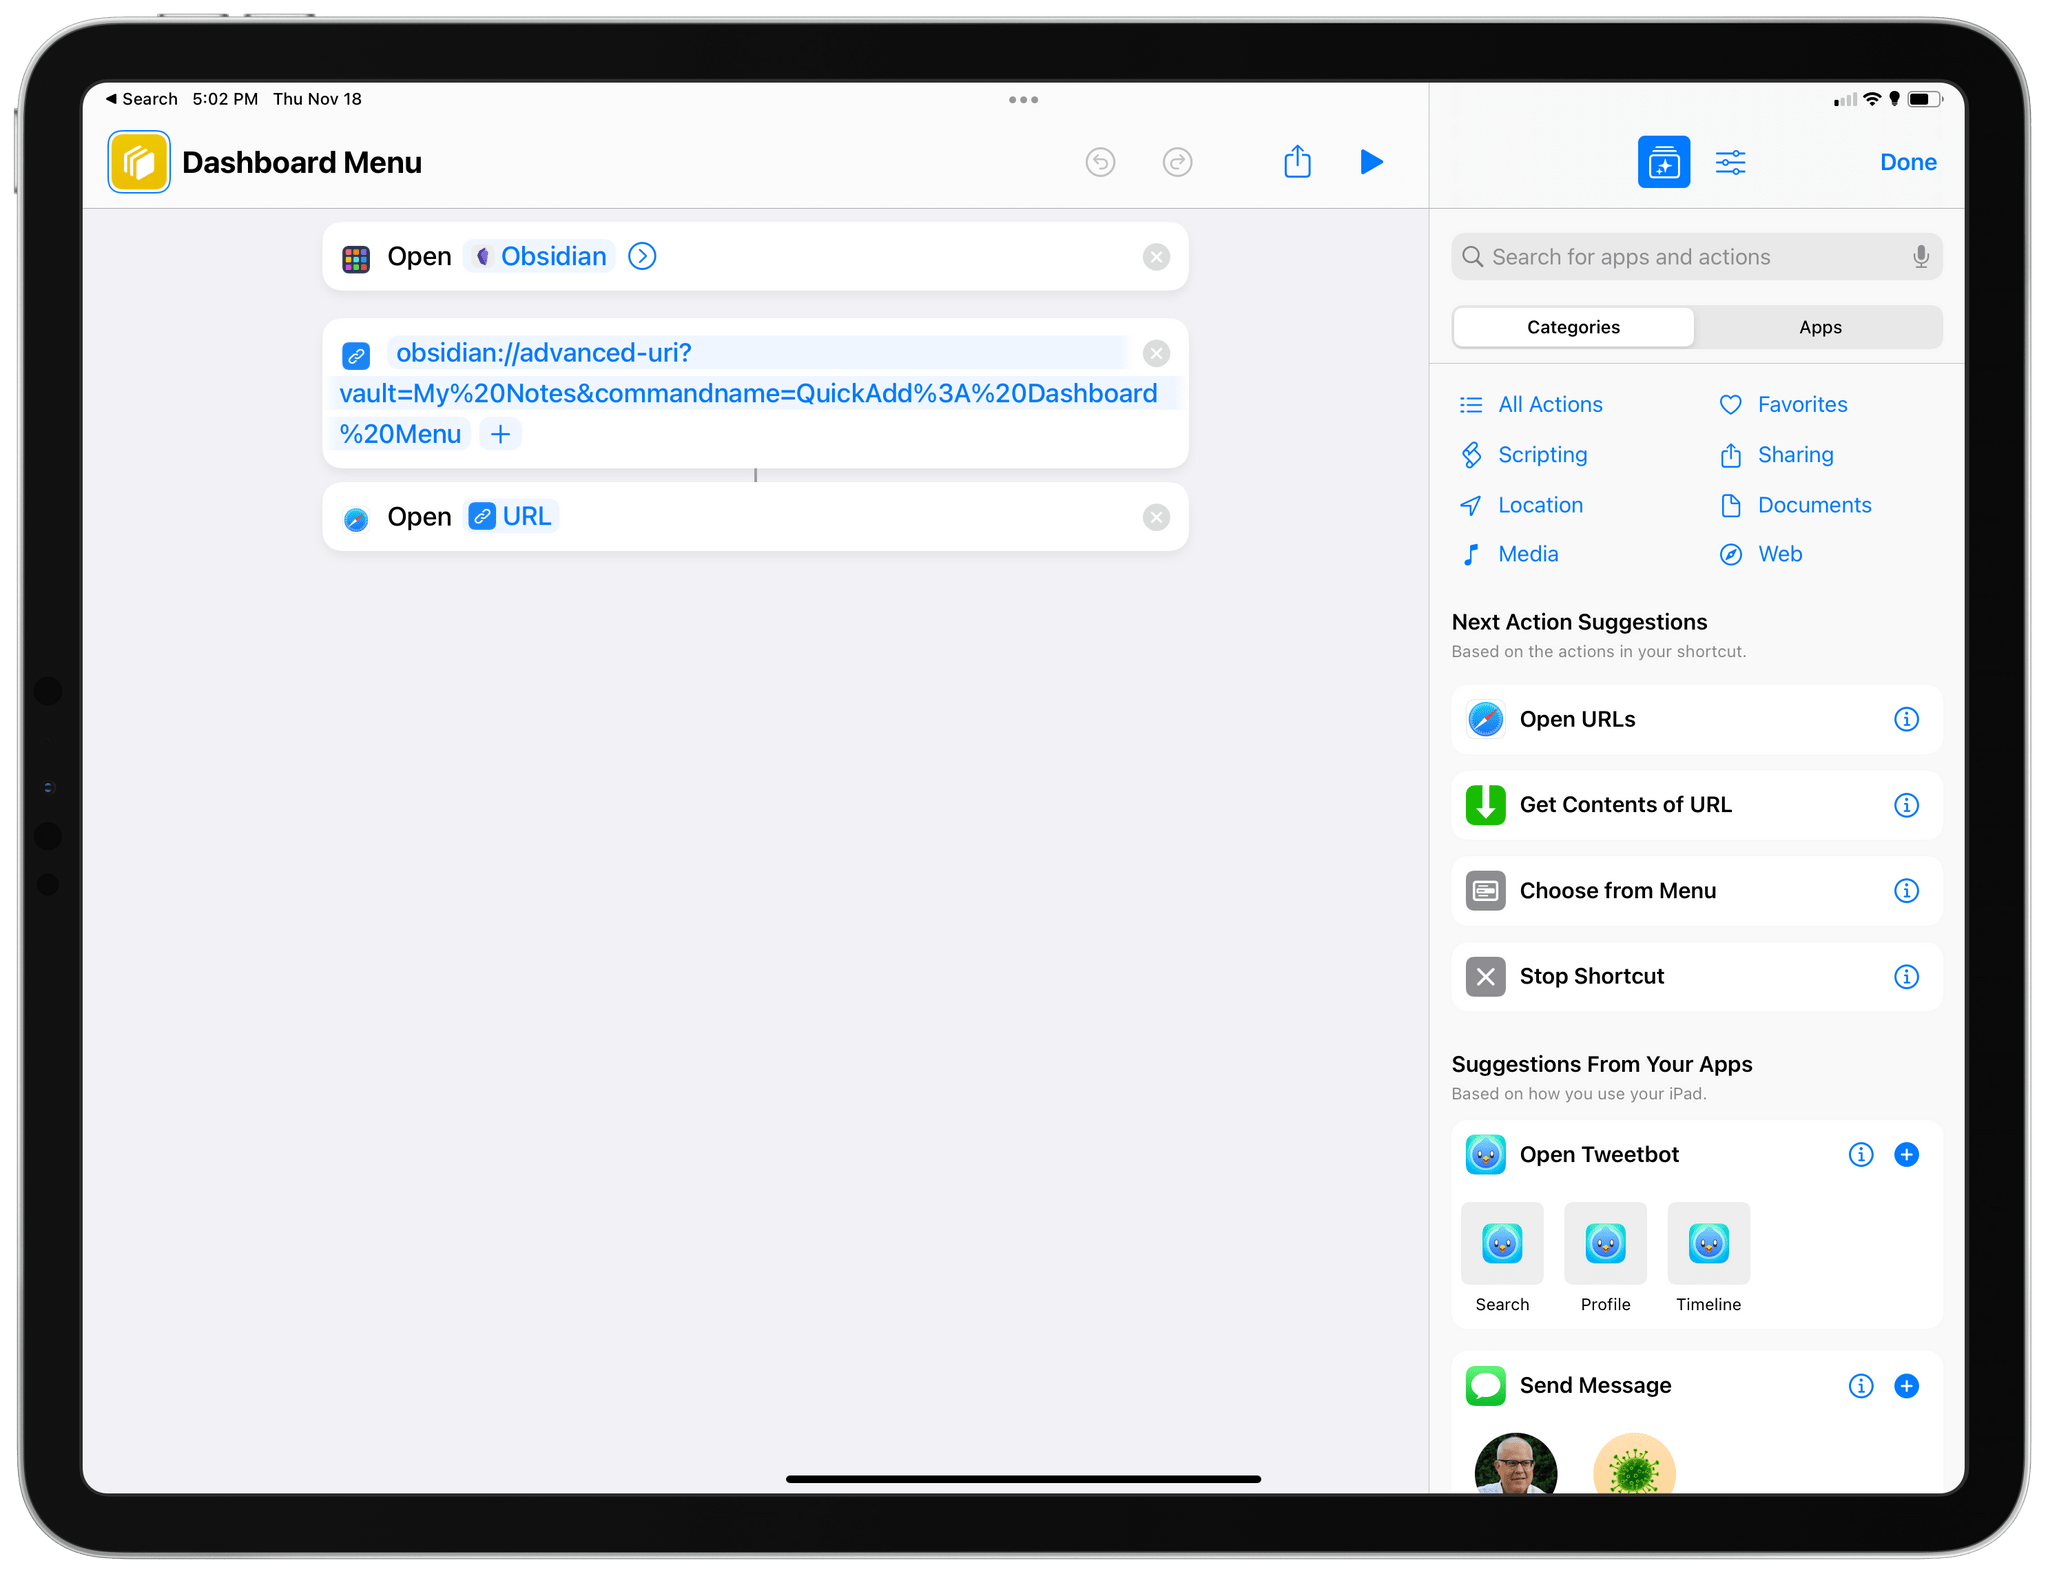
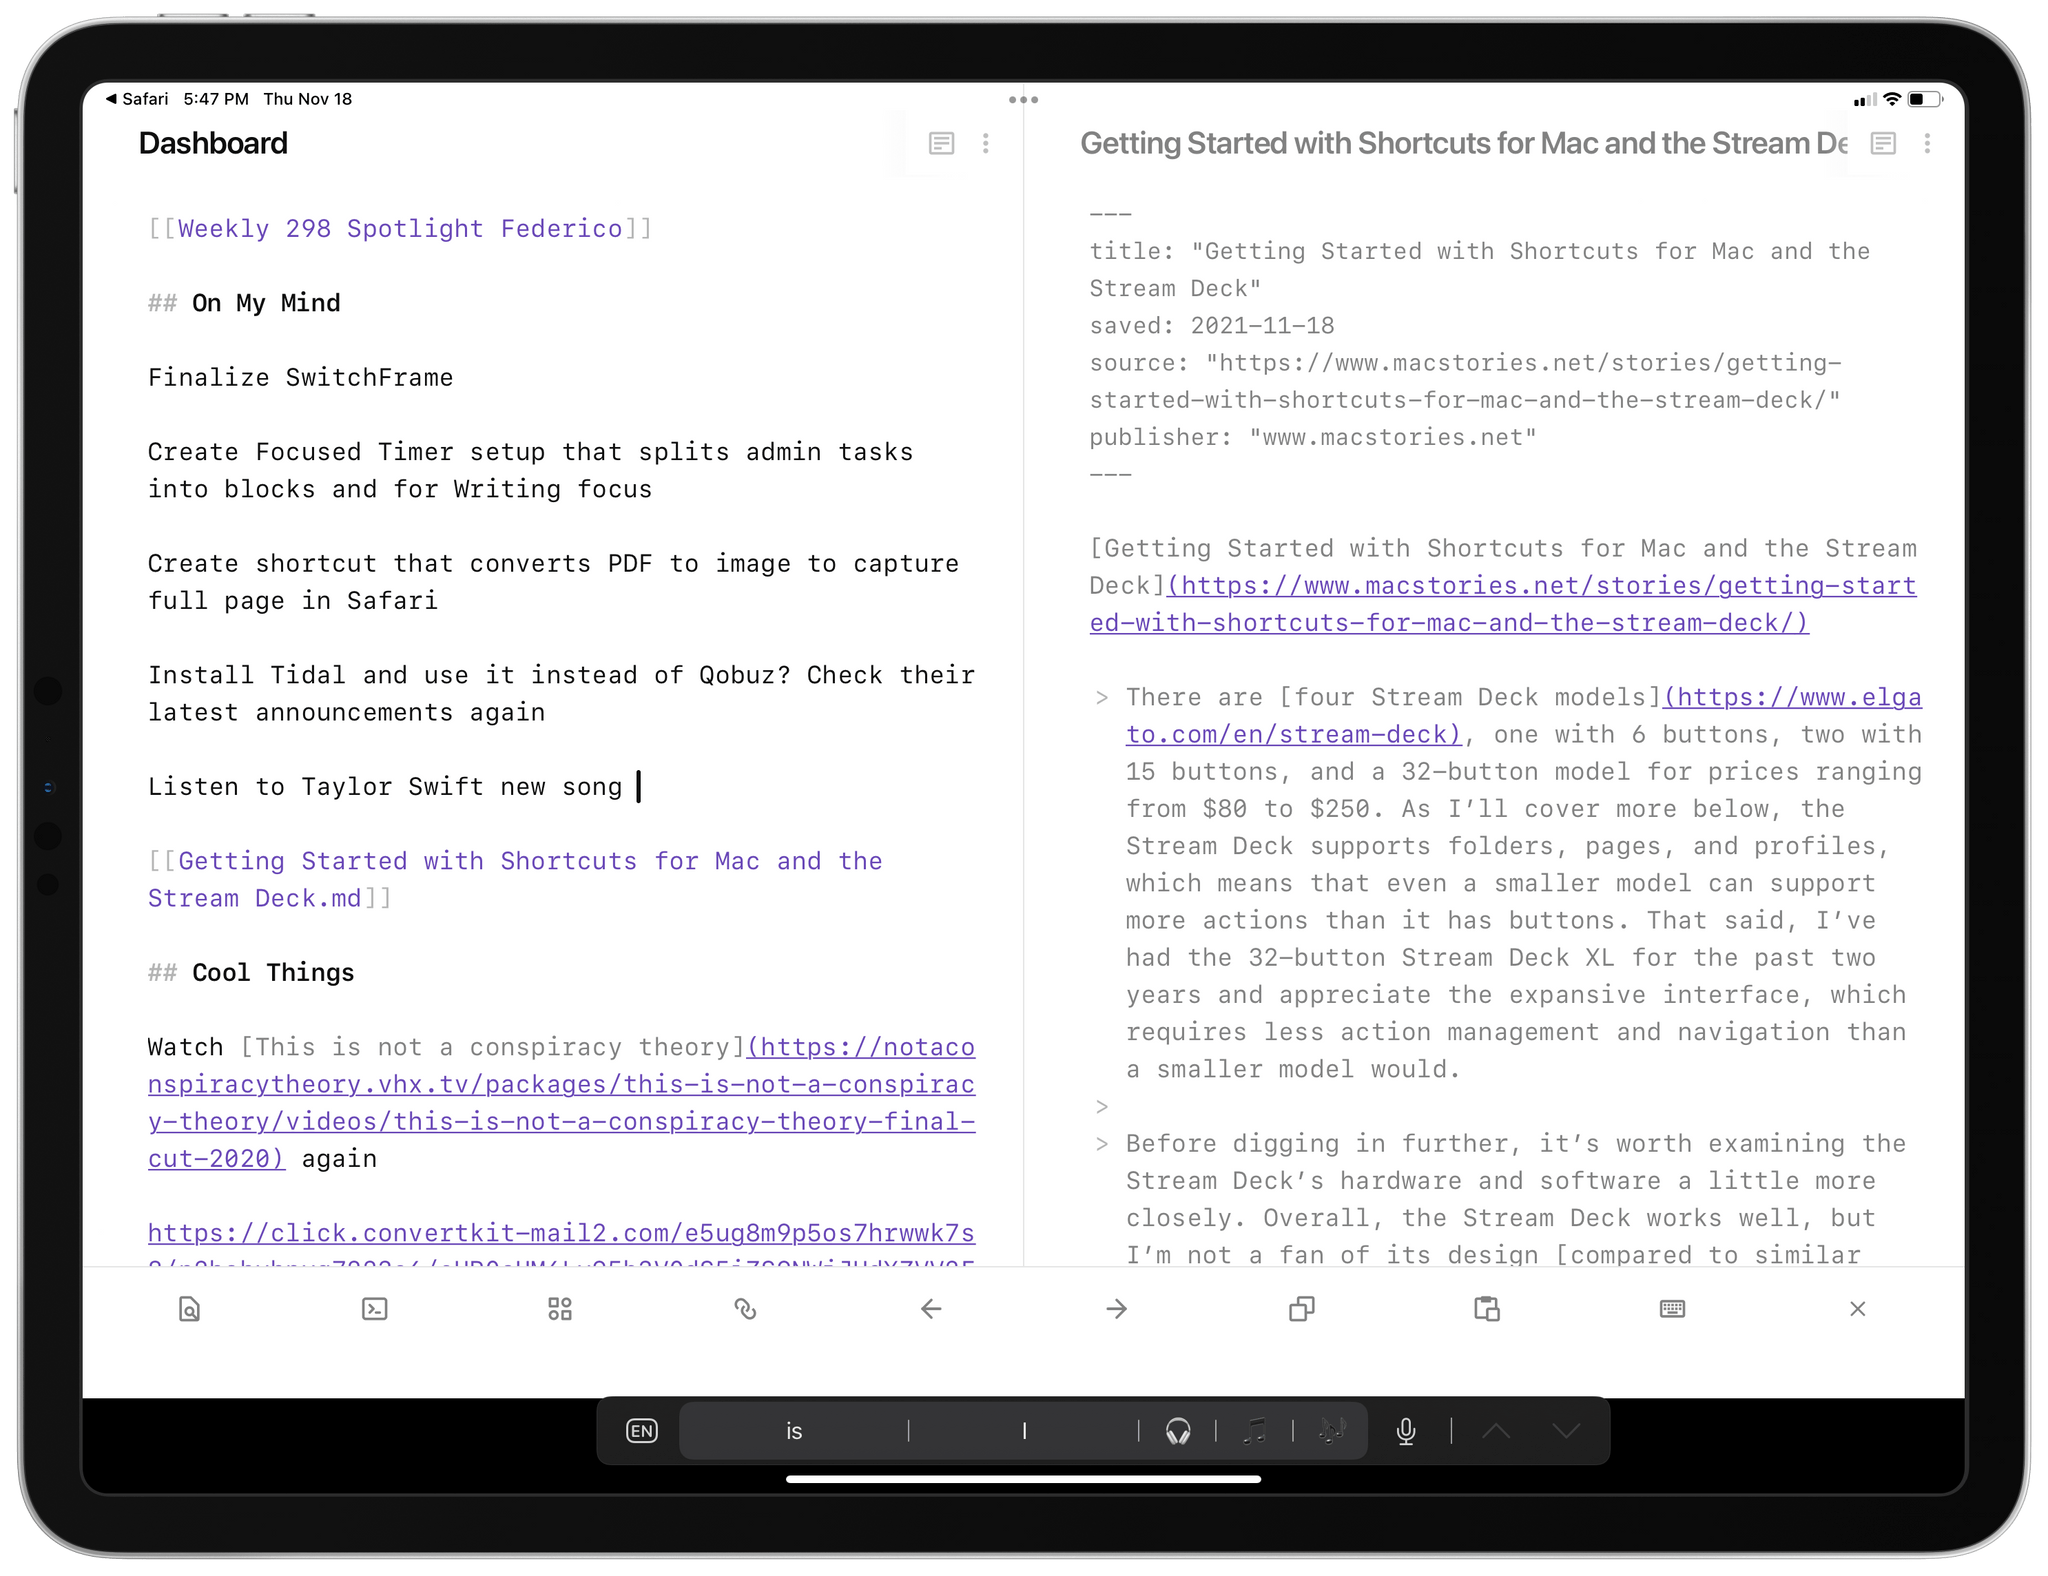
 The shortcut that triggers a QuickAdd macro.
In Part 4 of my Obsidian setup series, I described how I’ve been using a single ‘Dashboard’ note to quickly capture all kinds of links, ideas, and bits of text to process at a later stage – sort of like an inbox for my thoughts. In the story, I also detailed how I configured the incredibly powerful QuickAdd plugin with a menu that lets me easily append text or internal note links at the end of specific sections of my Dashboard note. I’ve been using this system for the past four months; being able to see at a glance what I’m working on or what’s on my mind for later has greatly improved how I can make sense of all the ideas I have.
The menu system I created in QuickAdd, of course, can only be triggered inside the Obsidian app. However, I wanted to remove as much friction as possible from the act of capturing an idea, so months ago I created a shortcut that launches Obsidian and instantly triggers my Dashboard Menu macro inside the app.
The shortcut that triggers a QuickAdd macro.
I installed this shortcut on the Home Screen of my iPhone and iPad, and I also enabled it as a menu bar shortcut on my MacBook Pro. With a single click, Obsidian launches and displays my custom QuickAdd menu, ready for me to save an idea or reopen the Dashboard note.
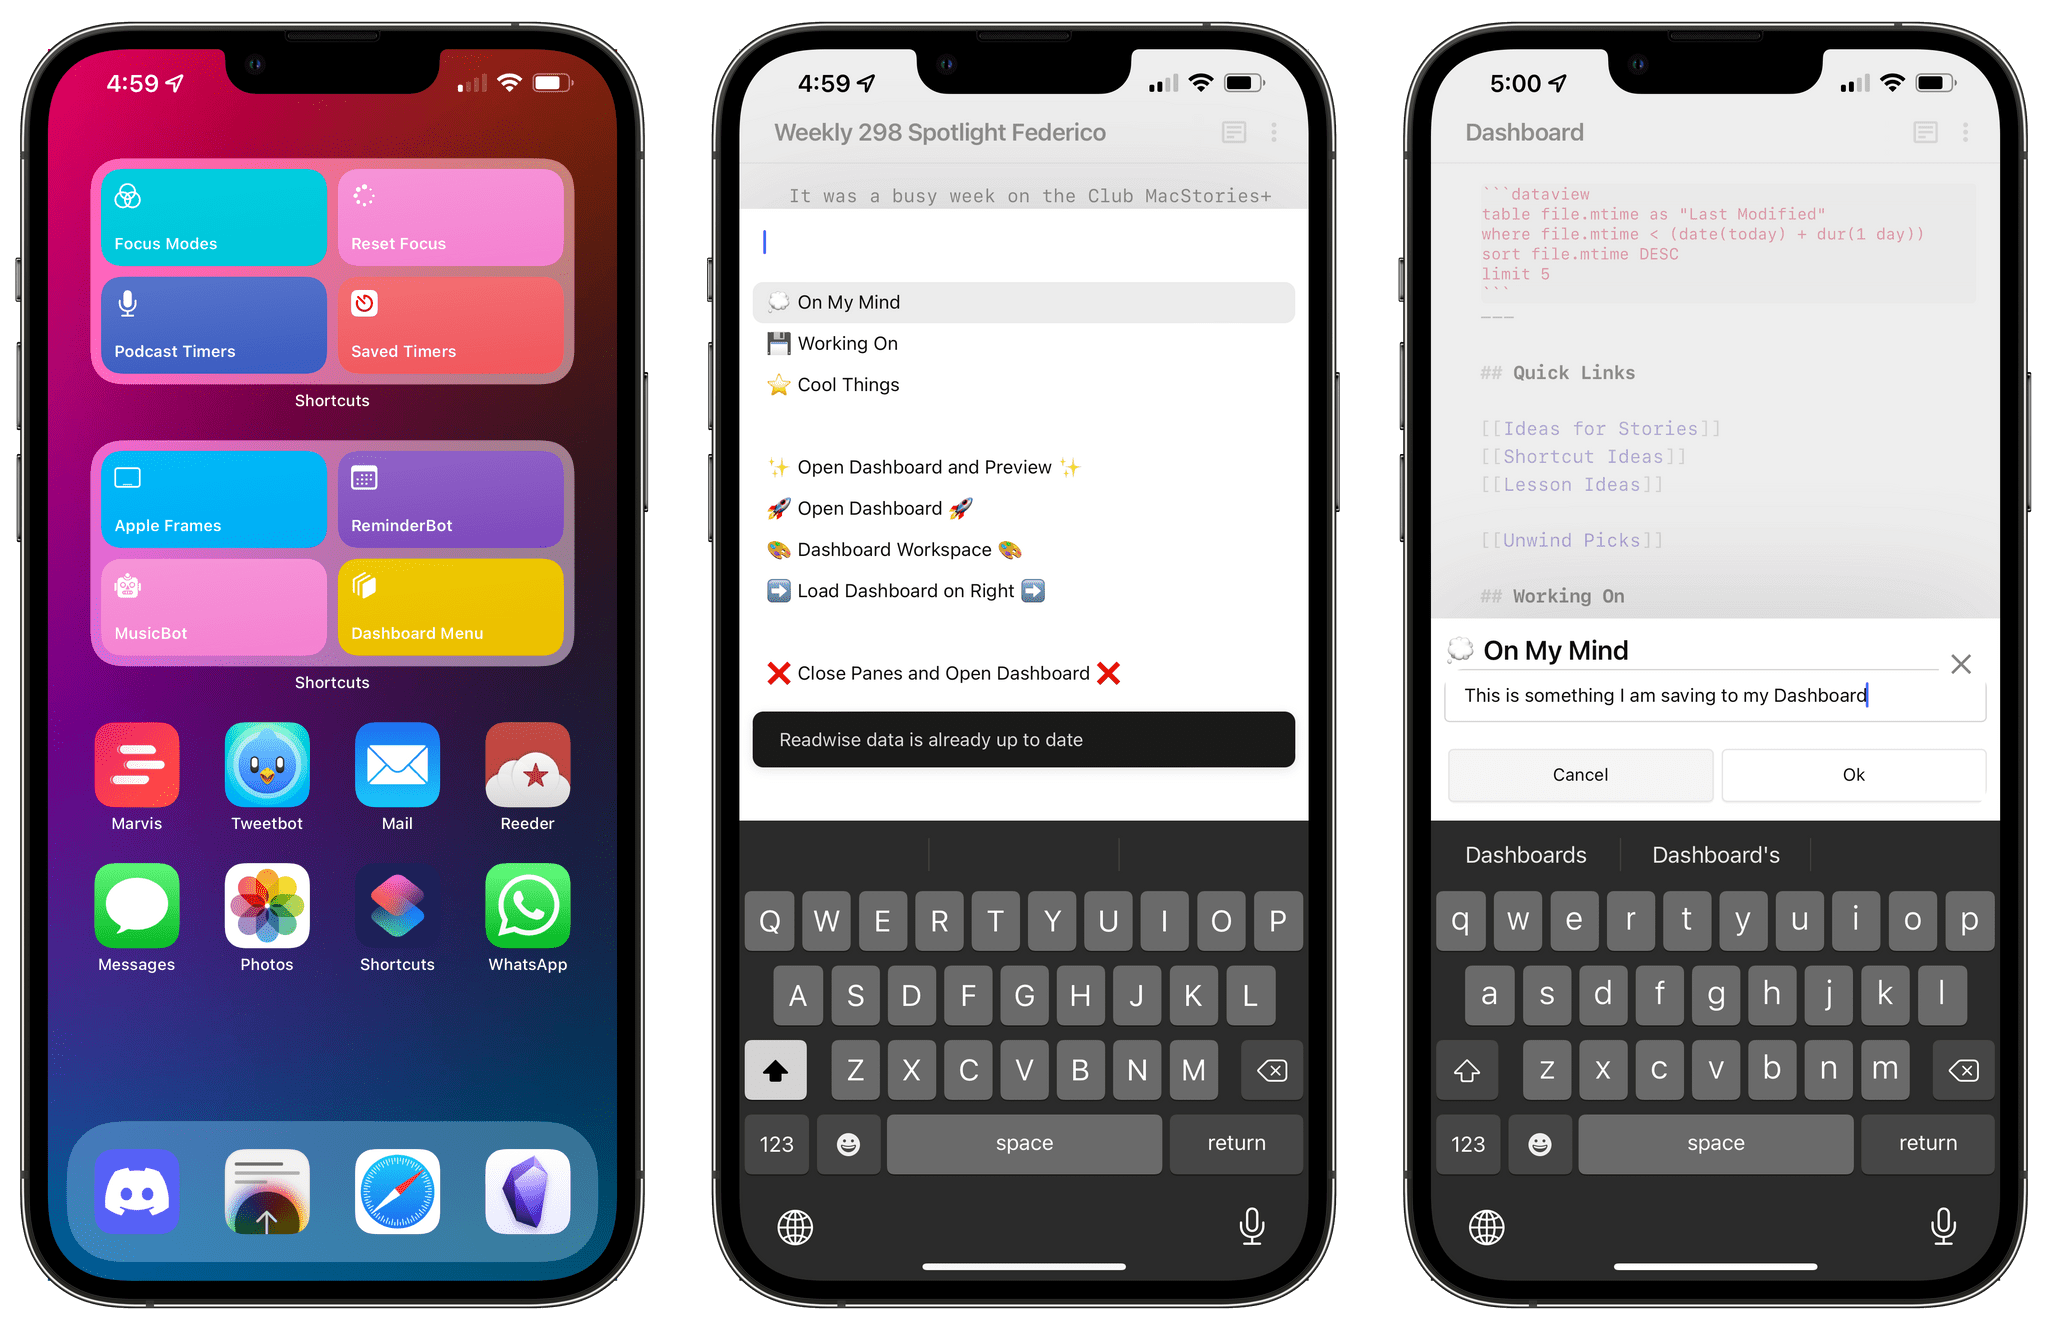 Triggering my QuickAdd macro in Obsidian from the Home Screen.
This has been great for me, but earlier this week I realized I could potentially make the entire process even more seamless and integrated with the Shortcuts app. With the QuickAdd plugin, the actual typing of text occurs inside Obsidian, which means there is no integration with the share sheet or, on macOS, text passed by other apps. If I could create a shortcut based on Apple’s new Files actions that appended text at the end of a specific section, I could potentially type text directly from the Home Screen and append it to my Dashboard note without using QuickAdd at all. Such a shortcut could even accept text input from the share sheet when used as an extension, or from Mac apps when triggered via the shell or AppleScript.
The only problem: by default, Shortcuts can only append text to the very end of a document. It has no idea what “appending to the bottom of a specific section” means. So if I wanted to replicate QuickAdd’s functionality in Shortcuts, I knew I had to do it all manually with regular expressions and conditional blocks.
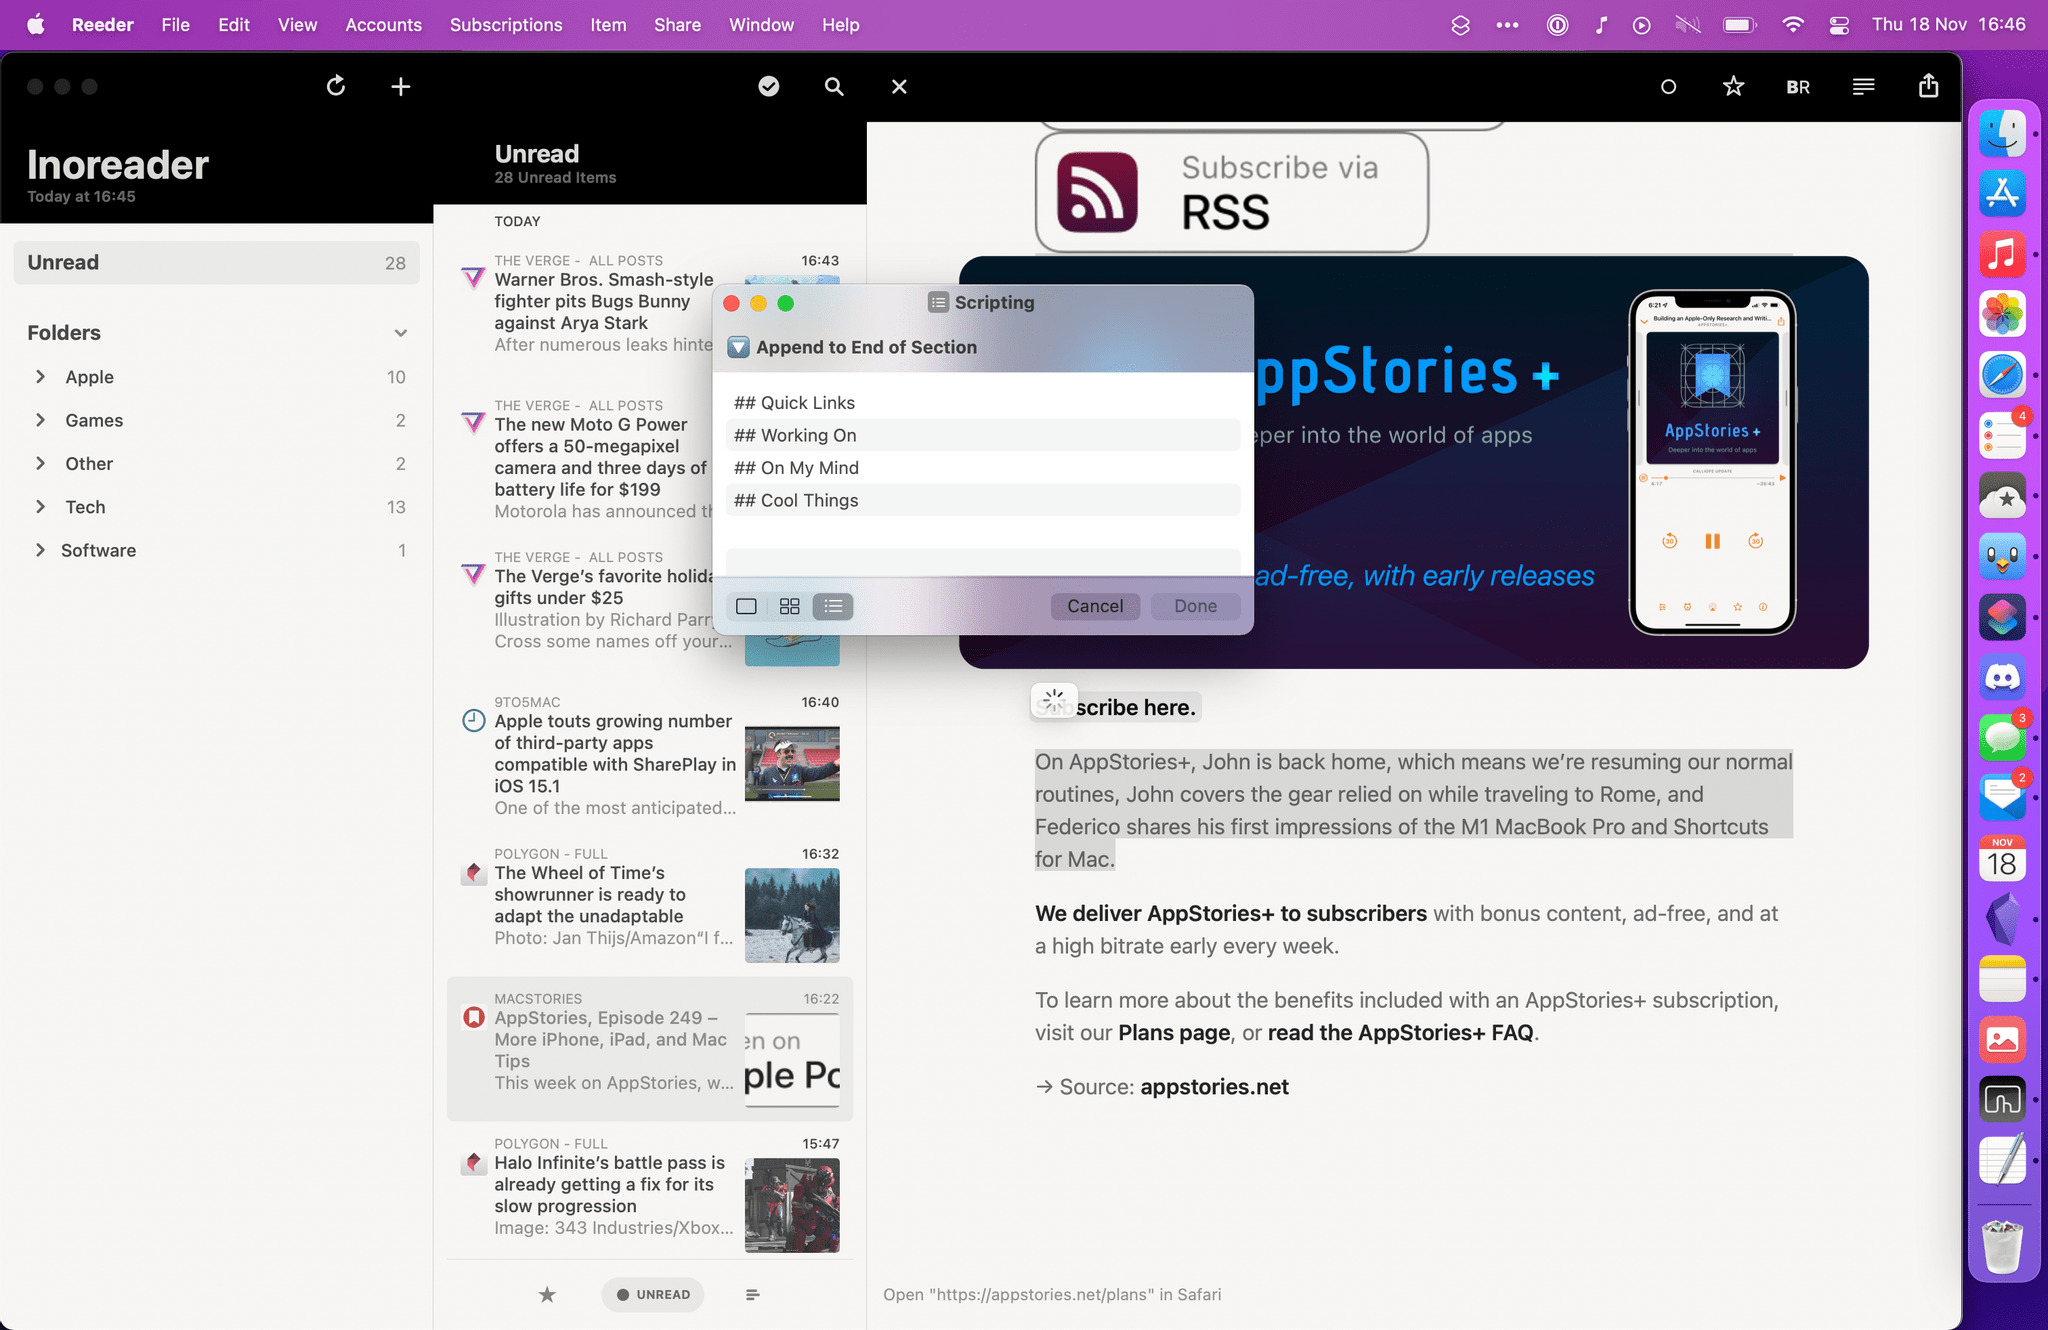
The result is a shortcut called Append to Dashboard, which I’ve designed in a way that can scale for different kinds of users and Markdown notes. Once pointed to a specific note, the shortcut can check whether it contains sections (formatted as Markdown headings) and gives you the ability to append text at the end of a section. If the note doesn’t have any sections, text will be appended at the end of the file instead. Append to Dashboard takes advantage of a new feature in iOS and iPadOS 15 to use text passed as input or ask you to manually type some text; furthermore, the shortcut is fully optimized for macOS Monterey and I’ve created PopClip extensions to quickly append text selected anywhere on a Mac. Plus, I’ve created a companion shortcut to clip webpages from Safari as new notes in Obsidian and append their internal links to the Dashboard note as well. There’s a lot going on here, so let’s dig in.
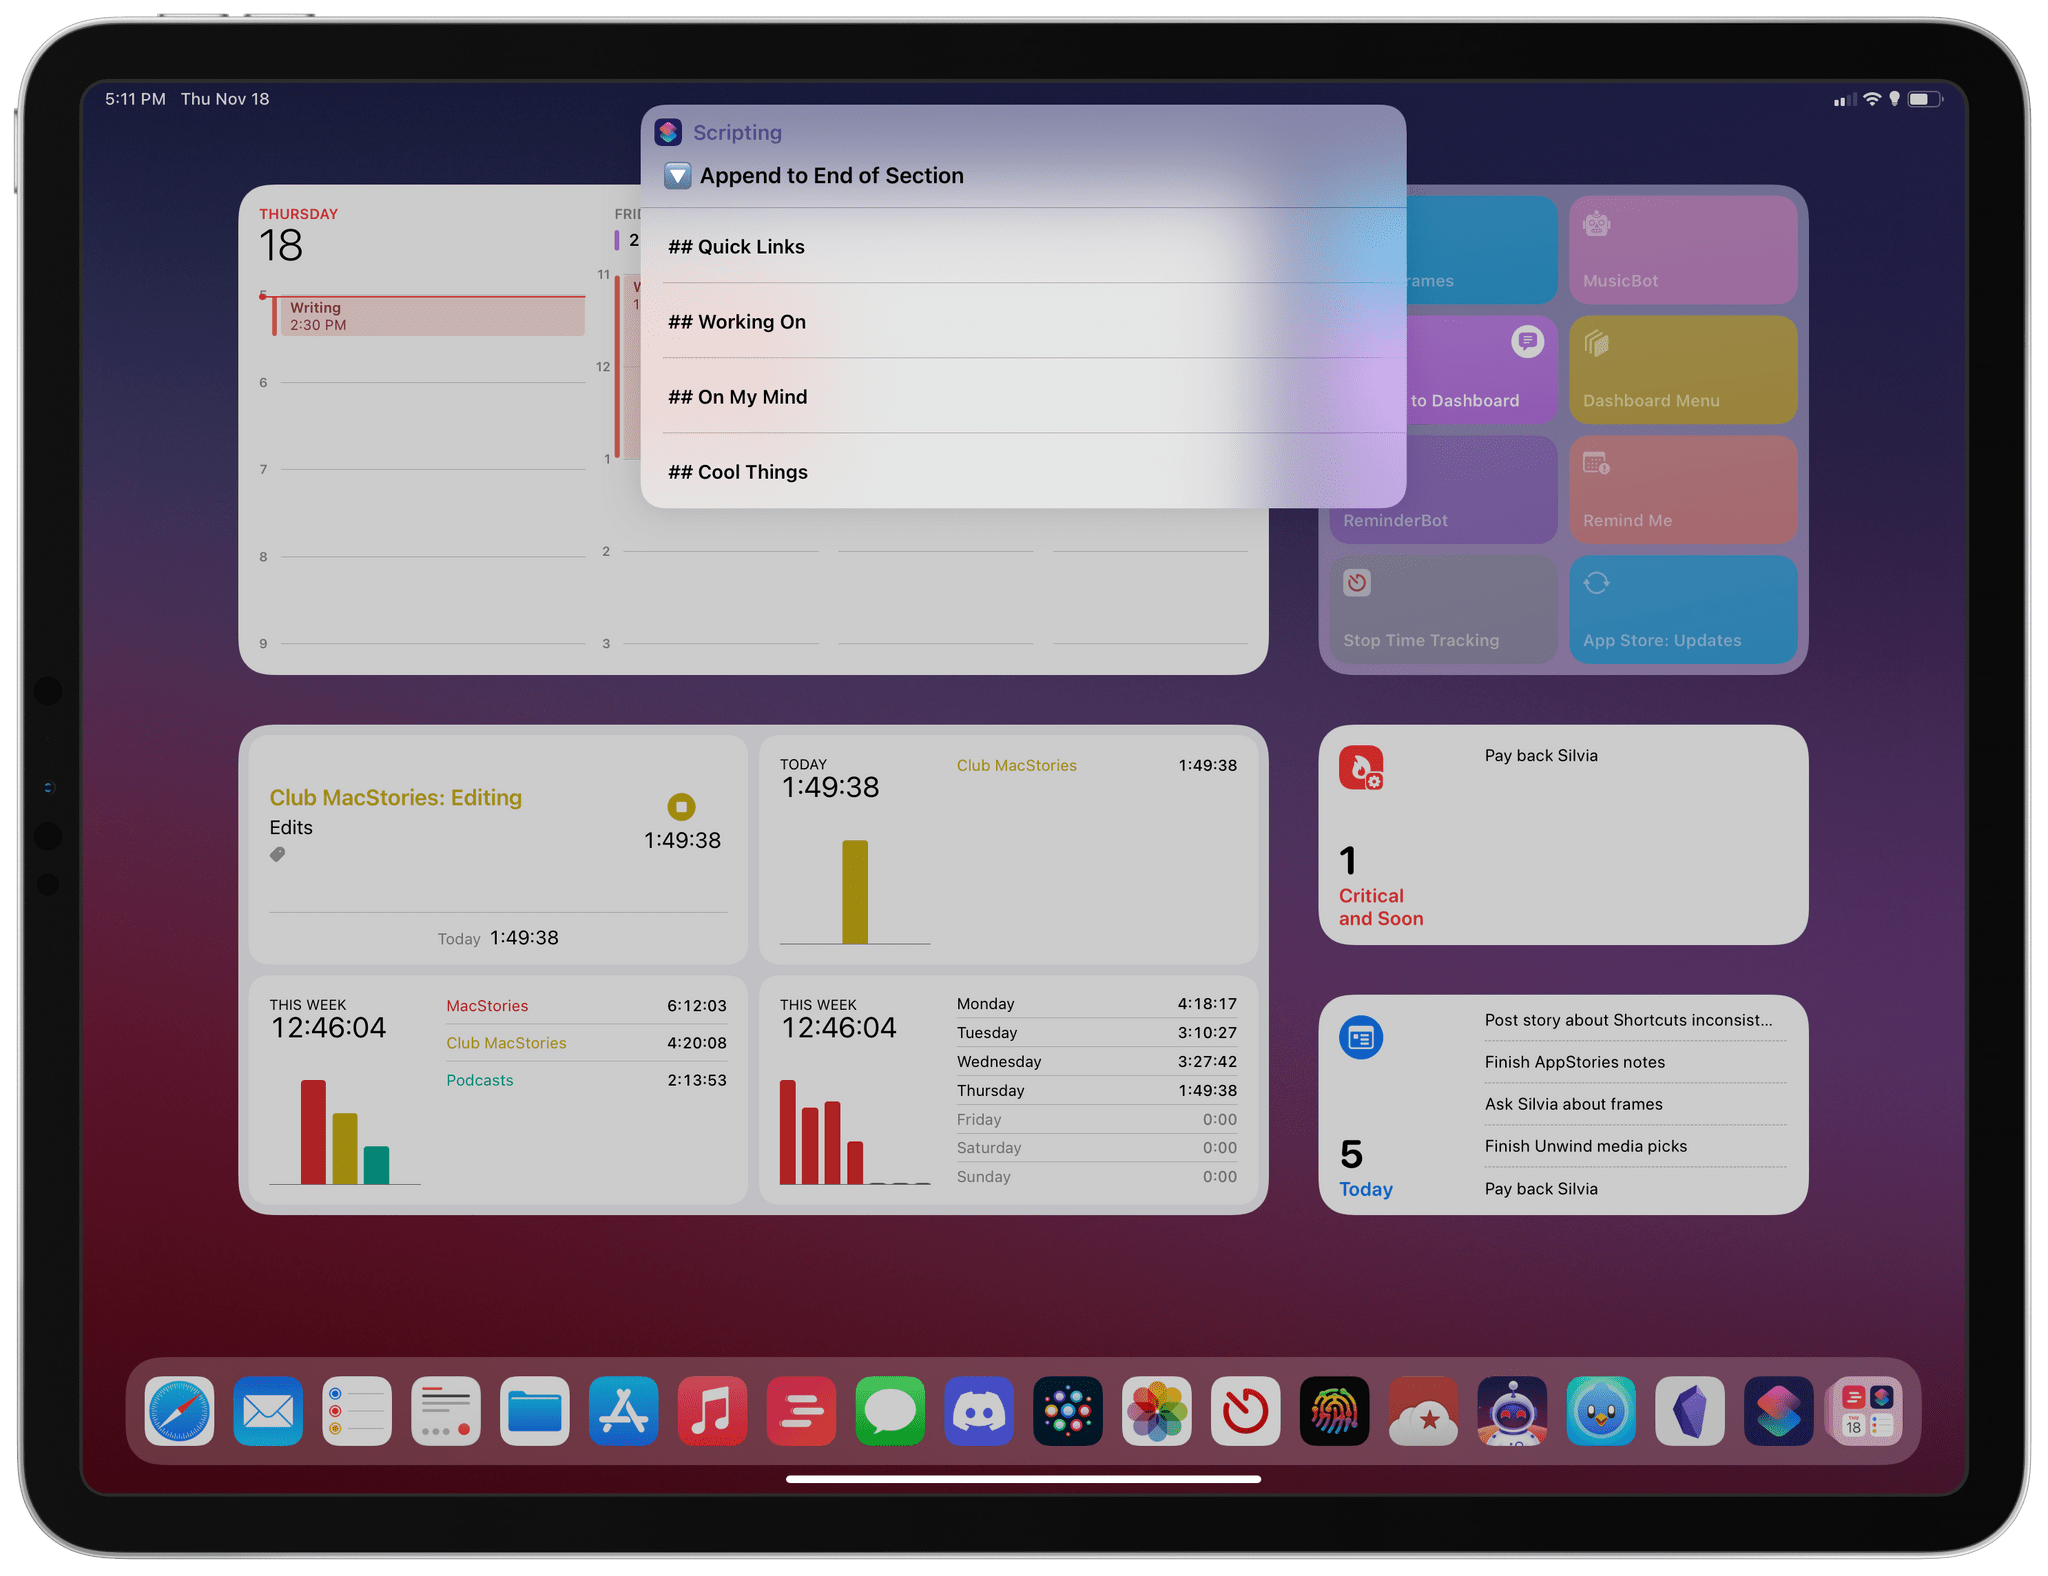
This is the star of the show and the shortcut I pinned to my Home Screen for fast access. At a high level, Append to Dashboard is quite simple to explain: when you run it, you see an empty text field where you can type; then you can pick a section of a note where you want to append that text; finally, Obsidian launches and your text is appended at the end of the section you selected.
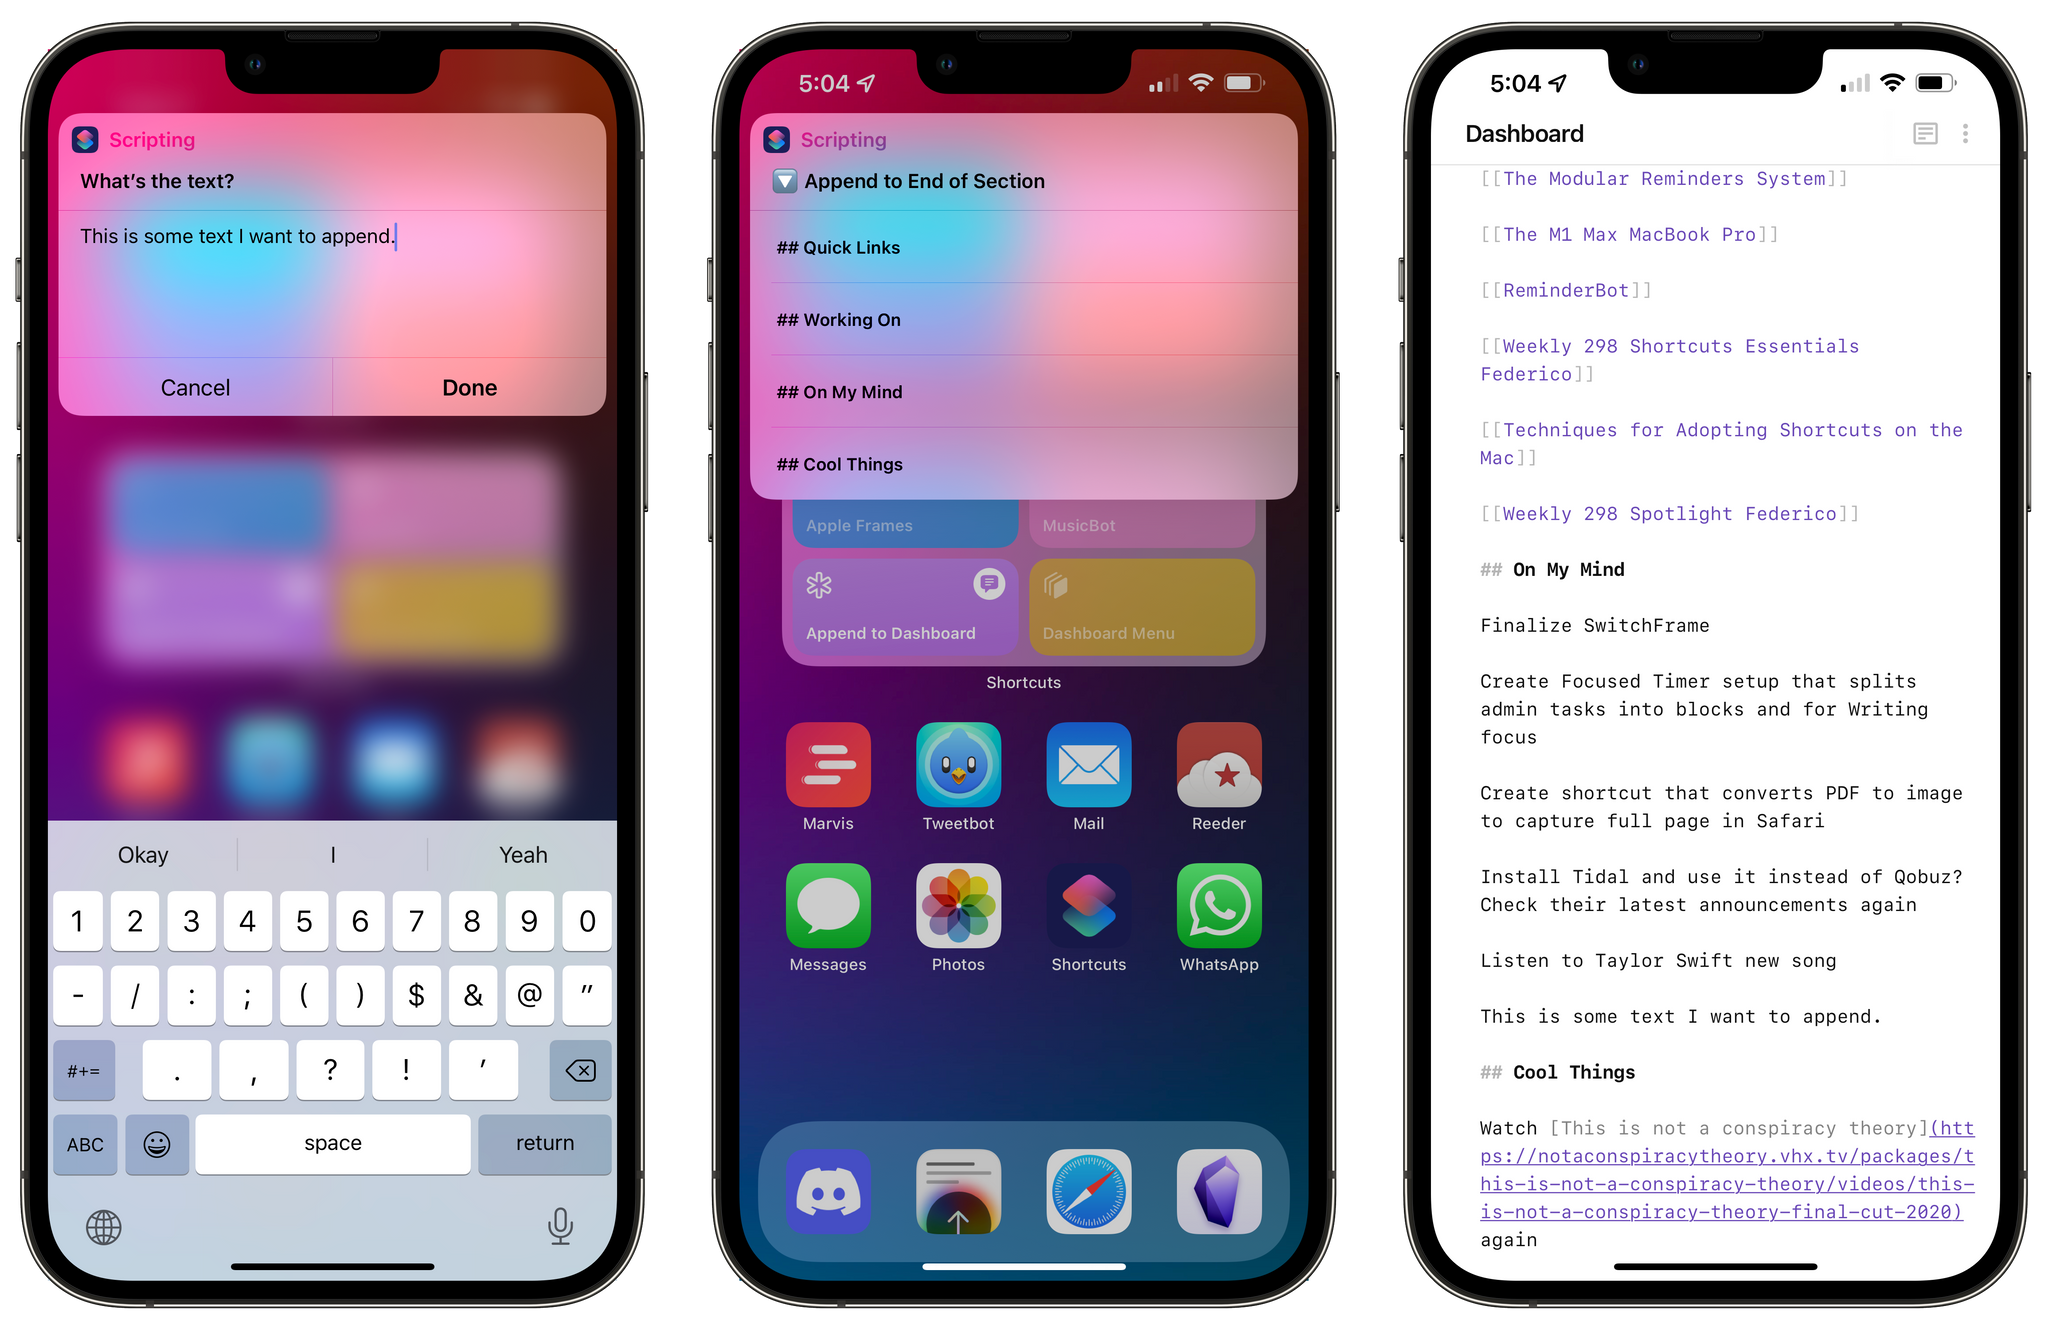 Running Append to Dashboard from the Home Screen. Text gets appended at the end of a specific section.
There’s more going on behind the scenes, of course. For starters, the shortcut uses iOS 15’s new input system to check whether it received any input from the share sheet or other techniques that can pass input text to a shortcut (such as URL schemes, the shell, or AppleScript). If no input text is found, the shortcut will automatically ask for text with a manual input field, which is one of my favorite additions to the Shortcuts app this year. No matter how you trigger this shortcut, you’ll always end up with text stored in the default ‘Shortcut Input’ variable.
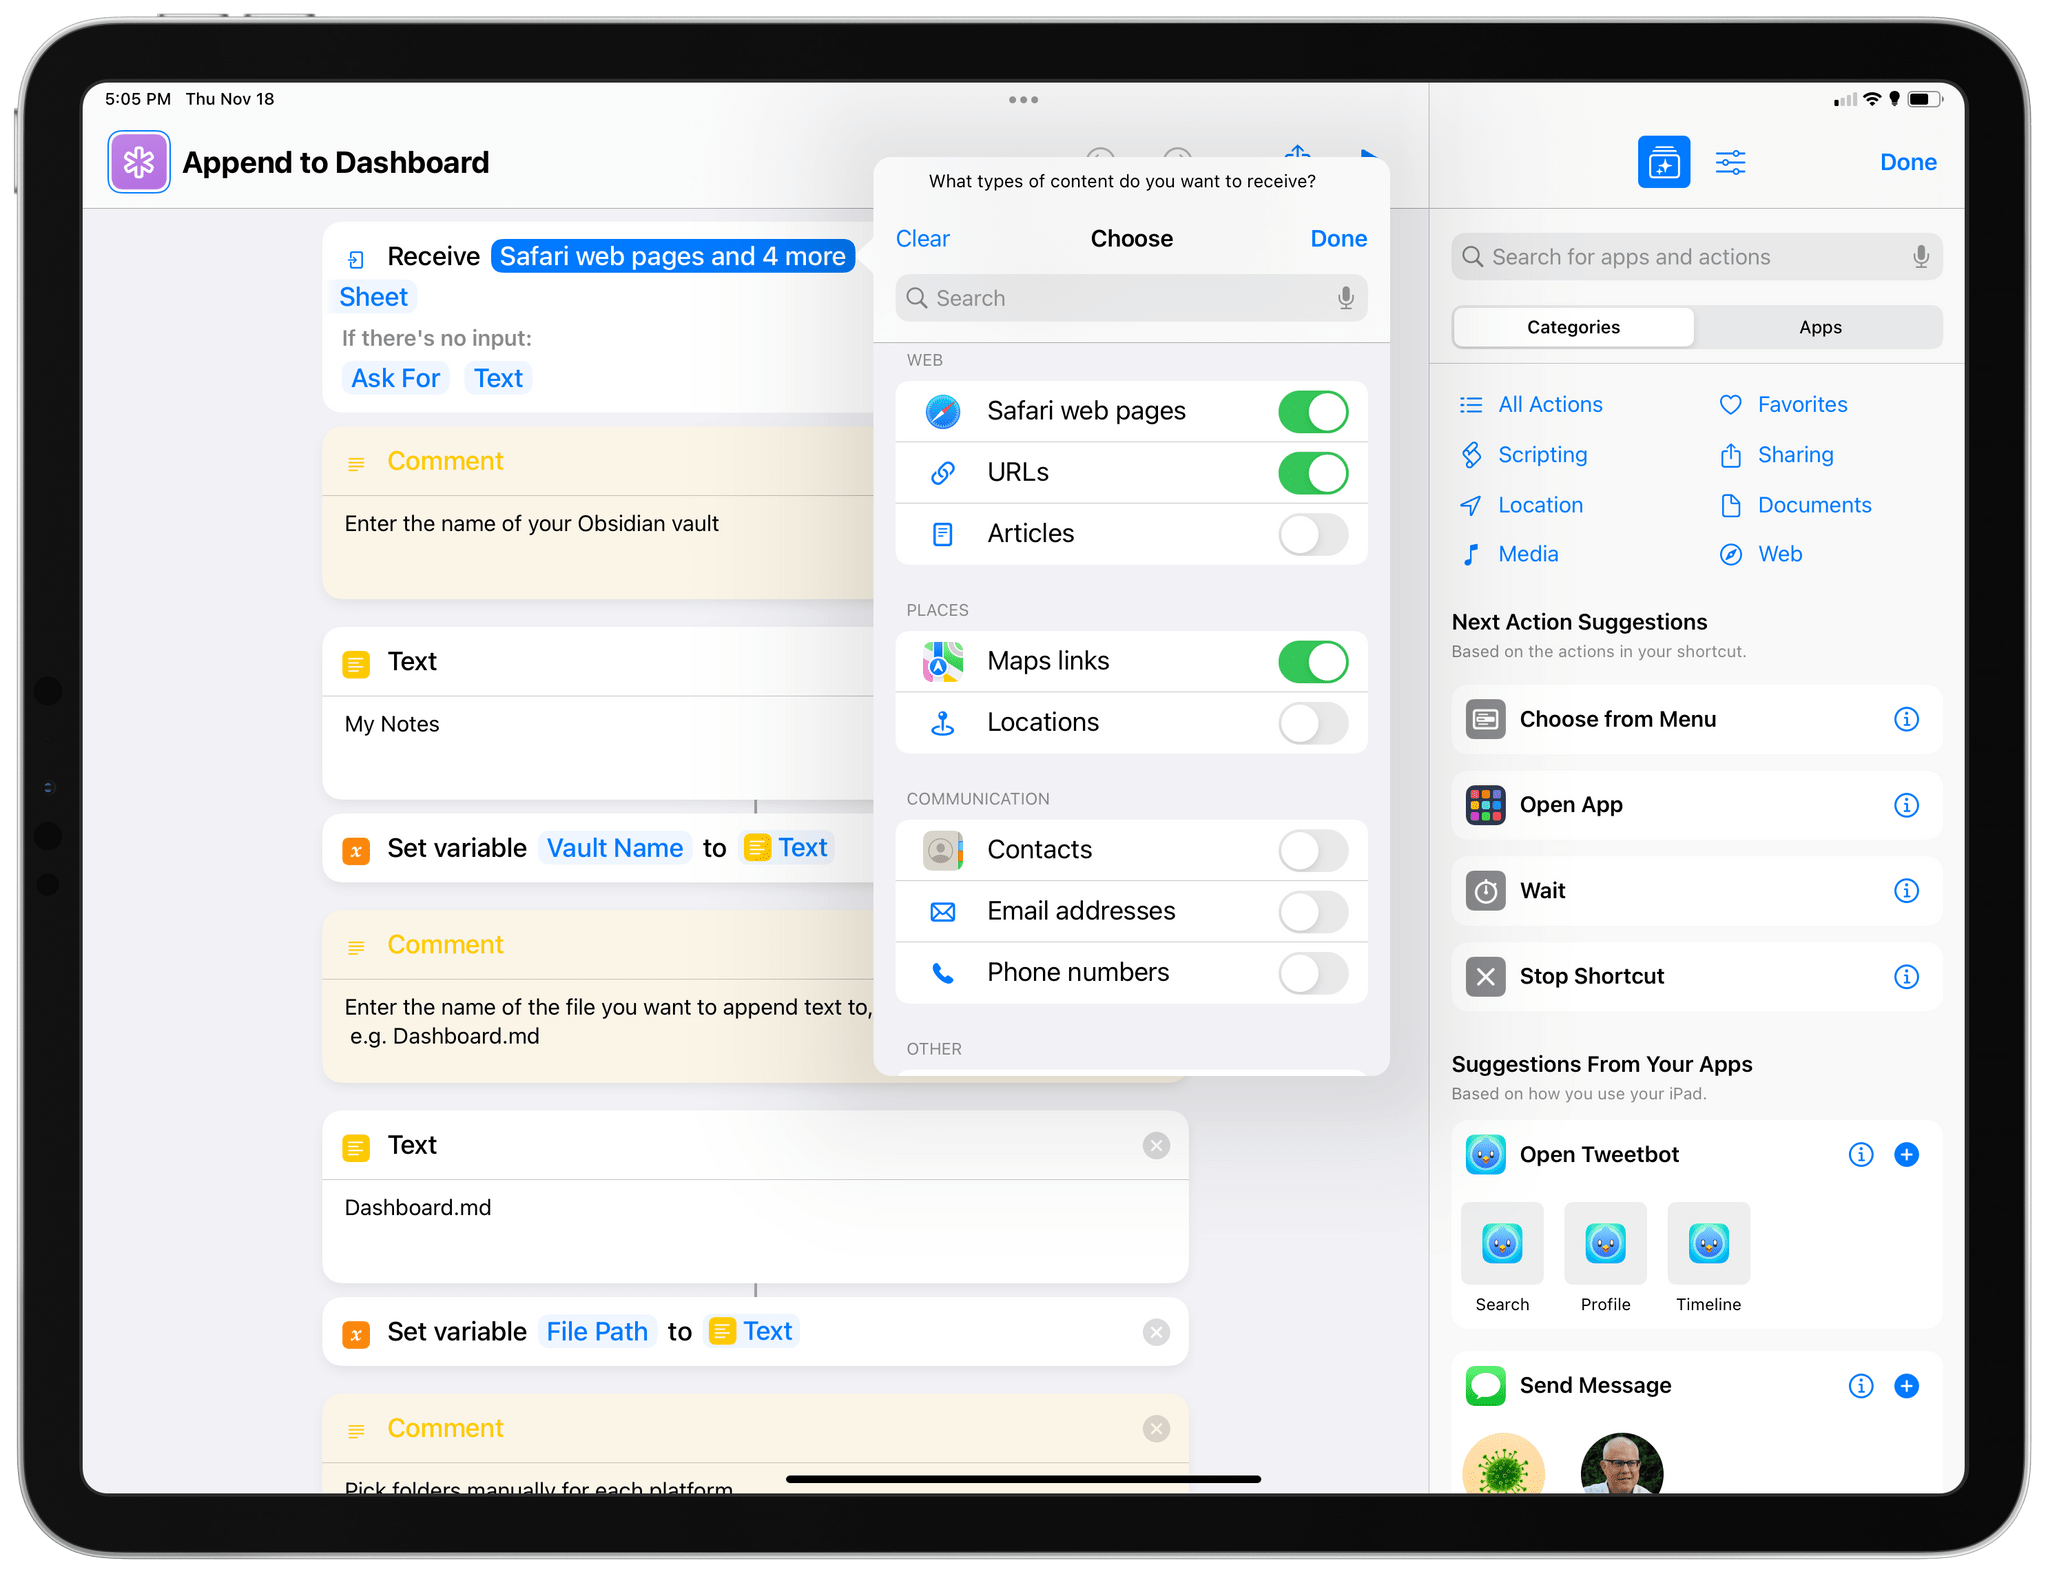 Configuring input types for the shortcut.
At the top of the shortcut, you’ll also find two Text actions to define your Obsidian vault name and the file name of the note you want to append text to. These variables are import questions you can configure upon installing the shortcut; if you don’t set them up correctly, the shortcut won’t work.
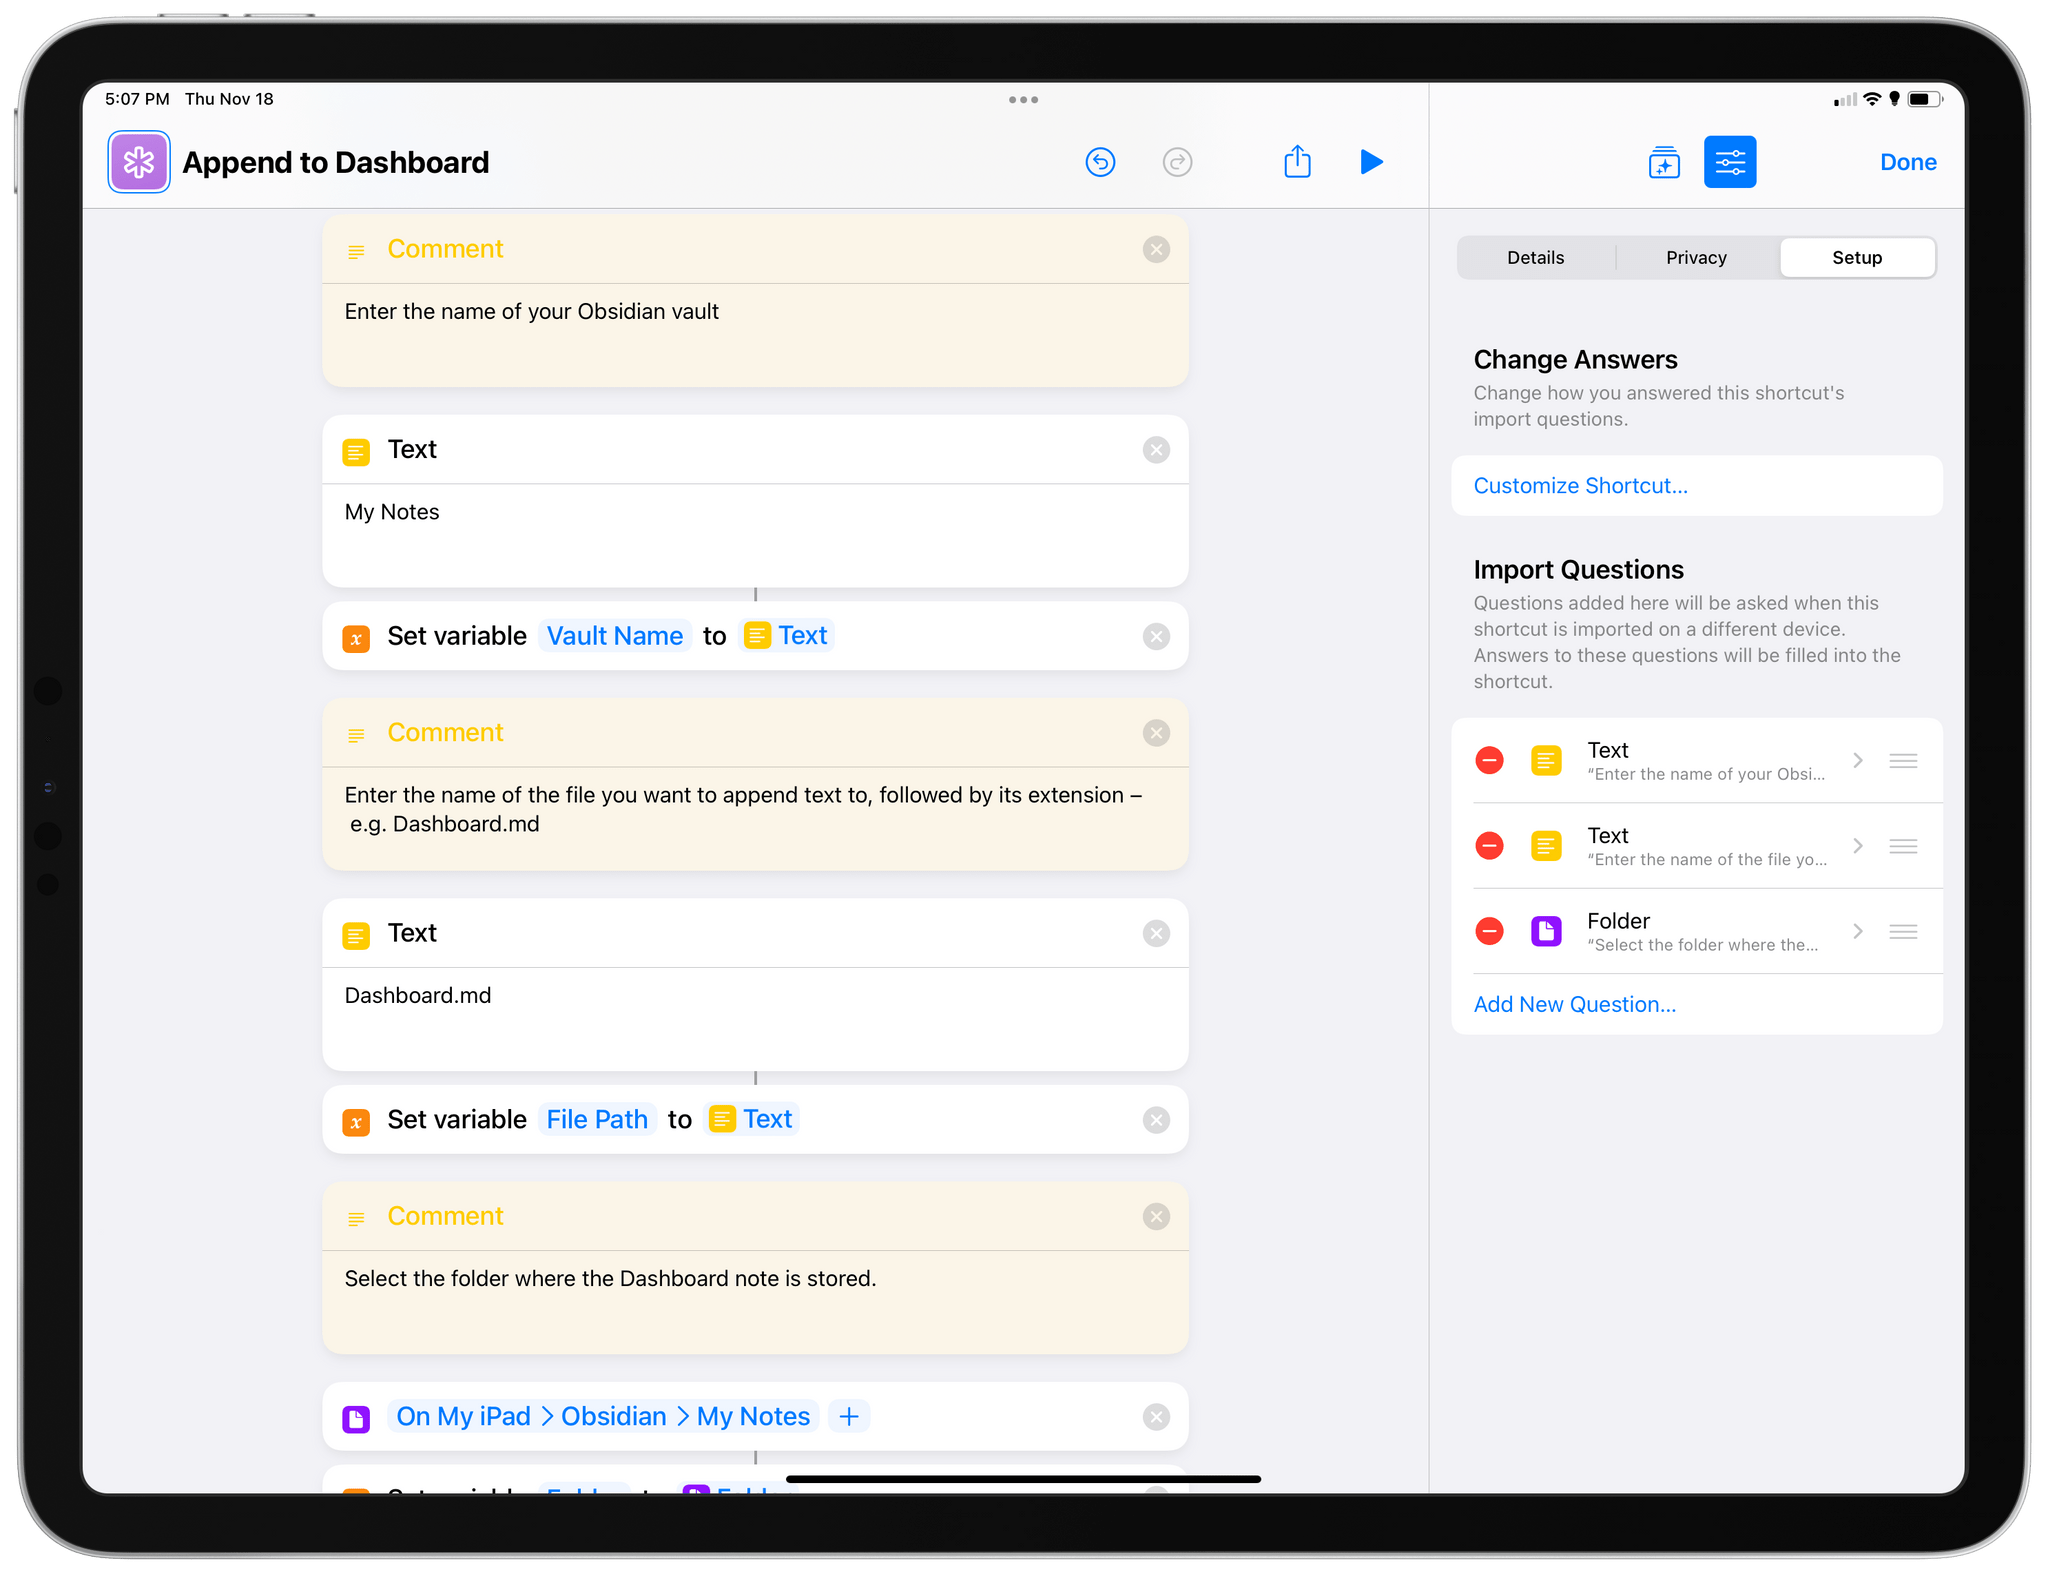 You’ll have to configure these actions for your Obsidian’s vault name, note, and folder.
Another variable you have to configure only once is the folder where the note you want to modify is stored. As of the latest iOS, iPadOS, and macOS betas, these ‘Folder’ actions work for local storage paths, too: if you set up a folder stored in ‘On My iPad’ on your iPad Pro, the same action will automatically point to the same folder in ‘On My iPhone’ or the ‘Documents’ folder on your Mac. This is ideal for Obsidian users who, like me, keep their vault in local storage and sync it across devices using the Obsidian Sync service. Thanks to this fix, we no longer have to put in conditional checks for separate folders on different devices – one of the drawbacks of Files actions I explained in this Automation Academy lesson.
And that’s it for configuration. The rest of the shortcut is all about reading the contents of the note, scanning it for headings, and letting you append text to the bottom of a section, before the next section begins. In my case, here’s what the Dashboard.md note looks like:
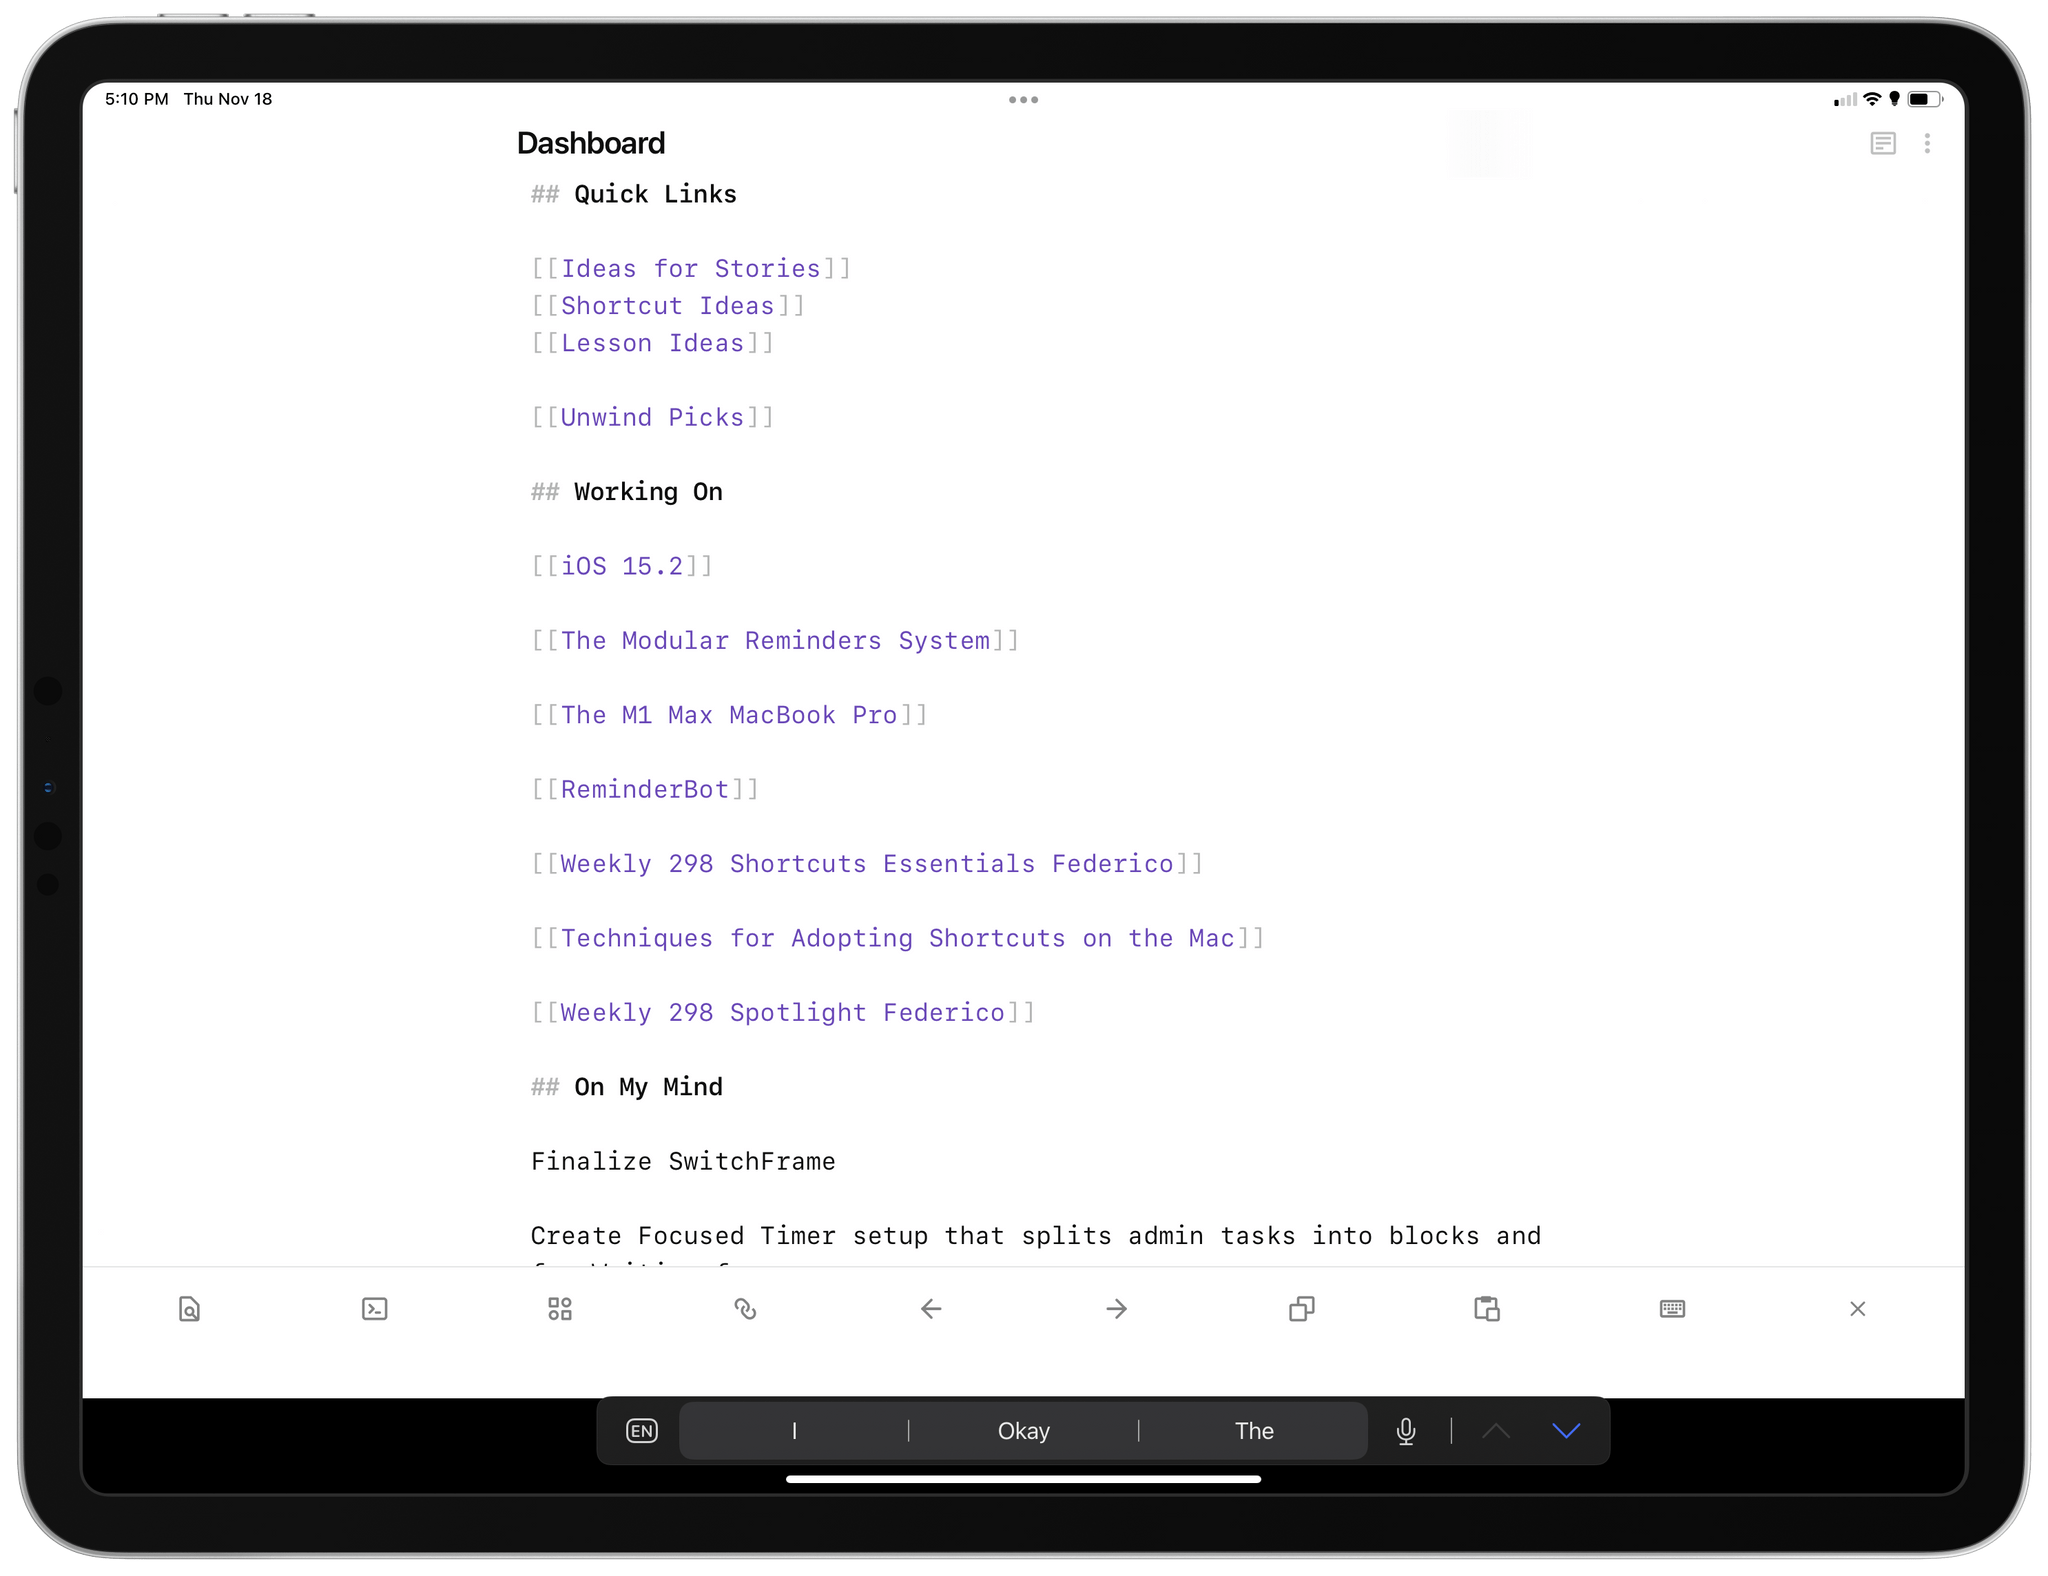
And here’s what Append to Dashboard sees in terms of sections contained in the note:
 Sections found in the Dashboard note.
Under the hood, the shortcut’s logic is powered by a regular expression, which checks for new lines that begin with one hashtag and which may contain up to six of them, followed by an optional space, followed by some text. Basically, the typical formatting of a ## Markdown Section. The regex is:
^#{1,6}\s?(.+)
There are some fascinating implementation details worth explaining here. To know whether the shortcut should append text at the end of a section or the end of a document, I use a ‘control variable’ that literally says “End of Document” or “Next Section”.
 The control variable for Append to Dashboard.
Additionally, the actual appending of text at the end of a section isn’t done with the ‘Append Text’ action: it’s powered by the ‘Replace Text’ action. The way I set it up is quite clever: rather than figuring out where the chosen section ends, the shortcut finds where the next section begins, and it inserts the new line of text right before that Markdown section heading. To do this, the shortcut relies on the ‘Get Item from List’ action to retrieve the section after the one you selected; I built it using a simple ‘Chosen Heading + 1’ operation.
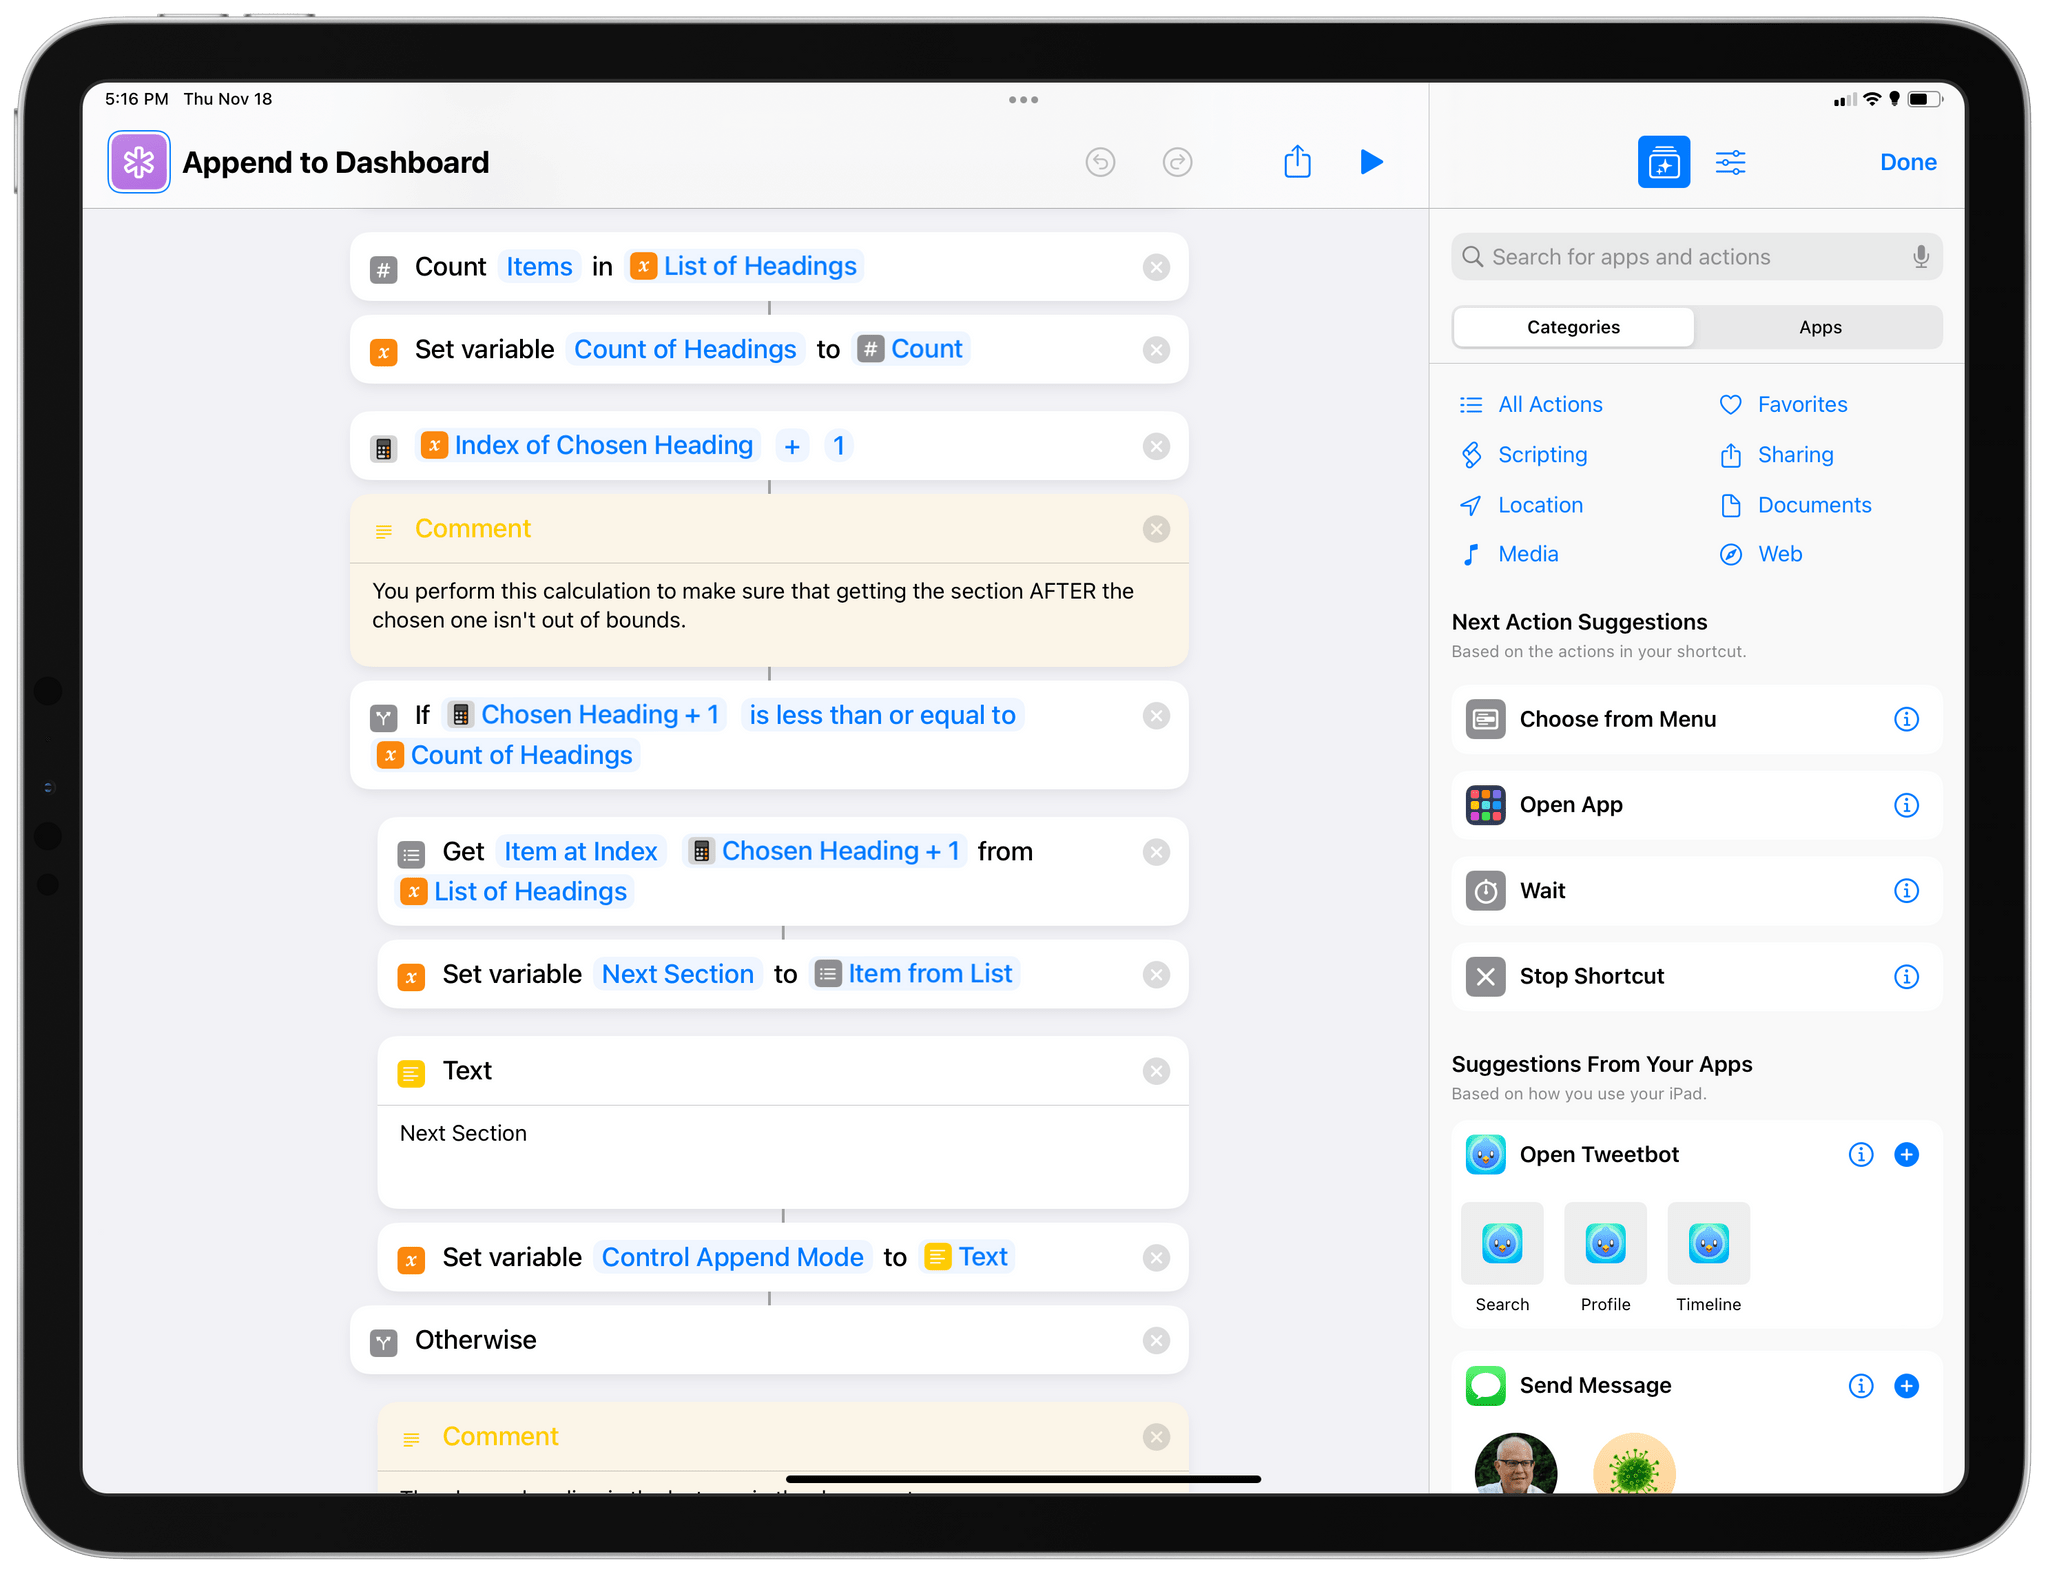 The math that finds the next section after the one you picked.
At the end of the shortcut, the modified note is saved directly to the Files app or Finder. At this point, the shortcut is, in theory, done, and I could have ended it here. However, because I’m using local storage paired with Obsidian Sync, I also wanted to open Obsidian to make sure it’d trigger a sync for the modified note. You’ll notice that I added an Open App action, followed by an Open URL one, followed by another Open App action to do so.
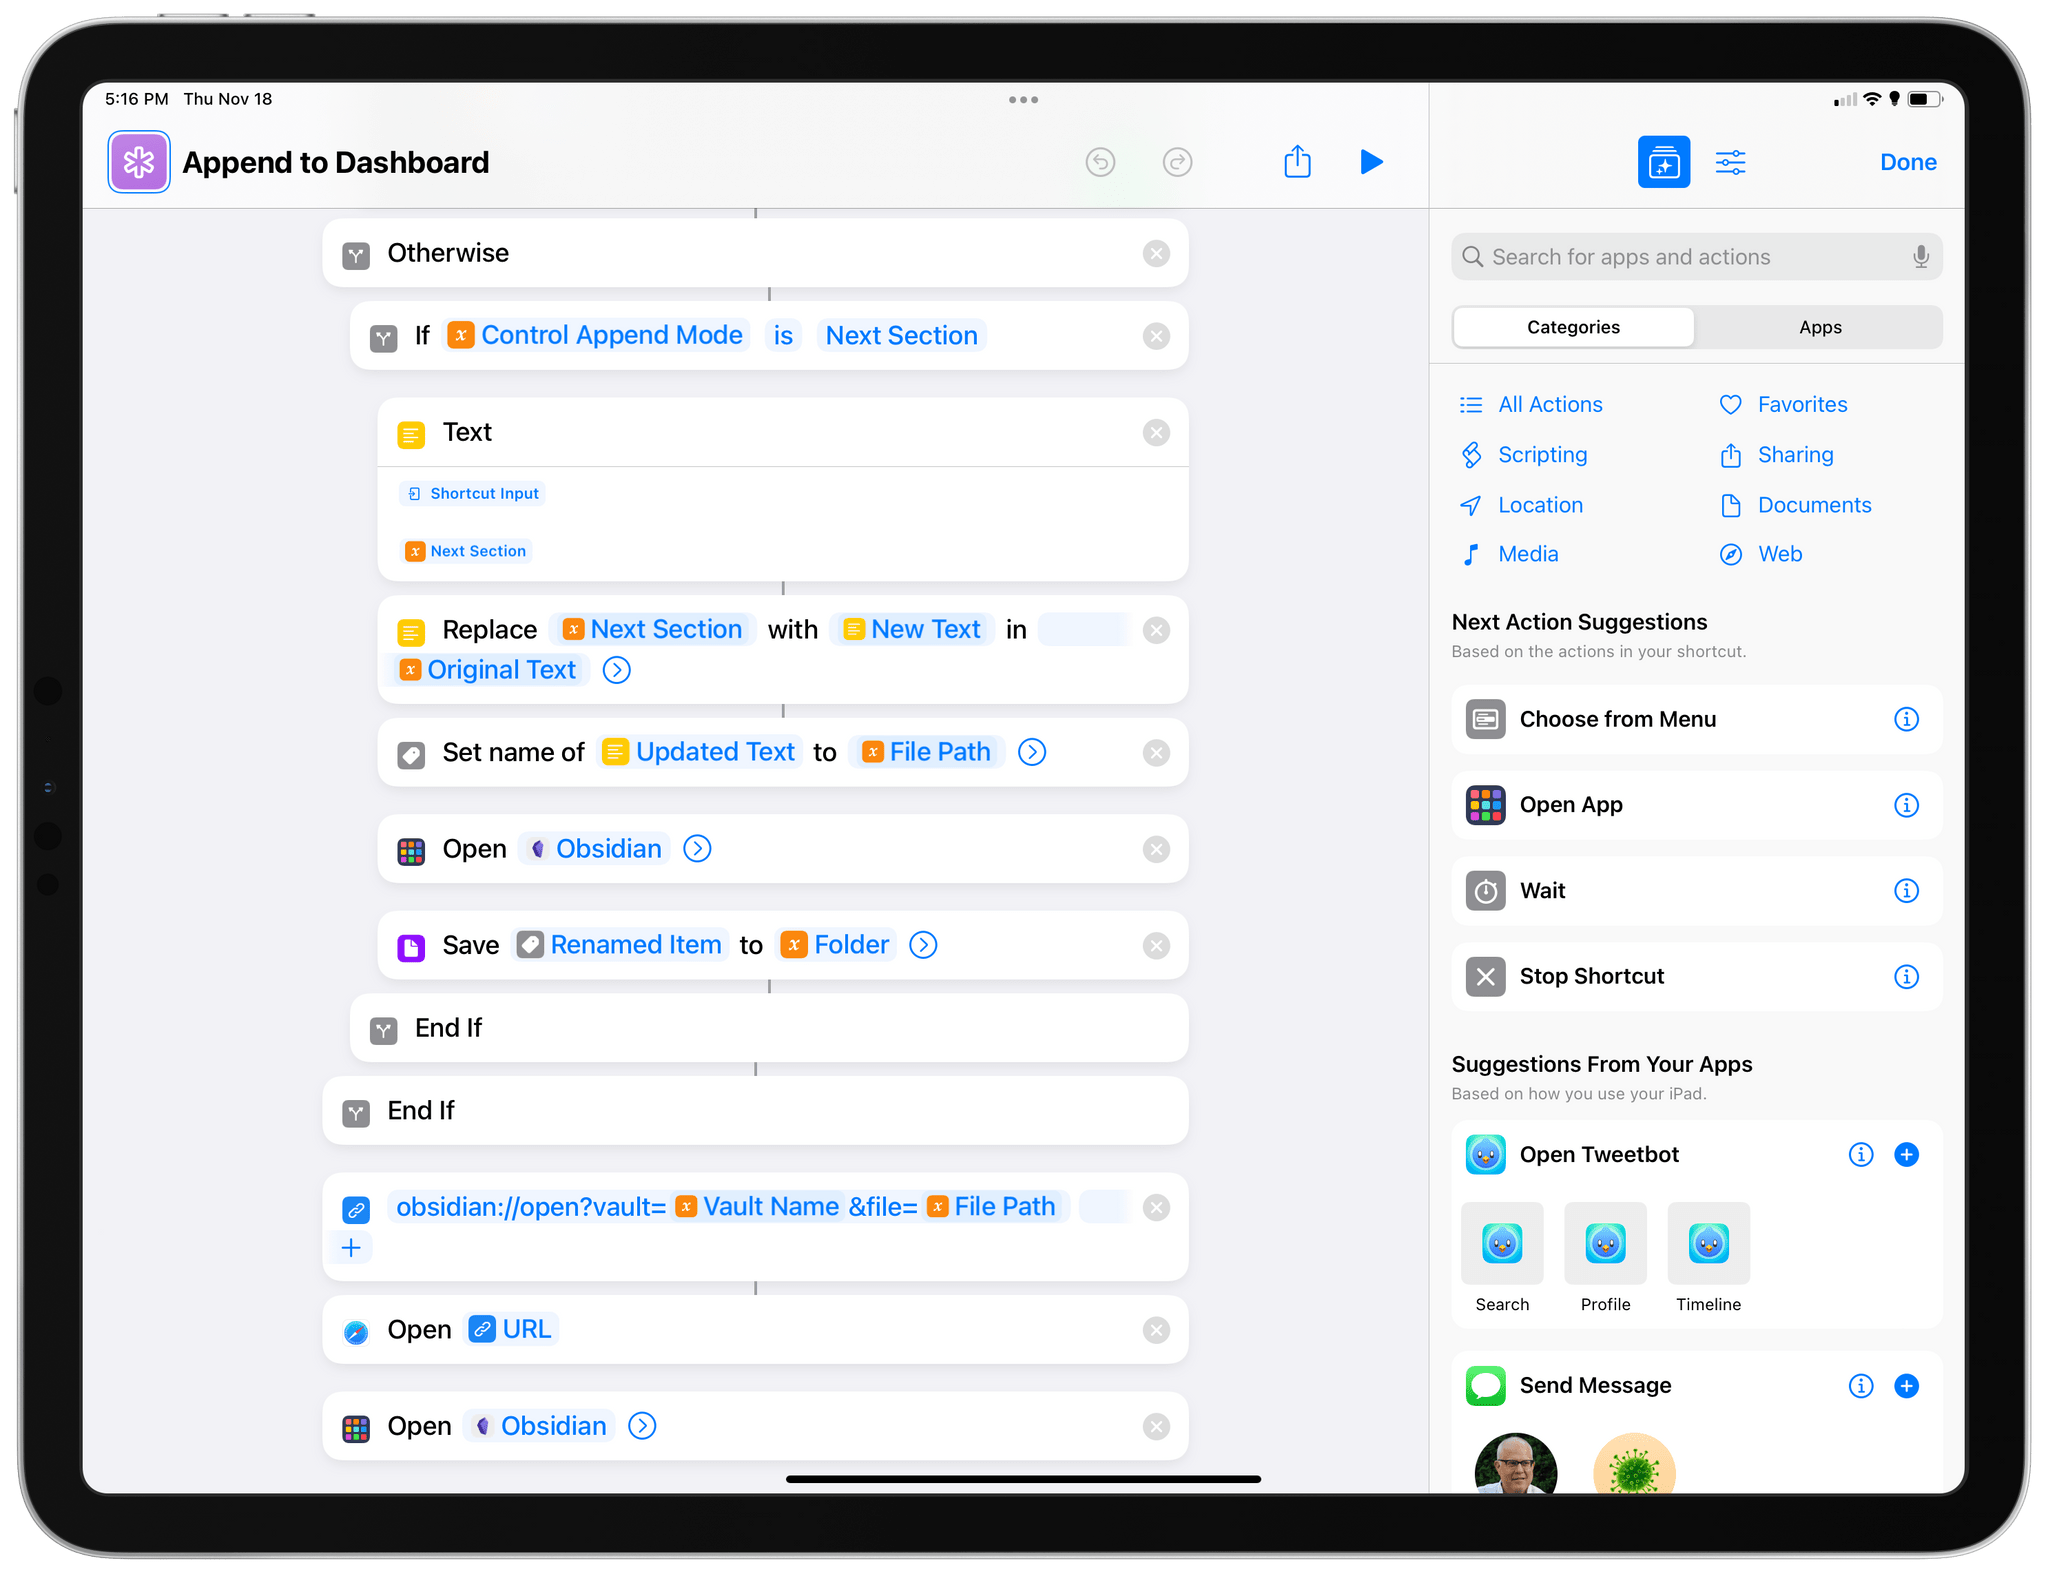
Why the repetition? In my experience, Obsidian may display a cached version of the note after launching the app, and the double Open App action seems to do the trick when it comes to forcing Obsidian to reload the contents of its vault and display the latest version of a note from the Files app.
I’ve been using the Append to Dashboard shortcut extensively on all my devices. It’s on the Home Screen of my iPhone, it’s in my iPad’s dock, and I can also trigger it from the Mac’s menu bar. On macOS, I can invoke the shortcut with the ⌃⌥⌘P hotkey too. Because I found Shortcuts’ built-in keyboard shortcut feature unreliable, I set up a simple BetterTouchTool trigger that runs my Append to Dashboard shortcut, which has worked consistently for me.
 Triggering Append to Dashboard on macOS.
 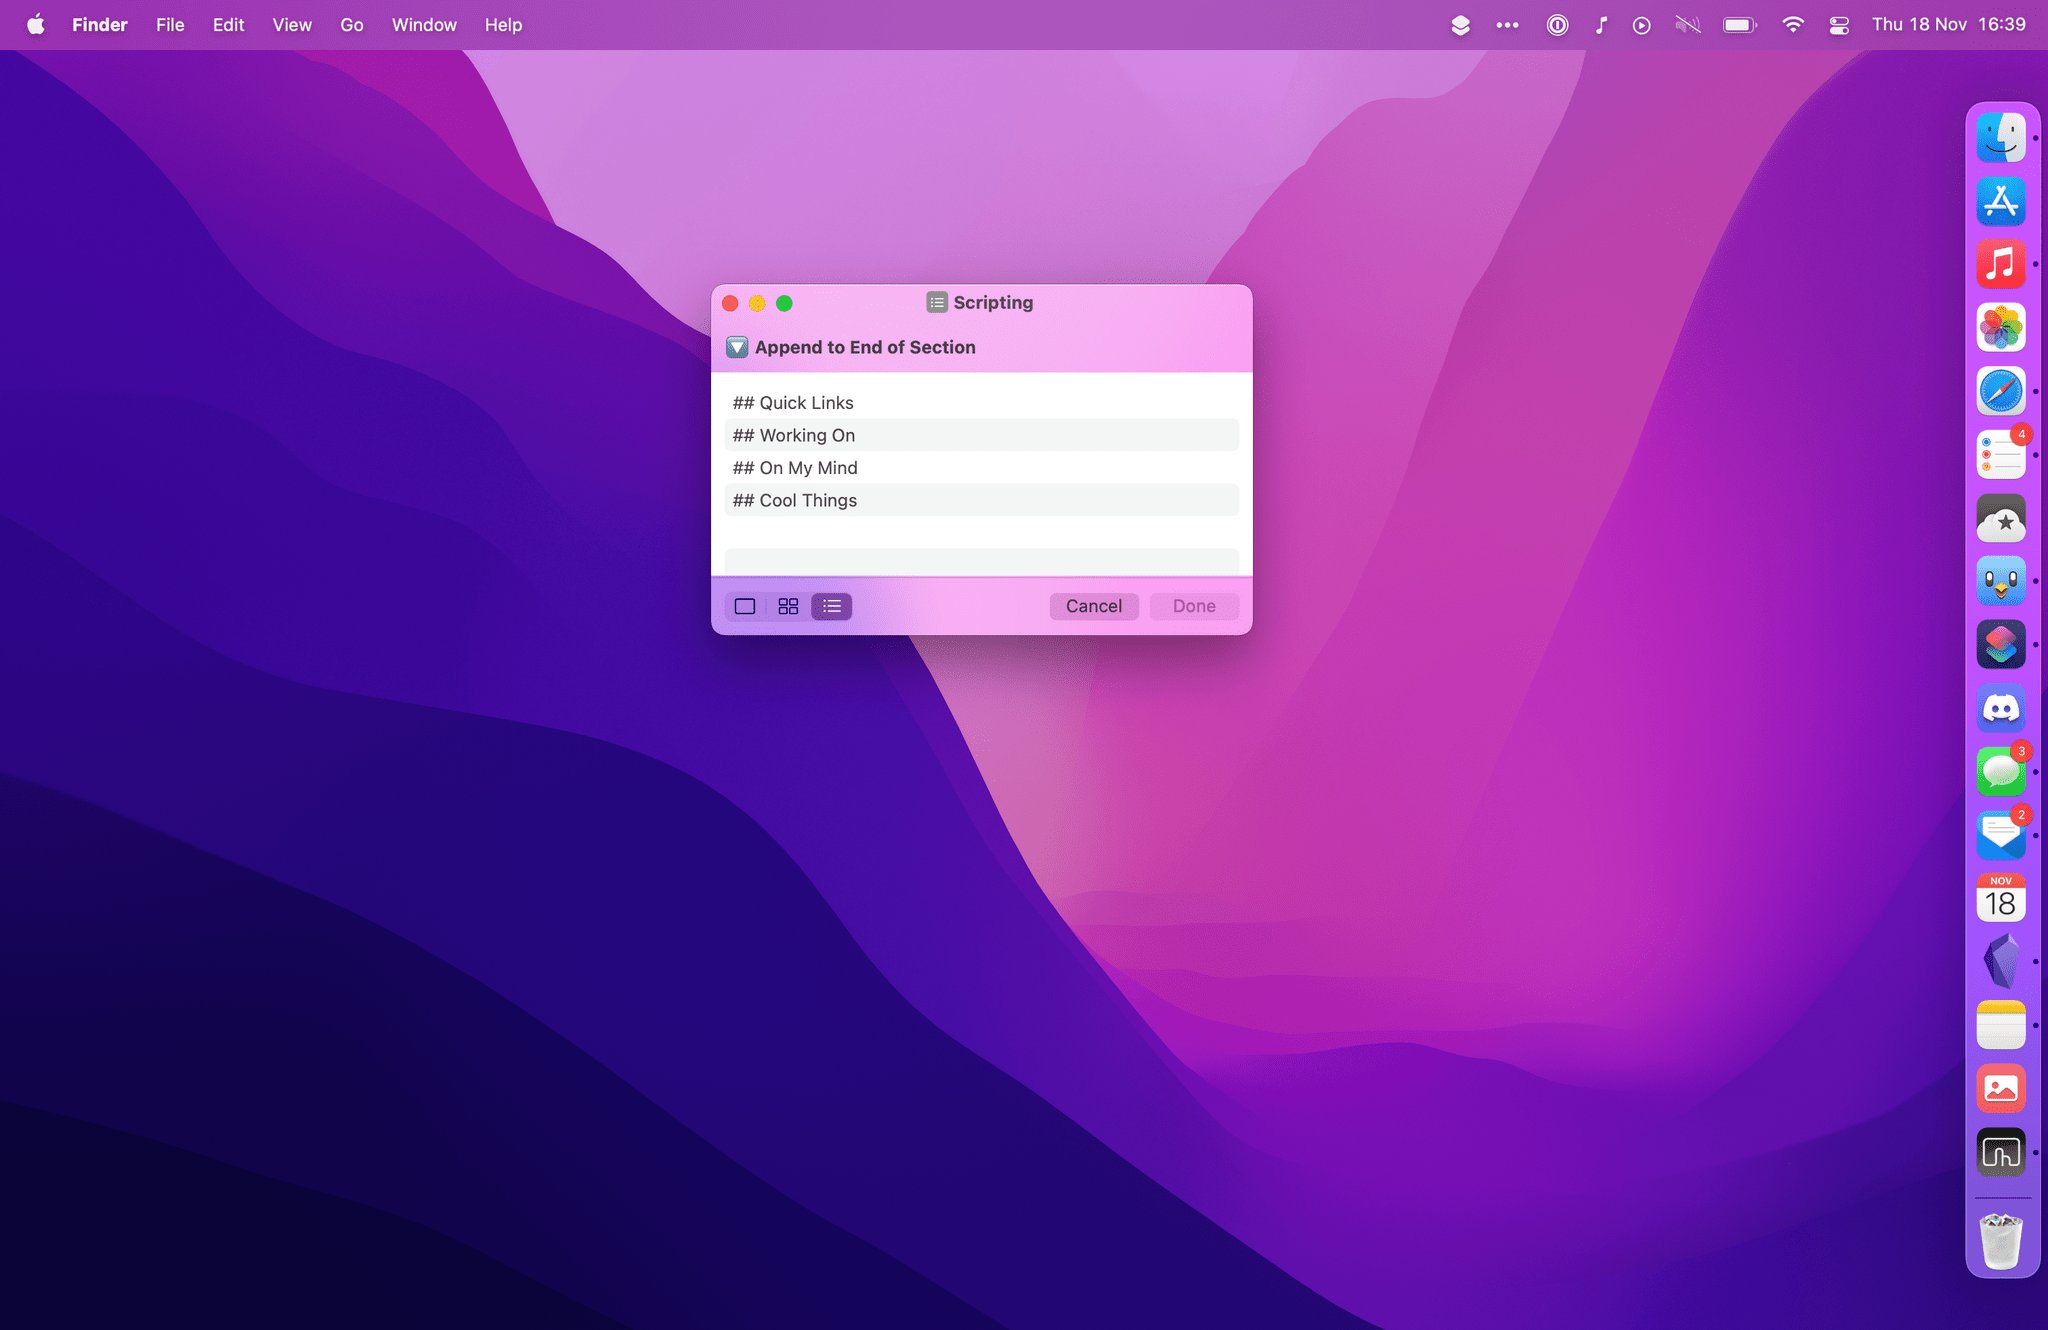 Sections from the Dashboard note as seen on Mac.
You can download my Append to Dashboard shortcut here.
As John covered in his review of macOS Monterey, share sheet integration is suspiciously absent from Shortcuts on the Mac. That was a problem for my Append to Dashboard shortcut as it meant its Mac version couldn’t easily accept text input shared from other apps. Fortunately, macOS lets me work around these limitations by installing all kinds of system enhancements and utilities, and in this case I turned to an obvious candidate: PopClip.
PopClip and MacStories go way back. I first wrote about the app in 2011 and followed up in 2012, before my switch to iPad as my primary computer. After a few years, John covered PopClip in MacStories Weekly, and later shared his favorite PopClip extensions. In case you’re not familiar with it, PopClip is an incredible tool that displays custom actions in a toolbar floating above selected text. PopClip works anywhere you can select text on macOS, and it can be enhanced with extensions that anyone can create and share. Imagine the iOS copy and paste menu, but if it was infused with the power of automation and was available system-wide in any text field with custom actions. PopClip is one of the greatest examples of what Mac software can do compared to iPadOS apps.
 PopClip for Mac.
Anyway, the PopClip developer recently announced the ability to create extensions for the app by simply writing a special plain text syntax, which you can then select – with PopClip itself – and add to the app as a new extension. It’s all very meta, and these are called snippets, which are based on PopClip’s existing syntax to define actions, icons, and more. You can read more about this in John’s column in this very issue.
So, I wanted to make a PopClip button that would let me capture any selected text and pass it to my Append to Dashboard shortcut. Here’s what the PopClip snippet syntax looks like:
#popclip
name: Append to Dashboard
icon: symbol:text.append
shortcut name: Append to Dashboard
Installing PopClip’s extension snippets.
If you want to use this snippet, make sure you have the latest version of PopClip installed, then select the text above, and add it as a new extension with PopClip. Once added, you’ll be able to select any text and fire off the Append to Dashboard shortcut with PopClip using the selected text as input.
Triggering Append to Dashboard for selected text from PopClip.
Append to Dashboard triggered by PopClip inside Reeder for Mac.
I also made a separate version of this PopClip extension that is optimized for Safari and lets you quickly append text selected on a webpage as Markdown to your Dashboard note in Obsidian. This extension takes advantage of PopClip’s ability to trigger shortcuts via AppleScript and pass along some input text. In this case, I’m using PopClip’s built-in {popclip markdown} variable, which takes text selected on a webpage and formats it as Markdown, preserving its links and styles. This way, if I find something on a webpage I want to append to my Dashboard note while keeping its formatting and links, I can run this extension from PopClip and save the Markdown selection in a few seconds.
#popclip
name: Append HTML
icon: symbol:doc.richtext
capture html: true
applescript: |
tell application "Shortcuts Events"
run the shortcut named "Append to Dashboard" with input "{popclip markdown}"
end tell
As I mentioned before, you can save this extension by highlighting its text and adding it directly to PopClip.
Saving a webpage selection as Markdown from Safari via PopClip and Shortcuts.
The selection appended as Markdown in Obsidian.
There’s more I’ve done with Obsidian and Shortcuts this week, so keep on reading to find out.
## Clip Webpage
Sometimes, what I want to capture in my Dashboard note isn’t some plain text, but a link to a webpage. So for this week’s column, I dusted off a shortcut I created months ago and never shared, optimized it for macOS Monterey, and integrated it with the Append to Dashboard shortcut.
This shortcut is called **Clip Webpage**, and it lets you capture any webpage from Safari as a new note in Obsidian that contains [YAML-formatted metadata](https://help.obsidian.md/Advanced+topics/YAML+front+matter) such as the title and URL of the page, plus the date when you saved it. Additionally, if you have selected something on the page before running the shortcut, your selection will be saved in the note as Markdown; and, you can optionally add your own comment to save alongside everything else.
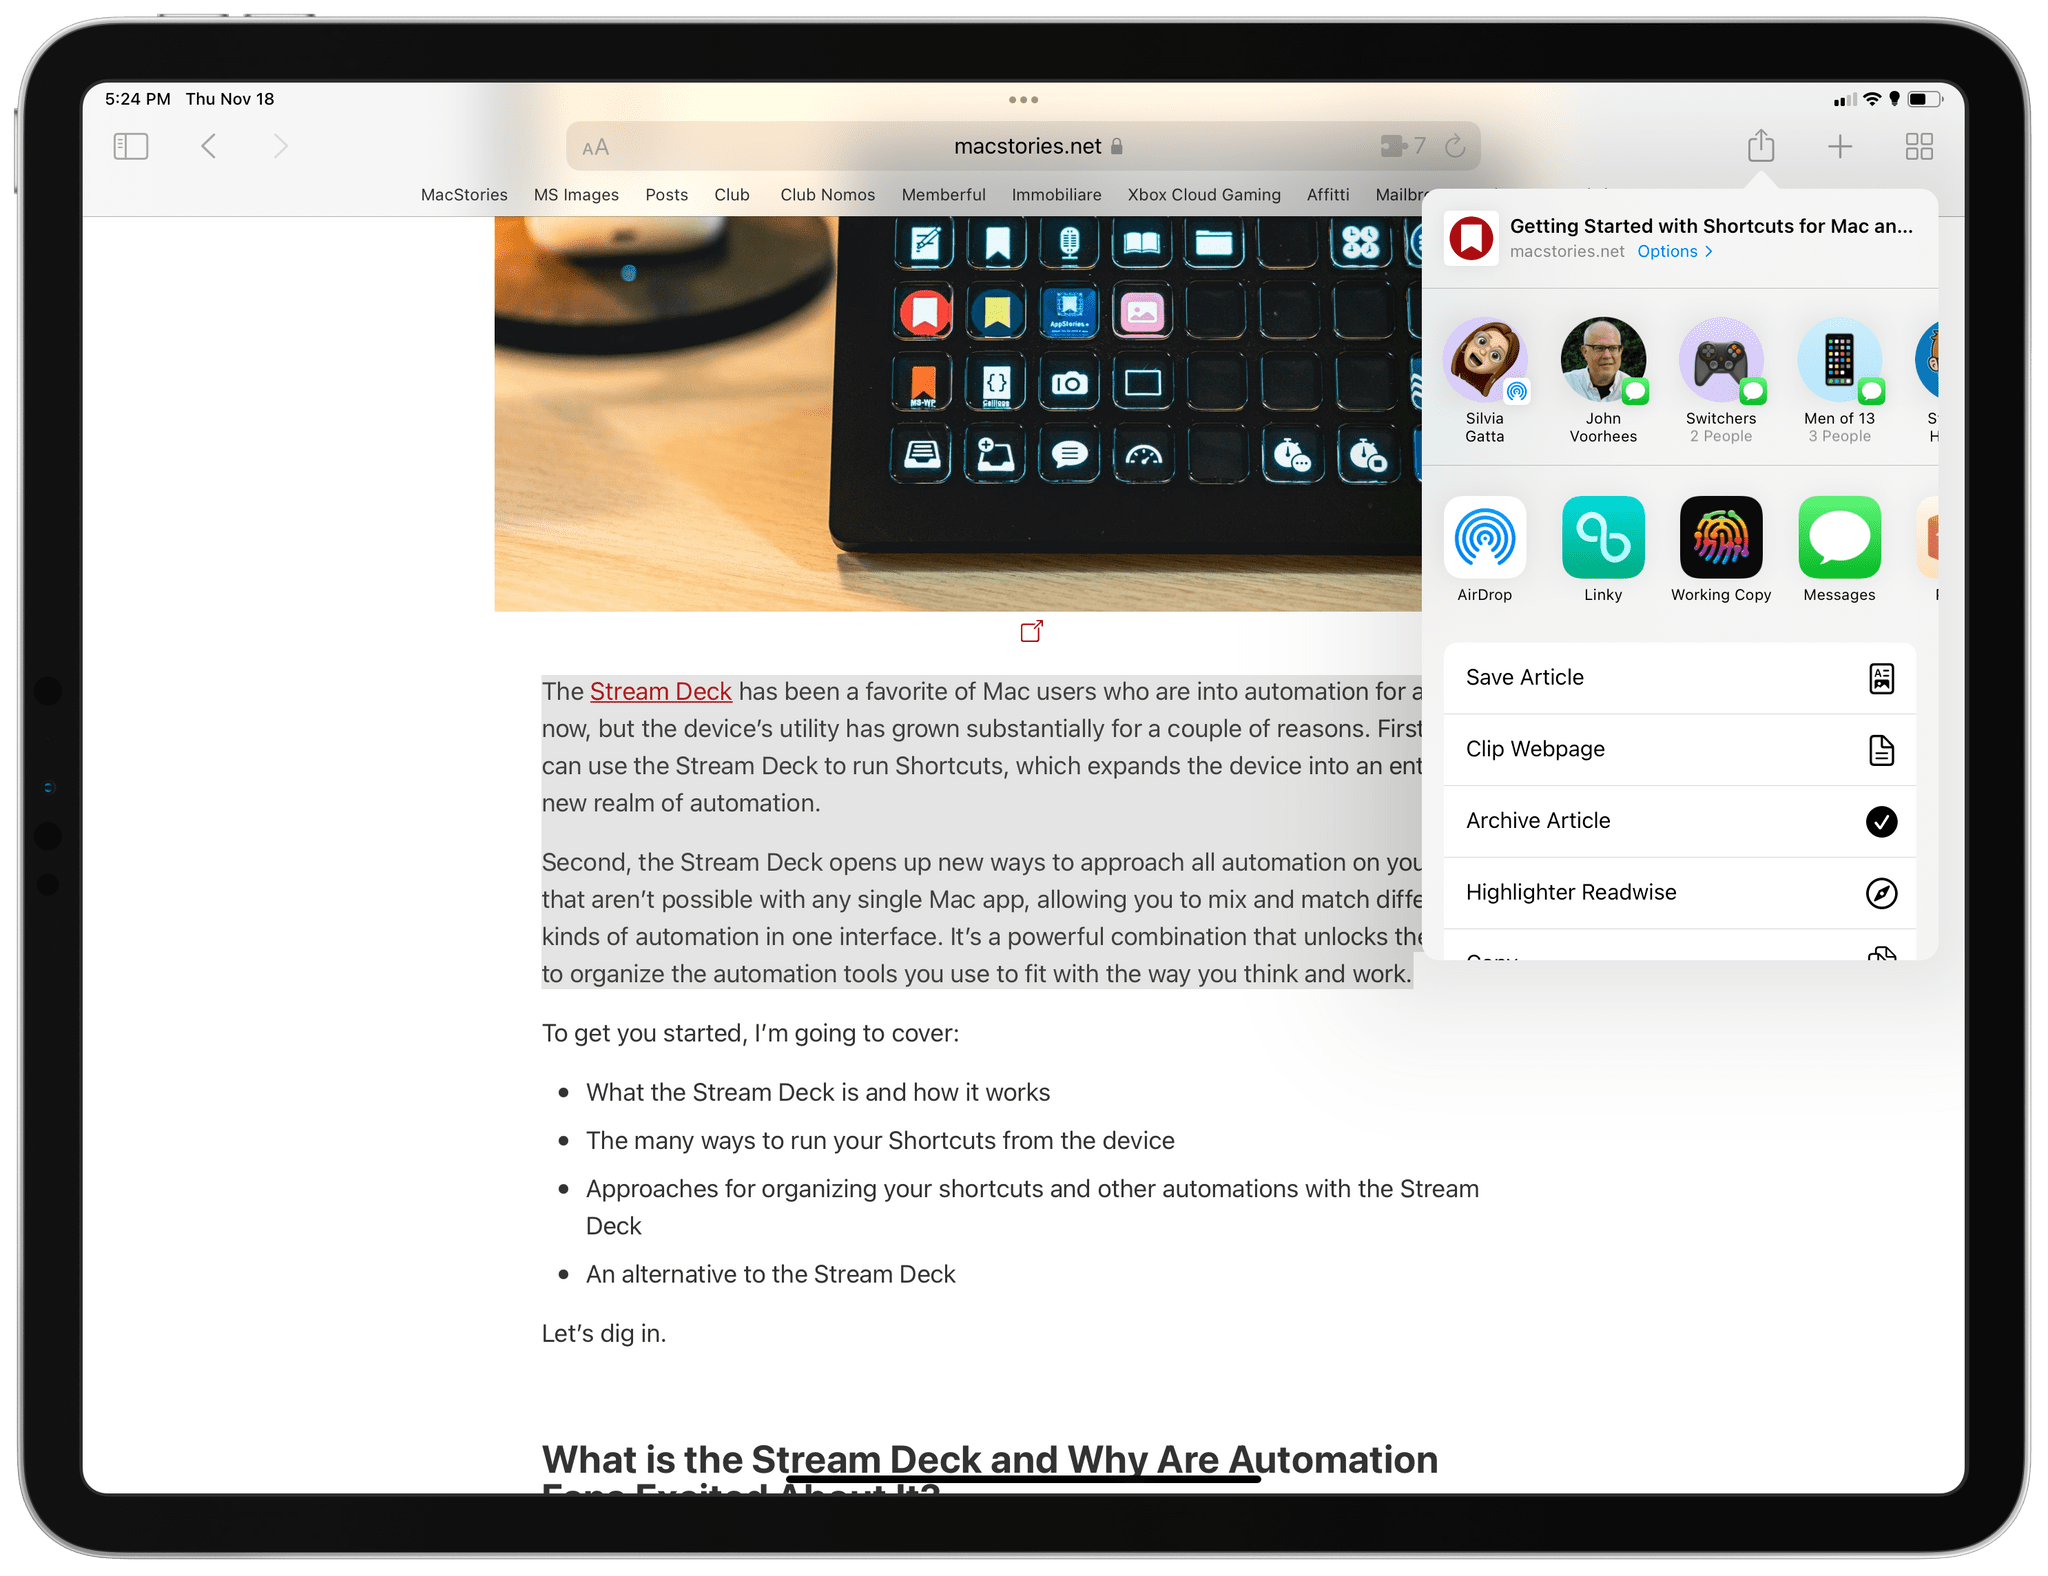Clipping a webpage from Safari.
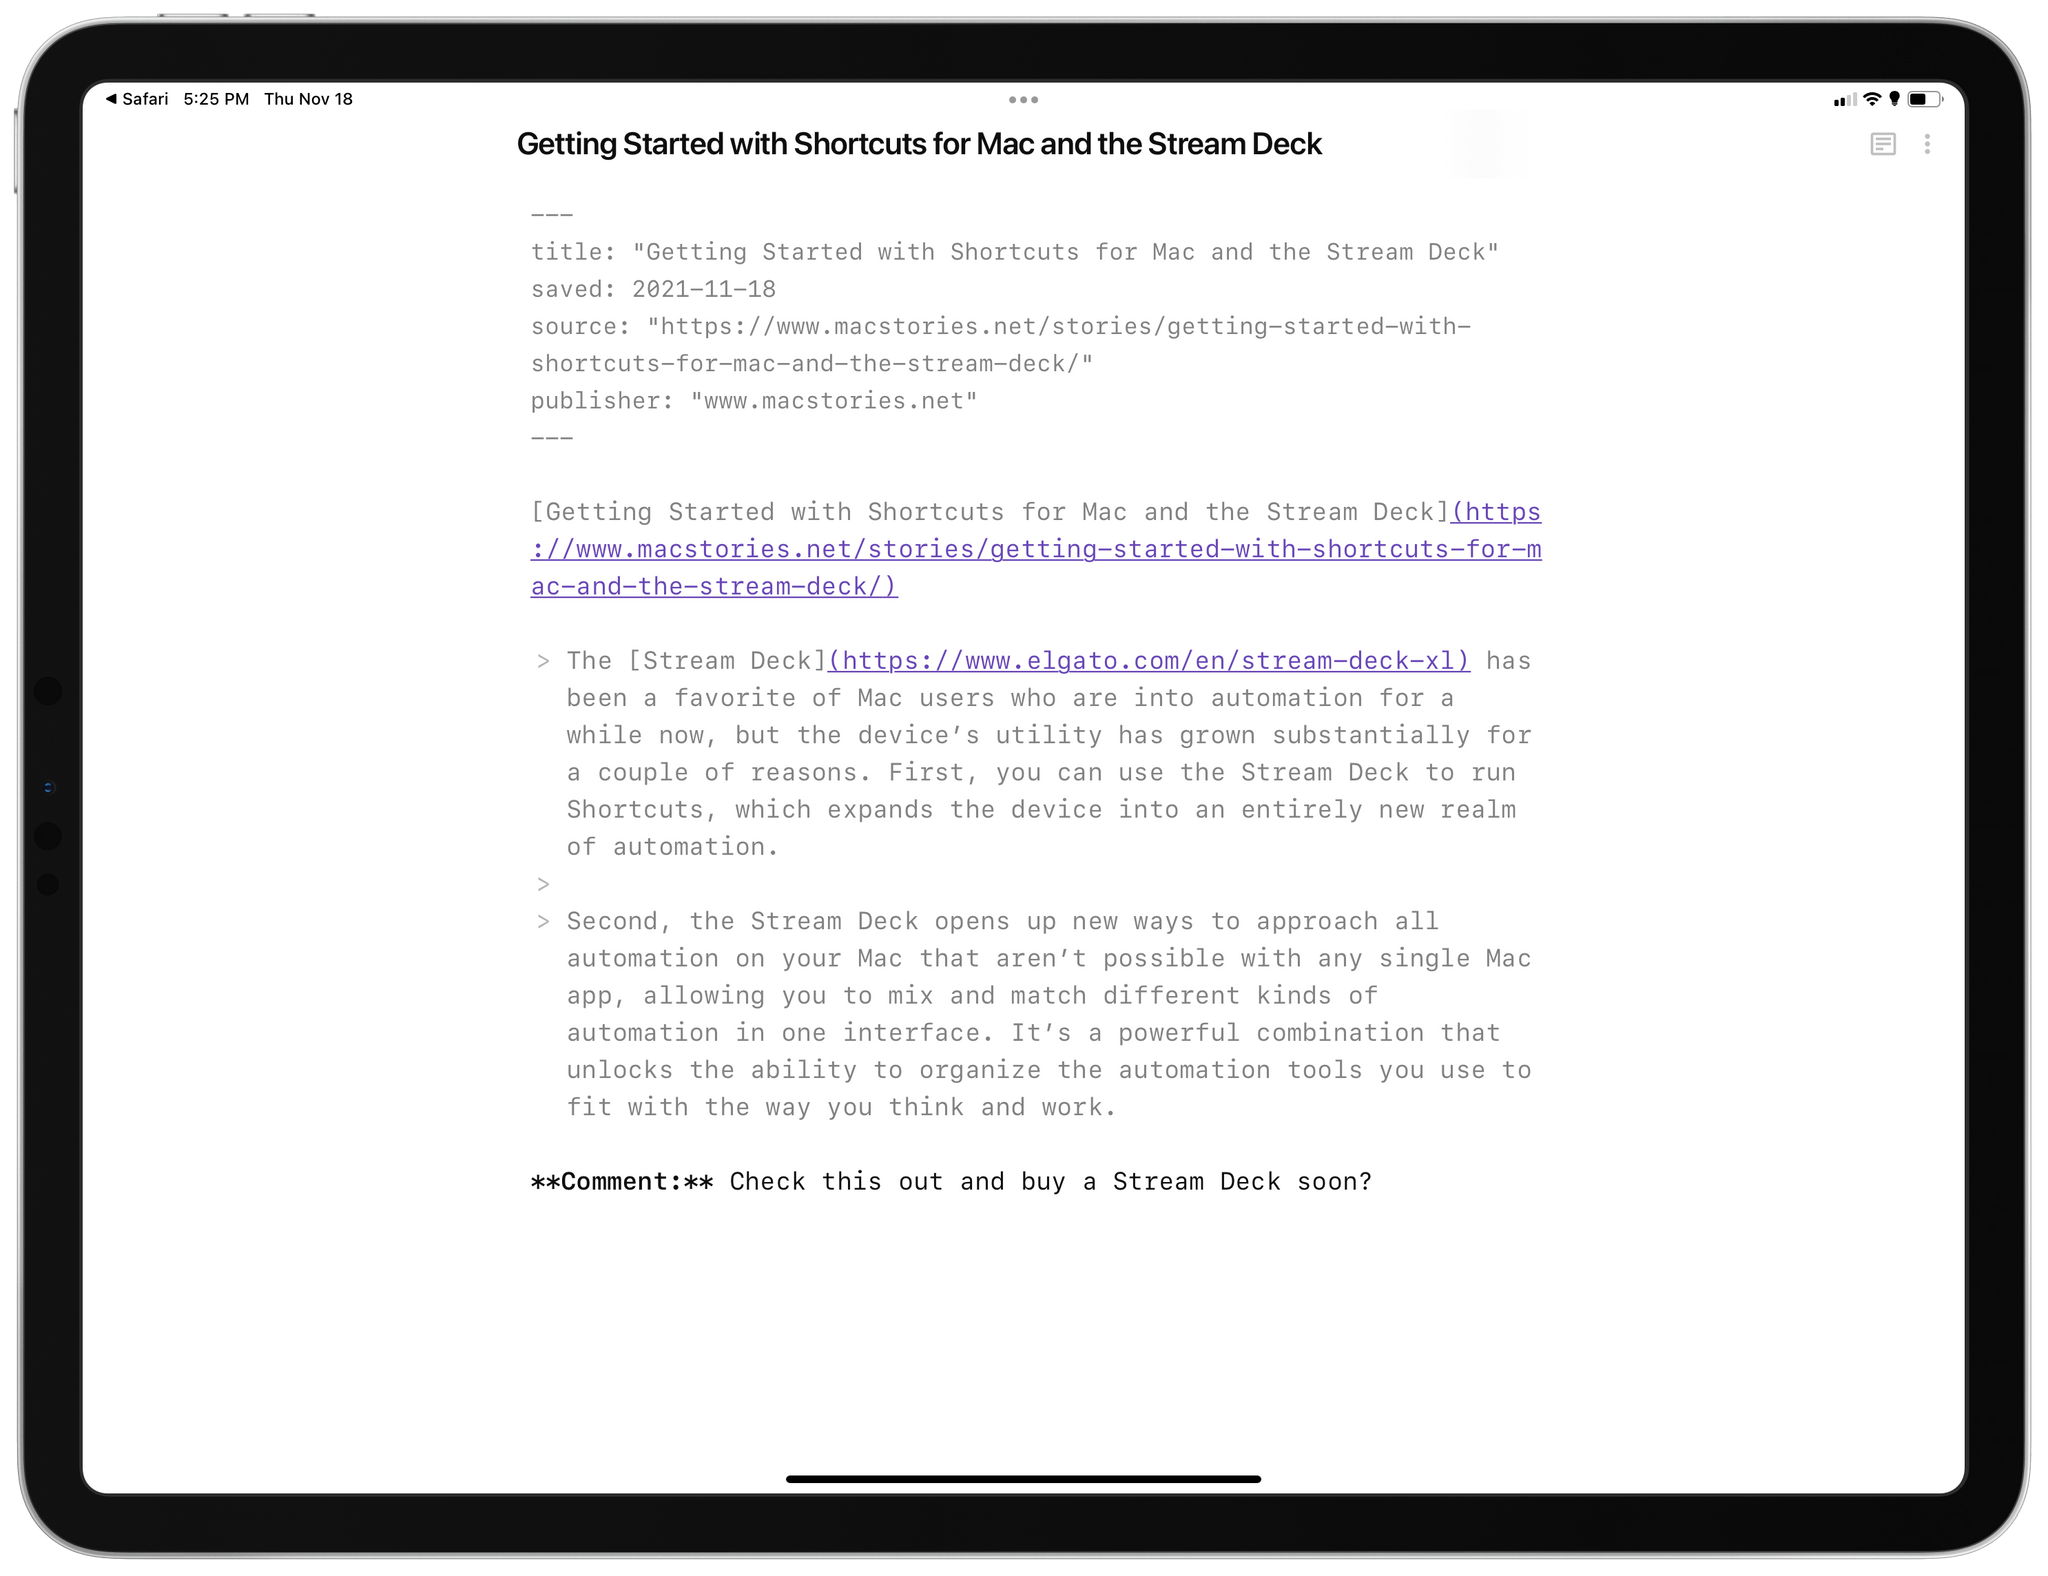The clipped link and webpage selection in Obsidian.
I created this shortcut during the week of WWDC, when I realized I wanted a way to save webpages in Obsidian as notes containing their link and selection. The shortcut is pretty basic in how it works: like Append to Dashboard, you have to pick a folder where you want new notes to be saved, and details such as page URL, selection, and title are all generated via built-in Safari variables in Shortcuts. It’s all a matter of formatting the note with Text actions and using the ‘Save File’ action to save the newly assembled note in a folder.
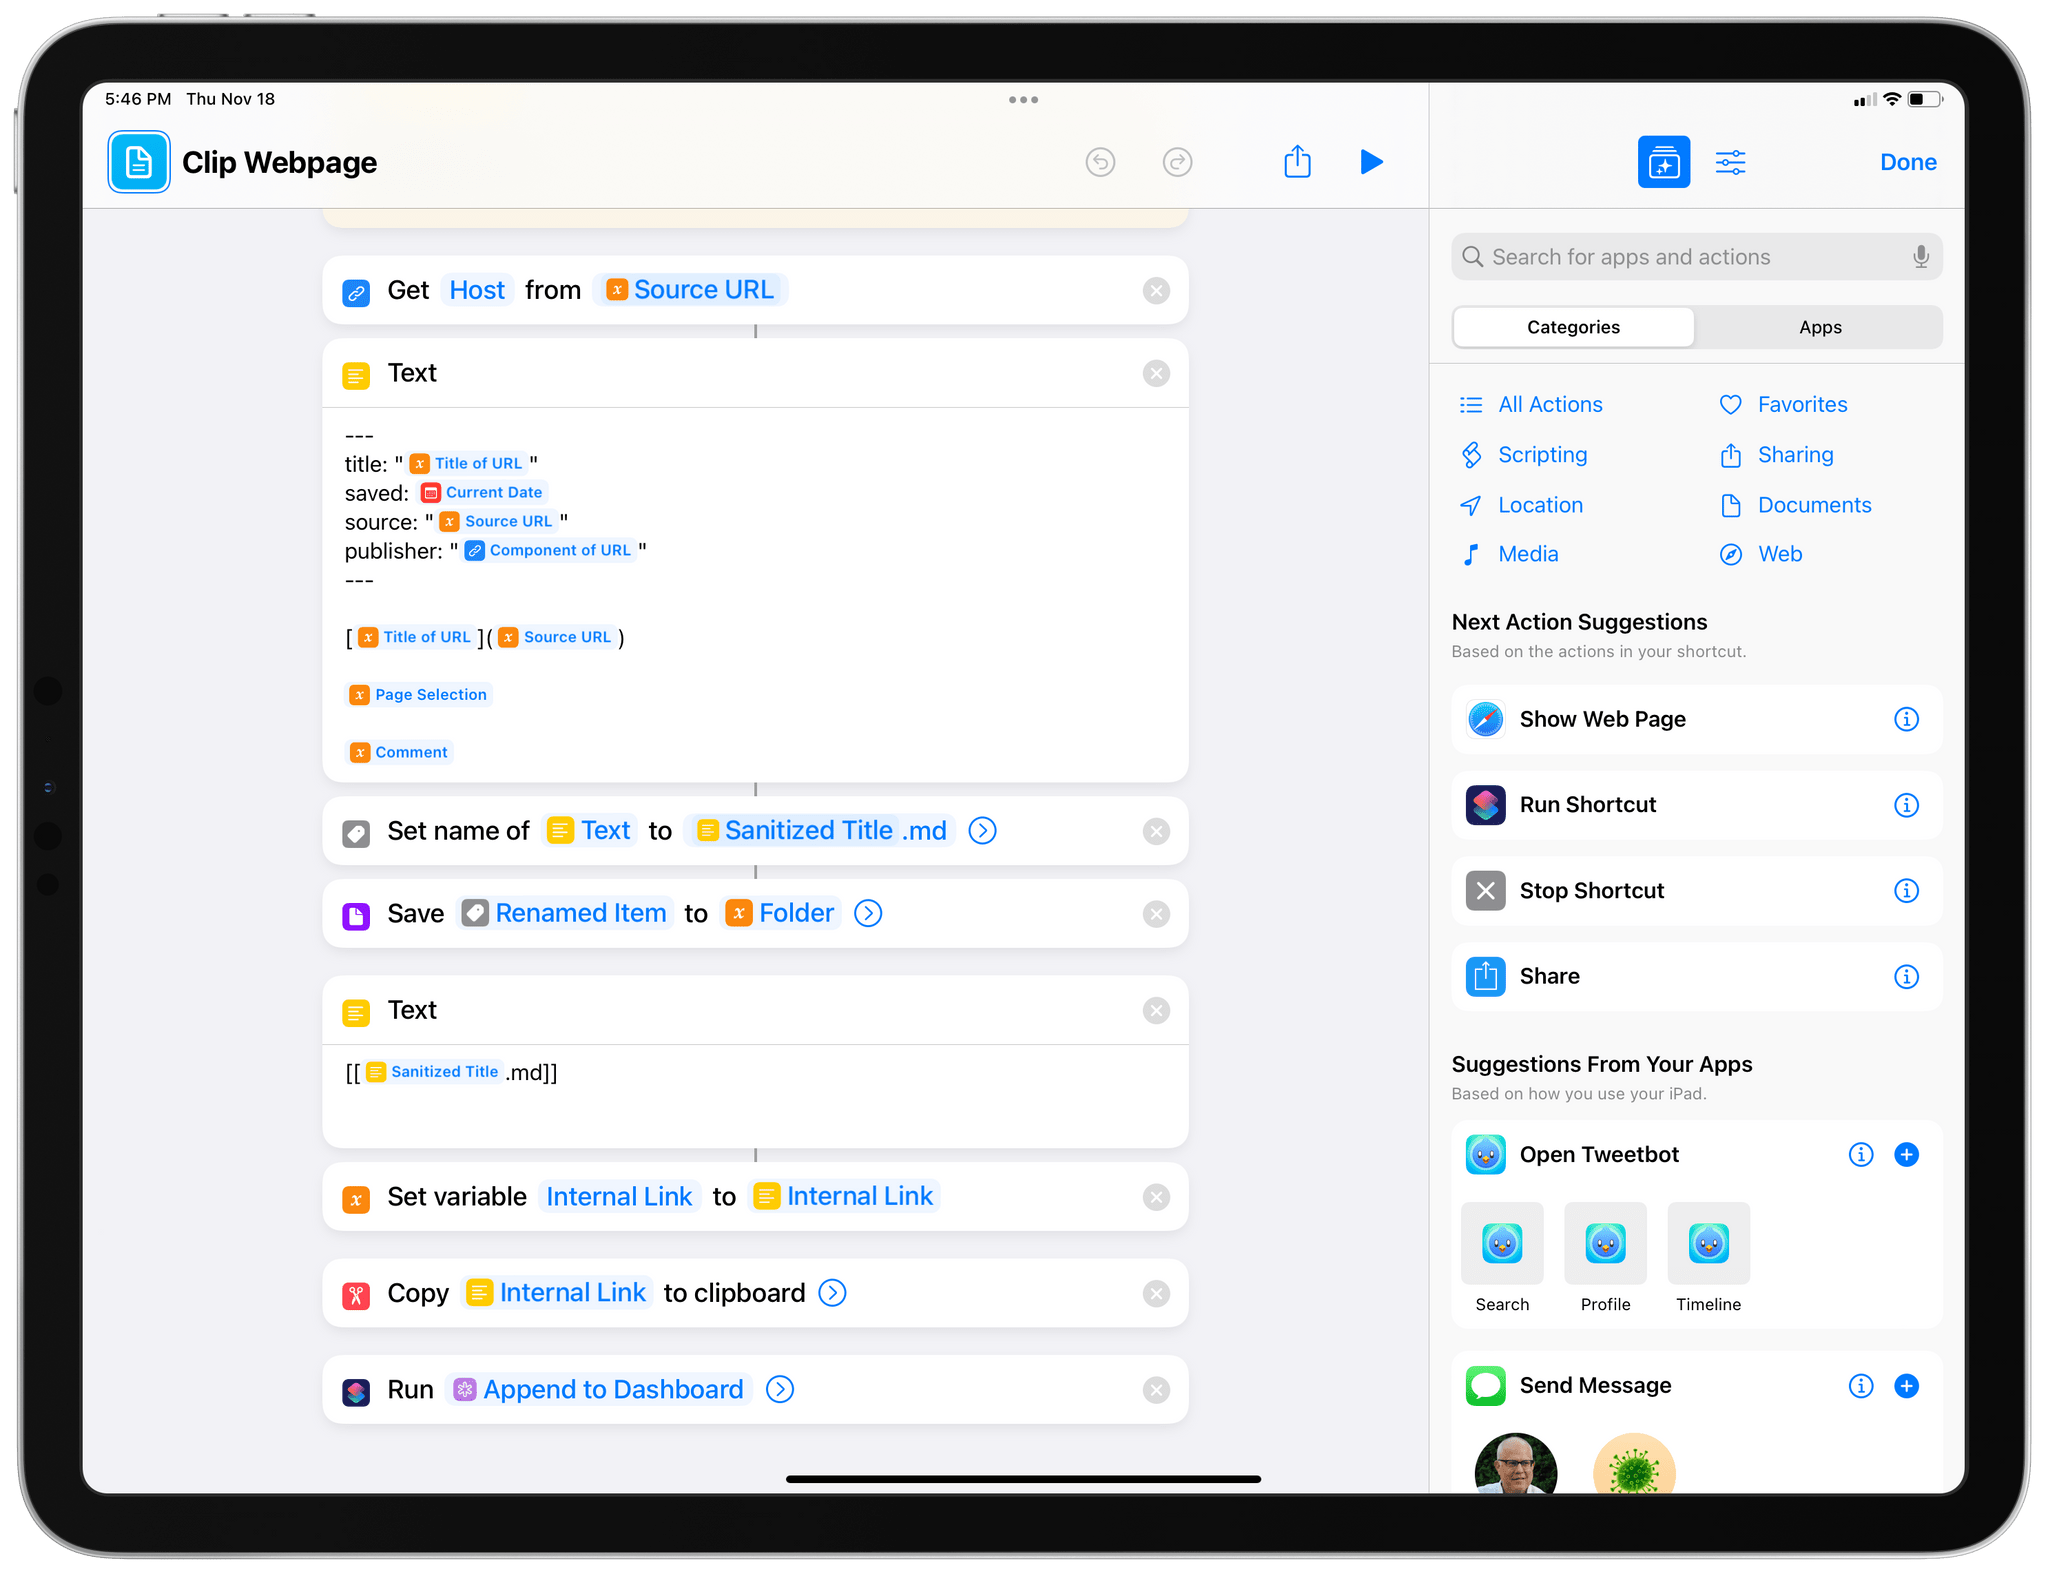Assembling the note template in Shortcuts.
What did require some work was figuring out how to handle capturing information from Safari on the Mac, where, for some reason, there’s no share sheet integration for Shortcuts and most Safari actions from iOS and iPadOS don’t work.
I had to get creative about how to get the URL of the current webpage, its title, and selected text. By default, the shortcut tries to find a URL passed from the share sheet and, if that’s empty, tries to get one from the clipboard. If no URL is found in the clipboard either, the shortcut checks whether you’re running it on a Mac and, if you are, uses the Mac-only ‘Get Current URL from Safari’ action to retrieve the URL of the current tab.
Then, for both webpage title and selection, I had to use two different ‘Run AppleScript’ actions. The one that deals with selection uses the do JavaScript AppleScript command for Safari, which is a topic I will explore more in depth in the future.
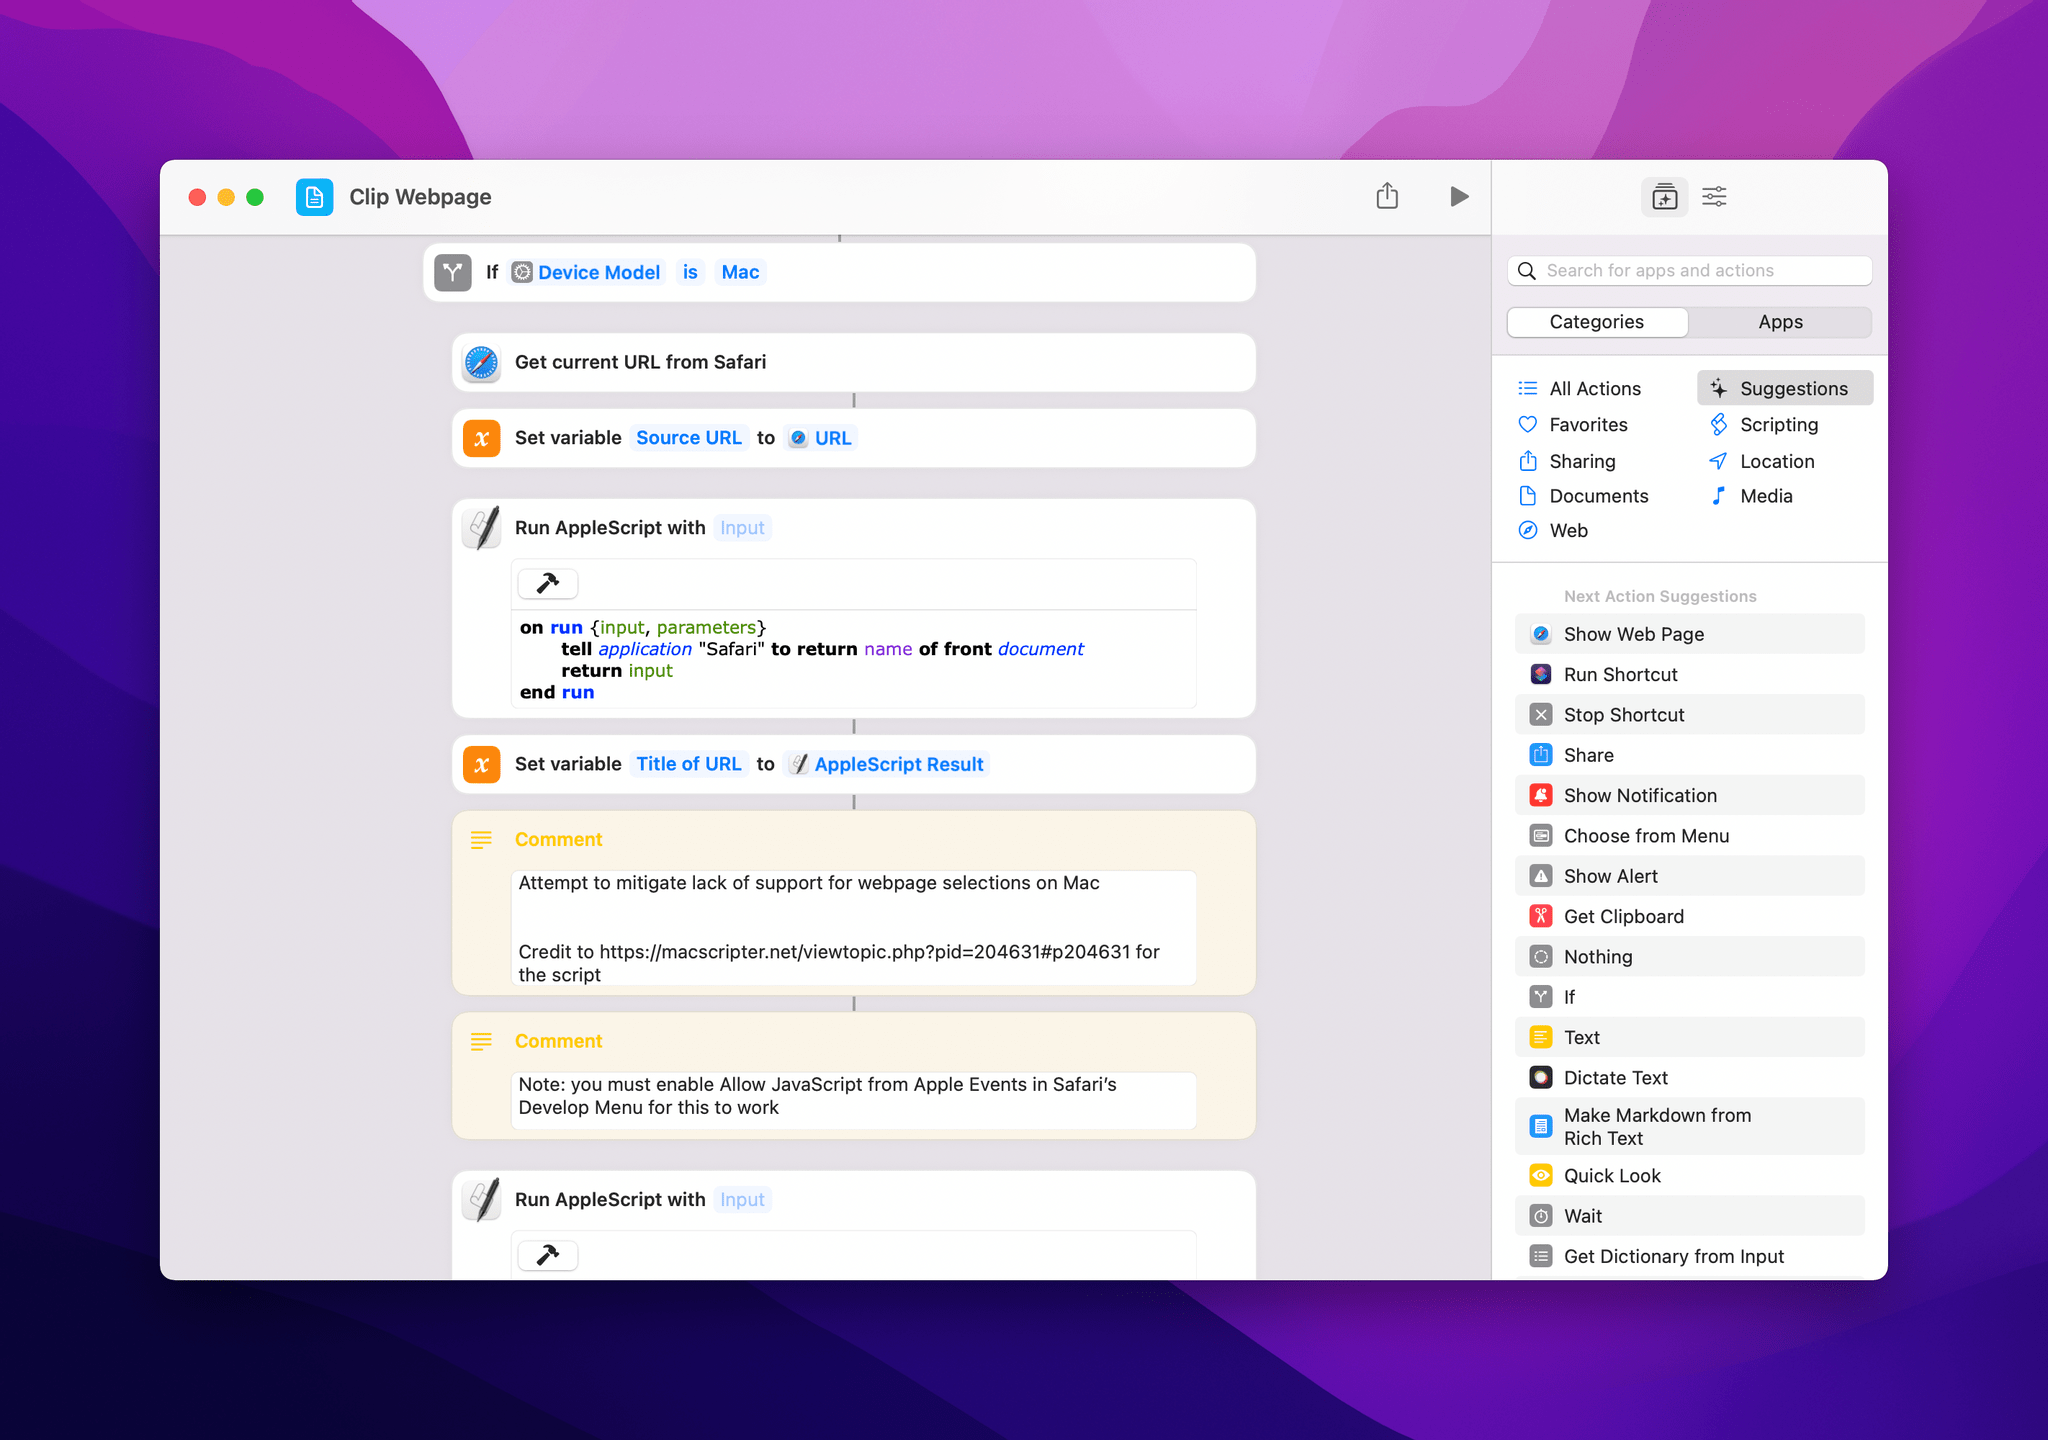Getting the URL and title from Safari for Mac.
Getting selected text from Safari for Mac in Shortcuts.
One word of caution for running AppleScript with JavaScript in Shortcuts: for these actions to work, you’ll have to enable the ‘Allow JavaScript from Apple Events’ option in Safari’s Develop menu. If you don’t see the Develop item in the menu bar in Safari for Mac, open its preferences, select the Advanced page, and enable ‘Show Develop menu in menu bar’ first. Furthermore, make sure you have enabled ‘Allow Running Scripts’ in Shortcuts for Mac’s settings, also under the Advanced section.
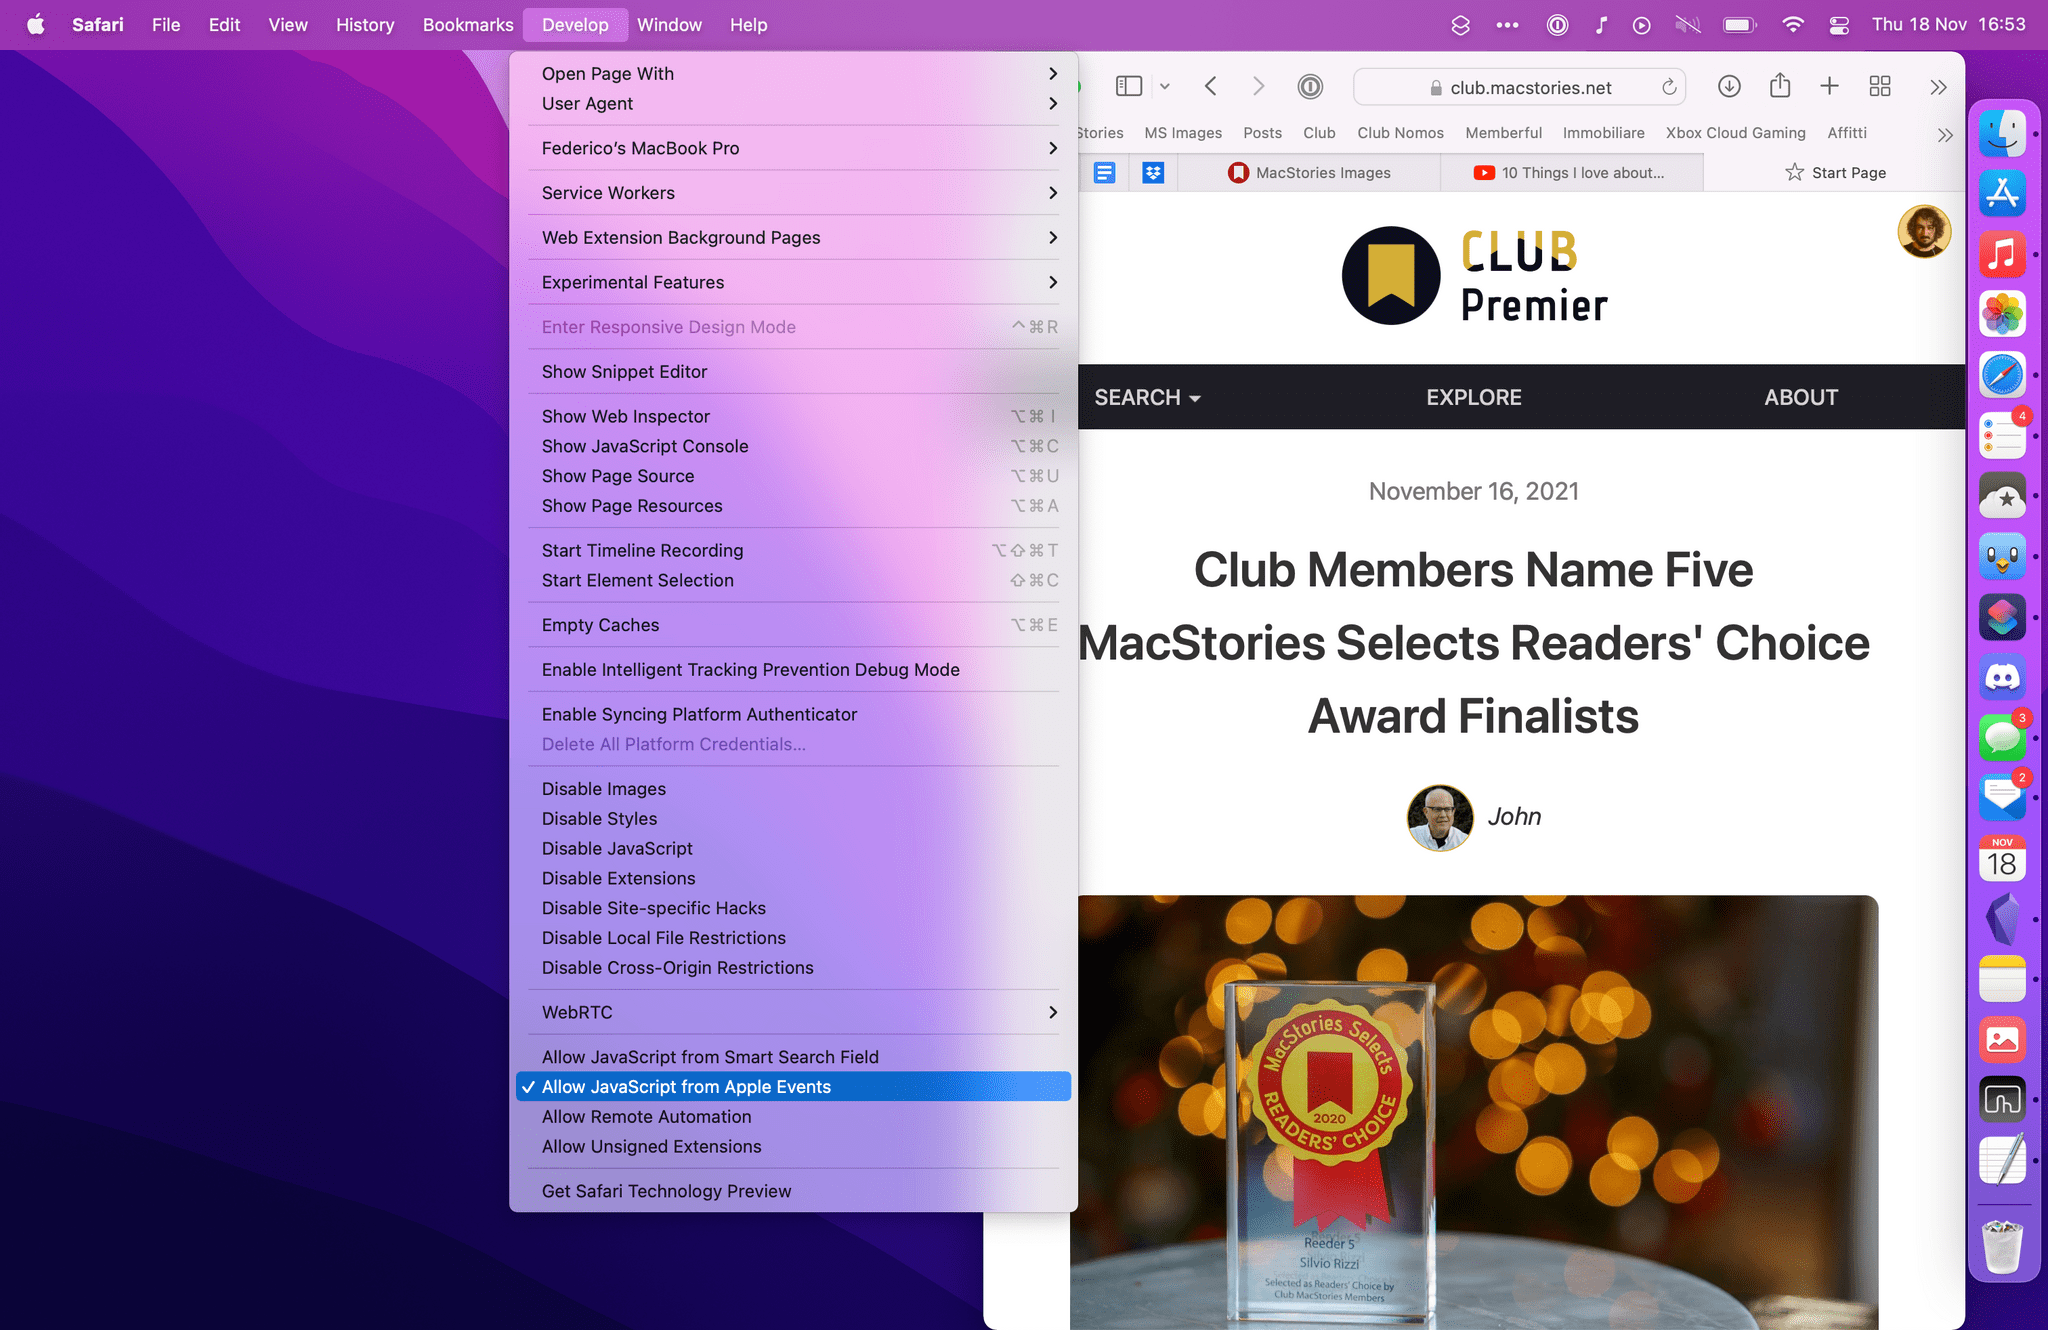Allowing JavaScript for Apple Events in Safari is required for this shortcut to work properly.
Once the note has been created and saved in your Obsidian vault in the background via Files actions, the shortcut outputs its filename formatted as an [[internal link]], copies it to the clipboard, and passes it to the Append to Dashboard shortcut. This way, you can either open Obsidian and manually paste this internal link for the new note somewhere, or you can use Append to Dashboard to instantly append it to a section of your Dashboard note (or whatever you like to call your version of my Dashboard note).
A clipped link appended to my Dashboard.
(**Note:** If the Clip Webpage shortcut isn’t properly running Append to Dashboard for you, this appears to be a bug in Shortcuts where shortcuts invoked via the ‘Run Shortcut’ action cannot access the contents documents from the Files app.)
I’ve been using Clip Webpage and Append to Dashboard together a lot, and they’re a great example of the kind of integration you can achieve between different apps, the filesystem, and Obsidian if you use Shortcuts as the glue between all of them. I do wish optimizing these shortcuts for Mac was easier and that I didn’t have to rely on AppleScript, but I’m also glad I was able to use this (temporary?) workaround. This is not the last time you’ll hear from me about shortcuts I’ve updated for macOS here on MacStories Weekly, so stay tuned for more.
You can [download my Clip Webpage shortcut here](https://www.icloud.com/shortcuts/90b0ca342b234163b2e314ac9c5ec596).
[Submit a Shortcut Request](https://docs.google.com/forms/d/e/1FAIpQLSeViYJRP69lNKgbmNWqxY1iEnz851gLE375swzC12Qarm-RxA/viewform?usp=sf_link)