 My template document for the Spotlight section.
In the last installment of My Obsidian Setup series from August, I described my Dashboard note that served as a centralized hub for saving ideas and quick links, navigating to different projects, and embedding Todoist tasks. That article predated the launch of Club MacStories+ and my annual iOS review; I was in the middle of finalizing both, so I was clearly prioritizing those massive, one-off projects over regular, day-to-day writing and note-taking tasks. Now that both have launched (successfully, thanks to all of you), I’ve adjusted to a “normal” usage of Obsidian again that doesn’t involve huge projects with a looming deadline that consume and take over my life.
In this week’s installment of the series, I’ll be taking a look at how I manage templates for MacStories Weekly posts in Obsidian and explain my approach to the mobile toolbar with pinned commands on iPhone and iPad. Let’s dive in.
As Club MacStories members know, our MacStories Weekly newsletter is comprised of regular sections we produce as a team on a weekly basis such as App Debuts, Interesting Links, Spotlight, and more. Both John and I work on our assigned parts of these sections in our own text editors and save drafts to a private GitHub repository where they are named with the upcoming issue of MacStories Weekly, the title of the section, and the author name. For instance, my App Debuts portion of this week’s newsletter was saved as a file called ‘Weekly 295 App Debuts Federico.md’ in GitHub. Each week, we merge every section into Calliope, assemble the newsletter version in Mailchimp, and publish everything. At the end of the process, these files are moved into an ‘Archive’ sub-folder of the repo and the process starts anew on Monday.
We’ve been doing this for six years now, and I recently realized that I can speed up my end of the process thanks to Obsidian by taking advantage of the amazing QuickAdd plugin (which I covered in August) and its support for templates based on the Templater engine. Specifically, I figured I could create templates that have pre-filled boilerplate for some sections, a consistent naming structure (to avoid typos), and a default destination folder in my Obsidian vault.
It was the most recent addition to MacStories Weekly, the new Spotlight section, that pushed me down this path of investigating templates. The section contains some default text at the beginning and end of the post, and I wanted to make sure I could easily generate a new one each week without forgetting to include the intro text and footer or, worse, having typos in them. This was very easy to build with QuickAdd, and if you also find yourself constantly generating similar documents on a regular basis, it’s a strategy you can apply to your Obsidian workflow as well.
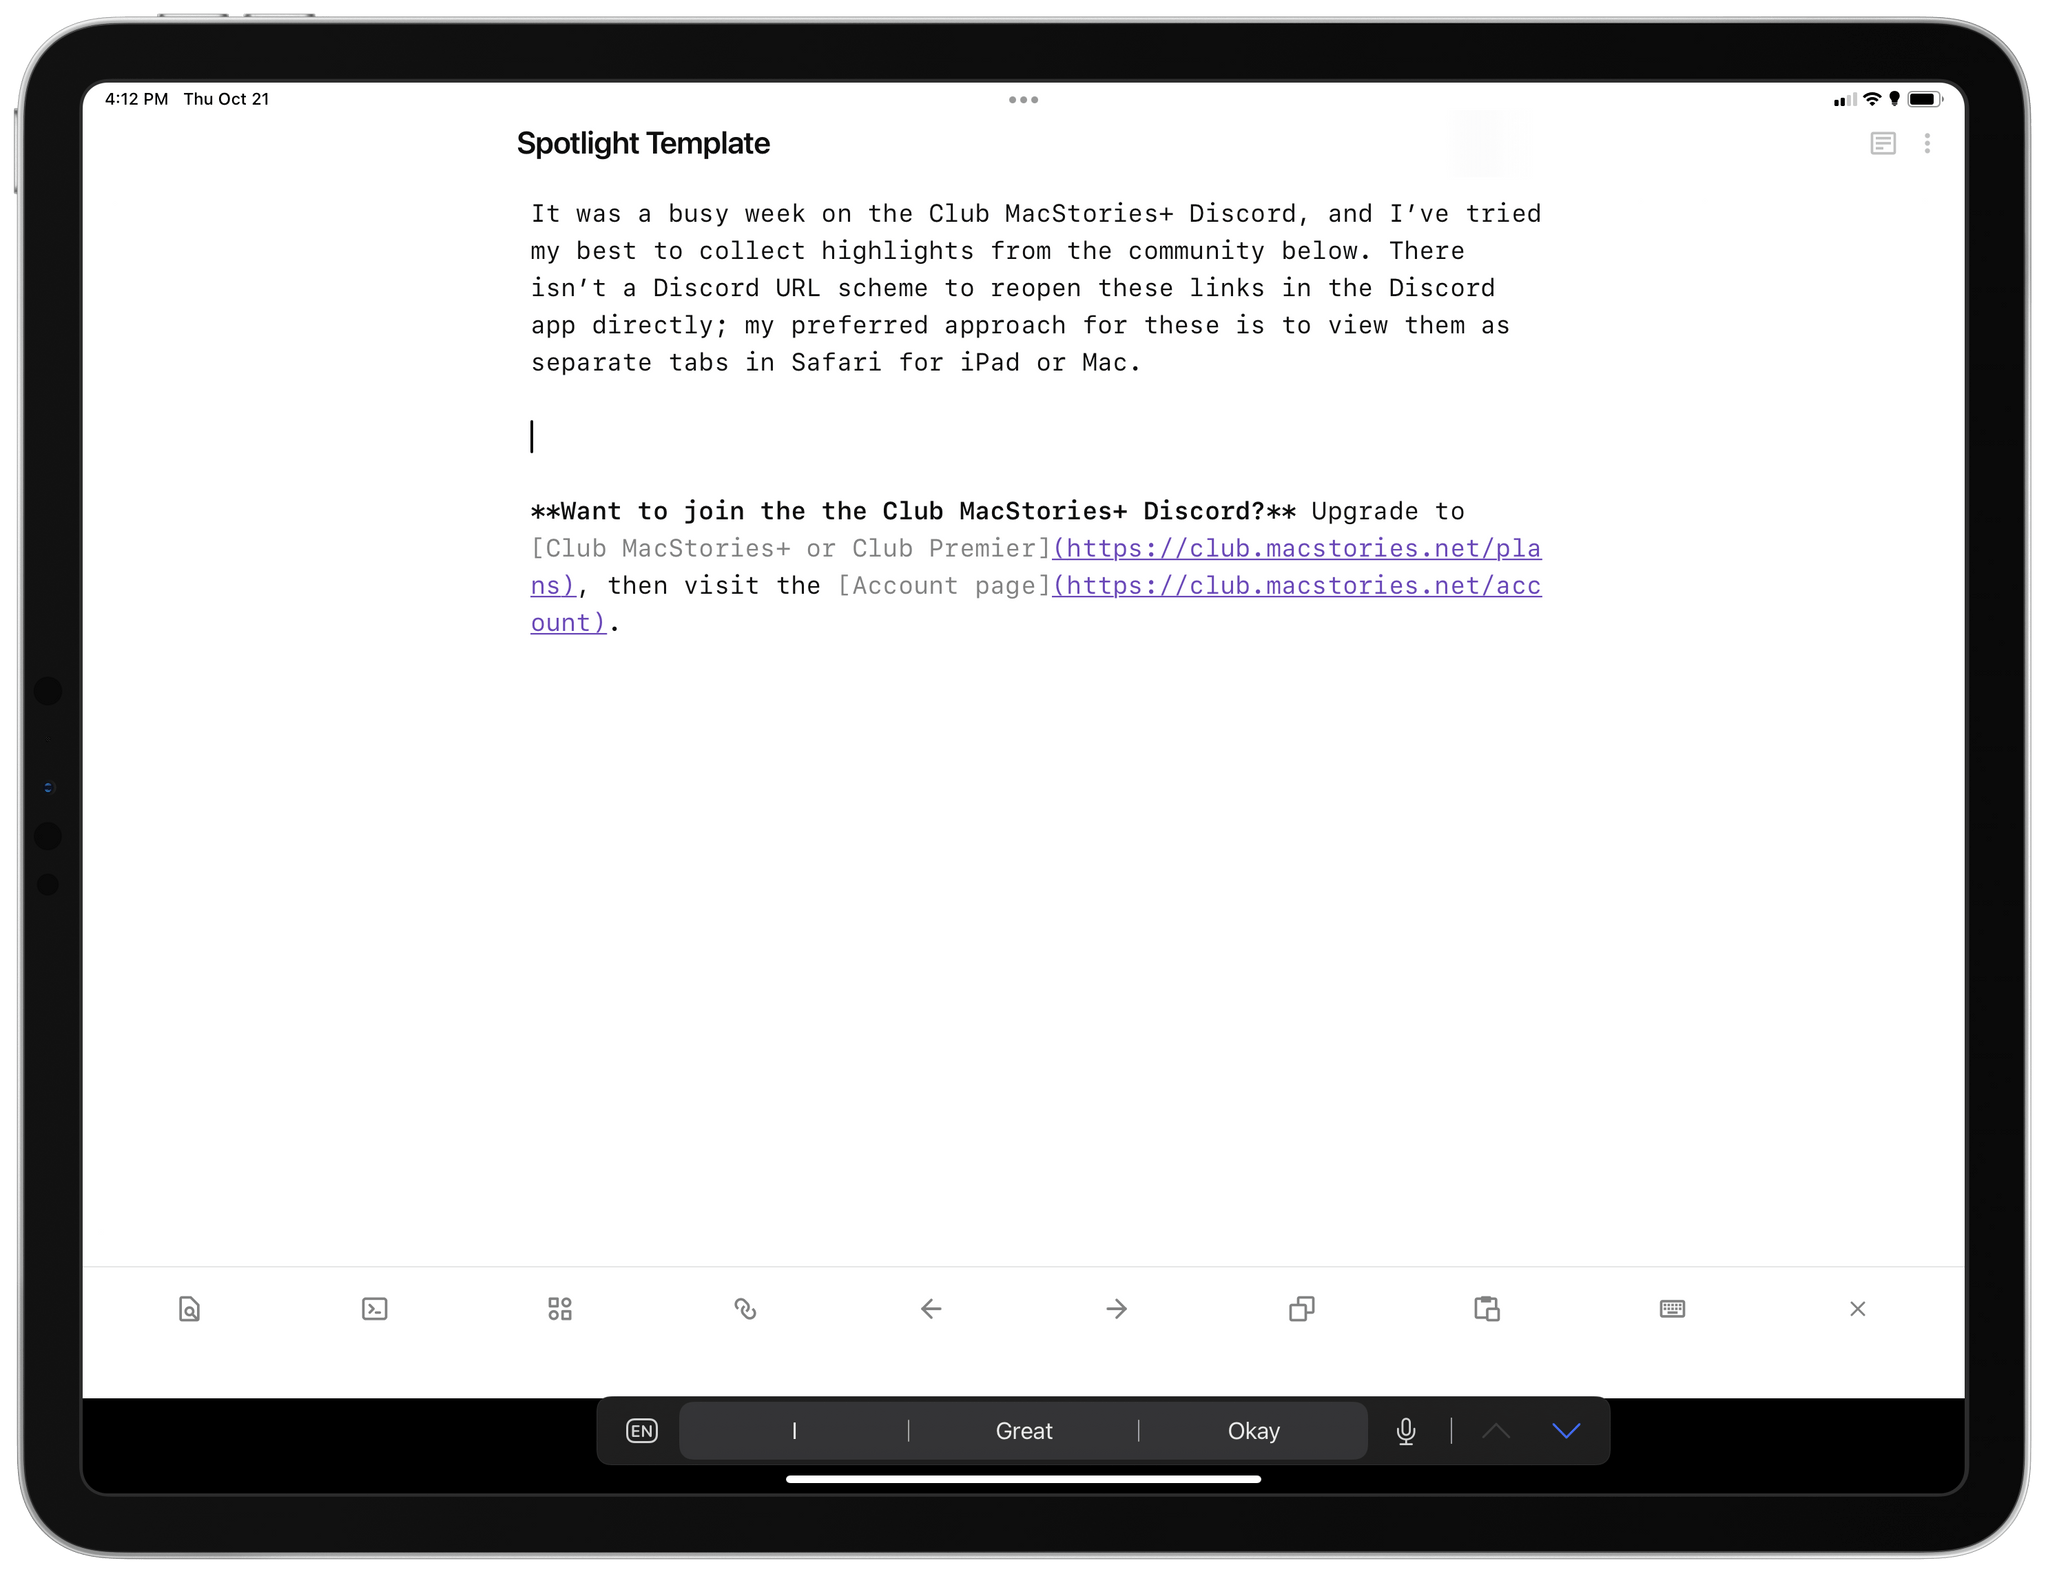
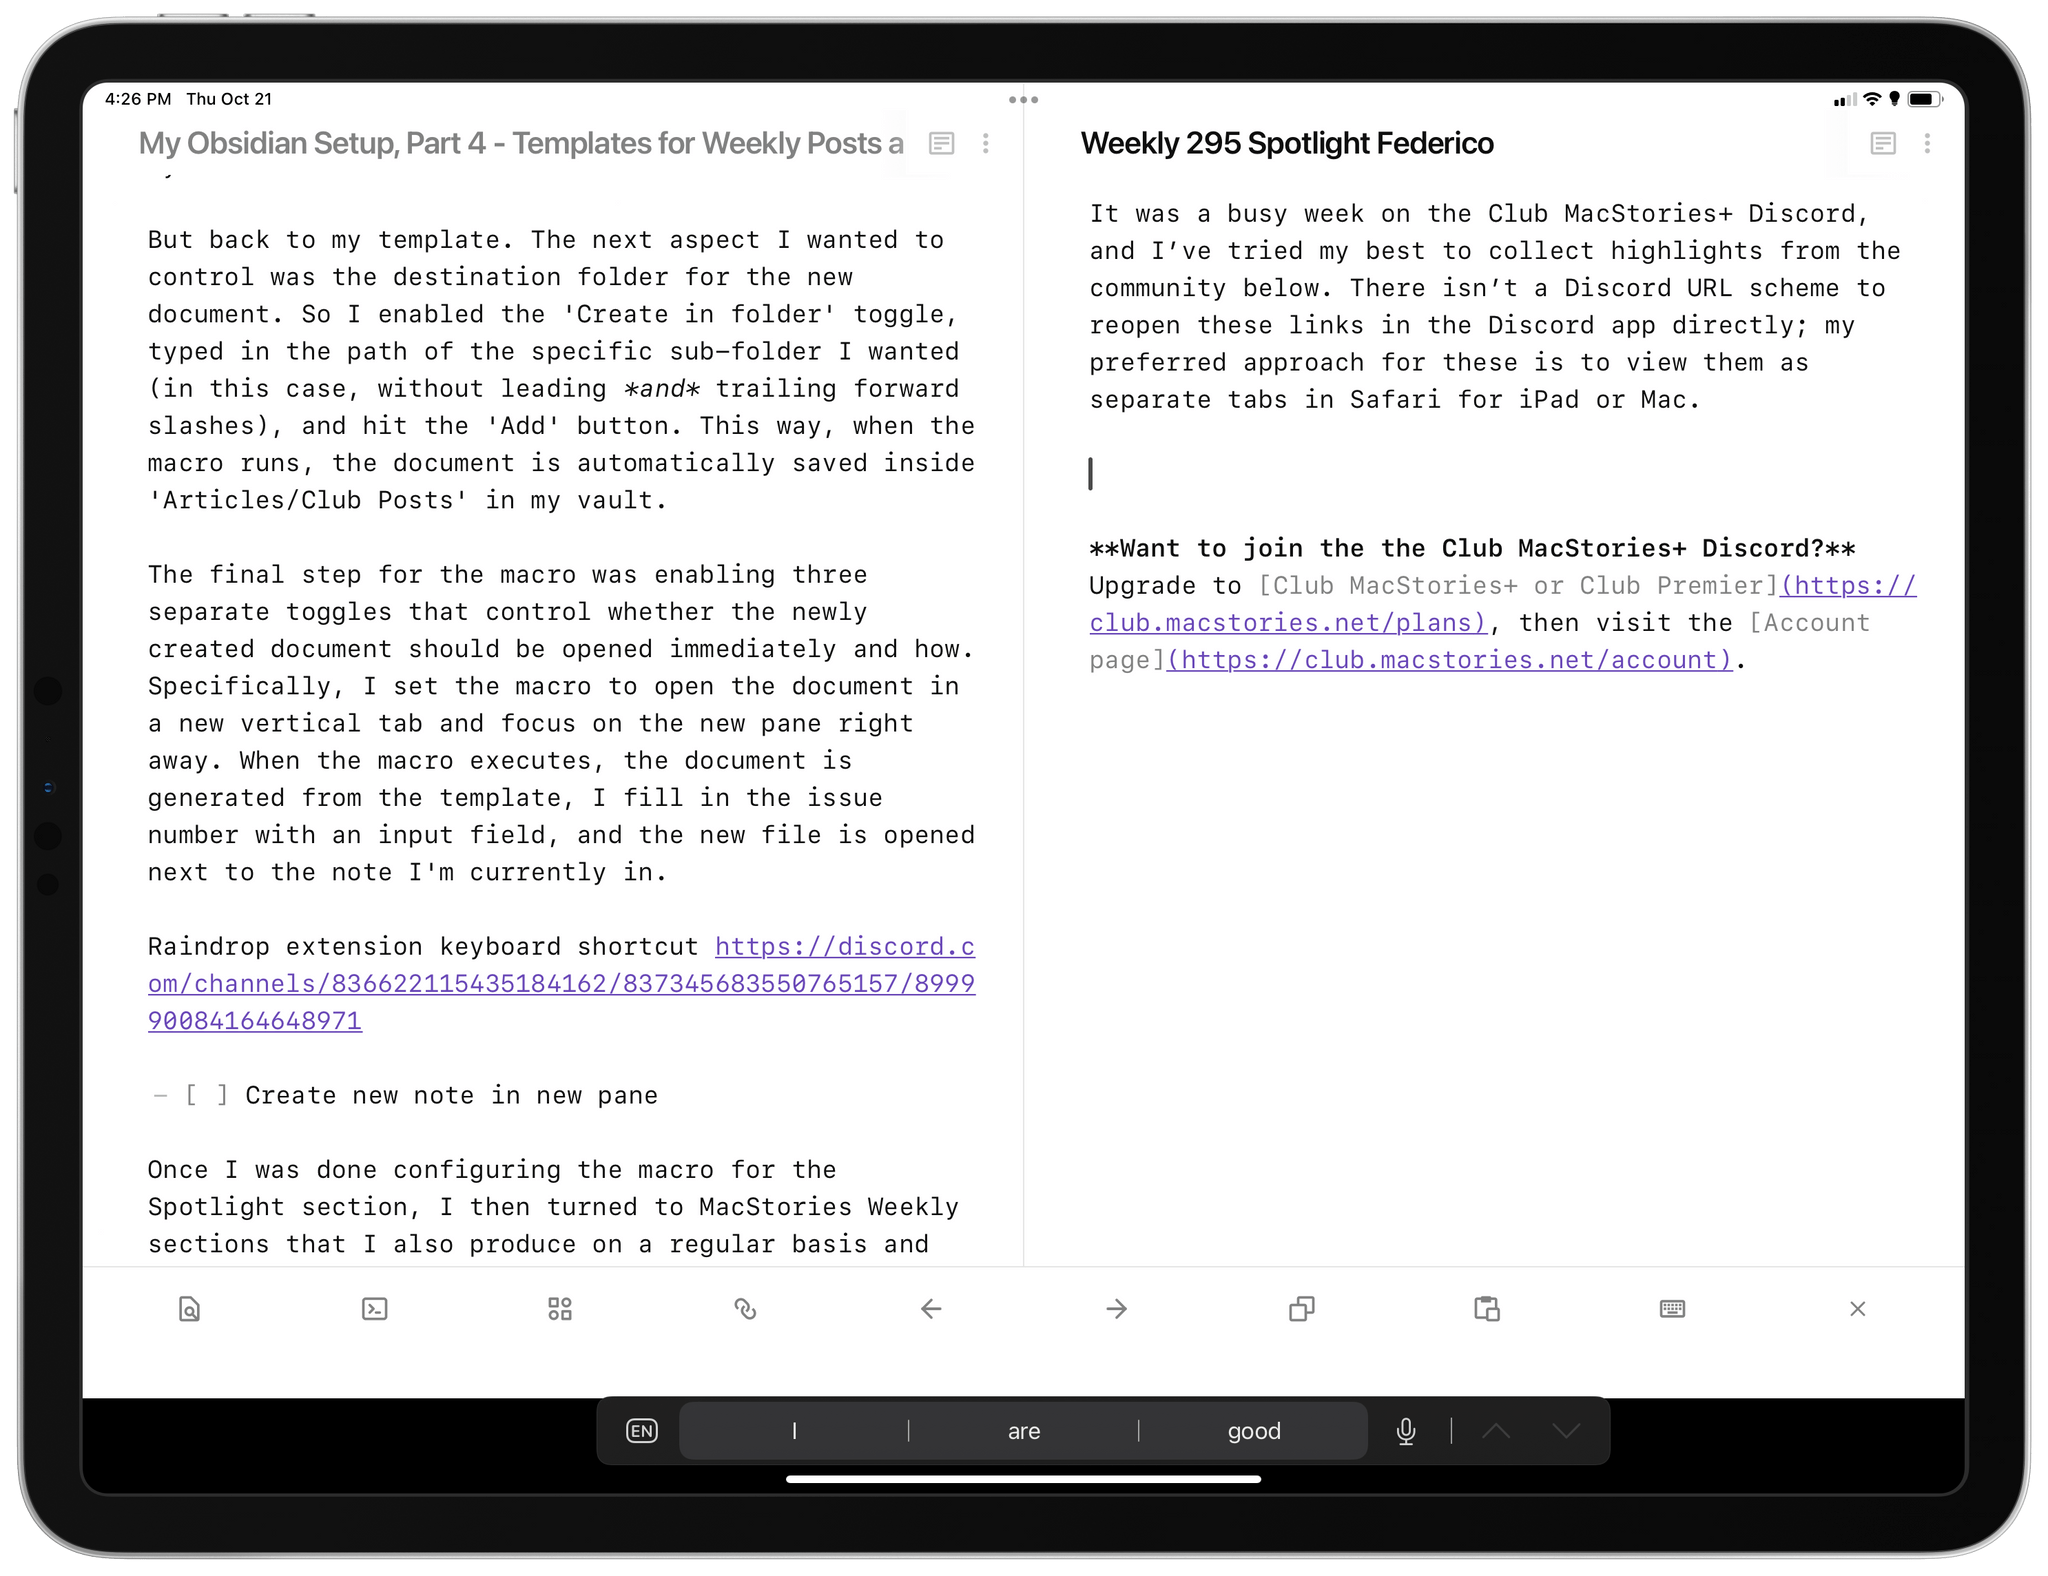
First, I created a document called ‘Spotlight Template.md’ and saved it into a ‘Templates’ folder in my Obsidian vault. The template document is, essentially, a shell version of MacStories Weekly’s Spotlight section with an introduction and footer already filled in.
My template document for the Spotlight section.
Then, I opened QuickAdd’s settings, pressed ‘Manage Macros’, created a new macro called ‘Create Spotlight Template’, and hit the ‘Configure’ button next to it. From the macro management screen, I chose the ‘Template’ option, which added a template action to the macro.
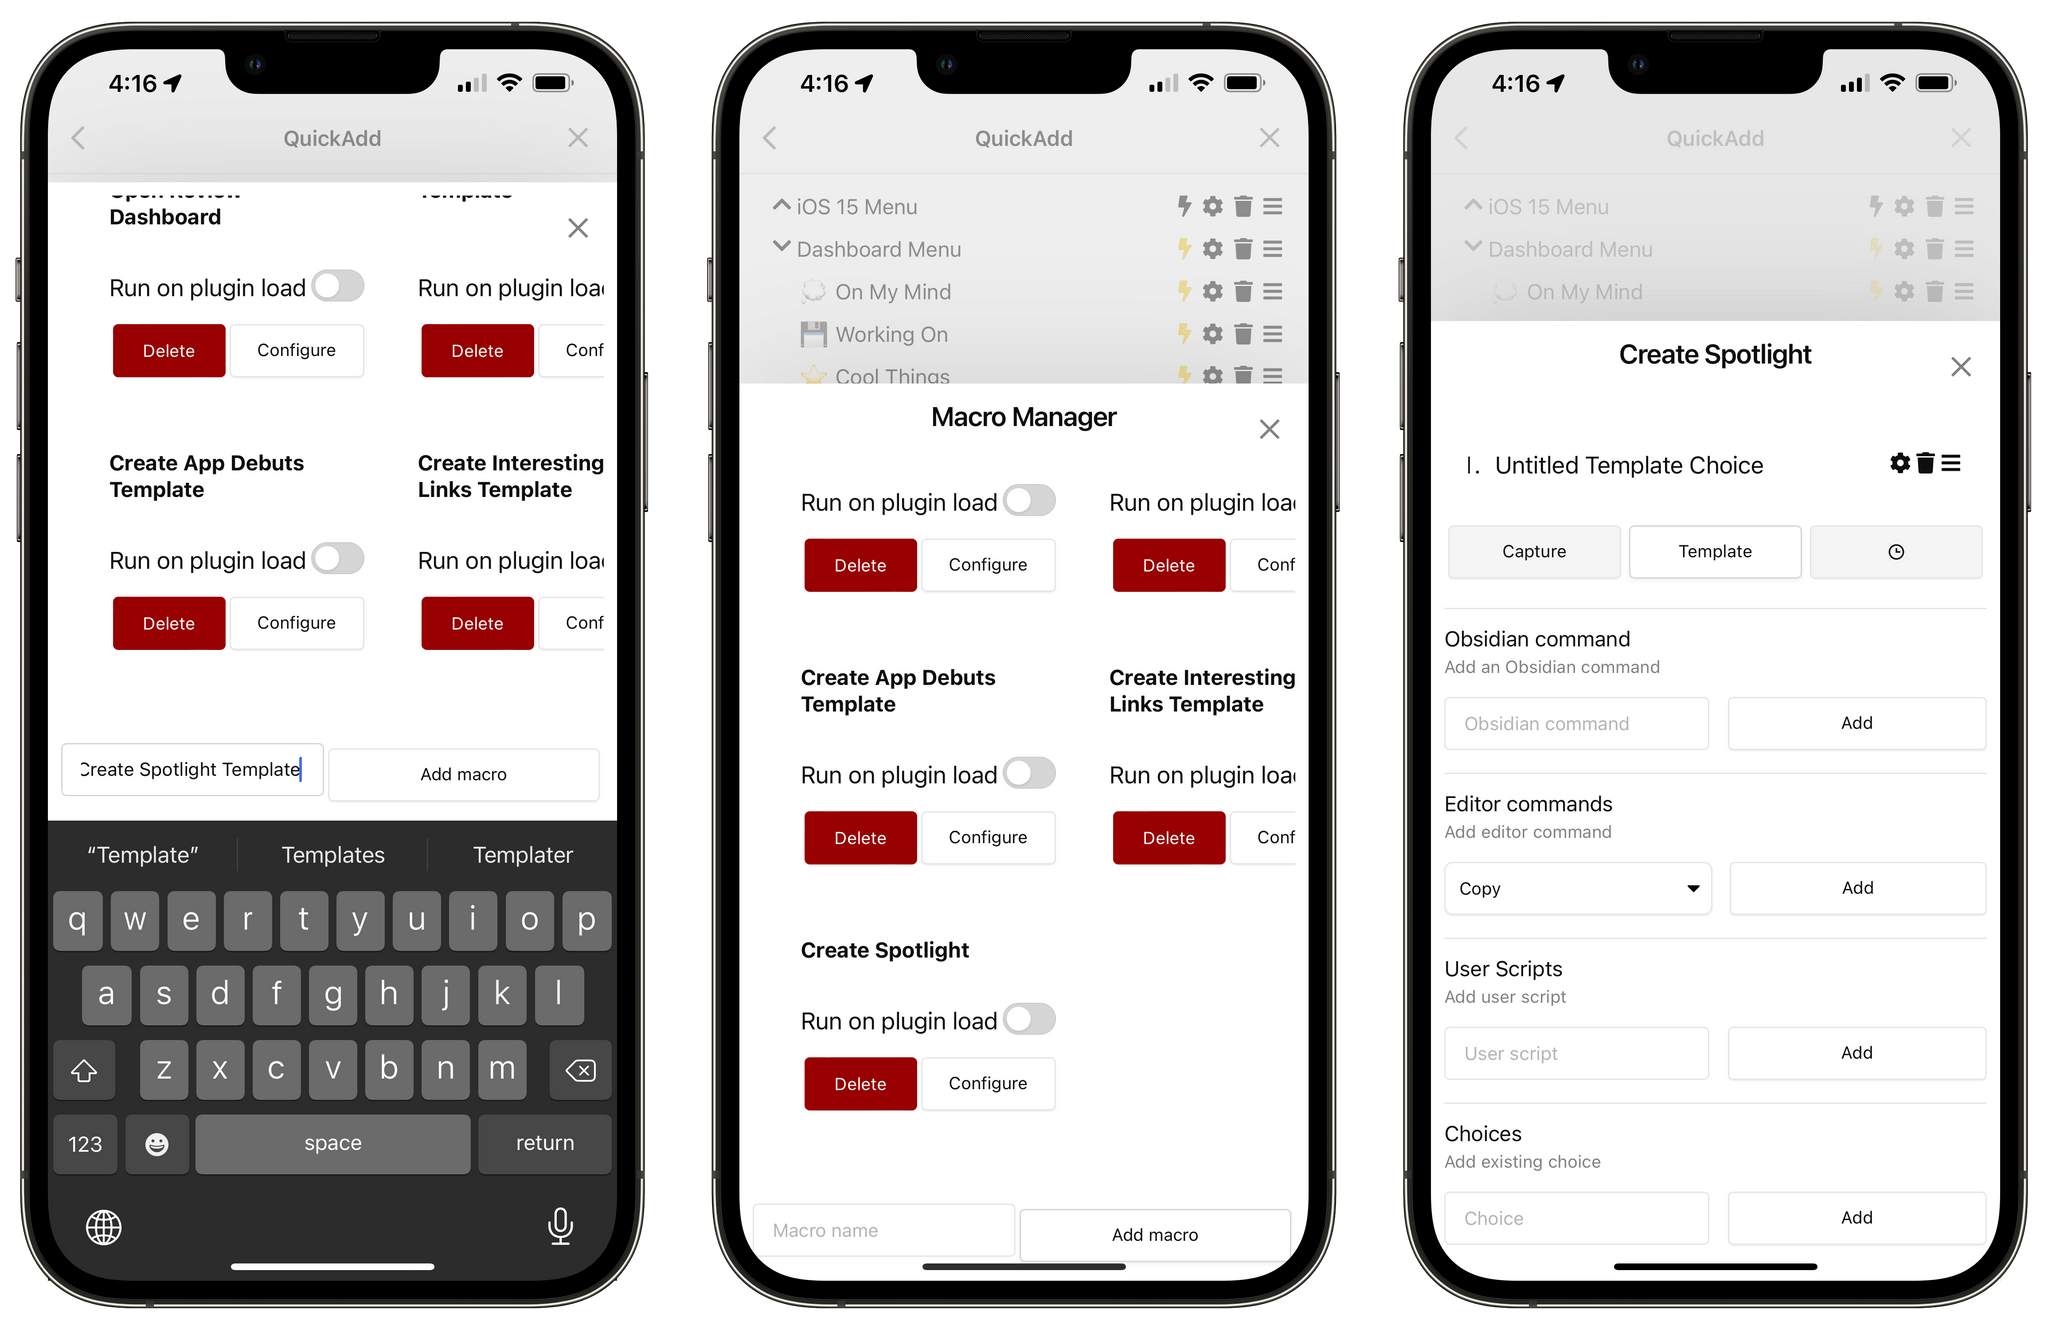 Creating a new macro for a template in QuickAdd’s settings.
At this point, I had a new macro in QuickAdd based on a template action, which is what I needed, but I had to configure the template too. So I tapped the gear icon next to ‘Untitled Template Choice’ and I was taken into a secondary template configuration page for the macro, which is where the magic happens. If you want to configure macros that create notes based on templates in Obsidian, you’ll have to follow the steps listed below, so be careful now.
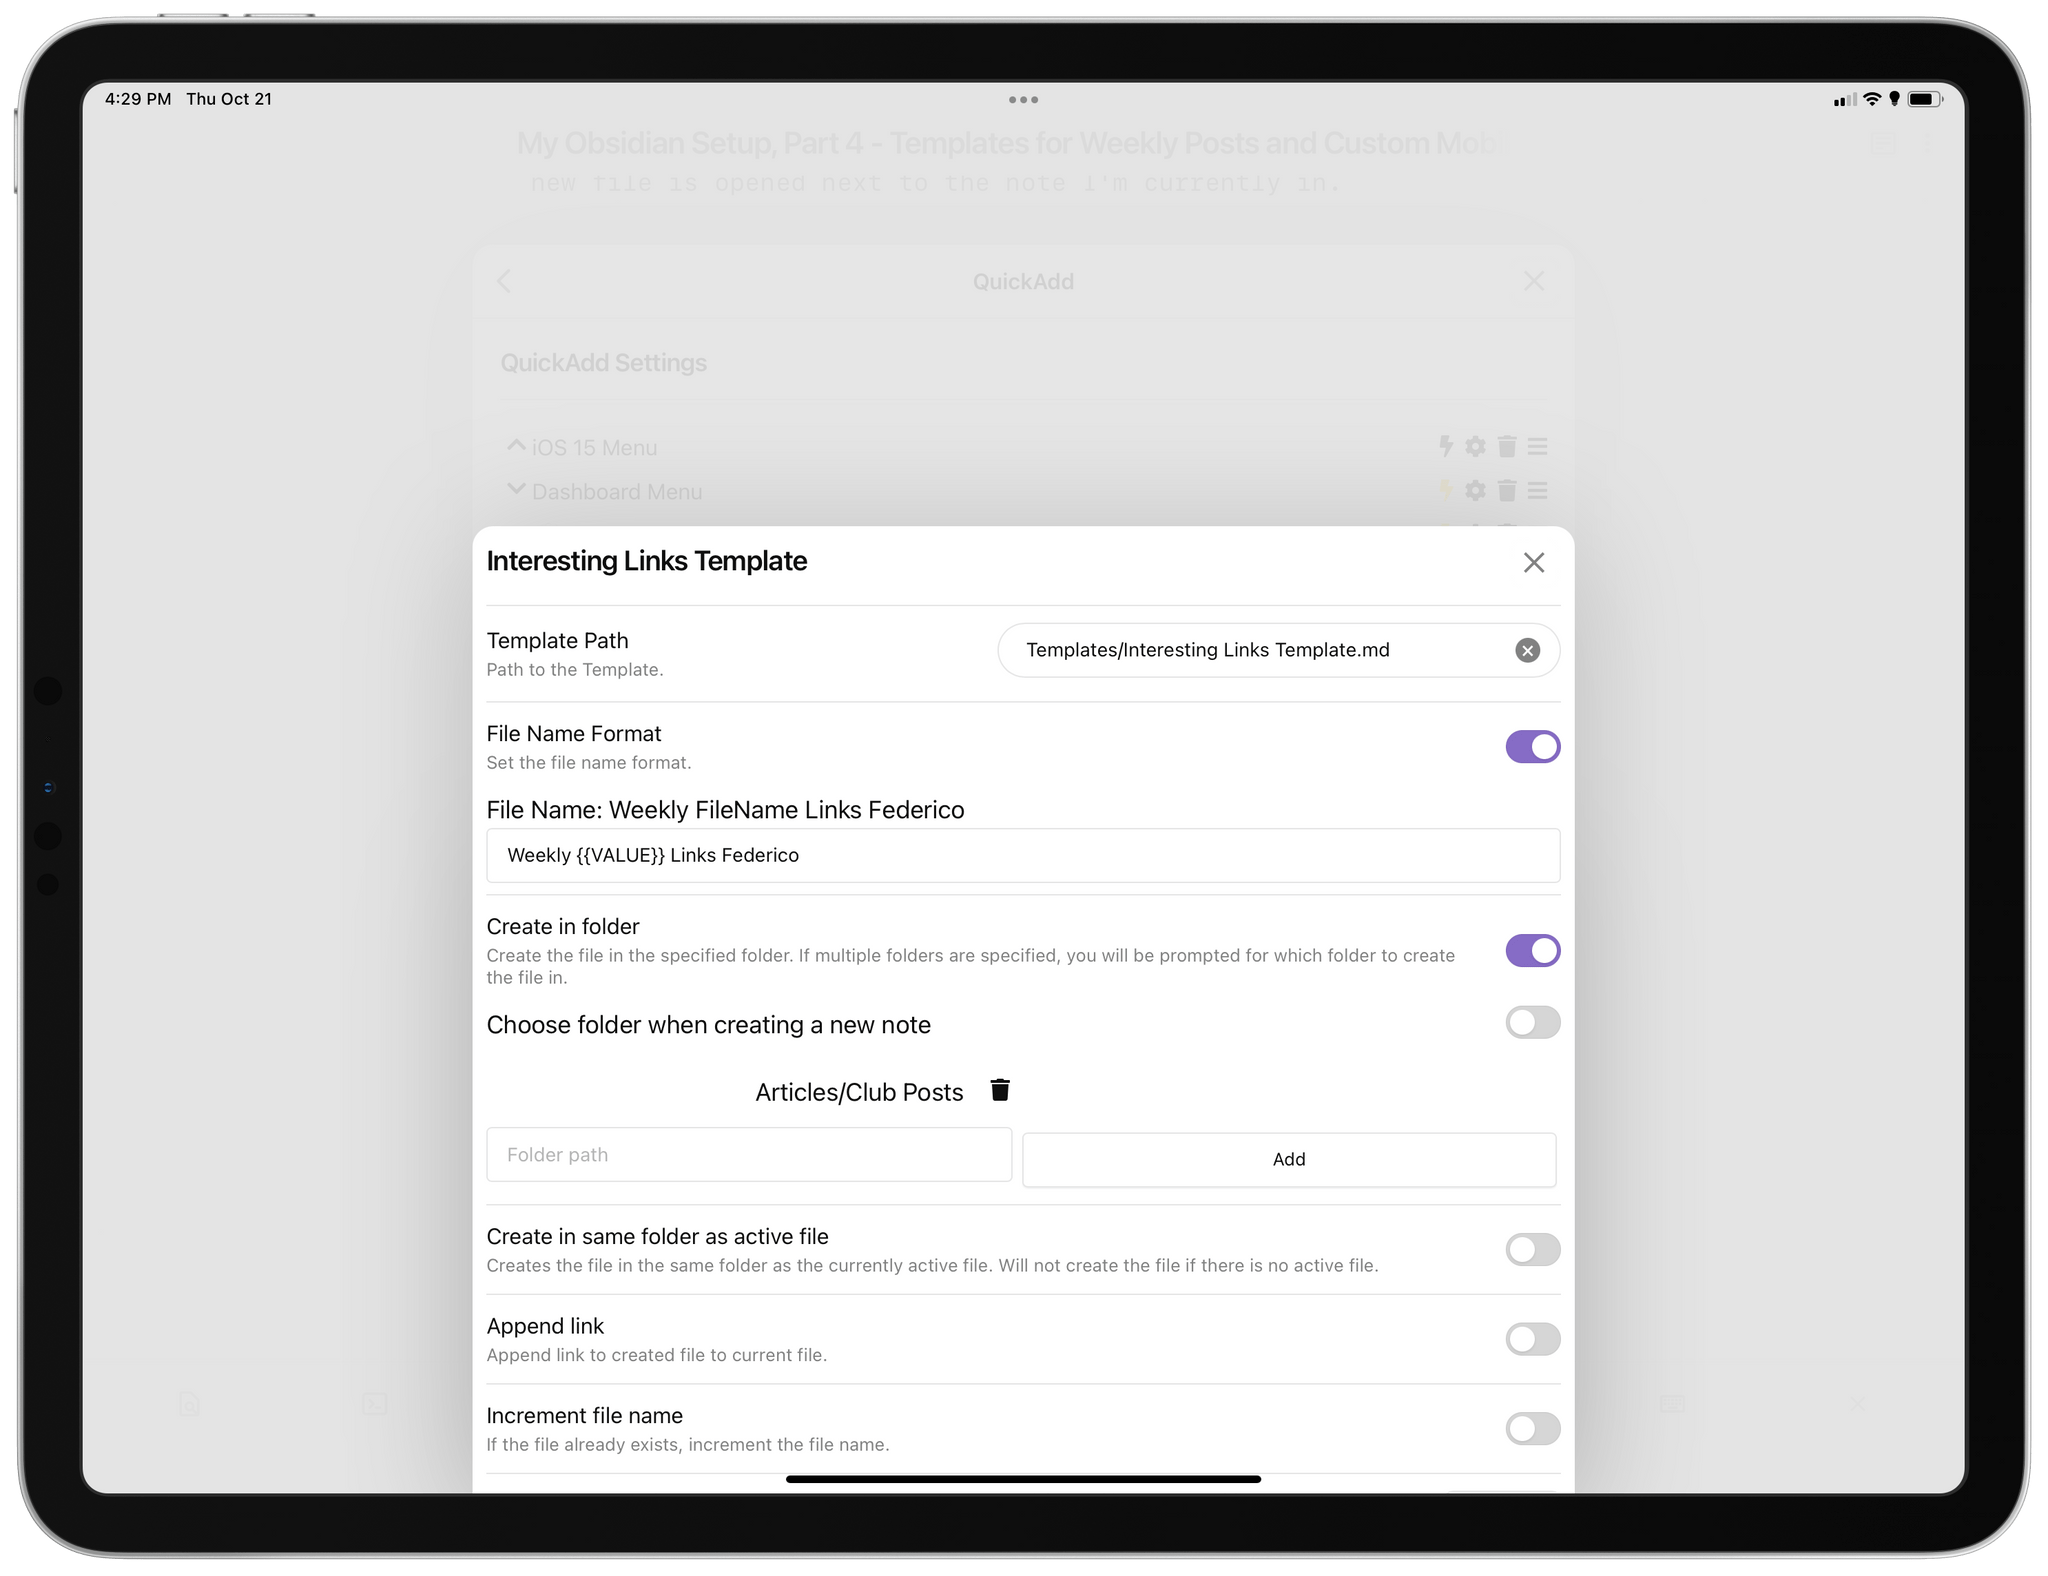
The first field that needs to be tweaked is the ‘Template Path’ one. This field tells QuickAdd where to find the template file that will be used to create a new note, and it needs to be an absolute file path that points to the document I mentioned above. In my case, I inserted ‘Templates/Spotlight Template.md’ without a leading forward slash (I don’t know why, but QuickAdd doesn’t like those).
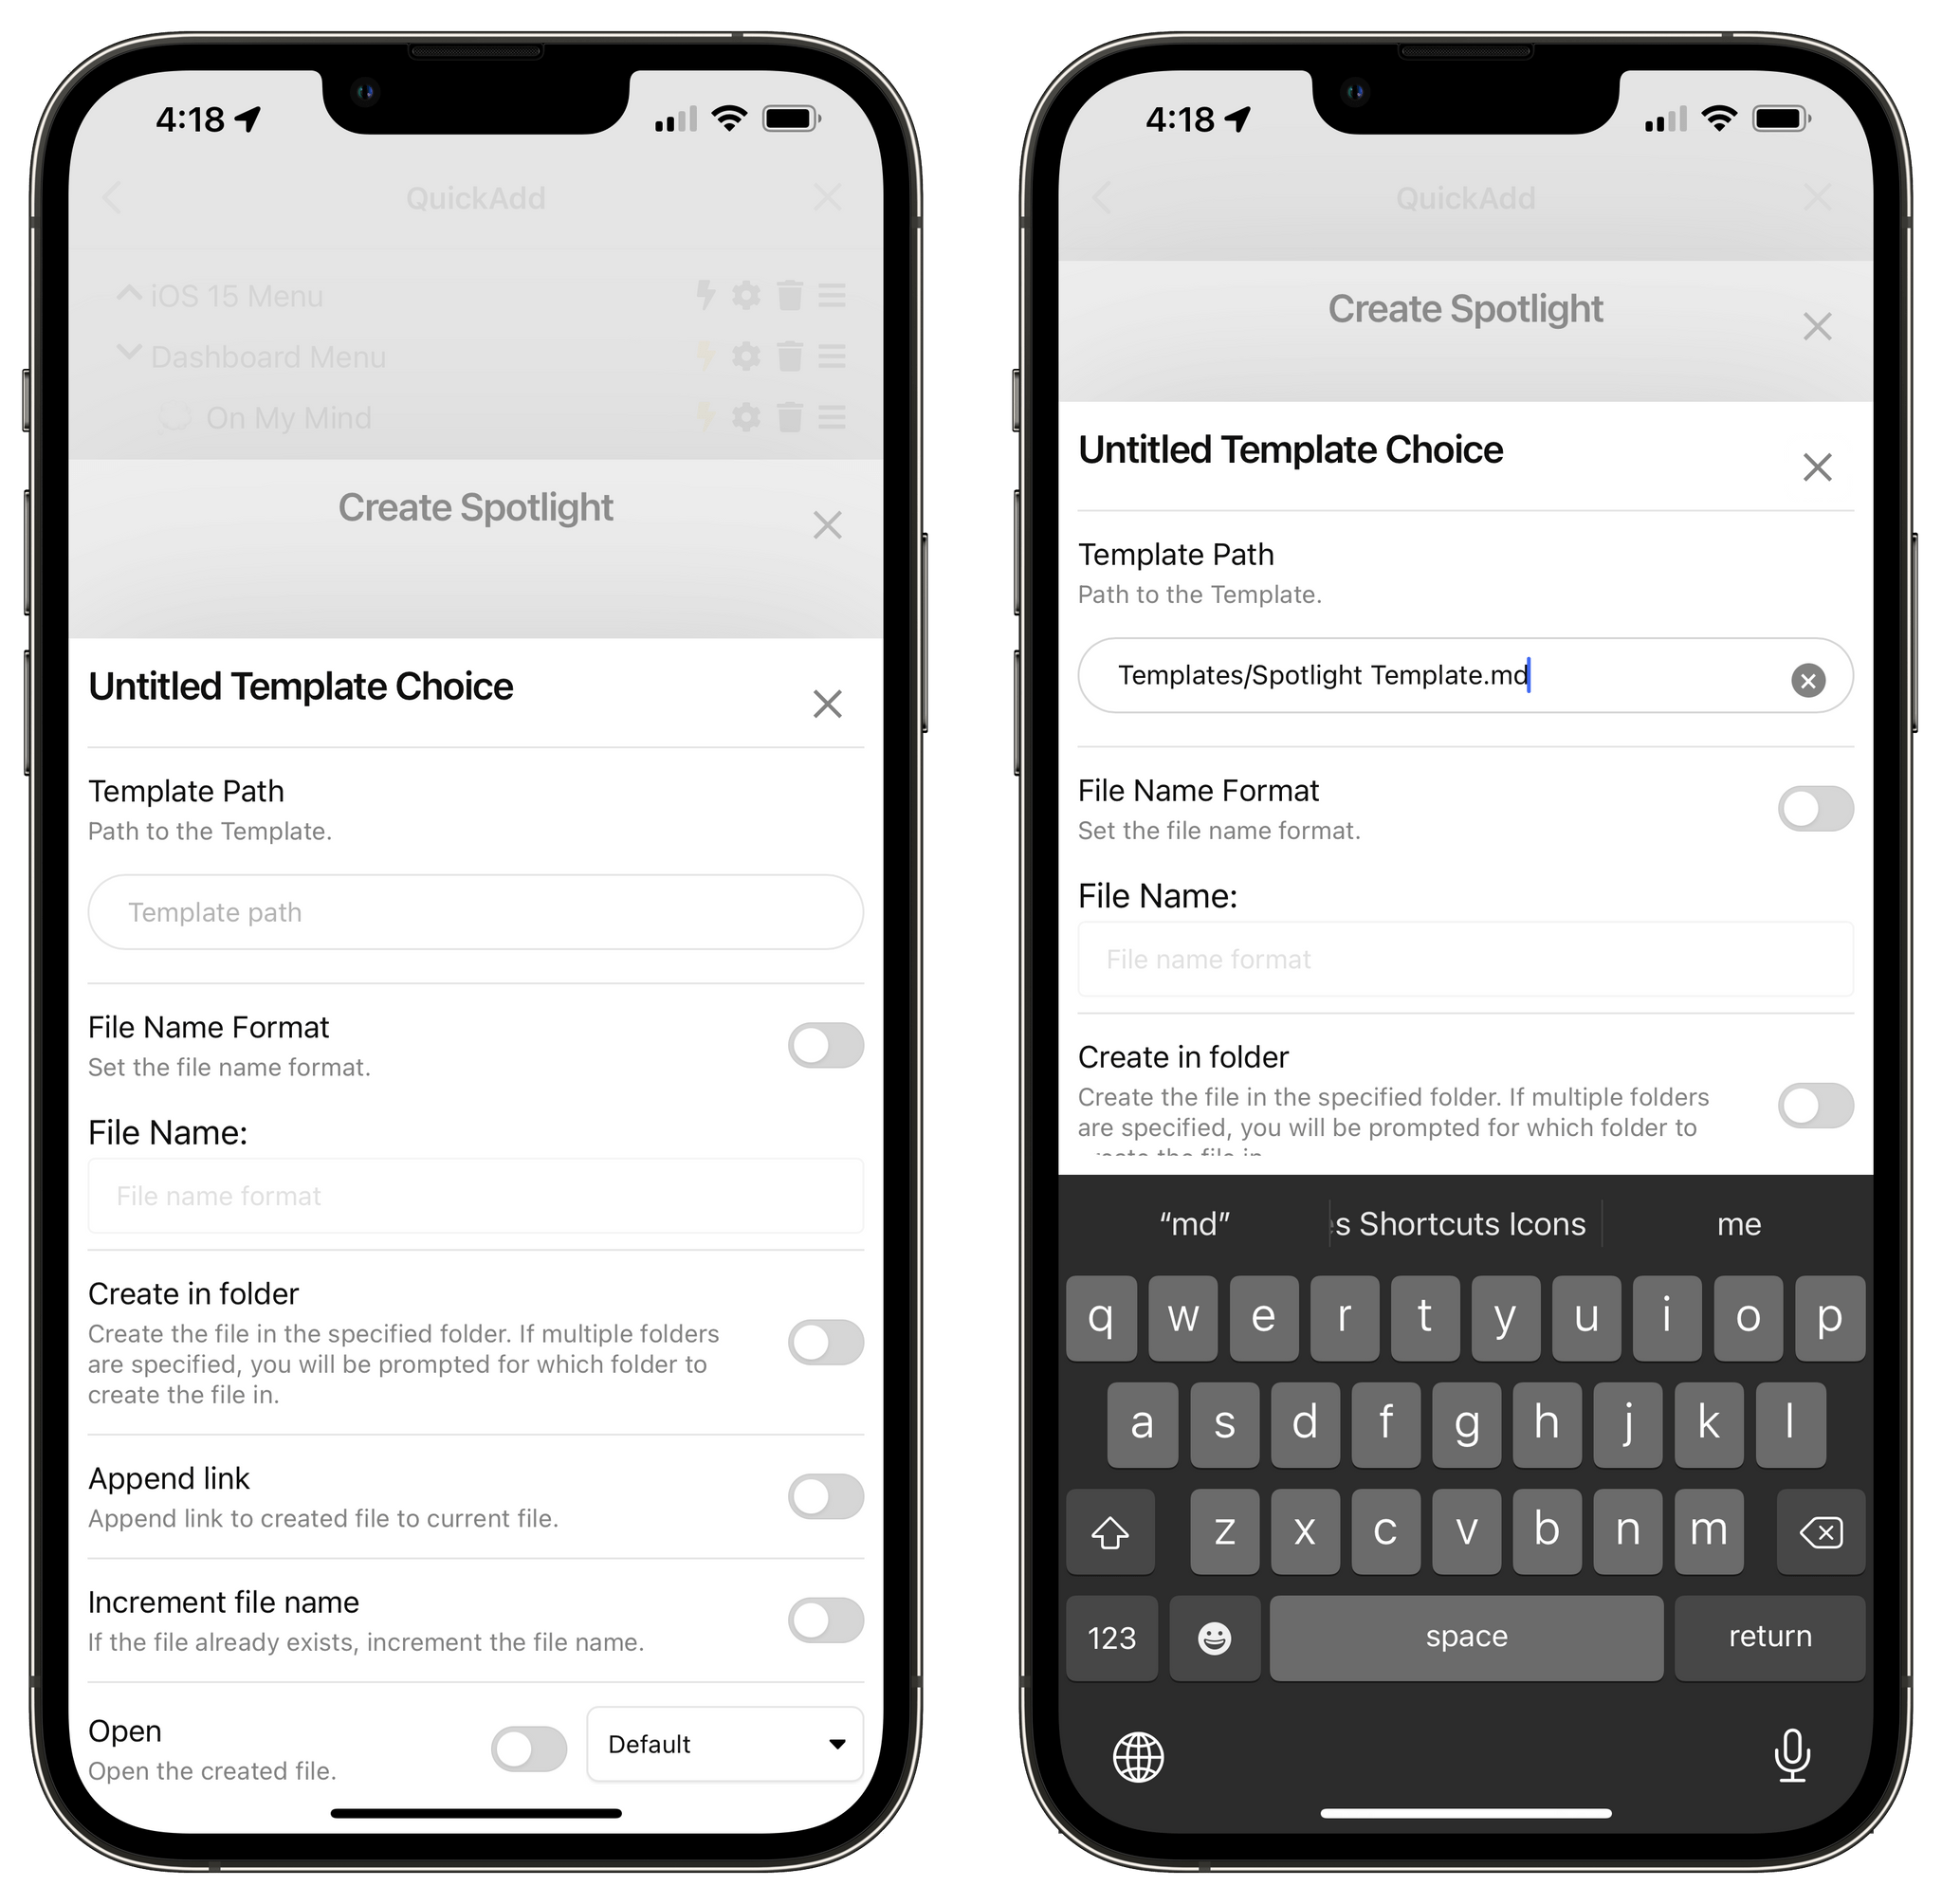 Configuring the template path for the macro.
With the template set, I then needed to ensure QuickAdd would name the document with a fixed structure except for the issue number of MacStories Weekly. That was the tricky part to figure out: I can name a document ‘Weekly Spotlight Federico’ just fine, but how can Obsidian know that the next issue of MacStories Weekly is, say, ‘295’?
The beauty of QuickAdd and its macro system is that you can freely mix and match static content and user interaction within the same text field. Put simply: QuickAdd lets you define values that are filled in with manual user input when the macro runs. Think of this ability as the QuickAdd equivalent of Shortcuts’ ‘Ask When Run’ variable: when the macro executes, you can put in a special variable that is only “resolved” by typing something in yourself at runtime.
If you remember, I also covered this back in August when I explained how QuickAdd allowed me to quickly append text to my Dashboard note by bringing up a text input field. Well, the same system can be used to define a portion of the name of a new document that is created from a template. In my case, I included a VALUE variable in between the words ‘Weekly’ and ‘Spotlight’ in the File Name Format text field. When the macro runs and hits this step, it sees the variable, knows that it needs to resolve it with my manual input, and displays an input field where I can manually type in the issue number of the next MacStories Weekly.
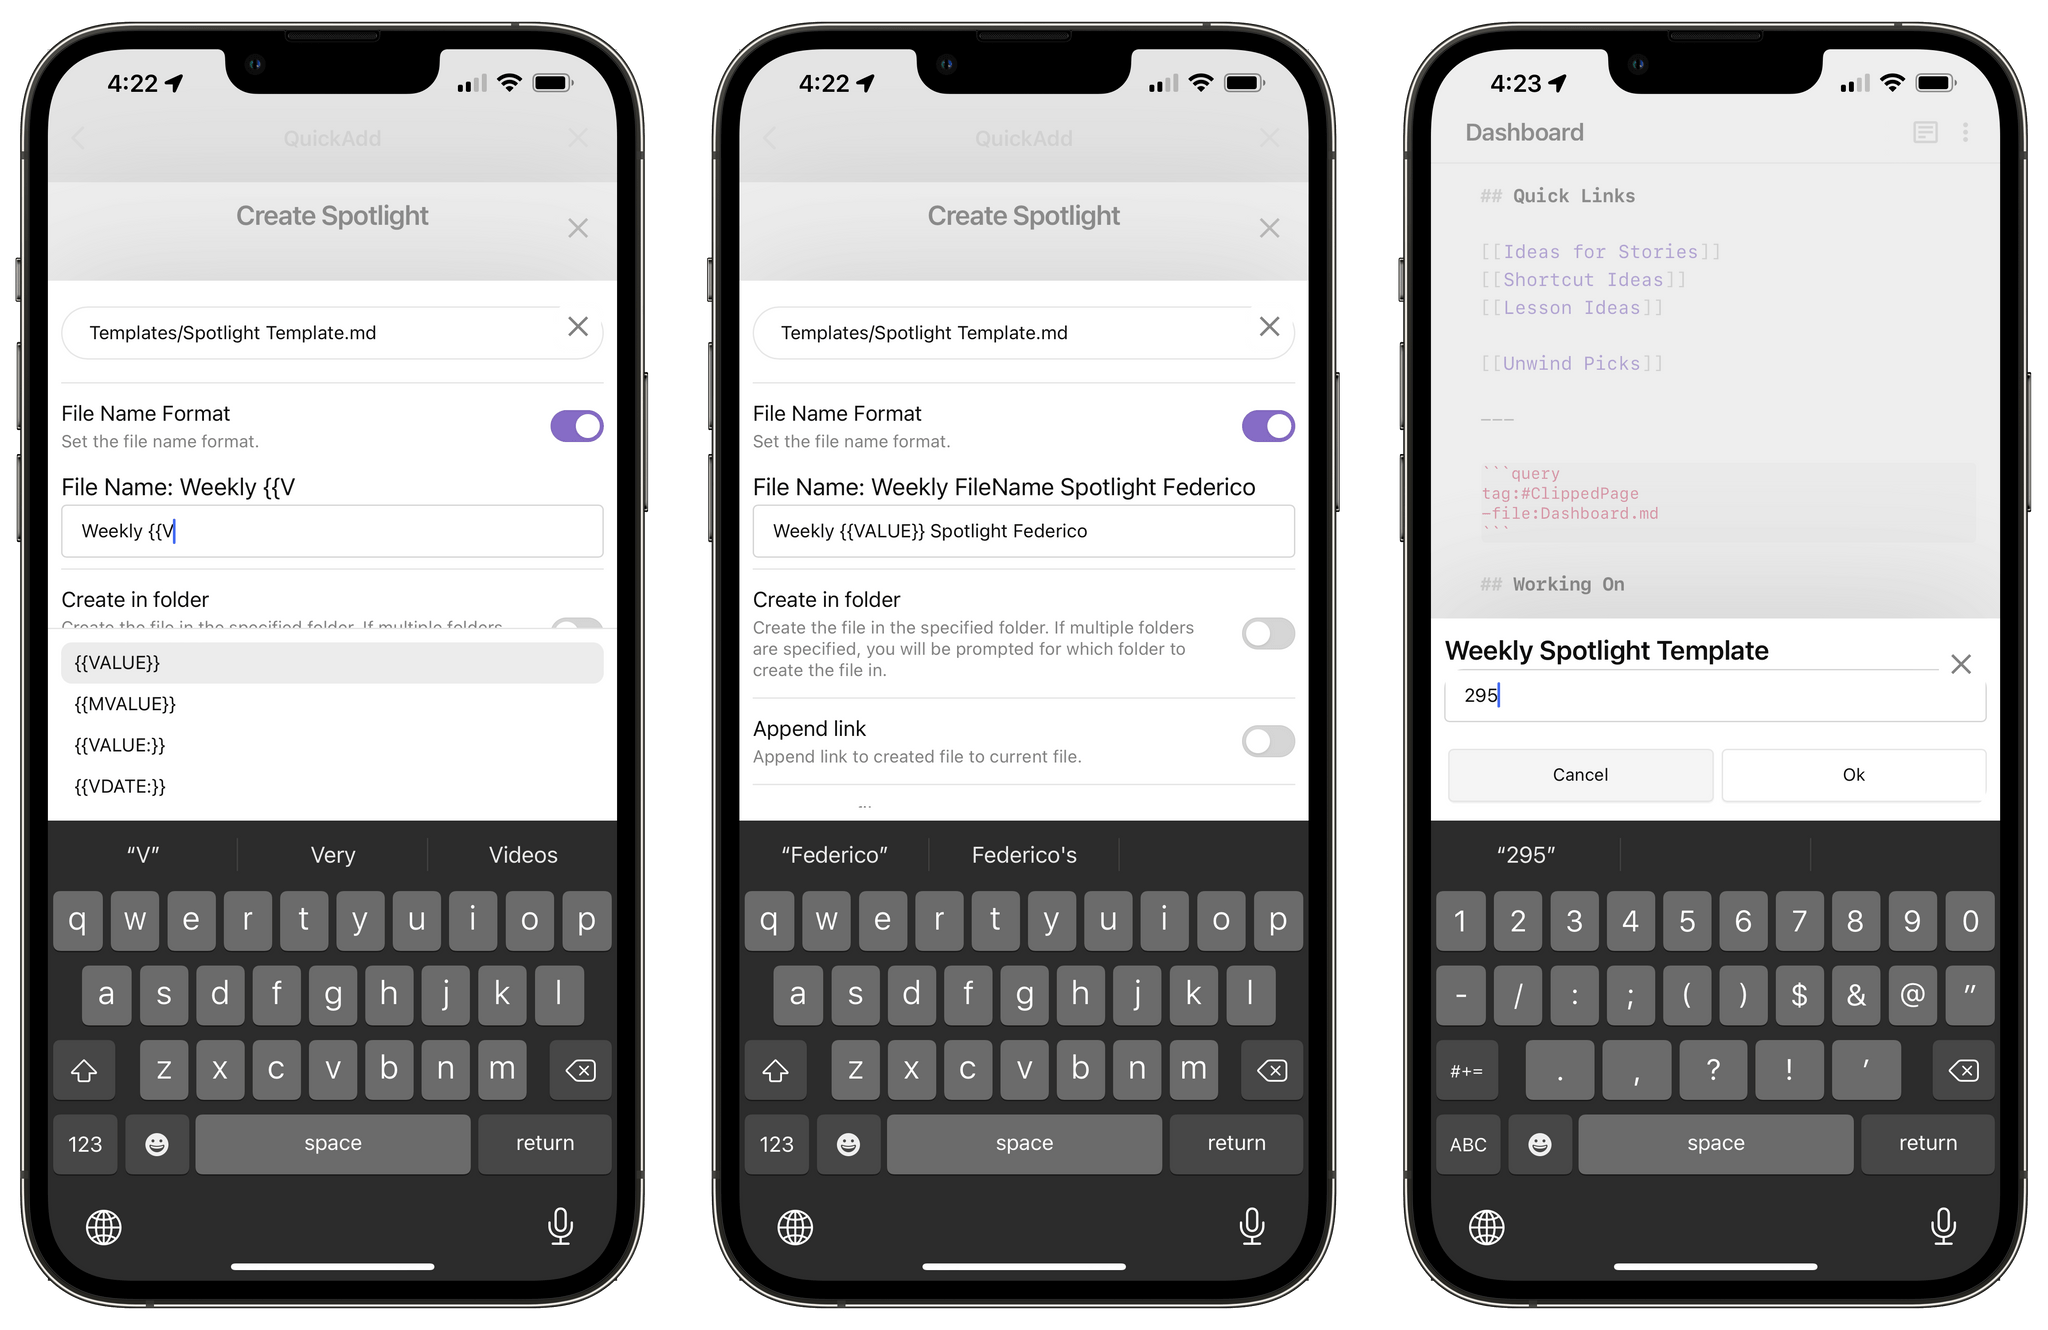 You can display text input fields when a macro runs thanks to QuickAdd.
If you’re interested in exploring QuickAdd variables, you can read the official documentation here. There’s a lot you could potentially do with dates, linking current documents (which I also covered in Part 3), or even writing LaTeX formulas. I plan to cover other implementations of this format syntax in the future.
But back to my template. The next aspect I wanted to control was the destination folder for the new document. So I enabled the ‘Create in folder’ toggle, typed in the path of the specific sub-folder I wanted (in this case, without leading and trailing forward slashes), and hit the ‘Add’ button. This way, when the macro runs, the document is automatically saved inside ‘Articles/Club Posts’ in my vault.
The final step for the macro was enabling three separate toggles that control whether the newly created document should be opened immediately and how. Specifically, I set the macro to open the document in a new vertical tab and focus on the new pane right away. When the macro executes, the document is generated from the template, I fill in the issue number with an input field, and the new file is opened next to the note I’m currently in.
Once I was done configuring the macro for the Spotlight section, I then turned to MacStories Weekly sections that I also produce on a regular basis and that need to have a consistent naming structure: App Debuts and Interesting Links. In this case, however, templates for these sections don’t need to have any boilerplate – just a static filename with a “dynamic” issue number. So I replicated the same setup as Spotlight with empty templates and a VALUE variable that lets me fill in the issue number manually.
 My template macro for the Interesting Links section of MacStories Weekly.
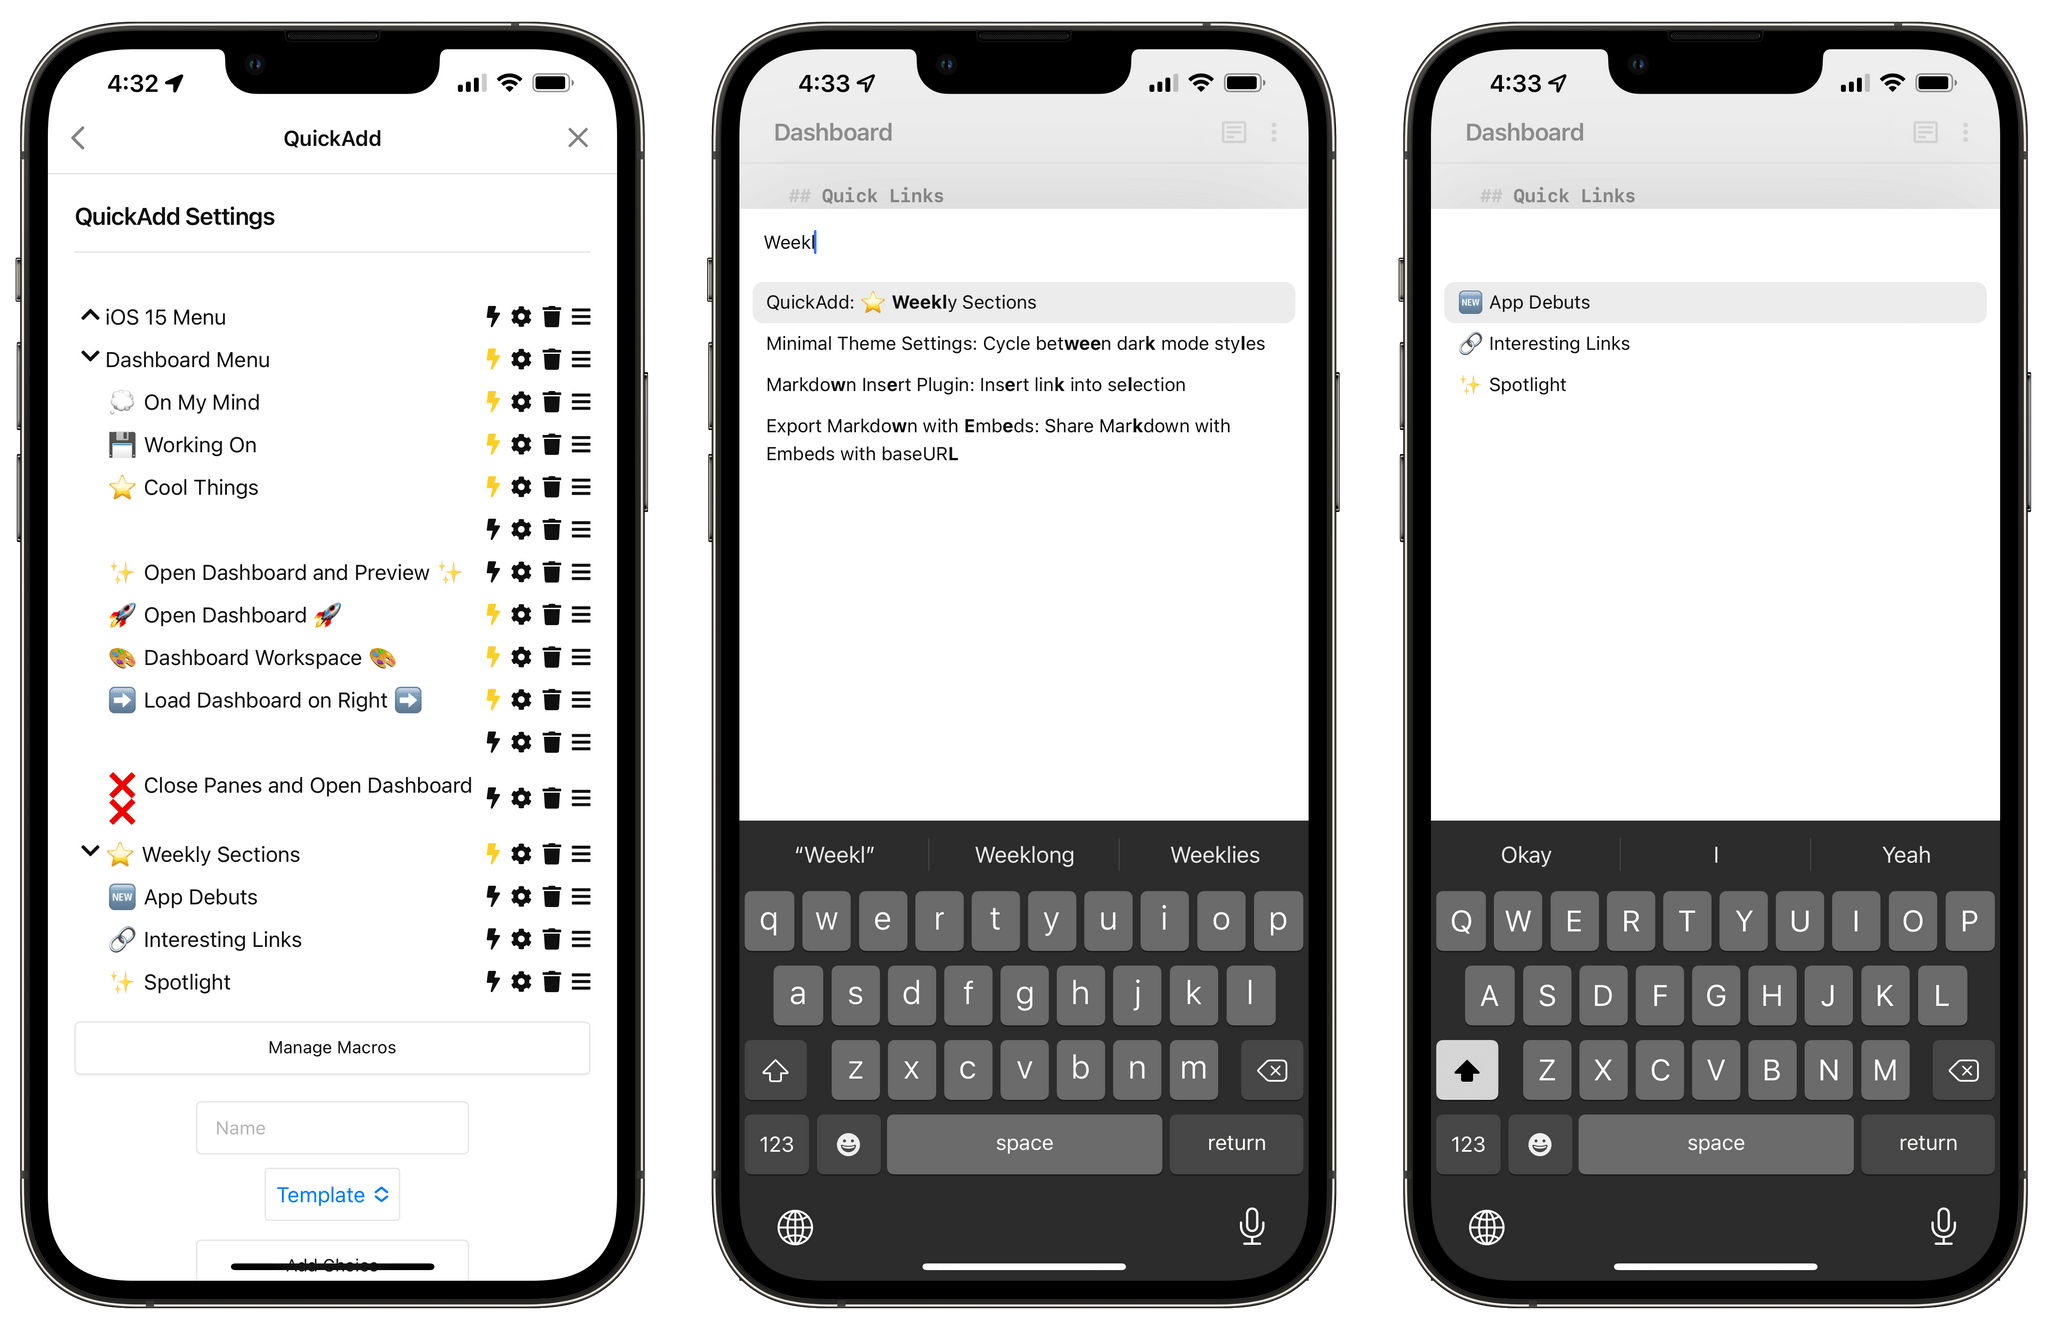
You may be wondering now: how do I remember how to trigger these individual macros? As I explained in Part 3 of the series, I like to take advantage of QuickAdd’s ability to group multiple macros together in a visual menu. Rather than remember multiple names and hotkeys for each individual macro, I can put them all inside a single ‘command palette’ and memorize just one name and hotkey. I can then select items in the palette with the pointer, arrow keys, or by typing a few letters of their name and pressing Enter.
 My command palette for MacStories Weekly templates.
To collect my three template macros in a single command palette, I opened QuickAdd’s settings and added a new ‘Multi’ choice as a first step. The ‘Multi’ choices in QuickAdd are the command palettes that let you choose and filter multiple macro ‘choices’ with a popup in the middle of the screen. I then created three separate ‘Macro’ choices, assigned each one the macros I previously configured, and dragged them with the dragging handle (the three vertical lines) inside the ‘Multi’ menu. In my screenshots, it’s the one called ‘Weekly Sections’ and you can see how three choices are nested inside it. Those are the macros that can be triggered by the QuickAdd palette, which I added to Obsidian’s list of command by selecting the lightning bolt icon next to it.
 A ‘Multi’ choice in QuickAdd can present multiple macros to choose from.
Now, whenever I sit down to work on a section of MacStories Weekly I want to recreate with a template, all I have to do is press a hotkey I assigned to this command (⌃⌥⌘S), pick a section, enter an issue number, and a new note gets created from a template in a specific folder in a second.
I recognize that I’ve barely scratched the surface of what QuickAdd and Obsidian can do together when it comes to templates and the Templater engine. However, I’m also a big believer in the idea that automations don’t have to be complex and esoteric to be powerful and useful. My template-based system for MacStories Weekly may not be as fancy as some of the ones you can find on the Obsidian forums, but it’s saving me time every week and it’s producing a consistent output free of typos. That’s a win in my book, and I love how I can trigger all this so easily from the keyboard.
Now, while my most used method for triggering commands on iPad is, by far, the keyboard (either via hotkeys or command name search), I’ve always preferred the ability to activate specific Obsidian features via the mobile toolbar on iPhone.
I previously covered the mobile toolbar in Part 2 of the series, so I won’t rehash that section again. As I covered in July, I like how you can fully customize the toolbar and pin any command from Obsidian as a button you can instantly trigger from above the keyboard. In fact, I soon realized I liked the toolbar so much, I wanted to do even more with it.
Enter Obsidian Advanced Toolbar, a community plugin that lets you extend the default mobile toolbar with multiple rows and the ability to customize icons for any command. Thanks to this plugin, I’ve been able to go from 5 buttons in the mobile toolbar to 10; the number works out nicely on iPhone, where the toolbar automatically reflows to place icons on two rows above the system keyboard. The plugin picks up all the default options you’ve already configured in Obsidian under Settings ⇾ Mobile for the app’s toolbar, and it also works perfectly with Minimal, my favorite theme for Obsidian on Apple platforms.
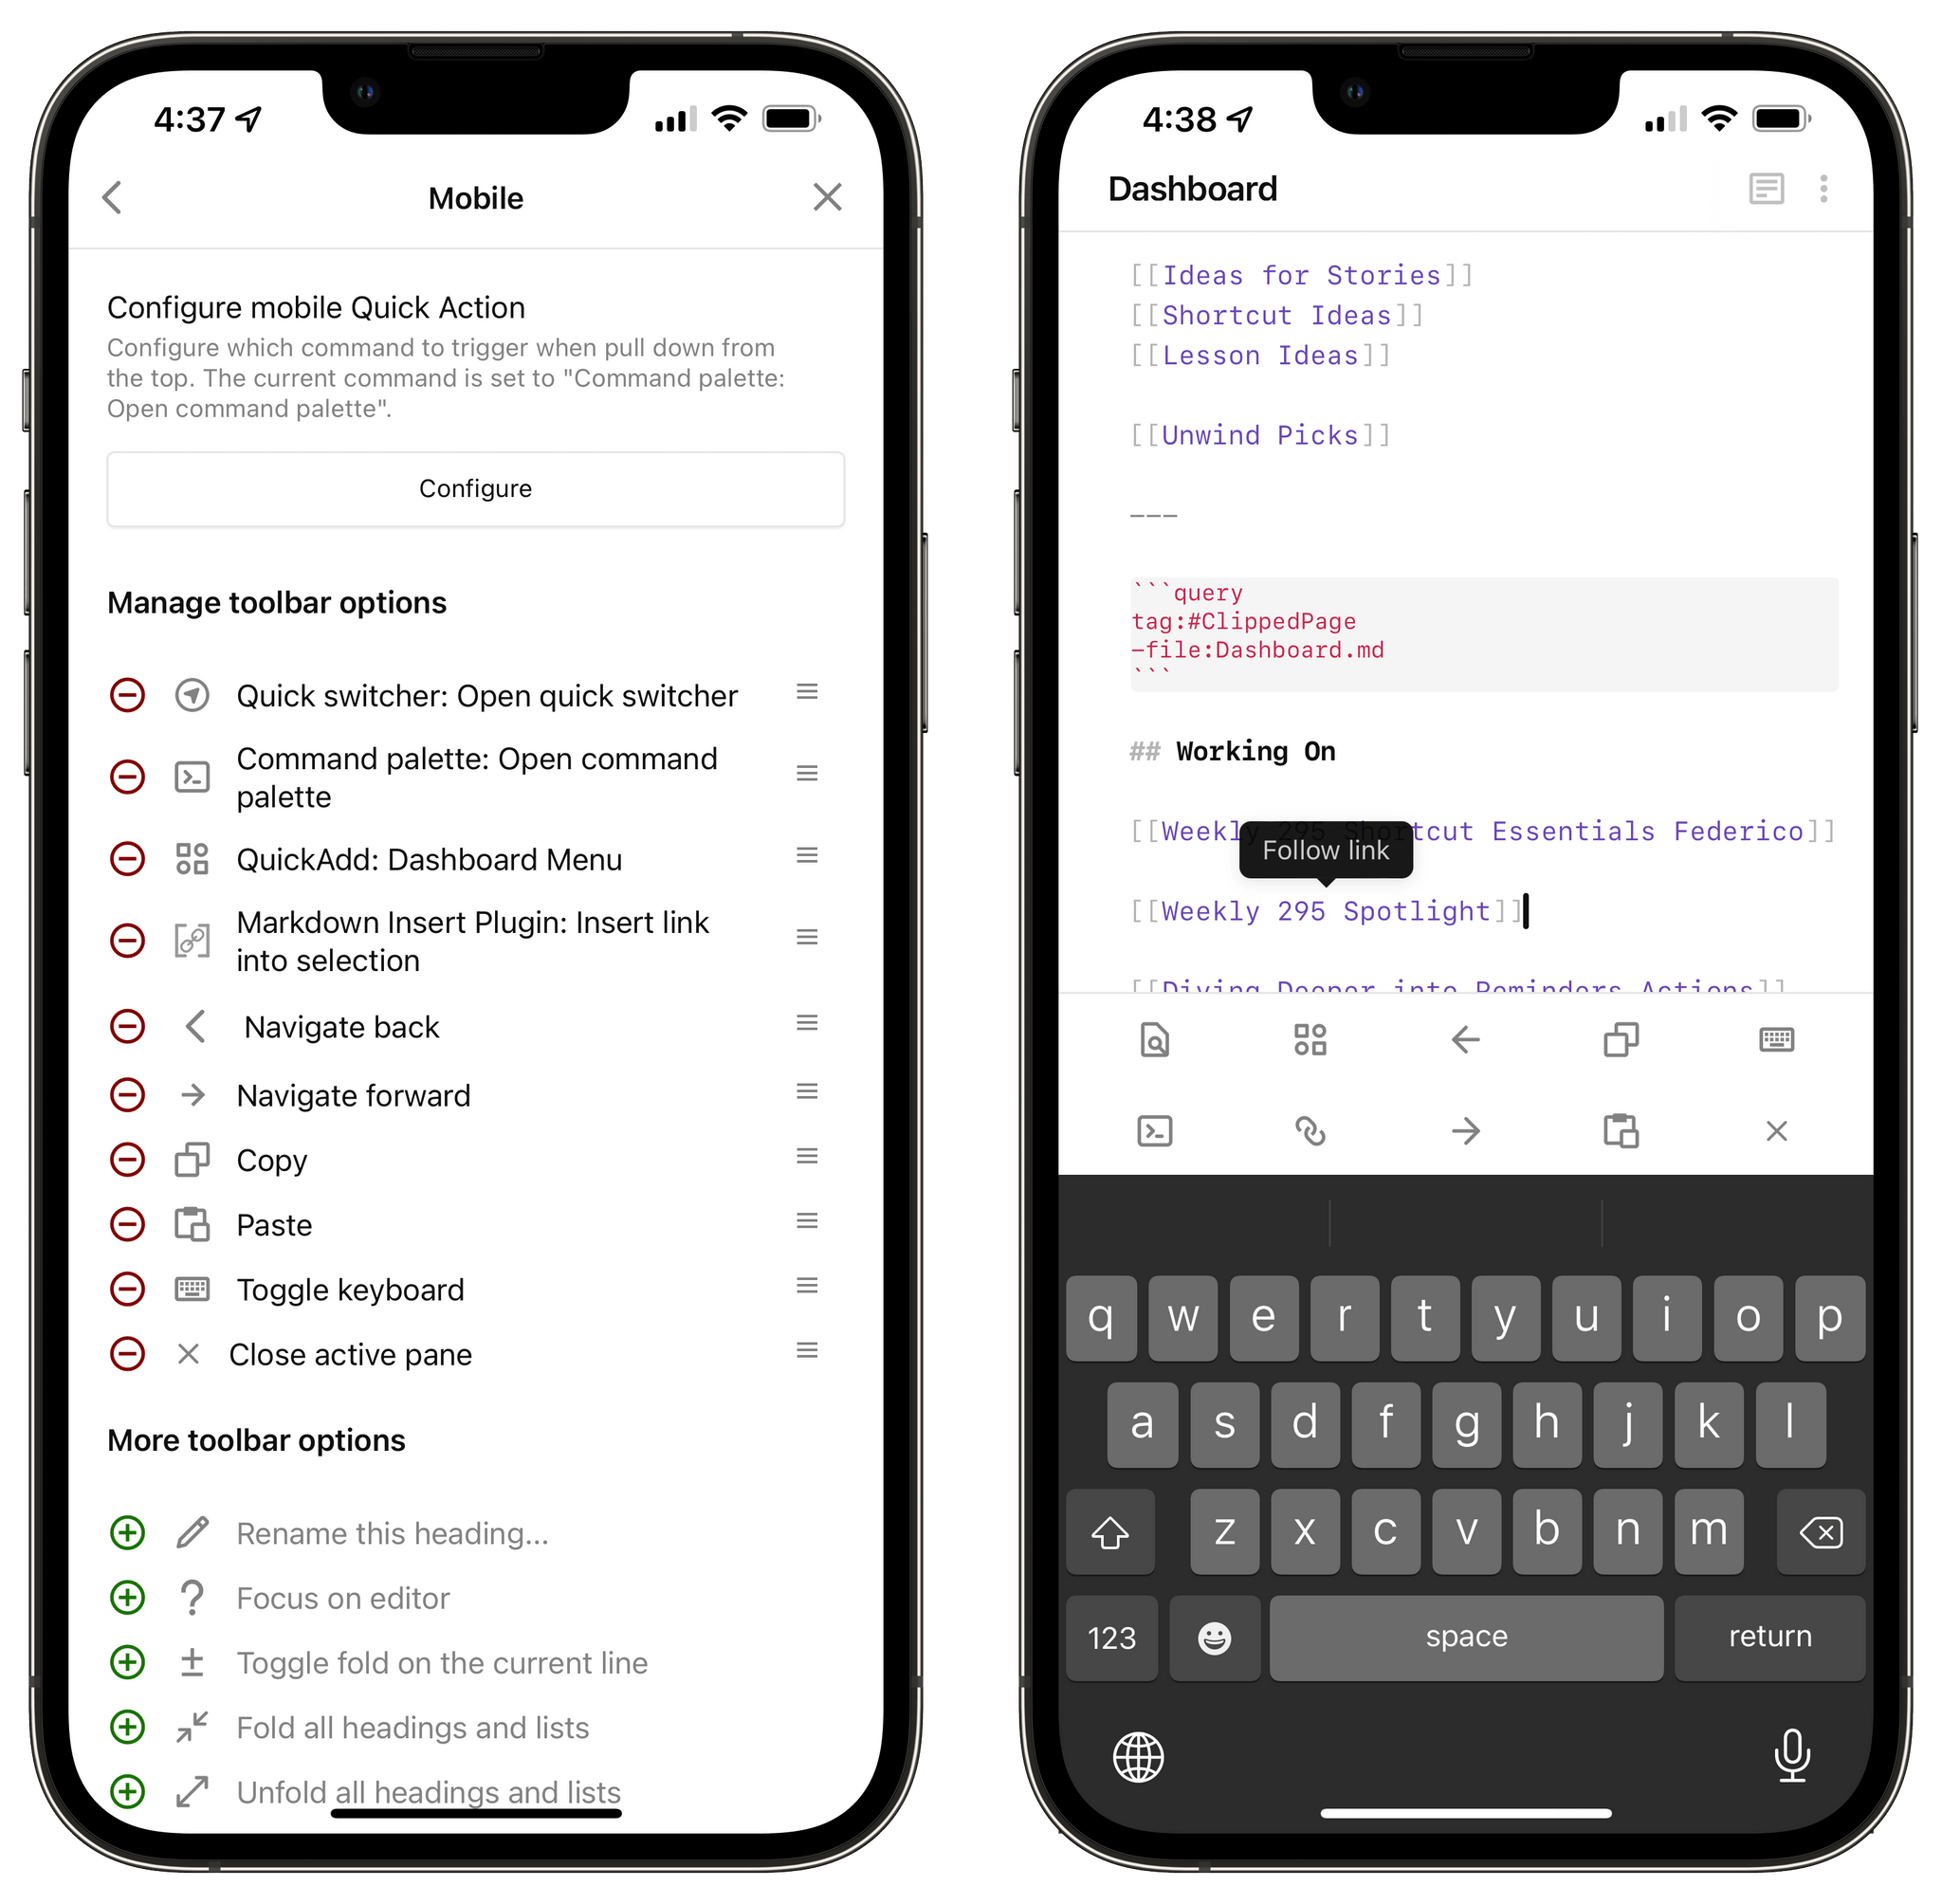 My custom mobile toolbar in Obsidian.
There are some nice touches in the plugin’s settings worth covering, too. For starters, you can define how many rows you want and the size of buttons. I like to keep a maximum of two rows on iPhone and the default button size; on iPad Pro, as you can see from my screenshots in this story, 10 buttons fill a single row above the keyboard.
Additionally, I recommend enabling the ‘Allow Styling of all Quick Actions’ option. With this enabled, you’ll unlock the ability to customize toolbar icons for all commands in the toolbar, not just the ones that don’t have a built-in icon. This means you can change toolbar icons for all commands and plugins – even those created by the Obsidian team. It couldn’t be easier: just click the icon you want to change and search for an alternative option from the list of built-in icons supported by the plugin.
 Changing icons from Advanced Toolbar’s preference pane.
Lastly, I also recommend considering the ‘Always Show Toolbar’ option. With this setting, you can force the toolbar to be always shown onscreen, even if the software keyboard has been dismissed. Otherwise, the mobile toolbar’s visibility is always controlled by whether the keyboard is shown or not.
That’s it for this week. Now that we’ve reached Part 4 of the series, I feel like I’ve covered all the basics of my Obsidian setup so far, and it’s time for me to dive deeper into more specific use cases I’ve devised to manage my read-later archive, tasks, and integration between Shortcuts and Obsidian. Stay tuned: it’s going to be a fun ride.
-"My Obsidian Setup, Part 4: Templates for Weekly Posts and Custom Mobile Toolbar"