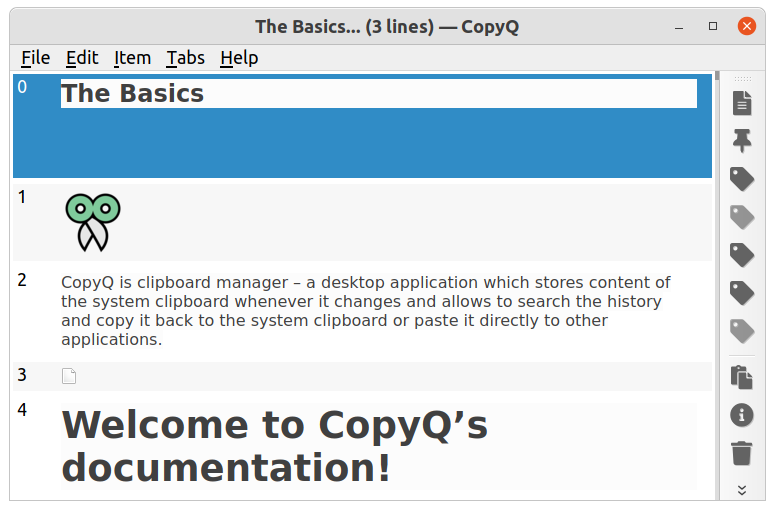
Welcome to CopyQ’s documentation!
CopyQ is clipboard manager – a desktop application which stores content of the system clipboard whenever it changes and allows to search the history and copy it back to the system clipboard or paste it directly to other applications.
This documentation describes some basic concepts and workflows as well as more advanced topics like scripting and application development process.
Installation
Packages and installation files are available at Releases page.
Alternatively, you can install the app with one of the following methods:
On Windows, you can install Chocolatey package.
On OS X, you can use Homebrew to install the app.
brew install --cask copyq
On Debian unstable, Debian 10+, Ubuntu 18.04+ and later derivatives can install stable version from official repositories:
sudo apt install copyq
# copyq-plugins and copyq-doc is splitted out and can be installed independently
On Ubuntu set up the official PPA repository and install the app from terminal:
sudo apt install software-properties-common python-software-properties
sudo add-apt-repository ppa:hluk/copyq
sudo apt update
sudo apt install copyq
On Fedora, install “copyq” package:
sudo dnf install copyq
On other Linux distributions, you can use Flapak to install the app:
# Install from Flathub.
flatpak install --user --from https://flathub.org/repo/appstream/com.github.hluk.copyq.flatpakref

# Run the app.
flatpak run com.github.hluk.copyq
Basic Usage
This page describes the basic functionality of CopyQ clipboard manager.
First Start
To start CopyQ, double-click the program icon or run command copyq.
This starts the graphical interface which can be accessed from the tray (NOTE: on OS X the tray defaults to the top-right of the screen and is not to be confused with Launchpad).
Click the tray icon to show application window or right-click the tray icon and select “Show/Hide” or run copyq show command.
The central element in the application window is item list containing clipboard history. By default, the application stores any new clipboard content in the list.
If you copy some text it will immediately show at the top of the list. Try copying text or images from various application to see how this works.
See also
Basic Item Manipulation
In the item list, press F2 to edit selected text items.
After editing, press F2 again to save the text.
Create new item with Ctrl+N, type some text and press F2 to save
the new item.
Copy the selected items back to clipboard with Enter key or Ctrl+C.
Move items around with Ctrl+Down and Ctrl+Up.
You can move important or special items to new tabs (see Tabs for more info).
Search
In the list you can filter items by typing some text.
For example, typing “Example” hides items that don’t contain “Example” text. Press Enter key to copy the first found item.
Tray
To quickly copy item to clipboard, you can select the item from tray
menu. To display the menu either right-click on tray icon, run command
copyq menu or use a custom system shortcut.
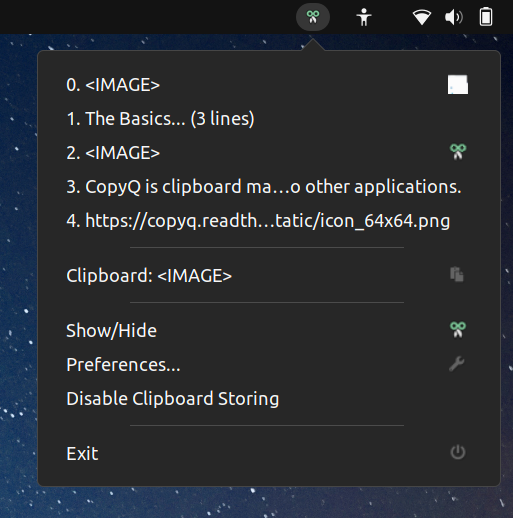
After selecting an item in tray menu and pressing enter (pressing a number key works as well), the item is copied to the clipboard.
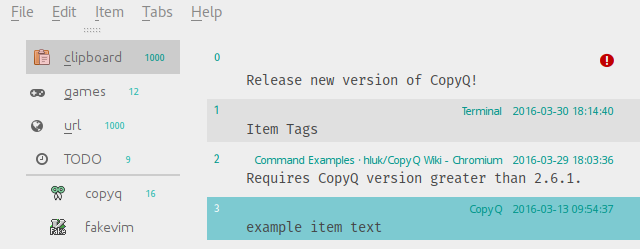
Tabs and Items
Tabs
Tabs are means to organize texts, images and other data.
Initially there is only one tab which is used for storing clipboard and the tab bar is hidden.
User can create new tabs from “Tabs” menu or using Ctrl+T. The tab
bar will appear if there is more than one tab. Using mouse, user can
reorder tabs and drop items and other data into tabs.
If tab name contains &, the following letter is used for quick
access to the tab (the letter is underlined in tab bar or tab tree and
& is hidden). For example, tab named “&Clipboard” can be opened
using Alt+C shortcut.
Option “Tab Tree” enables user to organize tabs into groups. Tabs with names “Job/Tasks/1” and “Job/Tasks/2” will create following structure in tab tree.
> Job
    > Tasks
        > 1
        > 2
Storing Clipboard
If “Store Clipboard” option is enabled (under “General” tab in config
dialog) and “Tab for storing clipboard” is set (under “History” tab in
config dialog), every time user copies something to clipboard a new item
will be created in that particular tab. The item will contain only text
and data that are needed by plugins (e.g. plugin “Images” requires
image/svg, image/png or similar).
Organizing Items
Any data or item can be moved or copied to other tab by dragging it using mouse or by pasting it in item list.
Commands can automatically organize items into tabs. For example, following command will put copied images to “Images” tab (to use the command, copy it to the command list in configuration).
[Command]
Name=Move Images to Other Tab
Input=image/png
Automatic=true
Remove=true
Icon=\xf03e
Tab=&Images
Keyboard
This page lists useful default shortcuts and key mappings for CopyQ and describes how to change them.
CopyQ is keyboard-friendly, i.e. it should be possible to quickly access any functionality with keyboard without using mouse.
Default Shortcuts
Note
On OS X, use ⌘ key instead of Ctrl for the shortcuts.
PgDown/PgUp, Home/End, Up/Down - item list navigation
Left, Right, Ctrl+Tab, Ctrl+Shift+Tab - tab navigation
Ctrl+T, Ctrl+W - create and remove tabs
Ctrl+Up, Ctrl+Down - move selected items
Esc - cancel search, hide window
Ctrl+Q - exit
F2 - edit selected items
Ctrl+E - edit items in an external editor
F5 - open action dialog for selected items
Delete - delete selected items
Ctrl+A - select all
Enter - put current item into clipboard and paste item (optional)
Ctrl+1…Ctrl+9 - focus a tab in given order
Ctrl+0 - focus last tab
Search
Start typing a text to search items. This works in main application
window and copyq menu.
Change Shortcuts
To change the shortcuts:
Open “File - Preferences”.
Select “Shortcuts” tab.
Click the button next to action you need to change.
Press a shortcut on keyboard.
Click OK to save the dialog.
Create new Shortcut
If and action with shortcut is missing in the Shortcuts configuration tab, you can use predefined ones:
Open “File - Commands/Global Shortcuts…”.
Click “Add” button.
Select command (e.g. “Show/hide main window”).
Press a shortcut on keyboard.
Click OK to save the dialog.
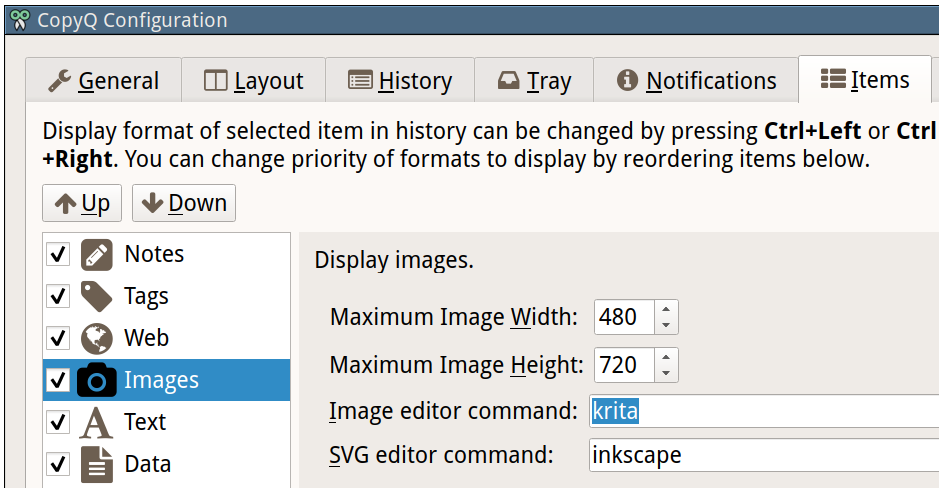
Images
This page describes how to display and work with images in CopyQ.
Display Image Items
Displaying images can be configured in “Items” configuration tab.
On Windows, “Item Image” plugin needs to be installed.
To disable storing and displaying image, disable the Image plugin (uncheck the checkbox next to “Image” in configuration).
Editor
Editors for bitmap and SVG images can be set in the configuration.
Editing an image item (default shortcut is Ctrl+E) should open the image editor.
Unfortunately, sometimes an item looks like an image but is an HTML. You can list available formats in Content dialog F4.
Preview Image
It’s useful to limit size of image item to a maximum width and height in the configuration.
You can still display the whole image in Preview dock (F7) or using Content dialog (F4).
Take Screenshots
You can use built-in functionality for taking screenshots of whole or part of the desktop.
Paste taken screenshots to CopyQ to store them for later use.
Save Image to a File
To save an image to a file, either copy it or drag’n’drop it to a file manager (if supported) or save it using command line.
copyq read image/png 0 > image.png
Alternatively use “Save Item/Clipboard To a File” command.
Tags
Tags are small icons or short texts in upper right corner of an item used to mark important or special items.
Tags can be configured in “Items” configuration tab. On Windows, “Item Tags” plugin needs to be installed.
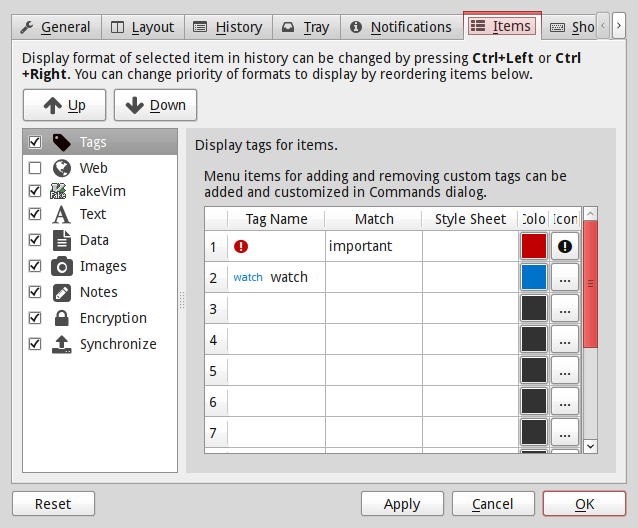
Configuration consists solely of table where each row contains matching and styling rules for tags.
Style from the first row which matches tag text is applied on the tag.
Column in the table are following.
“Tag Name”
Text for the tag. This is used for matching if “Match” column is empty.
Expressions like \1, \2 etc. will be replaced with
captured texts from “Match” column.
“Match”
Regular expression for matching the tags.
E.g. .* (any tag), Important: .* (match prefix),
\d\d\d\d-\d\d-\d\d.* (date time).
“Style Sheet”
Simple style sheet (https://doc.qt.io/qt-5/stylesheet-reference.html).
E.g. border: 1px solid white; border-radius: 3px; font-size: 7pt.
“Color” - Text color.
“Icon” - Icon for tag. To show only icon without text you have to set “Match” and keep “Tag Name” field empty.
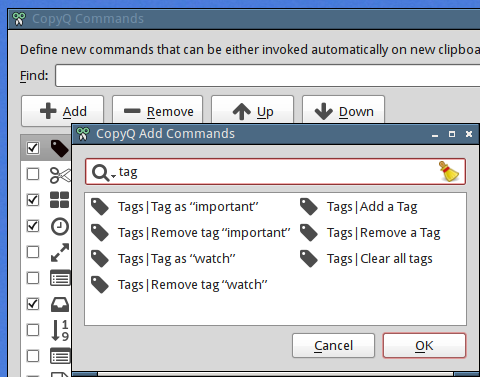
Tagging items can be accessed from context menu if appropriate commands are added in Command dialog (generated commands are available in the list under “Add” button).
Alternatively, tags are added to an item by setting “application/x-copyq-tags” format. It can contain multiple tags separated by comma. The tag text itself can be written as simple HTML.
Example:
copyq write text/plain "Item with tag" application/x-copyq-tags "Some tag text"
Security
This page describes how CopyQ handles the clipboard data and how to make the clipboard safer.
Data Storage
By default, Any text or image in the clipboard is stored automatically in CopyQ.
You can completely disable automatic clipboard storing or avoid storing content copied from windows with matching window titles.
See also
The data from all tabs are stored in the configuration directory unencrypted (unless the Encryption plugin is enabled for a tab).
CopyQ does not collect any other data and does not send anything over network.
Clipboard Content Visibility
The clipboard content is normally shown in the item list of a clipboard tab, main window title, tray tool tip and notification.
To disable showing the current clipboard in GUI, use “No Clipboard in Title and Tool Tip” command and disable notifications (in Preferences).
Clipboard Access
Usually other applications can access clipboard content without any restriction.
To restrict accessing the data after a long time, use “Clear Clipboard After Interval” command.
Theme
Application style can be configured in the Appearance configuration tab and using Cascading Style Sheets (CSS).
Appearance Configuration
The Appearance tab in configuration dialog allows to change font and colors of the item list and other GUI elements in the main window.
By default, only the item list and internal item editor style is changed. To change theme of whole the main window (menu bar, tool bar, tabs) and menus, enable option “Set colors for tabs, tool bar and menus”.
Note
Some desktop environments handle the tray menu style by themselves and it cannot be changed in CopyQ.
You can change style in more detail by using “Edit Theme” button.
Style Sheets
The appearance options are the used in application CSS files installed with
CopyQ (e.g. placeholders in the files like ${font}). You can list the
theme installation path with copyq info themes command.
To override a CSS file, copy the file to your configuration directory under
themes subdirectory. For example, override the style sheet for the item
list:
$ copyq info themes
/usr/share/copyq/themes

$ copyq info config
/home/me/.config/copyq/copyq.conf

$ cp /usr/share/copyq/themes/items.css /home/me/.config/copyq/themes/

$ $EDITOR /home/me/.config/copyq/themes/items.css
To reload the style sheets, you need to restart CopyQ or go to the configuration dialog and click OK button.
You can set COPYQ_THEME_PREFIX environment variable for the preferred path
for CSS files.
CSS files can contain placeholders like ${bg} which are defined in theme
configuration file. You can edit this file in Appearance configuration tab with
“Edit Theme” button.
Placeholder can be assigned to colors in following formats:
#RGB(each of R, G, and B is a single hex digit)#RRGGBB#AARRGGBB(with alpha channel)transparentrgba(R,G,B,A)(each of R, G, and B is 0-255, A is alpha channel 0.0-1.0)
There are extra color names for current system theme:
default_bg- background for list and line/text edit widgetsdefault_text- foreground color for the abovedefault_placeholder_text- placeholder text colordefault_alt_bg- alternative item backgrounddefault_highlight_bg- highlight backgrounddefault_highlight_text- highlighted text colordefault_tooltip_bg- tooltip backgrounddefault_tooltip_text- tooltip text colordefault_window- window backgrounddefault_window_text- window text colordefault_button- button backgrounddefault_button_text- button text colordefault_bright_text- bright window text colordefault_light- lighter than buttondefault_midlight- between button and lightdefault_dark- darker than buttondefault_mid- between button and darkdefault_shadow- very darkdefault_link- hyperlink colordefault_link_visited- visited hyperlink color
Placeholder can be also assigned color expressions, for example:
sel_bg=bg + #000409 - #100menu_bar_css="background: ${bg}; color: ${fg + #444}"${bg + #333}(directly in CSS)
Here are some special placeholders for CSS files:
${css:scrollbar}- includescrollbar.cssstyle sheet.${scale = 0.5}- set scaling for sizes and font (reset with value 1)${hsv_saturation_factor = 2}- set saturation for colors in the rest of the style sheet${hsv_value_factor = 0.9}- set value for colors in the rest of the style sheet
FAQ - Frequently Asked Questions
How to paste double-clicked item from CopyQ window?
Open “Preferences” (
Ctrl+Pshortcut).Go to “History” tab.
Enable “Paste to current window” option.
Next time you open the CopyQ main window and activate an item, it should be pasted.
How to paste as plain text?
To paste clipboard as plain text:
Open “Command” dialog (
F6shortcut).Click “Add” button in the dialog.
Select “Paste clipboard as plain text” from the list and click “OK” button.
Click the button next to “Global Shortcut” label and set the shortcut.
Click “OK” button to save the changes.
To paste selected items as plain text (from CopyQ window) follow the steps above but add “Paste as Plain Text” command instead and change “Shortcut”.
How to store only plain text?
To disallow storing HTML and rich text:
Open “Preferences” (
Ctrl+Pshortcut).Go to “Items” tab.
Disable “Web” item in the list.
Select “Text” item.
Disable “Save and display HTML and rich text”.
Similarly, you can also disable “Images” in the list to avoid storing and rendering images.
Existing items won’t be affected but any data formats can be removed:
Select an item.
Press
F4shortcut (“Item - Show Content…” in menu).Select format from list.
Press
Deletekey.
How to disable storing clipboard?
To temporarily disable storing the clipboard in the CopyQ item list,
select menu item “File - Disable Clipboard Storing” (Ctrl+Shift+X shortcut).
To re-enable the functionality select “File - Enable Clipboard Storing” (same shortcut).
To permanently disable storing the clipboard in CopyQ:
Open “Preferences” (
Ctrl+Pshortcut).Go to “History” tab.
Clear “Tab for storing clipboard” field.
How to back up tabs, configuration and commands?
From menu select “File - Export” and choose which tabs to export and whether to export configuration and commands.
To restore the backup, select menu item “File - Import”, select the exported file, and then choose what to import back.
Note
Importing tabs and commands won’t override existing tabs, and will create new ones.
How to enable or disable displaying notification when clipboard changes?
To enable displaying the notifications:
Open “Preferences” (
Ctrl+Pshortcut).Go to “Notifications” tab.
Set non-zero value for “Interval in seconds to display notifications”.
Set non-zero value for “Number of lines for clipboard notification”.
Click “OK” button.
To enable displaying the notifications, set either of the options mentioned above to zero.
How to omit storing text copied from specific windows like a password manager?
Add and modify automatic command to ignore text copied from the window:
Open “Command” dialog (
F6shortcut).Click “Add” button in the dialog.
Select “Ignore Password window” from the list and click “OK” Button.
Select “Show Advanced”
Change “Window” text box to match the title (or part of it) of the Window to ignore (e.g.
KeePass). But for KeePassXC (and possible other apps), it is better to set “Format” tox-kde-passwordManagerHintinstead.Click “OK” button to save the changes.
Note
This new command should be at the top of the command list because automatic commands are executed in the order they appear in the list, and we don’t want to process sensitive data in any way.
In some cases, e.g. the password manager is an extension of a web browser or a
password is copied from a menu instead of a window, the command above won’t
work. You can try setting the “Window” text box to ^$, which usually matches
popup menus.
For a more reliable way, use a command to blacklist texts (it stores just a salted hash, the text itself is not stored anywhere).
How to enable logging?
Set environment variable COPYQ_LOG_LEVEL to DEBUG for verbose logging
and set COPYQ_LOG_FILE to a file path for the log.
You can copy current log file path to clipboard from Action dialog (F5 shortcut)
by entering command copyq 'copy(info("log"))'. Alternatively, press F12
to directly access the log.
If you cannot access GUI, you can restart CopyQ from terminal and log to a separate file. On Linux and macOS:
copyq exit
export COPYQ_LOG_LEVEL='DEBUG'
export COPYQ_LOG_FILE="$HOME\copyq.log"
echo "Logs will be written to $COPYQ_LOG_FILE"
copyq
On Windows (in PowerShell):
& 'C:\Program Files (X86)\CopyQ\copyq.exe' exit
$env:COPYQ_LOG_LEVEL = 'DEBUG'
$env:COPYQ_LOG_FILE = [Environment]::GetFolderPath("MyDocuments") + '\copyq.log'
echo "Logs will be written to $env:COPYQ_LOG_FILE"
& 'C:\Program Files (X86)\CopyQ\copyq.exe'
How to preserve the order of copied items when copying or pasting multiple items?
Reverse order of selected items with
Ctrl+Shift+Rand copy them.Alternatively, select items in reverse order and then copy.
See #165.
How does pasting single/multiple items work internally?
Return key copies the whole item (with all formats) to the clipboard
and – if the “Paste to current window” option is enabled – it sends
Shift+Insert to previous window. So the target application decides
what format to paste on Shift+Insert.
If you select more items and press Return, just the concatenated
text of selected items is put into the clipboard. Though it could do more
in future, like join HTML, images or other formats.
See #165.
Why does pasting from CopyQ not work?
Pasting from CopyQ works only on Windows, macOS and X11 on Linux.
Specifically, this feature is not supported on Wayland, but you can use the workaround: On Linux, global shortcuts and pasting doesn’t work
First, check if you have the appropriate options enabled:
For pasting from main window, enable “Paste to current window” in “History” configuration tab.
For pasting from tray menu, enable “Paste activated item to current window” in “Tray” configuration tab.
If the pasting still doesn’t work, check if Shift+Insert shortcut pastes to
the target window. That’s the shortcut CopyQ uses by default. To change this to
Ctrl+V see #633.
If pasting still doesn’t work, it could be caused by either of these problems:
CopyQ fails to focus the target window correctly.
The format copied to the clipboard is not supported by the target application.
How to reuse file paths copied from a file manager?
By default, only the text is stored in item list when you copy or cut files from a file manager. Other data is usually needed to be able to copy/paste files from CopyQ.
You have to add additional data formats (MIME) using an automatic command
(similar to one below). The commonly used format in many file managers is
text/uri-list. Other special formats include
x-special/gnome-copied-files for Nautilus and
application/x-kde-cutselection for Dolphin. These formats are used to
specify type of action (copy or cut).
[Command]
Command="
    var originalFunction = global.clipboardFormatsToSave
    global.clipboardFormatsToSave = function() {
        return originalFunction().concat([
            mimeUriList,
            'x-special/gnome-copied-files',
            'application/x-kde-cutselection',
        ])
    }"
Icon=\xf0c1
IsScript=true
Name=Store File Manager Metadata
How to trigger a command based on primary selection only?
You can check application/x-copyq-clipboard-mode format in automatic commands.
E.g. if you set input format of a command it will be only executed on Linux mouse selection change:
[Command]
Automatic=true
Command="
    copyq:
    popup(input())"
Input=application/x-copyq-clipboard-mode
Name=Executed only on X11 selection change
Otherwise you can check it in command:
[Command]
Automatic=true
Command="
    copyq:
    if (str(data(mimeClipboardMode)) == 'selection')
      popup('selection changed')
    else
      popup('clipboard changed')"
Name=Show clipboard/selection change
Why can I no longer paste from the application on macOS?
Why does my external editor fail to edit items?
CopyQ creates a temporary file with content of the edited item and passes it as argument to the custom editor command. If the file changes, the item is also modified.
Usual issues are:
External editor opens an empty file.
External editor warns that the file is missing.
Saving the file doesn’t have any effect on the origin item.
This happens if the command to launch the editor exits, but the editor application itself is still running. Since the command exited, CopyQ assumes that the editor itself is no longer running, and stops monitoring the changes in the temporary file (and removes the file).
Here is the correct command to use for some editors:
emacsclientw.exe --alternate-editor="" %1
gvim --nofork %1
sublime_text --wait %1
code --wait %1
open -t -W -n %1
Where to find saved items and configuration?
You can find configuration and saved items in:
Windows folder
%APPDATA%\copyqfor installed version of CopyQ.Windows sub-folder
configin unzipped portable version of CopyQ.Linux directory
~/.config/copyq.In a directory specific to a given CopyQ instance - see Sessions.
Run copyq info config to get absolute path to the configuration file
(parent directory contains saved items).
Why are items and configuration not saved?
Check access rights to configuration directory and files.
Why do global shortcuts not work?
Global/system shortcuts (or specific key combinations) don’t work in some desktop environments (e.g. Wayland on Linux).
As a workaround, you can try to assign the shortcuts in your system settings.
To get the command to launch for a shortcut:
Open Command dialog (F6 from main window).
Click on the command with the global shortcut in the left panel.
Enable “Show Advanced” checkbox.
Copy the content of “Command” text field.
Note
If the command looks like this:
copyq: toggle()
the actual command to use is:
copyq -e "toggle()"
Why doesn’t the main window close on tiling window managers?
The main window remains open if it cannot minimize to task bar and tray icon is not available. This is a safety feature to allow users to see that the application is running and make any initial setup when the app is started for the first time.
To force hiding main window:
Open “Preferences” (
Ctrl+Pshortcut).Go to “Layout” tab.
Enable “Hide main window” option.
Alternatively, run the following command:
copyq config hide_main_window true
Why does encryption ask for password so often?
Encryption plugin uses gpg2 to decrypt tabs and items. The password usually
needs to be entered only once every few minutes.
If the password prompt is showing up too often, either increase tab unloading
interval (“Unload tab after an interval” option in “History” tab in
Preferences), or change gpg configuration (see #946).
How to fix “copyq: command not found” errors?
If you’re getting copyq: command not found or similar error, it means that
the copyq executable cannot be found by the shell or a language interpreter.
This usually happens if the executable’s directory is not in the PATH
environmental variable.
If this happens when running from within the command, e.g.
bash:
text="SOME TEXT"
copyq copy "$text"
you can fix it by using COPYQ environment variable instead.
bash:
text="SOME TEXT"
"$COPYQ" copy "$text"
What to do when CopyQ crashes or misbehaves?
When CopyQ crashes or doesn’t behave as expected, try to look up a similar issue first and provide details in a comment for that issue.
If you cannot find any such an issue, report a new bug.
Try to provide the following details:
CopyQ version
operating system (desktop environment, window manager, etc.)
steps to reproduce the issue
application log (see How to load shared commands and share them?)
stacktrace if available (e.g. on Linux
coredumpctl dump --reverse copyq)
Known Issues
This document lists known commonly occurring issues and possible solutions.
On Windows, CopyQ does not print anything on console
On Windows, you may not see any output when executing CopyQ in a console/terminal application (PowerShell or cmd).
Workarounds:
Use different console application: Git Bash, Cygwin or similar.
Use Action dialog in CopyQ (
F5shortcut) and set “Store standard output” to “text/plain” to save the output as new item in current tab.Append
| Write-Outputto commands in PowerShell:& 'C:\Program Files (x86)\CopyQ\copyq.exe' help | Write-Output
See also
On macOS, CopyQ won’t paste after installation/update
CopyQ is not signed app, you need to grant Accessibility again when it’s installed or updated.
To fix this, try following steps:
Go to System Preferences -> Security & Privacy -> Privacy -> Accessibility (or just search for “Allow apps to use Accessibility”).
Click the unlock button.
Select CopyQ from the list and remove it (with the “-” button).
See also
On Linux, global shortcuts and pasting doesn’t work
This can be caused by running Wayland instead of the old X11.
Wayland doesn’t support:
global shortcuts
clipboard access from window that is not active
mouse selection copy/pasting
pasting from CopyQ (i.e. passing shortcuts to application)
Workaround for most problems is to set QT_QPA_PLATFORM environment variable
and use Xwayland (e.g. xorg-x11-server-Xwayland Fedora package).
E.g. launch CopyQ with:
env QT_QPA_PLATFORM=xcb copyq
If CopyQ autostarts, you can change Exec=... line in
~/.config/autostart/copyq.desktop:
Exec=env QT_QPA_PLATFORM=xcb copyq
Note
Mouse selection will still work only if the source application itself supports it.
See also
Glossary
Here is a list of frequent terms from CopyQ.
Action - a command run from Action dialog
Clipboard - system clipboard that stores and provides copied stuff (
Ctrl+C)Command - user-defined command or script executed by the app
Item - element stored in a tab, usually automatically created from a new clipboard content
Main window - main application window shown by selecting “Show” from tray menu
Plugin - a binary file which adds some functionality when app starts
Process - an executed command
Script - simple code written in internal scripting language used by the app
Tray - tray or notification area in panel, contains small icons for various applications
Tray menu - menu invoked from app icon in tray (usually by right mouse button click)
Tab - container for multiple items, similar to tabs in modern web browsers
Command Line
Tabs, items, clipboard and configuration can be changed through command
line interface. Run command copyq help to see complete list of
commands and their description.
Warning
On Windows, you may not see any output when executing CopyQ in terminal/console (PowerShell or cmd).
See workarounds in On Windows, CopyQ does not print anything on console.
To add new item to tab with name “notes” run:
copyq tab notes add "This is the first note."
To print the item:
copyq tab notes read 0
Add other item:
copyq tab notes add "This is second note."
and print all items in the tab:
copyq eval -- "tab('notes'); for(i=size(); i>0; --i) print(str(read(i-1)) + '\n');"
This will print:
This is the first note.
This is second note.
Among other things that are possible with CopyQ are:
open video player if text copied in clipboard is URL with multimedia
store text copied from a code editor in “code” tab
store URLs in different tab
save screenshots (print-screen)
load all files from directory to items (create image gallery)
replace a text in all matching items
run item as a Python script
Sessions
You can run multiple instances of the application given that they have different session names.
Running Multiple Instances
Each application instance should have unique name.
To start new instance with test1 name, run:
copyq --session=test1
This instance uses configuration, tabs and items unique to given session name.
You can still start default session (with empty session name) with just:
copyq
In the same manner you can manipulate the session. E.g. to add an item
to first tab in test1 session, run:
copyq --session=test1 add "Some text"
Default session has empty name but it can be overridden by setting
COPYQ_SESSION_NAME environment variable.
You need to use same session name for clients launched outside the application.
$ copyq -s test2 tab
ERROR: Cannot connect to server! Start CopyQ server first.

$ copyq -s test1 tab
&clipboard
Configuration Path
Current configuration path can be overriden with COPYQ_SETTINGS_PATH
environment variable.
$ copyq info config
/home/user/.config/copyq/copyq.conf

$ COPYQ_SETTINGS_PATH=$HOME/copyq-settings copyq info config
/home/user/copyq-settings/copyq/copyq.conf
You need to use same configuration path (and session name) for clients lauched outside the application.
$ copyq tab
ERROR: Cannot connect to server! Start CopyQ server first.

$ COPYQ_SETTINGS_PATH=$HOME/copyq-settings copyq tab
&clipboard
Icon Color
Icon for each session is bit different. The color is generated from session
name and can be changed using COPYQ_SESSION_COLOR environment variable.
COPYQ_SESSION_COLOR="yellow" copyq
COPYQ_SESSION_COLOR="#f90" copyq
On Linux, changing icon color won’t work if current icon theme contains icon
named “copyq-normal” or doesn’t contain “copyq-mask”.
Use COPYQ_DEFAULT_ICON environment variable to avoid using the application
icon from icon theme.
COPYQ_DEFAULT_ICON=1 copyq
Pin Items
This page describes how to pin selected items in a tab so they cannot be accidentally removed or moved from current row.
Why pin items?
There are two main reasons to pin items.
If a new item is added to a list (e.g. automatically when clipboard changed), rest of the items need to move one row down, except pinned items which stay on the same row. This is useful to pin important items to the top of the list.
If a tab is full (see option “Maximum number of items in history” in “History” configuration tab), adding a new item removes old item from bottom of the list. Pinned items cannot be removed so the last unpinned item is removed instead.
Note
New items cannot be added to a tab if all its items are pinned and the tab is full.
Configuration
Note
On Windows, to enable this feature you need to install “Pinned Items” plugin.
To enable this functionality, assign keyboard shortcut for Pin and Unpin
actions in “Shortcuts” tab in Preferences (Ctrl+P).
Note
Keyboard shortcut for both menu items can be the same since at most one of the menu items is always visible.
Pinning Items
If set up correctly, when you select items, Pin action should be available in toolbar, context menu and “Item” menu.
Selecting the Pin menu item (or pressing assigned keyboard shortcut) will pin selected items to their current rows.
Pinned items will show with gray bar on the right side in the list.
Deleting pinned items won’t work, unpin the items first. Unpin action is available if an pinned item is selected.
Pinned items also will stay in same rows unless you move them with mouse or
using keyboard shortcuts (Ctrl+Up/Down/Home/End).
Password Protection
This page describes how to encrypt and protect selected tabs and single items with a password.
Installation
To enable this feature you need to have “Encryption” item plugin.
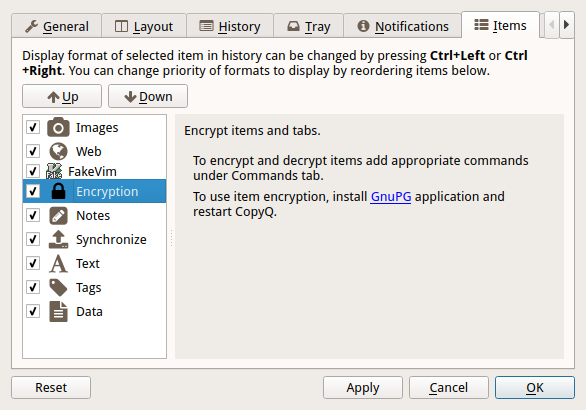
The plugin configuration (under “Items” configuration tab in Configuration dialog) may prompt you to install GnuPG:
For Windows you can use Chocolatey to install Gpg4win Vanilla:
choco install gpg4win-vanilla
For Linux install
gpgcommand line utility. It’s usually provided bygnupgpackage but the package name may differ on some distributions.
Generate Keys and Set Password
To be able to encrypt tabs and items you first need to generate private and public key files.
Click on the “Generate Ney Keys…” button and wait.
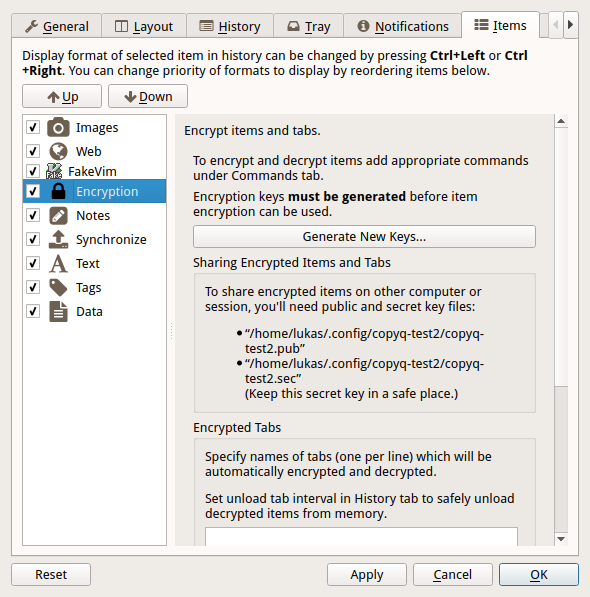
If didn’t set a password in previous step click “Change Password…” button and set it.
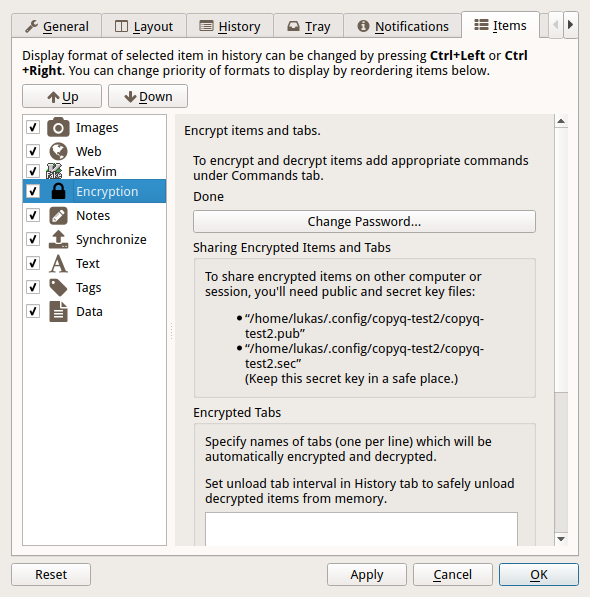
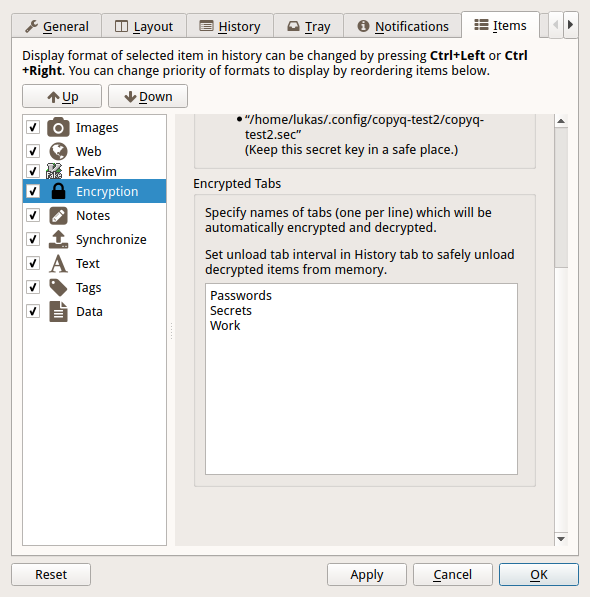
Last step in configuration is to set tabs to encrypt. You can skip this step if you only need to encrypt single item in each tab (see next section).
Click “OK” button to confirm Configuration dialog.
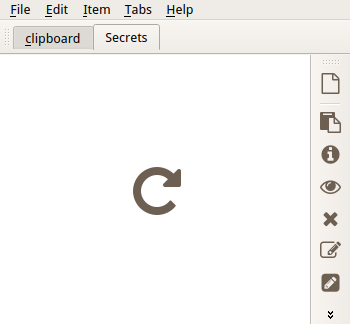
Protect Tabs
Now you can create the tabs you want to encrypt (Ctrl+T to create new tab).
The tab name should be same as one of the tabs entered in plugin configuration in previous step.

You’ll be prompt to enter password in future (you only need to enter it once in a while).
If you enter wrong password or cancel the password prompt you can later click on “Reload” button in tab to enter password again.
Protect Single Items
To protect items in unprotected tab you can add menu and tool bar actions with keyboard shortcut.
Go to Command dialog F6, click on “Add” button, “Encryption” commands from list and confirm dialogs with “OK” button.
Now you can select items and press Ctrl+L to encrypt (“Items - Encryption - Encrypt” in menu).
To decrypt selected item press Ctrl+L (“Items - Encryption - Decrypt” in menu).
Synchronize with Documents
This page describes how to keep items in a tab synchronized with files in a directory on a disk (or a Dropbox folder).
Configuration
Note
On Windows, to enable this feature you need to install “Synchronize” plugin. All plugins are installed by default and also included in the portable zip version of the app.
Set path synchronization directory for a tab.
Open “Preferences” (
Ctrl+Pshortcut).Go to “Items” tab.
Select “Synchronize”.

Double-click an empty space in Tab Name column and enter name of the tab to synchronize.
Click the browse button on the same row and select directory for the tab.
Click OK to save changes.
Now any items in the synchronized tab will be saved in the directory and existing files will show up in the tab even if the tab or a file is created later.
Synchronized items can be copied and edited as normal items.
File Types
Only files with known format can be shown as items. By default:
Files with
.txtsuffix show up as text items.Files with
.htmlsuffix show up as formatted text items.Files with
.pngsuffix (and others) show up as images.
To show other files as items you need to set their file suffix in the second table in the configuration. Here you can set icon and MIME format for the file data.
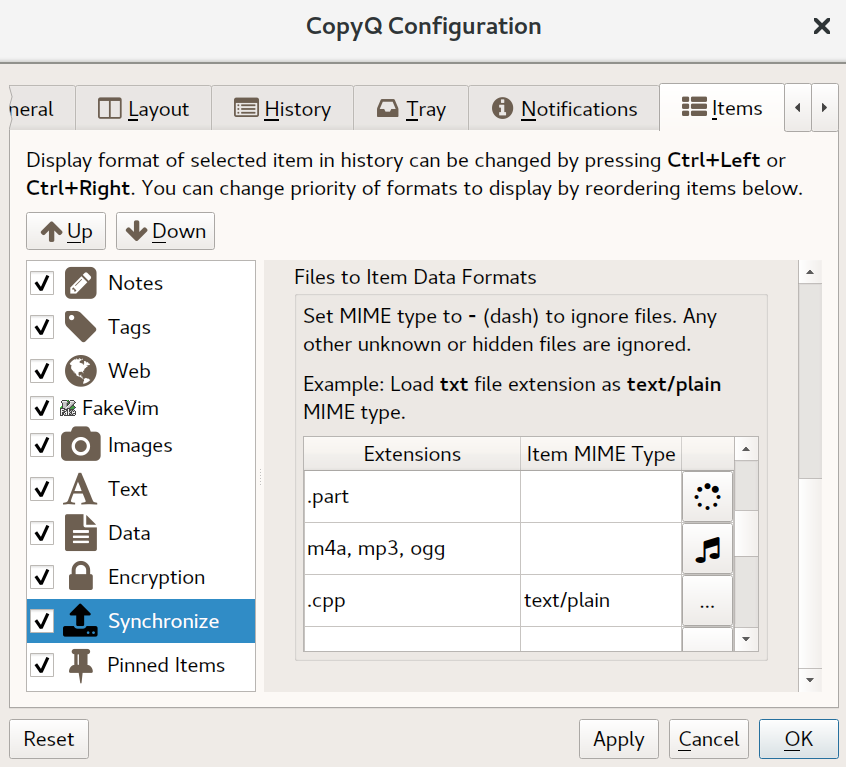
The configuration in the image above allows for content of all files with
.cpp suffix in synchronized directories to show up text items, i.e. items
have text/plain format containing the file data.
Writing Commands and Adding Functionality
CopyQ allows you to extend its functionality through commands in following ways:
Add custom commands to context menu for selected items in history.
Run custom commands automatically when clipboard changes.
Assign global/system-wide shortcuts to custom commands.
Here are some examples what can be achieved by using commands:
Automatically store web links or other types of clipboard content in special tabs to keep the history clean.
Paste current date and time or modified clipboard on a global shortcut.
Pass selected items or clipboard to external application (e.g. web browser or image editor).
Keep TODO lists and tag items as “important” or use custom tags.
See Command Examples for some other ideas and useful commands.
Command Dialog
You can create new commands in Command dialog. To open the dialog either:
Press default shortcut F6.
Select menu item “Commands/Global Shortcuts…” in “File” menu.
Command dialog contains:
list of custom commands on the left
settings for currently selected command on the right
command filter text field at the top
buttons to modify the command list (add, remove and move commands) at the top
buttons to save, load, copy and paste commands at the bottom
Create New Command
To create new command click the “Add” button in Command dialog. This opens list with predefined commands.
“New Command” creates new empty command (but it won’t do anything without being configured). One of the most frequently used predefined command is “Show/hide main window” which allows you to assign global shortcut for showing and hiding CopyQ window.
If you double click a predefined command (or select one or multiple commands and click OK) it will be added to list of commands. The right part of the Command dialog now shows the configuration for the new command.
For example, for the “Show/hide main window” you’ll most likely need to change only the “Global Shortcut” option so click on the button next to it and press the shortcut you want to assign.
Commands can be quickly disabled by clicking the check box next to them in command list.
By clicking on “OK” or “Apply” button in the dialog all commands will be saved permanently.
Command Options
The following options can be set for commands.
If unsure what an option does, hover mouse pointer over it and tool tip with description will appear.
Name
Name of the command. This is used in context menu if “In Menu” check box
is enabled. Use / in the name to create sub-menus.
Group: Type of Action
This group sets the main type of the command. Usually only one sub-option is set.
If enabled, the command is triggered whenever clipboard changes.
Automatic items are run in order they appear in the command list. No
other automatic commands will be run if a triggered automatic command
has “Remove Item” option set or calls copyq ignore.
The command is applied on current clipboard data - i.e. options below access text or other data in clipboard.
Global or system shortcut is a keyboard shortcut that works even if the main application window is not focused.
If enabled, the command is triggered whenever assigned shortcut is pressed.
This command is not applied on data in clipboard nor selected items.
If enabled, the command is script which is loaded before any other script is started. This allows overriding existing functions and creating new ones (allowing new command line arguments to be used).
See Script Commands.
If enabled, the command is used to modify item data before displaying. Use
data() to retrieve current item data and setData() to modify the data
to display (these are not stored permanently).
See Display Commands.
Group: Match Items
This group is visible only for “Automatic” or “In Menu” commands. Sub-options specify when the command can be used.
Regular expression to match text of selected items (for “In Menu” command) or clipboard (for “Automatic” command).
For example, ^https?:// will match simple web addresses (text
starting with http:// or https://).
Regular expression to match window title of active window (only for “Automatic” command).
For example, - Chromium$ or Mozilla Firefox$ to match some web
browser window titles ($ in the expression means end of the title).
A command for validating text of selected items (for “In Menu” command) or clipboard (for “Automatic” command).
If the command exits with non-zero exit code it won’t be shown in context menu and automatically triggered on clipboard change.
Example, copyq: if (tab().indexOf("Web") == -1) fail() triggers the
command only if tab “Web” is available.
Match format of selected items or clipboard.
The data of this format will be sent to standard input of the command - this doesn’t apply if the command is triggered with global shortcut.
Command
The command to run.
This can contain either:
simple command line (e.g.
copyq popup %1- expression%1means text of the selected item or clipboard)input for command interpreter (prefixed with
bash:,powershell:,python:etc.)CopyQ script (prefixed with
copyq:)
You can use COPYQ environment variable to get path of application
binary.
Current CopyQ session name is stored in COPYQ_SESSION_NAME
environment variable (see Sessions).
Example (call CopyQ from Python):
python:
import os
from subprocess import call
copyq = os.environ['COPYQ']
call([copyq, 'read', '0'])
Example (call CopyQ from PowerShell on Windows):
powershell:
$Item1 = (& "$env:COPYQ" read 0 | Out-String)
echo "First item: $Item1"
Group: Action
This group is visible only for “Automatic” or “In Menu” commands.
Creates new item in given tab.
Removes selected items. If enabled for “Automatic” command, the clipboard will be ignored and no other automatic commands will be executed.
Group: Command options
This group is visible only for “Automatic” or “In Menu” commands.
Show action dialog before applying options below.
Modify selected items - i.e. remove them and replace with standard output of the command.
Format of standard output to save as new item.
Separator for splitting output to multiple items (\n to split
lines).
Tab for saving the output of command.
Scripting
If you need to process items in some non-trivial way you can take
advantage of the scripting interface the application provides. This is
accessible on command line as copyq eval SCRIPT or
copyq -e SCRIPT where SCRIPT is string containing commands
written in JavaScript-similar scripting language (see Scripting API).
Every command line option is available as function in the scripting
interface. Command copyq help tab can be written as
copyq eval 'print(help("tab"))' (note: print is needed to print
the return value of help("tab") function call).
Searching Items
You can print each item with copyq read N where N is item number
from 0 to copyq size (i.e. number of items in the first tab) and put
item to clipboard with copyq select N. With these commands it’s
possible to search items and copy the right one with a script. E.g.
having file script.js containing
var match = "MATCH-THIS";
var i = 0;
while (i < size() && str(read(i)).indexOf(match) === -1)
    ++i;
select(i);
and passing it to CopyQ using cat script.js | copyq eval - will put
first item containing “MATCH-THIS” string to clipboard.
Working with Tabs
By default commands and functions work with items in the first tab.
Calling read(0, 1, 2) will read first three items from the first
tab. To access items in other tab you need to switch the current tab
with tab("TAB_NAME") (or copyq tab TAB_NAME on command line)
where TAB_NAME is name of the tab.
For example to search for an item as in the previous script but in all tabs you’ll have to run:
var match = "MATCH-THIS";
var tabs = tab();
for (var i in tabs) {
    tab(tabs[i]);
    var j = 0;
    while (j < size() && str(read(j)).indexOf(match) === -1)
        ++j;
    if (j < size())
        print("Match in tab \"" + tabs[i] + "\" item number " + j + ".\n");
}
Scripting Functions
As mentioned above, all command line options are also available for
scripting e.g.: show(), hide(), toggle(), copy(),
paste().
Reference for available scripting functions and language features can be found at Scripting API.
Command Examples
Here are some useful commands for creating custom menu items, global shortcuts and automatically process new clipboard content in CopyQ.
If you want to use any of the commands below, copy it to clipboard and paste it to the command list in Command dialog (opened with F6 shortcut). For detailed info see How to load shared commands and share them?.
All these and more commands are available at CopyQ command repository.
Join Selected Items
Creates new item containing concatenated text of selected items.
[Command]
Name=Join Selected Items
Command=copyq add -- %1
InMenu=true
Icon=\xf066
Shortcut=Space
Paste Current Date and Time
Copies current date/time text to clipboard and pastes to current window on global shortcut Win+Alt+T.
[Command]
Command="
    copyq:
    var time = dateString('yyyy-MM-dd hh:mm:ss')
    copy('Current date/time is ' + time)
    paste()"
GlobalShortcut=meta+alt+t
Icon=\xf017
Name=Paste Current Time
Play Sound when Copying to Clipboard
Following command will play an audio file whenever something is copied clipboard.
On Windows:
[Command]
Name=Play Sound on Copy
Command="
     powershell:
     (New-Object Media.SoundPlayer \"C:\\Users\\copy.wav\").PlaySync()"
Automatic=true
Icon=\xf028
On Linux (requires VLC multimedia player):
[Command]
Name=Play Sound on Copy
Command="
     bash:
     cvlc --play-and-exit ~/audio/example.mp3"
Automatic=true
Icon=\xf028
Edit and Paste
Following command allows to edit current clipboard text before pasting it. If the editing is canceled the text won’t be pasted.
[Command]
Command="
    copyq:
    var text = dialog('paste', str(clipboard()))
    if (text) {
      copy(text)
      copySelection(text)
      paste()
    }"
GlobalShortcut=ctrl+shift+v
Icon=\xf0ea
Name=Edit and Paste
Remove Background and Text Colors
Removes background and text colors from rich text (e.g. text copied from web pages).
Command can be both automatically applied on text copied to clipboard and invoked from menu (or using custom shortcut).
[Command]
Automatic=true
Command="
    copyq:
    var html = str(input())
    html = html.replace(/color\\s*:/g, 'xxx:')
    setData('text/html', html)"
Icon=\xf042
InMenu=true
Input=text/html
Name=Remove Background and Text Colors
Linkify
Creates interactive link from plain text.
[Command]
Name=Linkify
Match=^(https?|ftps?|file|mailto)://
Command="
    copyq:
    var link = str(input());
    var href = '<a href=\"###\">###</a>';
    write(
      'text/plain', link,
      'text/html', href.replace(/###/g, link)
    );"
Input=text/plain
Automatic=true
Remove=true
Icon=\xf127
Highlight Text
Highlight all occurrences of a text (change x = "text" to match
something else than text).
[Command]
Name=Highlight Text
Command="
    copyq:
    x = 'text'
    style = 'background: yellow; text-decoration: underline'

    text = str(input())
    x = x.toLowerCase()
    lowertext = text.toLowerCase()
    html = ''
    a = 0
    esc = function(a, b) {
        return escapeHTML( text.substr(a, b - a) )
    }

    while (1) {
        b = lowertext.indexOf(x, a)
        if (b != -1) {
            html += esc(a, b) + '<span>' + esc(b, b + x.length) + '</span>'
        } else {
            html += esc(a, text.length)
            break
        }
        a = b + x.length;
    }

    tab( selectedtab() )
    write(
        index(),
        'text/plain', text,
        'text/html',
            '<html><head><style>span{'
            + style +
            '}</style></head><body>'
            + html +
            '</body></html>'
    )"
Input=text/plain
Wait=true
InMenu=true
Render HTML
Render HTML code.
[Command]
Name=Render HTML
Match=^\\s*<(!|html)
Command="
    copyq:
    tab(selectedtab())
    write(index() + 1, 'text/html', input())"
Input=text/plain
InMenu=true
Translate to English
Pass to text to Google Translate.
[Command]
Name=Translate to English
Command="
    copyq:
    text = str(input())
    url = \"https://translate.google.com/#auto/en/???\"

    x = url.replace(\"???\", encodeURIComponent(text))
    html = '<html><head><meta http-equiv=\"refresh\" content=\"0;url=' + x + '\" /></head></html>'

    tab(selectedtab())
    write(index() + 1, \"text/html\", html)"
Input=text/plain
InMenu=true
Paste and Forget
Paste selected items and clear clipboard.
[Command]
Name=Paste and Forget
Command="
    copyq:
    tab(selectedtab())
    items = selecteditems()
    if (items.length > 1) {
        text = ''
        for (i in items)
            text += read(items[i]);
        copy(text)
    } else {
        select(items[0])
    }

    hide()
    paste()
    copy('')"
InMenu=true
Icon=\xf0ea
Shortcut=Ctrl+Return
Render Math Equations
Render math equations using MathJax (e.g.
$$x = {-b \pm \sqrt{b^2-4ac} \over 2a}$$).
[Command]
Name=Render Math Equations
Command="
    copyq:
    text = str(input())
    js = 'http://cdn.mathjax.org/mathjax/latest/MathJax.js?config=TeX-AMS-MML_HTMLorMML'

    html = '<html><head><script type=\"text/javascript\" src=\"' + js + '\"></script></head><body>' + escapeHTML(text) + '</body></html>';

    tab(selectedtab())
    write(index() + 1, 'text/html', html)"
Input=text/plain
InMenu=true
Icon=\xf12b
Move Images to Other Tab
With this command active, images won’t be saved in the first tab. This can make application a bit more snappier since big image data won’t need to be loaded when main window is displayed or clipboard is stored for the first time.
[Command]
Name=Move Images to Other Tab
Input=image/png
Automatic=true
Remove=true
Icon=\xf03e
Tab=&Images
Copy Clipboard to Window Tabs
Following command automatically adds new clipboard to tab with same name as title of the window where copy operation was performed.
[Command]
Name=Window Tabs
Command="copyq:
    item = unpack(input())
    window_title = item[\"application/x-copyq-owner-window-title\"]
    if (window_title) {
        // Remove the part of window title before dash
        // (it's usually document name or URL).
        tabname = str(window_title).replace(/.* (-|\x2013) /, \"\")
        tab(\"Windows/\" + tabname)
        write(\"application/x-copyq-item\", input())
    }
    "
Input=application/x-copyq-item
Automatic=true
Icon=\xf009
Quickly Show Current Clipboard Content
Quickly pop up notification with text in clipboard using Win+Alt+C
system shortcut.
[Command]
Name=Show clipboard
Command="
    copyq:
    seconds = 2;
    popup(\"\", clipboard(), seconds * 1000)"
GlobalShortcut=Meta+Alt+C
Replace All Occurrences in Selected Text
[Command]
Name=Replace in Selection
Command="
    copyq:
    // Copy without changing Linux mouse selection (on Windows you can use "copy" instead).
    function copy2() {
      try {
        var x = config('copy_clipboard')
        config('copy_clipboard', false)
        try {
          copy.apply(this, arguments)
        } finally {
          config('copy_clipboard', x)
        }
      } catch(e) {
        copy.apply(this, arguments)
      }
    }

    copy2()
    var text = str(clipboard())

    if (text) {
      var r1 = 'Text'
      var r2 = 'Replace with'
      var reply = dialog(r1, '', r2, '')

      if (reply) {
        copy2(text.replace(new RegExp(reply[r1], 'g'), reply[r2]))
        paste()
      }
    }"
Icon=\xf040
GlobalShortcut=Meta+Alt+R
Copy Nth Item
Copy item in row depending on which shortcut was pressed. E.g. Ctrl+2 for item in row “2”.
[Command]
Name=Copy Nth Item
Command="
    copyq:
    var shortcut = str(data(\"application/x-copyq-shortcut\"));
    var row = shortcut ? shortcut.replace(/^\\D+/g, '') : currentItem();
    var itemIndex = (config('row_index_from_one') == 'true') ? row - 1 : row;
    selectItems(itemIndex);
    copy(\"application/x-copyq-item\", pack(getItem(itemIndex)));"
InMenu=true
Icon=\xf0cb
Shortcut=ctrl+1, ctrl+2, ctrl+3, ctrl+4, ctrl+5, ctrl+6, ctrl+7, ctrl+8, ctrl+9, ctrl+0
Edit Files
Opens files referenced by selected item in external editor (uses “External editor command” from “History” config tab).
Works with following path formats (some editors may not support all of these).
C:/...file://...~...(some shells)%...%...(Windows environment variables)$...(environment variables)/c/...(gitbash)
[Command]
Name=Edit Files
Match=^([a-zA-Z]:[\\\\/]|~|file://|%\\w+%|$\\w+|/)
Command="
    copyq:
    var editor = config('editor')
        .replace(/ %1/, '')

    var filePaths = str(input())
        .replace(/^file:\\/{2}/gm, '')
        .replace(/^\\/(\\w):?\\//gm, '$1:/')
        .split('\\n')

    var args = [editor].concat(filePaths)

    execute.apply(this, args)"
Input=text/plain
InMenu=true
Icon=\xf040
Shortcut=f4
Change Monitoring State Permanently
Disables clipboard monitoring permanently, i.e. the state is restored when clipboard changes even after application is restarted.
Should be the first automatic command in the list of commands so other commands are not invoked.
[Command]
Automatic=true
Command="
    copyq:
    var option = 'disable_monitoring'
    var disabled = str(settings(option)) === 'true'

    if (str(data('application/x-copyq-shortcut'))) {
      disabled = !disabled
      settings(option, disabled)
      popup('', disabled ? 'Monitoring disabled' : 'Monitoring enabled')
    }

    if (disabled) {
      disable()
      ignore()
    } else {
      enable()
    }"
GlobalShortcut=meta+alt+x
Icon=\xf05e
Name=Toggle Monitoring
Show Window Title
Shows source application window title for new items in tag (“Tags” plugin must be enabled in “Items” config tab).
[Command]
Automatic=true
Command="
    copyq:
    var window = str(data('application/x-copyq-owner-window-title'))
    var tagsMime = 'application/x-copyq-tags'
    var tags = str(data(tagsMime)) + ', ' + window
    setData(tagsMime, tags)"
Icon=\xf009
Name=Store Window Title
Show Copy Time
Shows copy time of new items in tag (“Tags” plugin must be enabled in “Items” config tab).
[Command]
Automatic=true
Command="
    copyq:
    var time = dateString('yyyy-MM-dd hh:mm:ss')
    setData('application/x-copyq-user-copy-time', time)

    var tagsMime = 'application/x-copyq-tags'
    var tags = str(data(tagsMime)) + ', ' + time
    setData(tagsMime, tags)"
Icon=\xf017
Name=Store Copy Time
Mark Selected Items
Toggles highlighting of selected items.
[Command]
Command="
    copyq:
    var color = 'rgba(255, 255, 0, 0.5)'
    var mime = 'application/x-copyq-color'

    var firstSelectedItem = selectedItems()[0]
    var currentColor = str(read(mime, firstSelectedItem))
    if (currentColor != color)
      setData(mime, color)
    else
      removeData(mime)"
Icon=\xf1fc
InMenu=true
Name=Mark/Unmark Items
Shortcut=ctrl+m
Change Upper/Lower Case of Selected Text
[Command]
Command="
    copyq:
    if (!copy())
      abort()

    var text = str(clipboard())

    var newText = text.toUpperCase()
    if (text == newText)
      newText = text.toLowerCase()

    if (text == newText)
      abort();

    copy(newText)
    paste()"
GlobalShortcut=meta+ctrl+u
Icon=\xf034
Name=Toggle Upper/Lower Case
Change Copied Text to Title Case
[Command]
Command="
  copyq:
    function toTitleCase(str) {
      return str.replace(
        /\w\S*/g,
        function(txt) {
          return txt.charAt(0).toUpperCase() + txt.substr(1).toLowerCase();
        }
      );
    }
    copy(toTitleCase(str(input())))
    paste()"
GlobalShortcut=meta+ctrl+e
Icon=\xf034
Name=Title Case
Script Commands
Script command is type of command which allows overriding existing functions and creating new ones (allowing new command line arguments to be used).
The command is executed before any script and all defined variables and functions are available to the scripts.
Script commands can be created in Command dialog by setting Type of Action to Script.
Extending Command Line Interface
By adding following script command you can use hello() from other script
or on command line (copyq hello):
global.hello = function() {
    print('Hello, World!\n')
}
Script commands are executed in own scope so as to avoid adding temporary
variables in the global scope which contains all functions like copy() or
add(). Using global object allows to modify the global scope.
It’s useful to move code used by multiple commands to a new script command.
It can also simplify using copyq from another application or shell script.
Override Functionality
Existing functions can be overridden from script commands.
Specifically onClipboardChanged and functions it calls can be
overridden to customize handling of new clipboard content.
E.g. following command saves only textual clipboard data and removes any formatted text:
var saveData_ = saveData

saveData = function() {
    if ( str(data(mimeText)) != "" ) {
        popup('Saving only text')
        removeData(mimeHtml)
        saveData_()
    } else {
        popup('Not saving non-textual data')
    }
}
E.g. following command overrides paste() to use an external utility for
pasting clipboard:
paste = function() {
    var x = execute(
        'xdotool',
        'keyup', 'alt', 'ctrl', 'shift', 'super', 'meta',
        'key', 'shift+Insert')
    if (!x)
        throw 'Failed to run xdotool'
    if (x.stderr)
        throw 'Failed to run xdotool: ' + str(x.stderr)
}
E.g. show custom notifications for clipboard and Linux mouse selection changes.
function clipboardNotification(owns, hidden) {
    var id = isClipboard() ? 'clipboard' : 'selection'
    var icon = isClipboard() ? '\uf0ea' : '\uf246'
    var owner = owns ? 'CopyQ' : str(data(mimeWindowTitle))
    var title = id + ' - ' + owner
    var message = hidden ? '<HIDDEN>' : data(mimeText).left(100)
    notification(
    '.id', id,
    '.title', title,
    '.message', message,
    '.icon', icon
    )
}

var onClipboardChanged_ = onClipboardChanged
onClipboardChanged = function() {
    clipboardNotification(false, false)
    onClipboardChanged_()
}

var onOwnClipboardChanged_ = onOwnClipboardChanged
onOwnClipboardChanged = function() {
    clipboardNotification(true, false)
    onOwnClipboardChanged_()
}

var onHiddenClipboardChanged_ = onHiddenClipboardChanged
onHiddenClipboardChanged = function() {
    clipboardNotification(true, true)
    onHiddenClipboardChanged_()
}
Display Commands
Display command is type of command that modifies item data before displaying. The modified data are only used for displaying the item and are not stored.
The command is executed just before an item needs to be displayed. This can sometimes happen multiple times for the same item if the data or configuration changes or the tab was unloaded.
Display commands can be created in Command dialog by setting Type of Action to Display.
Use data() to retrieve current item data and setData() to set the
data to display (these are not stored permanently).
E.g. use slightly different color for plain text items.
copyq:
if ( str(data(mimeText)) && !str(data(mimeHtml)) ) {
    html = escapeHtml(data(mimeText))
    setData(mimeHtml, '<span style="color:#764">' + html + '</span>')
}
E.g. try to interpret text as Markdown (with marked external utility).
copyq:
var text = data(mimeText)
var result = execute('marked', null, text)
if (result && result.exit_code == 0) {
    setData(mimeHtml, result.stdout)
}
Backup
This page describes how to back up tabs, configuration and commands in CopyQ.
Back Up All Data Automatically on Exit
You can use command that backs up all items, tabs and settings after exit.
To install the command see the description in the repository.
Back Up Manually
To back up all the data, exit the application first and copy the configuration directory.
Path to configuration is usually:
Windows:
%APPDATA%\copyqPortable version for Windows:
configsub-folder in unzipped application directoryLinux:
~/.config/copyq
To copy the configuration path to clipboard from CopyQ:
Open Action dialog (
F5shortcut).Enter the command:
copyq:
dir = Dir(info('config') + '/..')
copy(dir.absolutePath())
Click OK dialog button.
To restore the backup, exit the application and replace the configuration directory.
Warning
Before making or restoring back up, always exit CopyQ (don’t only close the main window).
Export and Import
You can easily export selected tabs and optionally configuration and commands within the application.
Warning
Tabs are always exported unencrypted and if a tab is synchronized with directory on disk the files themselves won’t be exported.
To export the data click “Export…” in “File” menu and select what to export, confirm with OK button and select file to save the stuff to.
To restore the data click “Import…” in “File” menu, select file to import and select what to import.
Note
Import won’t overwrite existing tabs and commands but create new ones.
Alternatively you can use command line for export and import everything (selection dialogs won’t be opened).
copyq exportData {FILE/PATH/TO/EXPORT}
copyq importData {FILE/PATH/TO/IMPORT}
Writing Raw Data
Application allows you to save any kind of data using drag and drop or scripting interface.
To add an image to Images tab you can run:
cat image1.png | copyq tab Images write image/png -
This works for any other MIME data type (though unknown formats won’t be displayed properly).
Scripting API
CopyQ provides scripting capabilities to automatically handle clipboard changes, organize items, change settings and much more.
Supported language features and base function can be found at ECMAScript Reference. The language is mostly equivalent to modern JavaScript. Some features may be missing but feel free to use for example JavaScript reference on MDN.
CopyQ-specific features described in this document:
Note
These terms are equivalent: format, MIME type, media type
Execute Script
The scripts can be executed from:
Action or Command dialogs (F5, F6 shortcuts), if the first line starts with
copyq:command line as
copyq eval '<SCRIPT>'command line as
cat script.js | copyq eval -command line as
copyq <SCRIPT_FUNCTION> <FUNCTION_ARGUMENT_1> <FUNCTION_ARGUMENT_2> ...
When run from command line, result of last expression is printed on stdout.
Command exit values are:
0 - script finished without error
1 -
fail()was called2 - bad syntax
3 - exception was thrown
Command Line
If number of arguments that can be passed to function is limited you can use
copyq <FUNCTION1> <FUNCTION1_ARGUMENT_1> <FUNCTION1_ARGUMENT_2> \
          <FUNCTION2> <FUNCTION2_ARGUMENT> \
              <FUNCTION3> <FUNCTION3_ARGUMENTS> ...
where <FUNCTION1> and <FUNCTION2> are scripts where result of
last expression is functions that take two and one arguments
respectively.
Example:
copyq tab clipboard separator "," read 0 1 2
After eval() no arguments are treated as functions since it can access
all arguments.
Arguments recognize escape sequences \n (new line), \t
(tabulator character) and \\ (backslash).
Argument -e is identical to eval().
Argument - is replaced with data read from stdin.
Argument -- is skipped and all the remaining arguments are
interpreted as they are (escape sequences are ignored and -e, -,
-- are left unchanged).
Functions
Argument list parts ... and [...] are optional and can be
omitted.
Comment /*set*/ in function declaration indicates a specific function overload.
Item row values in scripts always start from 0 (like array index), unlike in GUI, where row numbers start from 1 by default.
- version()
Returns version string.
- Returns
Version string.
- Return type
string
Example of the version string:
CopyQ Clipboard Manager v4.0.0-19-g93d95a7f
Qt: 5.15.2
KNotifications: 5.79.0
Compiler: GCC
Arch: x86_64-little_endian-lp64
OS: Fedora 33 (Workstation Edition)
- help()
Returns help string.
- Returns
Help string.
- Return type
string
- /*search*/ help(searchString, ...)
Returns help for matched commands.
- Returns
Help string.
- Return type
string
- show()
Shows main window.
- /*tab*/ show(tabName)
Shows tab.
- showAt(x, y[, width, height])
Shows main window with given geometry.
- /*cursor*/ showAt()
Shows main window under mouse cursor.
- /*tab*/ showAt(x, y, width, height, tabName)
Shows tab with given geometry.
- hide()
Hides main window.
- toggle()
Shows or hides main window.
- Returns
trueonly if main window is being shown, otherwisefalse.- Return type
bool
Opens context menu.
Shows context menu for given tab.
This menu doesn’t show clipboard and doesn’t have any special actions.
Second argument is optional maximum number of items. The default value same as for tray (i.e. value of
config('tray_items')).Optional arguments x, y are coordinates in pixels on screen where menu should show up. By default menu shows up under the mouse cursor.
- exit()
Exits server.
- monitoring()
Returns true only if clipboard storing is enabled.
- Returns
trueif clipboard storing is enabled, otherwisefalse.- Return type
bool
- visible()
Returns true only if main window is visible.
- Returns
trueif main window is visible, otherwisefalse.- Return type
bool
- focused()
Returns true only if main window has focus.
- Returns
trueif main window has focus, otherwisefalse.- Return type
bool
- focusPrevious()
Activates window that was focused before the main window.
- Throws
Error()– Thrown if previous window cannot be activated.
- preview([true|false])
Shows/hides item preview and returns true only if preview was visible.
Example – toggle the preview:
preview(false) || preview(true)
- filter()
Returns the current text for filtering items in main window.
- Returns
Current filter.
- Return type
string
- /*set*/ filter(filterText)
Sets text for filtering items in main window.
- ignore()
Ignores current clipboard content (used for automatic commands).
This does all of the below.
Skips any next automatic commands.
Omits changing window title and tray tool tip.
Won’t store content in clipboard tab.
- clipboard([mimeType])
Returns clipboard data for MIME type (default is text).
Pass argument
"?"to list available MIME types.- Returns
Clipboard data.
- Return type
- selection([mimeType])
Same as
clipboard()for Linux mouse selection.- Returns
Selection data.
- Return type
- hasClipboardFormat(mimeType)
Returns true only if clipboard contains MIME type.
- Returns
trueif clipboad contans the format, otherwisefalse.- Return type
bool
- hasSelectionFormat(mimeType)
Same as
hasClipboardFormat()for Linux mouse selection.- Returns
trueif selection contans the format, otherwisefalse.- Return type
bool
- isClipboard()
Returns true only in automatic command triggered by clipboard change.
This can be used to check if current automatic command was triggered by clipboard and not Linux mouse selection change.
- Returns
trueif current automatic command is triggered by clipboard change, otherwisefalse.- Return type
bool
- copy(text)
Sets clipboard plain text.
Same as
copy(mimeText, text).- Throws
Error()– Thrown if clipboard fails to be set.
- /*data*/ copy(mimeType, data, [mimeType, data]...)
Sets clipboard data.
This also sets
mimeOwnerformat so automatic commands are not run on the new data and it’s not stored in clipboard tab.All other data formats are dropped from clipboard.
- Throws
Error()– Thrown if clipboard fails to be set.
Example – set both text and rich text:
copy(mimeText, 'Hello, World!',
     mimeHtml, '<p>Hello, World!</p>')
- /*item*/ copy(Item)
Function override with an item argument.
- Throws
Error()– Thrown if clipboard fails to be set.
Example – set both text and rich text:
var item = {}
item[mimeText] = 'Hello, World!'
item[mimeHtml] = '<p>Hello, World!</p>'
copy(item)
- /*window*/ copy()
Sends
Ctrl+Cto current window.- Throws
Error()– Thrown if clipboard doesn’t change (clipboard is reset before sending the shortcut).
Example:
try {
    copy(arguments)
} catch (e) {
    // Coping failed!
    popup('Coping Failed', e)
    abort()
}
var text = str(clipboard())
popup('Copied Text', text)
- copySelection(...)
Same as
copy()for Linux mouse selection.There is no
copySelection()without parameters.- Throws
Error()– Thrown if selection fails to be set.
- paste()
Pastes current clipboard.
This is basically only sending
Shift+Insertshortcut to current window.Correct functionality depends a lot on target application and window manager.
- Throws
Error()– Thrown if paste operation fails.
Example:
try {
    paste()
} catch (e) {
    // Pasting failed!
    popup('Pasting Failed', e)
    abort()
}
popup('Pasting Successful')
- tab()
Returns tab names.
- Returns
Array with names of existing tab.
- Return type
array of strings
- /*set*/ tab(tabName)
Sets current tab for the script.
Example – select third item at index 2 from tab “Notes”:
tab('Notes')
select(2)
- removeTab(tabName)
Removes tab.
- renameTab(tabName, newTabName)
Renames tab.
- tabIcon(tabName)
Returns path to icon for tab.
- Returns
Path to icon for tab.
- Return type
string
- /*set*/ tabIcon(tabName, iconPath)
Sets icon for tab.
- unload([tabNames...])
Unload tabs (i.e. items from memory).
If no tabs are specified, unloads all tabs.
If a tab is open and visible or has an editor open, it won’t be unloaded.
- Returns
Array of successfully unloaded tabs.
- Return type
array of strings
- forceUnload([tabNames...])
Force-unload tabs (i.e. items from memory).
If no tabs are specified, unloads all tabs.
Refresh button needs to be clicked to show the content of a force-unloaded tab.
If a tab has an editor open, the editor will be closed first even if it has unsaved changes.
- count()
- length()
- size()
Returns amount of items in current tab.
- Returns
Item count.
- Return type
int
- select(row)
Copies item in the row to clipboard.
Additionally, moves selected item to top depending on settings.
- next()
Copies next item from current tab to clipboard.
- previous()
Copies previous item from current tab to clipboard.
- add(text|Item...)
Same as
insert(0, ...).
- insert(row, text|Item...)
Inserts new items to current tab.
- Throws
Error()– Thrown if space for the items cannot be allocated.
- remove(row, ...)
Removes items in current tab.
- Throws
Error()– Thrown if some items cannot be removed.
- move(row)
Moves selected items to given row in same tab.
- edit([row|text] ...)
Edits items in current tab.
Opens external editor if set, otherwise opens internal editor.
- read([mimeType])
Same as
clipboard().
- /*row*/ read(mimeType, row, ...)
Returns concatenated data from items, or clipboard if row is negative.
Pass argument
"?"to list available MIME types.- Returns
Concatenated data in the rows.
- Return type
- write(row, mimeType, data, [mimeType, data]...)
Inserts new item to current tab.
- Throws
Error()– Thrown if space for the items cannot be allocated.
- /*item*/ write(row, Item...)
Function override with one or more item arguments.
- /*items*/ write(row, Item[])
Function override with item list argument.
- change(row, mimeType, data, [mimeType, data]...)
Changes data in item in current tab.
If data is
undefinedthe format is removed from item.
- /*item*/ change(row, Item...)
Function override with one or more item arguments.
- /*items*/ change(row, Item[])
Function override with item list argument.
- separator()
Returns item separator (used when concatenating item data).
- Returns
Current separator.
- Return type
string
- /*set*/ separator(separator)
Sets item separator for concatenating item data.
- action()
Opens action dialog.
- /*row*/ action([rows, ..., ]command[, outputItemSeparator])
Runs command for items in current tab.
If rows arguments is specified,
%1in the command will be replaced with concatenated text of the rows.If no rows are specified,
%1in the command will be replaced with clipboard text.The concatenated text (if rows are defined) or clipboard text is also passed on standard input of the command.
- popup(title, message[, time=8000])
Shows popup message for given time in milliseconds.
If
timeargument is set to -1, the popup is hidden only after mouse click.
- notification(...)
Shows popup message with icon and buttons.
Each button can have script and data.
If button is clicked the notification is hidden and script is executed with the data passed as stdin.
The function returns immediately (doesn’t wait on user input).
Special arguments:
‘.title’ - notification title
‘.message’ - notification message (can contain basic HTML)
‘.icon’ - notification icon (path to image or font icon)
‘.id’ - notification ID - this replaces notification with same ID
‘.time’ - duration of notification in milliseconds (default is -1, i.e. waits for mouse click)
‘.button’ - adds button (three arguments: name, script and data)
Example:
notification(
      '.title', 'Example',
      '.message', 'Notification with button',
      '.button', 'Cancel', '', '',
      '.button', 'OK', 'copyq:popup(input())', 'OK Clicked'
      )
- exportTab(fileName)
Exports current tab into file.
- Throws
Error()– Thrown if export fails.
- importTab(fileName)
Imports items from file to a new tab.
- Throws
Error()– Thrown if import fails.
- exportData(fileName)
Exports all tabs and configuration into file.
- Throws
Error()– Thrown if export fails.
- importData(fileName)
Imports all tabs and configuration from file.
- Throws
Error()– Thrown if import fails.
- config()
Returns help with list of available application options.
Users can change most of these options via the CopyQ GUI, mainly via the “Preferences” window.
These options are persisted within the
[Options]section of a correspondingcopyq.iniorcopyq.conffile (copyq.iniis used on Windows).- Returns
Available options.
- Return type
string
- /*get*/ config(optionName)
Returns value of given application option.
- Returns
Current value of the option.
- Return type
string
- Throws
Error()– Thrown if the option is invalid.
- /*set*/ config(optionName, value)
Sets application option and returns new value.
- Returns
New value of the option.
- Return type
string
- Throws
Error()– Thrown if the option is invalid.
- /*set-more*/ config(optionName, value, ...)
Sets multiple application options and return list with values in format
optionName=newValue.- Returns
New values of the options.
- Return type
string
- Throws
Error()– Thrown if there is an invalid option in which case it won’t set any options.
- toggleConfig(optionName)
Toggles an option (true to false and vice versa) and returns the new value.
- Returns
New value of the option.
- Return type
bool
- info([pathName])
Returns paths and flags used by the application.
- Returns
Path for given identifier.
- Return type
string
Example – print path to the configuration file:
info('config')
- eval(script)
Evaluates script and returns result.
- Returns
Result of the last expression.
- source(fileName)
Evaluates script file and returns result of last expression in the script.
This is useful to move some common code out of commands.
- Returns
Result of the last expression.
// File: c:/copyq/replace_clipboard_text.js
replaceClipboardText = function(replaceWhat, replaceWith)
{
    var text = str(clipboard())
    var newText = text.replace(replaceWhat, replaceWith)
    if (text != newText)
        copy(newText)
}
source('c:/copyq/replace_clipboard_text.js')
replaceClipboardText('secret', '*****')
- currentPath()
Get current path.
- Returns
Current path.
- Return type
string
cd /tmp
copyq currentPath
# Prints: /tmp
- /*set*/ currentPath(path)
Set current path.
- str(value)
Converts a value to string.
If ByteArray object is the argument, it assumes UTF8 encoding. To use different encoding, use :js:func`toUnicode`.
- Returns
Value as string.
- Return type
string
- input()
Returns standard input passed to the script.
- Returns
Data on stdin.
- Return type
- toUnicode(ByteArray)
Returns string for bytes with encoding detected by checking Byte Order Mark (BOM).
- Returns
Value as string.
- Return type
string
- /*encoding*/ toUnicode(ByteArray, encodingName)
Returns string for bytes with given encoding.
- Returns
Value as string.
- Return type
string
- fromUnicode(String, encodingName)
Returns encoded text.
- Returns
Value as ByteArray.
- Return type
- data(mimeType)
Returns data for automatic commands or selected items.
If run from menu or using non-global shortcut the data are taken from selected items.
If run for automatic command the data are clipboard content.
- Returns
Data for the format.
- Return type
- setData(mimeType, data)
Modifies data for
data()and new clipboard item.Next automatic command will get updated data.
This is also the data used to create new item from clipboard.
- Returns
trueif data were set,falseif parsing data failed (in case ofmimeItems).- Return type
bool
Example – automatic command that adds a creation time data and tag to new items:
copyq:
var timeFormat = 'yyyy-MM-dd hh:mm:ss'
setData('application/x-copyq-user-copy-time', dateString(timeFormat))
setData(mimeTags, 'copied: ' + time)
Example – menu command that adds a tag to selected items:
copyq:
setData('application/x-copyq-tags', 'Important')
- dataFormats()
Returns formats available for
data().- Returns
Array of data formats.
- Return type
array of strings
- print(value)
Prints value to standard output.
- serverLog(value)
Prints value to application log.
- logs()
Returns application logs.
- Returns
Application logs.
- Return type
string
- abort()
Aborts script evaluation.
- fail()
Aborts script evaluation with nonzero exit code.
- setCurrentTab(tabName)
Focus tab without showing main window.
- selectItems(row, ...)
Selects items in current tab.
- selectedTab()
Returns tab that was selected when script was executed.
- Returns
Currently selected tab name, empty if called outside the main window context (see Selected Items).
- Return type
string
- selectedItems()
Returns selected rows in current tab.
- Returns
Currently selected rows, empty if called outside the main window context (see Selected Items).
- Return type
array of ints
- selectedItemData(index)
Returns data for given selected item.
The data can empty if the item was removed during execution of the script.
- Returns
Currently selected items, empty if called outside the main window context (see Selected Items).
- Return type
array of
Item()
- setSelectedItemData(index, Item)
Set data for given selected item.
Returns false only if the data cannot be set, usually if item was removed.
See Selected Items.
- Returns
trueif data were set, otherwisefalse.- Return type
bool
- selectedItemsData()
Returns data for all selected items.
Some data can be empty if the item was removed during execution of the script.
- Returns
Currently selected item data, empty if called outside the main window context (see Selected Items).
- Return type
array of
Item()
- setSelectedItemsData(Item[])
Set data to all selected items.
Some data may not be set if the item was removed during execution of the script.
See Selected Items.
- currentItem()
- index()
Returns current row in current tab.
See Selected Items.
- Returns
Current row,
-1if called outside the main window context (see Selected Items).- Return type
int
- escapeHtml(text)
Returns text with special HTML characters escaped.
- Returns
Escaped HTML text.
- Return type
string
- unpack(data)
Returns deserialized object from serialized items.
- Returns
Deserialize item.
- Return type
- pack(Item)
Returns serialized item.
- Returns
Serialize item.
- Return type
- getItem(row)
Returns an item in current tab.
- Returns
Item data for the row.
- Return type
Example – show data of the first item in a tab in popups:
tab('work')  // change current tab for the script to 'work'
var item = getItem(0)
for (var format in item) {
    var data = item[format]
    popup(format, data)
}
See also
- setItem(row, text|Item)
Inserts item to current tab.
Same as
insert(row, something).See also
- toBase64(data)
Returns base64-encoded data.
- Returns
Base64-encoded data.
- Return type
string
- fromBase64(base64String)
Returns base64-decoded data.
- Returns
Base64-decoded data.
- Return type
- md5sum(data)
Returns MD5 checksum of data.
- Returns
MD5 checksum of the data.
- Return type
- sha1sum(data)
Returns SHA1 checksum of data.
- Returns
SHA1 checksum of the data.
- Return type
- sha256sum(data)
Returns SHA256 checksum of data.
- Returns
SHA256 checksum of the data.
- Return type
- sha512sum(data)
Returns SHA512 checksum of data.
- Returns
SHA512 checksum of the data.
- Return type
- open(url, ...)
Tries to open URLs in appropriate applications.
- Returns
trueif all URLs were successfully opened, otherwisefalse.- Return type
bool
- execute(argument, ..., null, stdinData, ...)
Executes a command.
All arguments after
nullare passed to standard input of the command.If argument is function it will be called with array of lines read from stdout whenever available.
- Returns
Finished command properties or
undefinedif executable was not found or could not be executed.- Return type
FinishedCommand()orundefined
Example – create item for each line on stdout:
execute('tail', '-f', 'some_file.log',
        function(lines) { add.apply(this, lines) })
Returns object for the finished command or
undefinedon failure.
- String currentWindowTitle()
Returns window title of currently focused window.
- Returns
Current window title.
- Return type
string
- dialog(...)
Shows messages or asks user for input.
Arguments are names and associated values.
Special arguments:
‘.title’ - dialog title
‘.icon’ - dialog icon (see below for more info)
‘.style’ - Qt style sheet for dialog
‘.height’, ‘.width’, ‘.x’, ‘.y’ - dialog geometry
‘.label’ - dialog message (can contain basic HTML)
- Returns
Value or values from accepted dialog or
undefinedif dialog was canceled.
dialog(
  '.title', 'Command Finished',
  '.label', 'Command <b>successfully</b> finished.'
  )
Other arguments are used to get user input.
var amount = dialog('.title', 'Amount?', 'Enter Amount', 'n/a')
var filePath = dialog('.title', 'File?', 'Choose File', new File('/home'))
If multiple inputs are required, object is returned.
var result = dialog(
  'Enter Amount', 'n/a',
  'Choose File', new File(str(currentPath))
  )
print('Amount: ' + result['Enter Amount'] + '\n')
print('File: ' + result['Choose File'] + '\n')
A combo box with an editable custom text/value can be created by passing an array argument. The default text can be provided using
.defaultChoice(by default it’s the first item).var text = dialog('.defaultChoice', '', 'Select', ['a', 'b', 'c'])
A combo box with non-editable text can be created by prefixing the label argument with
.combo:.var text = dialog('.combo:Select', ['a', 'b', 'c'])
An item list can be created by prefixing the label argument with
.list:.var items = ['a', 'b', 'c'] var selected_index = dialog('.list:Select', items) if (selected_index !== undefined) print('Selected item: ' + items[selected_index])
Icon for custom dialog can be set from icon font, file path or theme. Icons from icon font can be copied from icon selection dialog in Command dialog or dialog for setting tab icon (in menu ‘Tabs/Change Tab Icon’).
var search = dialog(
  '.title', 'Search',
  '.icon', 'search', // Set icon 'search' from theme.
  'Search', ''
  )
Opens menu with given items and returns selected item or an empty string.
- Returns
Selected item or empty string if menu was canceled.
- Return type
string
var selectedText = menuItems('x', 'y', 'z')
if (selectedText)
    popup('Selected', selectedText)
Opens menu with given items and returns index of selected item or -1.
Menu item label is taken from
mimeTextformat an icon is taken frommimeIconformat.- Returns
Selected item index or -1 if menu was canceled.
- Return type
int
var items = selectedItemsData()
var selectedIndex = menuItems(items)
if (selectedIndex != -1)
    popup('Selected', items[selectedIndex][mimeText])
- settings()
Returns array with names of all custom user options.
These options can be managed by various commands, much like cookies are used by web applications in a browser. A typical usage is to remember options lastly selected by user in a custom dialog displayed by a command.
These options are persisted within the
[General]section of a correspondingcopyq-scripts.inifile. But if an option is named likegroup/..., then it is written to a section named[group]instead. By grouping options like this, we can avoid potential naming collisions with other commands.- Returns
Available custom options.
- Return type
array of strings
- /*get*/ Value settings(optionName)
Returns value for a custom user option.
- Returns
Current value of the custom options,
undefinedif the option was not set.
- /*set*/ settings(optionName, value)
Sets value for a new custom user option or overrides existing one.
- dateString(format)
Returns text representation of current date and time.
See Date QML Type for details on formatting date and time.
- Returns
Current date and time as string.
- Return type
string
Example:
var now = dateString('yyyy-MM-dd HH:mm:ss')
- commands()
Return list of all commands.
- Returns
Array of all commands.
- Return type
array of
Command()
- setCommands(Command[])
Clear previous commands and set new ones.
To add new command:
var cmds = commands()
cmds.unshift({
        name: 'New Command',
        automatic: true,
        input: 'text/plain',
        cmd: 'copyq: popup("Clipboard", input())'
        })
setCommands(cmds)
- Command[] importCommands(String)
Return list of commands from exported commands text.
- Returns
Array of commands loaded from a file path.
- Return type
array of
Command()
- String exportCommands(Command[])
Return exported command text.
- Returns
Serialized commands.
- Return type
string
- addCommands(Command[])
Opens Command dialog, adds commands and waits for user to confirm the dialog.
- NetworkReply networkGet(url)
Sends HTTP GET request.
- Returns
HTTP reply.
- Return type
- NetworkReply networkPost(url, postData)
Sends HTTP POST request.
- Returns
HTTP reply.
- Return type
- NetworkReply networkGetAsync(url)
Same as
networkGet()but the request is asynchronous.The request is handled asynchronously and may not be finished until you get a property of the reply.
- Returns
HTTP reply.
- Return type
- NetworkReply networkPostAsync(url, postData)
Same as
networkPost()but the request is asynchronous.The request is handled asynchronously and may not be finished until you get a property of the reply.
- Returns
HTTP reply.
- Return type
- env(name)
Returns value of environment variable with given name.
- Returns
Value of the environment variable.
- Return type
- setEnv(name, value)
Sets environment variable with given name to given value.
- Returns
trueif the variable was set, otherwisefalse.- Return type
bool
- sleep(time)
Wait for given time in milliseconds.
- afterMilliseconds(time, function)
Executes function after given time in milliseconds.
- screenNames()
Returns list of available screen names.
- Returns
Available screen names.
- Return type
array of strings
- screenshot(format='png'[, screenName])
Returns image data with screenshot.
Default
screenNameis name of the screen with mouse cursor.You can list valid values for
screenNamewithscreenNames().- Returns
Image data.
- Return type
Example:
copy('image/png', screenshot())
- screenshotSelect(format='png'[, screenName])
Same as
screenshot()but allows to select an area on screen.- Returns
Image data.
- Return type
- queryKeyboardModifiers()
Returns list of currently pressed keyboard modifiers which can be ‘Ctrl’, ‘Shift’, ‘Alt’, ‘Meta’.
- Returns
Currently pressed keyboard modifiers.
- Return type
array of strings
- pointerPosition()
Returns current mouse pointer position (x, y coordinates on screen).
- Returns
Current mouse pointer coordinates.
- Return type
array of ints (with two elements)
- setPointerPosition(x, y)
Moves mouse pointer to given coordinates on screen.
- Throws
Error()– Thrown if the pointer position couldn’t be set (for example, unsupported on current the system).
- iconColor()
Get current tray and window icon color name.
- Returns
Current icon color.
- Return type
string
- /*set*/ iconColor(colorName)
Set current tray and window icon color name (examples: ‘orange’, ‘#ffa500’, ‘#09f’).
Resets color if color name is empty string.
- Throws
Error()– Thrown if the color name is empty or invalid.
// Flash icon for few moments to get attention.
var color = iconColor()
for (var i = 0; i < 10; ++i) {
  iconColor("red")
  sleep(500)
  iconColor(color)
  sleep(500)
}
See also
- iconTag()
Get current tray and window icon tag text.
- Returns
Current icon tag.
- Return type
string
- /*set*/ iconTag(tag)
Set current tray and window tag text.
- iconTagColor()
Get current tray and window tag color name.
- Returns
Current icon tag color.
- Return type
string
- /*set*/ iconTagColor(colorName)
Set current tray and window tag color name.
- Throws
Error()– Thrown if the color name is invalid.
- loadTheme(path)
Loads theme from an INI file.
- Throws
Error()– Thrown if the file cannot be read or is not valid INI format.
- onClipboardChanged()
Called when clipboard or Linux mouse selection changes.
Default implementation is:
if (!hasData()) {
    updateClipboardData();
} else if (runAutomaticCommands()) {
    saveData();
    updateClipboardData();
} else {
    clearClipboardData();
}
- onOwnClipboardChanged()
Called when clipboard or Linux mouse selection changes by a CopyQ instance.
Owned clipboard data contains
mimeOwnerformat.Default implementation calls
updateClipboardData().
- onHiddenClipboardChanged()
Called when hidden clipboard or Linux mouse selection changes.
Hidden clipboard data contains
mimeHiddenformat set to1.Default implementation calls
updateClipboardData().
- onClipboardUnchanged()
Called when clipboard or Linux mouse selection changes but data remained the same.
Default implementation does nothing.
- onStart()
Called when application starts.
- onExit()
Called just before application exists.
- runAutomaticCommands()
Executes automatic commands on current data.
If an executed command calls
ignore()or have “Remove Item” or “Transform” check box enabled, following automatic commands won’t be executed and the function returnsfalse. Otherwisetrueis returned.- Returns
trueif clipboard data should be stored, otherwisefalse.- Return type
bool
- clearClipboardData()
Clear clipboard visibility in GUI.
Default implementation is:
if (isClipboard()) {
    setTitle();
    hideDataNotification();
}
- updateTitle()
Update main window title and tool tip from current data.
Called when clipboard changes.
- updateClipboardData()
Sets current clipboard data for tray menu, window title and notification.
Default implementation is:
if (isClipboard()) {
    updateTitle();
    showDataNotification();
    setClipboardData();
}
- setTitle([title])
Set main window title and tool tip.
- synchronizeToSelection(text)
Synchronize current data from clipboard to Linux mouse selection.
Called automatically from clipboard monitor process if option
copy_clipboardis enabled.Default implementation calls
provideSelection().
- synchronizeFromSelection(text)
Synchronize current data from Linux mouse selection to clipboard.
Called automatically from clipboard monitor process if option
copy_selectionis enabled.Default implementation calls
provideClipboard().
- clipboardFormatsToSave()
Returns list of clipboard format to save automatically.
- Returns
Formats to get and save automatically from clipboard.
- Return type
array of strings
Override the funtion, for example, to save only plain text:
global.clipboardFormatsToSave = function() {
    return ["text/plain"]
}
Or to save additional formats:
var originalFunction = global.clipboardFormatsToSave;
global.clipboardFormatsToSave = function() {
    return originalFunction().concat([
        "text/uri-list",
        "text/xml"
    ])
}
- saveData()
Save current data (depends on mimeOutputTab).
- hasData()
Returns true only if some non-empty data can be returned by data().
Empty data is combination of whitespace and null characters or some internal formats (mimeWindowTitle, mimeClipboardMode etc.)
- Returns
trueif there are some data, otherwisefalse.- Return type
bool
- showDataNotification()
Show notification for current data.
- hideDataNotification()
Hide notification for current data.
- setClipboardData()
Sets clipboard data for menu commands.
- styles()
List available styles for
styleoption.- Returns
Style identifiers.
- Return type
array of strings
To change or update style use:
config("style", styleName)
Types
- class ByteArray()
Wrapper for QByteArray Qt class.
See QByteArray.
ByteArrayis used to store all item data (image data, HTML and even plain text).Use
str()to convert it to string. Strings are usually more versatile. For example to concatenate two items, the data need to be converted to strings first.var text = str(read(0)) + str(read(1))
- class File()
Wrapper for QFile Qt class.
See QFile.
To open file in different modes use:
open() - read/write
openReadOnly() - read only
openWriteOnly() - write only, truncates the file
openAppend() - write only, appends to the file
Following code reads contents of “README.md” file from current directory:
var f = new File('README.md')
if (!f.openReadOnly())
  throw 'Failed to open the file: ' + f.errorString()
var bytes = f.readAll()
Following code writes to a file in home directory:
var dataToWrite = 'Hello, World!'
var filePath = Dir().homePath() + '/copyq.txt'
var f = new File(filePath)
if (!f.openWriteOnly() || f.write(dataToWrite) == -1)
  throw 'Failed to save the file: ' + f.errorString()

// Always flush the data and close the file,
// before opening the file in other application.
f.close()
- class Dir()
Wrapper for QDir Qt class.
Use forward slash as path separator, for example “D:/Documents/”.
See QDir.
- class TemporaryFile()
Wrapper for QTemporaryFile Qt class.
See QTemporaryFile.
var f = new TemporaryFile()
f.open()
f.setAutoRemove(false)
popup('New temporary file', f.fileName())
To open file in different modes, use same open methods as for File.
- class Item()
Object with MIME types of an item.
Each property is MIME type with data.
Example:
var item = {}
item[mimeText] = 'Hello, World!'
item[mimeHtml] = '<p>Hello, World!</p>'
write(mimeItems, pack(item))
- class ItemSelection()
List of items from given tab.
An item in the list represents the same item in tab even if it is moved to a different row.
New items in the tab are not added automatically into the selection.
To create new empty selection use
ItemSelection()then add items withselect*()methods.Example - move matching items to the top of the tab:
ItemSelection().select(/^prefix/).move(0)
Example - remove all items from given tab but keep pinned items:
ItemSelection(tabName).selectRemovable().removeAll();
Example - modify items containing “needle” text:
var sel = ItemSelection().select(/needle/, mimeText);
for (var index = 0; index < sel.length; ++index) {
    var item = sel.itemAtIndex(index);
    item[mimeItemNotes] = 'Contains needle';
    sel.setItemAtIndex(item);
}
Example - selection with new items only:
var sel = ItemSelection().selectAll()
add("New Item 1")
add("New Item 2")
sel.invert()
sel.items();
- ItemSelection.tab
Tab name
- ItemSelection.length
Number of filtered items in the selection
- ItemSelection.selectAll()
Select all items in the tab.
- Returns
self
- Return type
ItemSelection
- ItemSelection.select(regexp[, mimeType])
Select additional items matching the regular expression.
If regexp is a valid regular expression and
mimeTypeis not set, this selects items with matching text.If regexp matches empty strings and
mimeTypeis set, this selects items containing the MIME type.If regexp is
undefinedandmimeTypeis set, this select items not containing the MIME type.- Returns
self
- Return type
ItemSelection
- ItemSelection.selectRemovable()
Select only items that can be removed.
- Returns
self
- Return type
ItemSelection
- ItemSelection.invert()
Select only items not in the selection.
- Returns
self
- Return type
ItemSelection
- ItemSelection.deselectIndexes(int[])
Deselect items at given indexes in the selection.
- Returns
self
- Return type
ItemSelection
- ItemSelection.deselectSelection(ItemSelection)
Deselect items in other selection.
- Returns
self
- Return type
ItemSelection
- ItemSelection.current()
Deselects all and selects only the items which were selected when the command was triggered.
See Selected Items.
- Returns
self
- Return type
ItemSelection
- ItemSelection.removeAll()
Delete all items in the selection (if possible).
- Returns
self
- Return type
ItemSelection
- ItemSelection.move(row)
Move all items in the selection to the target row.
- Returns
self
- Return type
ItemSelection
- ItemSelection.copy()
Clone the selection object.
- Returns
cloned object
- Return type
ItemSelection
- ItemSelection.rows()
Returns selected rows.
- Returns
Selected rows
- Return type
array of ints
- ItemSelection.itemAtIndex(index)
Returns item data at given index in the selection.
- Returns
Item data
- Return type
- ItemSelection.setItemAtIndex(index, Item)
Sets data to the item at given index in the selection.
- Returns
self
- Return type
ItemSelection
- ItemSelection.items()
Return list of data from selected items.
- Returns
Selected item data
- Return type
array of
Item()
- ItemSelection.setItems(Item[])
Set data for selected items.
- Returns
self
- Return type
ItemSelection
- ItemSelection.itemsFormat(mimeType)
Return list of data from selected items containing specified MIME type.
- Returns
Selected item data containing only the format
- Return type
array of
Item()
- ItemSelection.setItemsFormat(mimeType, data)
Set data for given MIME type for the selected items.
- Returns
self
- Return type
ItemSelection
- class FinishedCommand()
Properties of finished command.
- FinishedCommand.stdout
Standard output
- FinishedCommand.stderr
Standard error output
- FinishedCommand.exit_code
Exit code
- class NetworkReply()
Received network reply object.
- NetworkReply.data
Reply data
- NetworkReply.status
HTTP status
- NetworkReply.error``
Error string (set only if an error occurred)
- NetworkReply.redirect
URL for redirection (set only if redirection is needed)
- NetworkReply.headers
Reply headers (array of pairs with header name and header content)
- NetworkReply.finished
True only if request has been completed, false only for unfinished asynchronous requests
- class Command()
Wrapper for a command (from Command dialog).
Properties are same as members of Command struct.
Objects
- arguments
Array for accessing arguments passed to current function or the script (
arguments[0]is the script itself).
- global
Object allowing to modify global scope which contains all functions like
copy()oradd().This is useful for Script Commands.
- console
Allows some logging and debugging.
// Print a message if COPYQ_LOG_LEVEL=DEBUG
// environment variable is set
console.log(
    'Supported console properties/functions:',
    Object.getOwnPropertyNames(console))
console.warn('Changing clipboard...')

// Elapsed time
console.time('copy')
copy('TEST')
console.timeEnd('copy')

// Ensure a condition is true before continuing
console.assert(str(clipboard()) == 'TEST')
MIME Types
Item and clipboard can provide multiple formats for their data. Type of the data is determined by MIME type.
Here is list of some common and builtin (start with
application/x-copyq-) MIME types.
These MIME types values are assigned to global variables prefixed with
mime.
Note
Content for following types is UTF-8 encoded.
- mimeText
Data contains plain text content. Value: ‘text/plain’.
- mimeHtml
Data contains HTML content. Value: ‘text/html’.
- mimeUriList
Data contains list of links to files, web pages etc. Value: ‘text/uri-list’.
- mimeWindowTitle
Current window title for copied clipboard. Value: ‘application/x-copyq-owner-window-title’.
- mimeItems
Serialized items. Value: ‘application/x-copyq-item’.
- mimeItemNotes
Data contains notes for item. Value: ‘application/x-copyq-item-notes’.
- mimeIcon
Data contains icon for item. Value: ‘application/x-copyq-item-icon’.
- mimeOwner
If available, the clipboard was set from CopyQ (from script or copied items). Value: ‘application/x-copyq-owner’.
Such clipboard is ignored in CopyQ, i.e. it won’t be stored in clipboard tab and automatic commands won’t be executed on it.
- mimeClipboardMode
Contains
selectionif data is from Linux mouse selection. Value: ‘application/x-copyq-clipboard-mode’.
- mimeCurrentTab
Current tab name when invoking command from main window. Value: ‘application/x-copyq-current-tab’.
Following command print the tab name when invoked from main window:
copyq data application/x-copyq-current-tab
copyq selectedTab
- mimeSelectedItems
Selected items when invoking command from main window. Value: ‘application/x-copyq-selected-items’.
- mimeCurrentItem
Current item when invoking command from main window. Value: ‘application/x-copyq-current-item’.
- mimeHidden
If set to
1, the clipboard or item content will be hidden in GUI. Value: ‘application/x-copyq-hidden’.This won’t hide notes and tags.
Example – clear window title and tool tip:
copyq copy application/x-copyq-hidden 1 plain/text "This is secret"
- mimeShortcut
Application or global shortcut which activated the command. Value: ‘application/x-copyq-shortcut’.
copyq:
var shortcut = data(mimeShortcut)
popup("Shortcut Pressed", shortcut)
- mimeColor
Item color (same as the one used by themes). Value: ‘application/x-copyq-color’.
Examples:
#ffff00
rgba(255,255,0,0.5)
bg - #000099
- mimeOutputTab
Name of the tab where to store new item. Value: ‘application/x-copyq-output-tab’.
The clipboard data will be stored in tab with this name after all automatic commands are run.
Clear or remove the format to omit storing the data.
Example – automatic command that avoids storing clipboard data:
removeData(mimeOutputTab)
Valid only in automatic commands.
Selected Items
Functions that get and set data for selected items and current tab are only available if called from Action dialog or from a command which is in menu.
Selected items are indexed from top to bottom as they appeared in the current tab at the time the command is executed.
Linux Mouse Selection
In many application on Linux, if you select a text with mouse, it’s possible to paste it with middle mouse button.
The text is stored separately from normal clipboard content.
On non-Linux system, functions that support mouse selection will do nothing
(for example copySelection()) or return undefined (in case of
selection()).
Plugins
Use plugins object to access functionality of plugins.
- plugins.itemsync.selectedTabPath()
Returns synchronization path for current tab (mimeCurrentTab).
var path = plugins.itemsync.selectedTabPath()
var baseName = str(data(plugins.itemsync.mimeBaseName))
var absoluteFilePath = Dir(path).absoluteFilePath(baseName)
// NOTE: Known file suffix/extension can be missing in the full path.
- class plugins.itemsync.tabPaths()
Object that maps tab name to synchronization path.
var tabName = 'Downloads'
var path = plugins.itemsync.tabPaths[tabName]
- plugins.itemsync.mimeBaseName
MIME type for accessing base name (without full path).
Known file suffix/extension can be missing in the base name.
- plugins.itemtags.userTags
List of user-defined tags.
- plugins.itemtags.tags(row, ...)
List of tags for items in given rows.
- plugins.itemtags.tag(tagName[, rows, ...])
Add given tag to items in given rows or selected items.
See Selected Items.
- plugins.itemtags.untag(tagName[, rows, ...])
Remove given tag from items in given rows or selected items.
See Selected Items.
- plugins.itemtags.clearTags([rows, ...])
Remove all tags from items in given rows or selected items.
See Selected Items.
- plugins.itemtags.hasTag(tagName[, rows, ...])
Return true if given tag is present in any of items in given rows or selected items.
See Selected Items.
- plugins.itemtags.mimeTags
MIME type for accessing list of tags.
Tags are separated by comma.
- plugins.itempinned.isPinned(rows, ...)
Returns true only if any item in given rows is pinned.
- plugins.itempinned.pin(rows, ...)
Pin items in given rows or selected items or new item created from clipboard (if called from automatic command).
- plugins.itempinned.unpin(rows, ...)
Unpin items in given rows or selected items.
- plugins.itempinned.mimePinned
Presence of the format in an item indicates that it is pinned.
Build from Source Code
This page describes how to build the application from source code.
Get the Source Code
Download the source code from git repository
git clone https://github.com/hluk/CopyQ.git
or download the latest source code archive from:
Install Dependencies
The build requires:
Ubuntu
On Ubuntu you can install all build dependencies with:
sudo apt install \
  build-essential \
  cmake \
  extra-cmake-modules \
  git \
  libkf5notifications-dev \
  libqt5svg5 \
  libqt5svg5-dev \
  libqt5waylandclient5-dev \
  libqt5x11extras5-dev \
  libwayland-dev \
  libxfixes-dev \
  libxtst-dev \
  qtbase5-private-dev \
  qtdeclarative5-dev \
  qttools5-dev \
  qttools5-dev-tools \
  qtwayland5 \
  qtwayland5-dev-tools
Fedora / RHEL / Centos
On Fedora and derivatives you can install all build dependencies with:
sudo yum install \
  cmake \
  extra-cmake-modules \
  gcc-c++ \
  git \
  kf5-knotifications-devel \
  libSM-devel \
  libXfixes-devel \
  libXtst-devel \
  qt5-qtbase-devel \
  qt5-qtbase-private-devel \
  qt5-qtdeclarative-devel \
  qt5-qtsvg-devel \
  qt5-qttools-devel \
  qt5-qtwayland-devel \
  qt5-qtx11extras-devel \
  wayland-devel
Build and Install
Build the source code with CMake and make or using an IDE of your choice (see next sections).
cd CopyQ
cmake -DCMAKE_BUILD_TYPE=Release -DCMAKE_INSTALL_PREFIX=/usr/local .
make
make install
Qt Creator
Qt Creator is IDE focused on developing C++ and Qt applications.
Install Qt Creator from your package manager or by selecting it from Qt installation utility.
Set up Qt library, C++ compiler and CMake.
See also
Open file CMakeLists.txt in repository clone to create new project.
Visual Studio
You need to install Qt for given version Visual Studio.
In Visual Studio 2017 open folder containing repository clone using “File - Open - Folder”.
In older versions, create solution manually by running cmake -G "Visual Studio 14 2015 Win64" .
(select appropriate generator name) in repository clone folder.
See also
Building and Packaging for OS X
On OS X, required Qt 5 libraries and utilities can be easily installed with Homebrew.
cd CopyQ
git -C "utils/github/homebrew" init .
git -C "utils/github/homebrew" add .
git -C "utils/github/homebrew" commit -m "Initial"
brew tap copyq/kde utils/github/homebrew/
brew install qt5 copyq/kde/kf5-knotifications
Build with the following commands:
cmake -DCMAKE_PREFIX_PATH="$(brew --prefix qt5)" .
cmake --build .
cpack
This will produce a self-contained application bundle CopyQ.app
which can then be copied or moved into /Applications.
Fixing Bugs and Adding Features
This page describes how to build, fix and improve the source code.
Making Changes
Pull requests are welcome at github project page.
For more info see Creating a pull request from a fork.
Try to keep the code style consistent with the existing code.
Build the Debug Version
mkdir build
cd build
cmake -DCMAKE_BUILD_TYPE=Debug -DWITH_TESTS=ON ..
make
Run Tests
You can run automated tests if the application is built either in debug
mode, with CMake flag -DWITH_TESTS=ON.
Run the tests with following command.
copyq tests
This command will execute all test cases in new special CopyQ session so that user configuration, tabs and items are not modified. It’s better to close any other CopyQ session before running tests since they can affect test results.
While running tests there must be no keyboard and mouse interaction.
Preferably you can execute the tests in separate virtual environment. On
Linux you can run the tests on virtual X11 server with xvfb-run.
xvfb-run sh -c 'openbox & sleep 1; copyq tests'
Test invocation examples:
Print help for tests:
copyq tests --helpRun specific tests:
copyq tests commandHelp commandVersionRun specific tests for a plugin:
copyq tests 'PLUGINS:pinned' isPinnedRun tests only for specific plugins:
copyq tests 'PLUGINS:pinned|tags'List tests:
copyq tests -functionsList tests for a plugin:
copyq tests PLUGINS:tags -functionsLess verbose tests:
copyq tests -silentSlower GUI tests:
COPYQ_TESTS_KEYS_WAIT=1000 COPYQ_TESTS_KEY_DELAY=50 copyq tests editItems
Source Code Overview
This page describes application processes and source code.
Applications, Frameworks and Libraries
The application is written in C++17 and uses Qt framework.
Source code can be build either with CMake.
Most icons in the application are taken from theme by default (which currently works only on Linux) with fallback to built-in icons provided by FontAwesome.
The application logo and icons were created in Inkscape (icon source is in src/images/icon.svg).
Application Processes
There are these system processes related to CopyQ:
Main GUI application
Clipboard monitor - executes automatic clipboard commands
Menu command filter - enables/hides custom menu items based on “Filter” field in menu commands
Display command - executes display commands as needed
Clipboard and X11 selection owner and synchronization - provides clipboard data; launched as needed
Multiple clients - anything run by user from Action dialog or triggered as menu, automatic or global-shortcut command
Main GUI Application
The main GUI application (or server) can be executed by running
copyq binary without attributes (session name can be optionally
specified on command line).
It creates local server allowing communication with clipboard monitor process and other client processes.
Each user can run multiple main application processes each with unique session name (default name is empty).
Clipboard Monitor
Clipboard monitoring happens in separate process because otherwise it would block GUI (in Qt clipboard needs to be accessed in main GUI thread). The process is allowed to crash or loop indefinitely due to bugs on some platforms.
Setting and retrieving clipboard can still happen in GUI thread (copying and pasting in various GUI widgets) but it’s preferred to send and receive clipboard data using monitor process.
The monitor process is launched as soon as GUI application starts and is restarted whenever it doesn’t respond to keep-alive requests.
Clients and Scripting
Scripting language is Qt Script (mostly same syntax and functions as JavaScript).
API is described in Scripting API.
A script can be started by passing arguments to copyq.
For example: copyq "1+1"
After script finishes, the server sends back output of last command and exit code (non-zero if script crashes).
copyq eval 'read(0,1,2)' # prints first three items in list
copyq eval 'fail()' # exit code will be non-zero
While script is running, it can send print requests to client.
copyq eval 'print("Hello, "); print("World!\n")'
Scripts can ask for stdin from client.
copyq eval 'var client_stdin = input()'
The script run in current directory of client process.
copyq eval 'Dir().absolutePath()'
copyq eval 'execute("ls", "-l").stdout'
Single function call where all arguments are numbers or strings can be executed by passing function name and function arguments on command line. Following commands are equal.
copyq eval 'copy("Hello, World!")'
copyq copy "Hello, World!"
Getting application version or help mustn’t require the server to be running.
copyq help
copyq version
Scripts run in separate thread and communicate with main thread by
calling methods on an object of ScriptableProxy class. If called
from non-main thread, these methods invoke a slot on an QObject in
main thread and pass it a function object which simply calls the method
again.
bool ScriptableProxy::loadTab(const QString &tabName)
{
    // This section is wrapped in an macro so to remove duplicate code.
    if (!m_inMainThread) {
        // Callable object just wraps the lambda so it's possible to send it to a slot.
        auto callable = createCallable([&]{ return loadTab(tabName); });

        m_inMainThread = true;
        QMetaObject::invokeMethod(m_wnd, "invoke", Qt::BlockingQueuedConnection, Q_ARG(Callable*, &callable));
        m_inMainThread = false;

        return callable.result();
    }

    // Now it's possible to call method on an object in main thread.
    return m_wnd->loadTab(tabName);
}
Platform-dependent Code
Code for various platforms is stored in src/platform.
This leverages amount of #ifs and similar preprocessor directives
in common code.
Each supported platform implements
PlatformNativeInterface
and platformNativeInterface().
The implementations can contain:
Creating Qt application objects
Clipboard handling (for clipboard monitor)
Focusing window and getting window titles
Getting system paths
Setting “autostart” option
Handling global shortcuts (note: this part is in qxt/)
For unsupported platforms there is simple implementation to get started.
Plugins
Plugins are built as dynamic libraries which are loaded from runtime plugin directory (platform-dependent) after application start.
Code is stored in plugins.
Plugins implement interfaces from src/item/itemwidget.h.
To create new plugin just duplicate and rewrite an existing plugin. You
can build the plugin with make {PLUGIN_NAME}.
Continuous Integration (CI)
The application binaries and packages are built and tested on multiple CI servers.
- GitHub Actions
Builds packages for OS X.
Builds and runs tests for Linux binaries.
- GitLab CI
Builds and runs tests for Ubuntu 16.04 binaries.
Screenshots are taken while GUI tests are running. These are available if a test fails.
- AppVeyor
Builds installers and portable packages for Windows.
Provides downloads for recent commits.
Release build are based on gcc-compiled binaries (Visual Studio builds are also available).
- OBS Linux Packages
Builds release packages for various Linux distributions.
- Beta OBS Linux Packages
Builds beta and unstable packages for various Linux distributions.
- Coveralls
Contains coverage report from tests run with GitHub Actions.
Translations
Translations can be done either via Weblate (preferred) or by using Qt utilities.
For explanation for some frequent words see Glossary.
Translating Keyboard Accelerators
Some texts contain single & character that is not visible in UI and is used
to mark the following character as keyboard accelerator (the character is
usually underlined in UI). This is used to quickly access labels, menu items
etc. with keyboard shortcut.
E.g. &File menu item can be accesses with Alt+F shortcut on most
systems.
If multiple UI elements have the same keyboard accelerator, associated shortcut cycles through them (if pressed multiple times). It’s better to avoid this by defining unique accelerator, but that’s not always easy.
If unsure, use the original one enclosed in parentheses, e.g. label
For&mat: can be translated to simplified Chinese as 格式(&M):.
Writing Translatable Code
All GUI strings should be translatable. This is indicated in code with
tr("Some GUI text", "Hints for translators").
Adding New Language
To add new language for the application follow these steps.
Create new translation file with
utils/lupdate.sh translations/copyq_<LANGUAGE>.ts.Add new language file to Git repository.
Translate with Weblate service or locally with
linguist translations/copyq_<LANGUAGE>.ts.
Updating Translations
To push and pull changes from Weblate safely, avoiding merge conflicts, you can use Weblate Client.
Install Weblate Client:
pip3 install -U --user wlc
Lock and push changes from Weblate (remember to unlock later):
wlc lock
wlc push
git pull
Update and push new translations to repository:
utils/lupdate.sh
git add translations/
git commit -m "Update translations"
git push
Pull changes to Weblate and unlock:
wlc pull
wlc unlock
Text Encoding
This page serves as concept for adding additional CopyQ command line switch to print and read texts in UTF-8 (i.e. without using system encoding).
Every time the bytes are read from a command (standard output or arguments from client) the input is expected to be either just series of bytes or text in system encoding (possibly Latin1 on Windows). But texts/strings in CopyQ and in clipboard are UTF-8 formatted (except some MIME types with specified encoding).
When reading system-encoded text (MIME starts with “text/”) CopyQ re-encodes the data from system encoding to UTF-8. That’s not a problem if the received data is really in system encoding. But if you send data from Perl with the UTF-8 switch, CopyQ must also know that UTF-8 is used instead of system encoding.
The same goes for other way. CopyQ sends texts back to client or to a command in system encoding so it needs to convert these texts from UTF-8.
As for the re-encoding part, Qt does nice job transforming characters from UTF-8 but of course for lot of characters in UTF-8 there is no alternative in Latin1 and other encodings.
Customize and Build the Windows Installer
Translations
Most of the translations for the installer are taken directly from the installer generator Inno Setup (http://www.jrsoftware.org/isinfo.php).
You can add translations for CopyQ-specific messages in
shared/copyq.iss. Just copy lines starting with en. from
[Custom Messages] section and change prefix to de. (for german
translation).
Modify and Test Installation
Normally the installation file is generated automatically by Appveyor which executes appveyor-after-build.bat to generate portable app folder from build files and runs Inno Setup (the last line).
You don’t have to build the app again, you just need:
Download the unzipped portable version of the app.
Clone of this repository.
Install Inno Setup.
Open shared/copyq.iss in Inno Setup and add few lines at the beginning of the file.
#define AppVersion 2.8.1-beta
#define Source C:\path\to\CopyQ-repository-clone
#define Destination C:\path\to\CopyQ-portable
You should now be able to modify the file in Inno Setup and run it easily.