Read the Docs: Documentation Simplified
Read the Docs simplifies software documentation by building, versioning, and hosting of your docs, automatically. This enables many “docs like code” workflows, keeping your code & documentation as close as possible.
- Never out of sync 🔄
Whenever you push code to your favorite version control system, whether that is Git or Mercurial, Read the Docs will automatically build your docs so your code and documentation are always up-to-date. Read more about VCS Integrations.
- Multiple versions 🗂️
Read the Docs can host and build multiple versions of your docs so having a 1.0 version of your docs and a 2.0 version of your docs is as easy as having a separate branch or tag in your version control system. Read more about Versioned Documentation.
- Open Source and User Focused 💓
Our code is free and open source. Our company is bootstrapped and 100% user focused. Read the Docs Community hosts documentation for over 100,000 large and small open source projects, in almost every human and computer language. Read the Docs for Business supports hundreds of organizations with product and internal documentation.
You can find out more about our all the Main Features in these pages.
First steps
Are you new to software documentation or are you looking to use your existing docs with Read the Docs? Learn about documentation authoring tools such as Sphinx and MkDocs to help you create fantastic documentation for your project.
Tutorial: Read the Docs tutorial
Getting started: With Sphinx | With MkDocs | Choosing Between Our Two Platforms
Importing your existing documentation: Import guide
Read the Docs tutorial
In this tutorial you will create a documentation project on Read the Docs by importing an Sphinx project from a GitHub repository, tailor its configuration, and explore several useful features of the platform.
The tutorial is aimed at people interested in learning how to use Read the Docs to host their documentation projects. You will fork a fictional software library similar to the one developed in the official Sphinx tutorial. No prior experience with Sphinx is required, and you can follow this tutorial without having done the Sphinx one.
The only things you will need to follow are a web browser, an Internet connection, and a GitHub account (you can register for a free account if you don’t have one). You will use Read the Docs Community, which means that the project will be public.
Getting started
Preparing your project on GitHub
To start, sign in to GitHub and navigate to the tutorial GitHub template, where you will see a green Use this template button. Click it to open a new page that will ask you for some details:
Leave the default “Owner”, or change it to something better for a tutorial project.
Introduce an appropriate “Repository name”, for example
rtd-tutorial.Make sure the project is “Public”, rather than “Private”.
After that, click on the green Create repository from template button, which will generate a new repository on your personal account (or the one of your choosing). This is the repository you will import on Read the Docs, and it contains the following files:
README.rstBasic description of the repository, you will leave it untouched.
pyproject.tomlPython project metadata that makes it installable. Useful for automatic documentation generation from sources.
lumache.pySource code of the fictional Python library.
docs/Directory holding all the Sphinx documentation sources, including some required dependencies in
docs/requirements.txt, the Sphinx configurationdocs/source/conf.py, and the root documentdocs/source/index.rstwritten in reStructuredText.
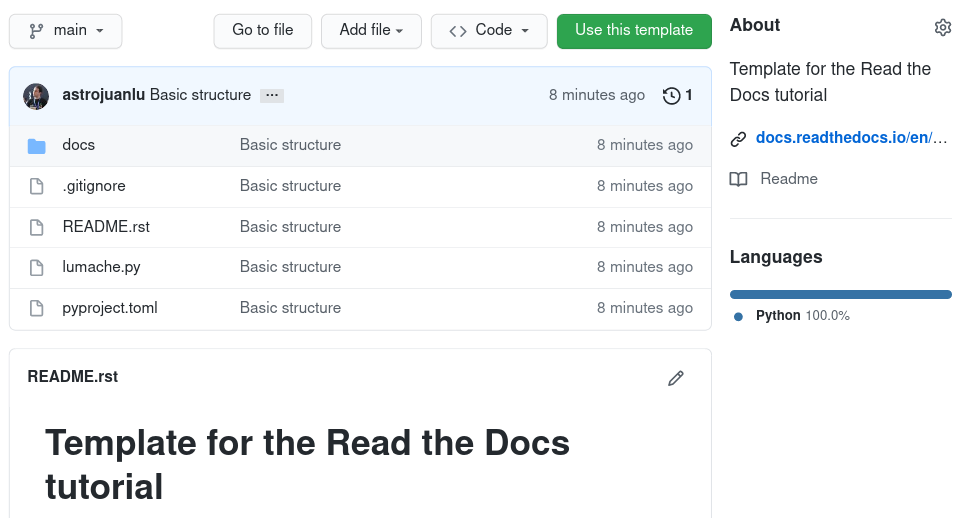
GitHub template for the tutorial
Sign up for Read the Docs
To sign up for a Read the Docs account, navigate to the Sign Up page and choose the option Sign up with GitHub. On the authorization page, click the green Authorize readthedocs button.
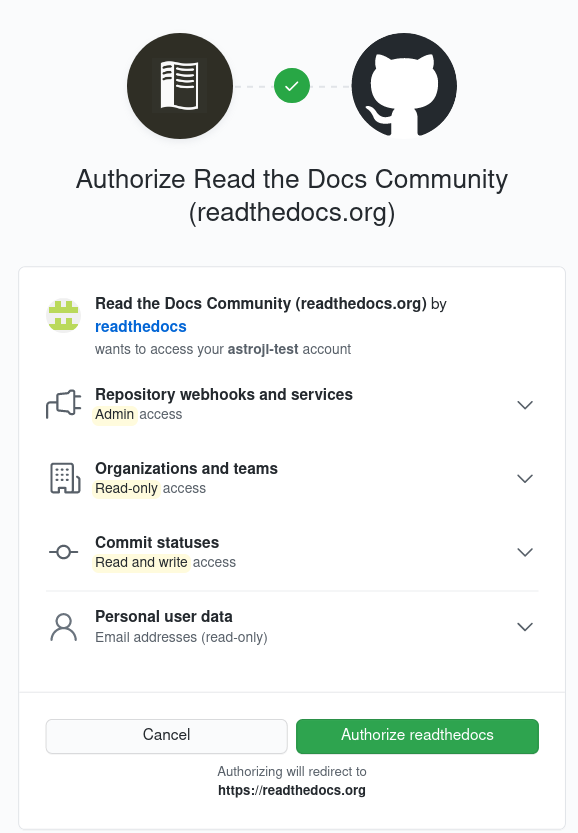
GitHub authorization page
Note
Read the Docs needs elevated permissions to perform certain operations that ensure that the workflow is as smooth as possible, like installing webhooks. If you want to learn more, check out Permissions for connected accounts.
After that, you will be redirected to Read the Docs, where you will need to confirm your e-mail and username. Clicking the Sign Up » button will create your account and redirect you to your dashboard.
By now, you should have two email notifications:
One from GitHub, telling you that “A third-party OAuth application … was recently authorized to access your account”. You don’t need to do anything about it.
Another one from Read the Docs, prompting you to “verify your email address”. Click on the link to finalize the process.
Finally, you created your account on Read the Docs and are ready to import your first project.
Welcome!
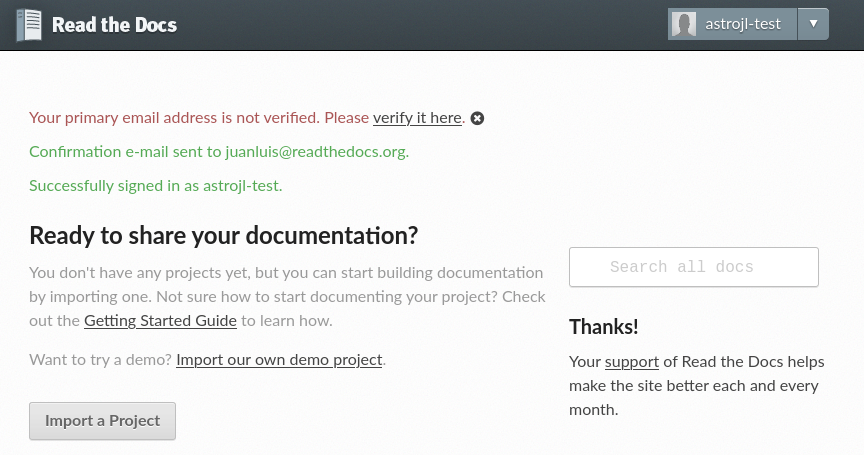
Read the Docs empty dashboard
Note
Our commercial site offers some extra features, like support for private projects. You can learn more about our two different sites.
First steps
Importing the project to Read the Docs
To import your GitHub project to Read the Docs, first click on the Import a Project button on your dashboard (or browse to the import page directly). You should see your GitHub account under the “Filter repositories” list on the right. If the list of repositories is empty, click the 🔄 button, and after that all your repositories will appear on the center.
Import projects workflow
Locate your rtd-tutorial project
(possibly clicking next ›› at the bottom if you have several pages of projects),
and then click on the ➕ button to the right of the name.
The next page will ask you to fill some details about your Read the Docs project:
- Name
The name of the project. It has to be unique across all the service, so it is better if you prepend your username, for example
{username}-rtd-tutorial.- Repository URL
The URL that contains the sources. Leave the automatically filled value.
- Repository type
Version control system used, leave it as “Git”.
- Default branch
Name of the default branch of the project, leave it as
main.- Edit advanced project options
Leave it unchecked, we will make some changes later.
After hitting the Next button, you will be redirected to the project home. You just created your first project on Read the Docs! 🎉
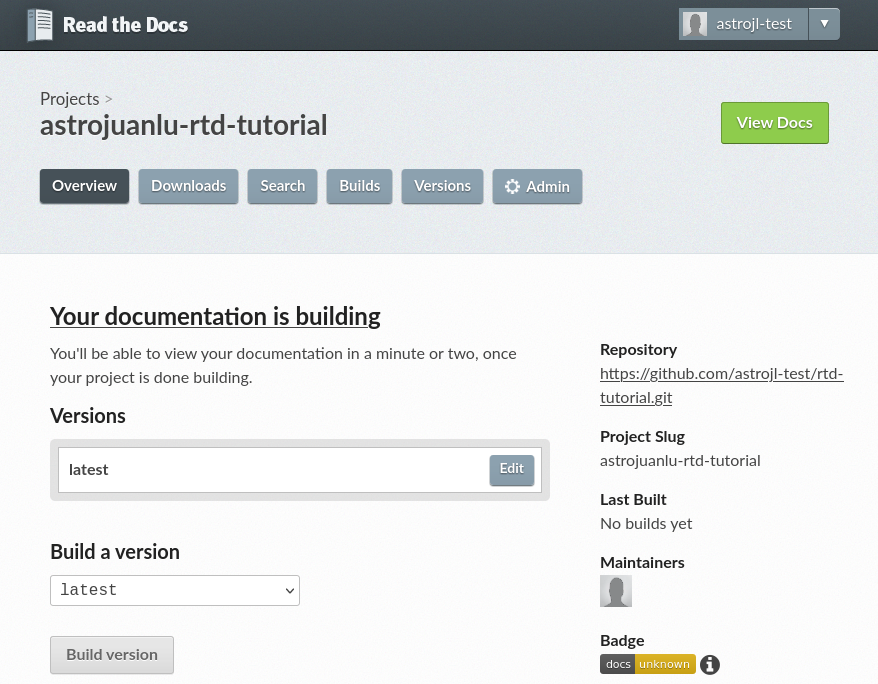
Project home
Checking the first build
Read the Docs will try to build the documentation of your project right after you create it. To see the build logs, click on the Your documentation is building link on the project home, or alternatively navigate to the “Builds” page, then open the one on top (the most recent one).
If the build has not finished yet by the time you open it, you will see a spinner next to a “Installing” or “Building” indicator, meaning that it is still in progress.
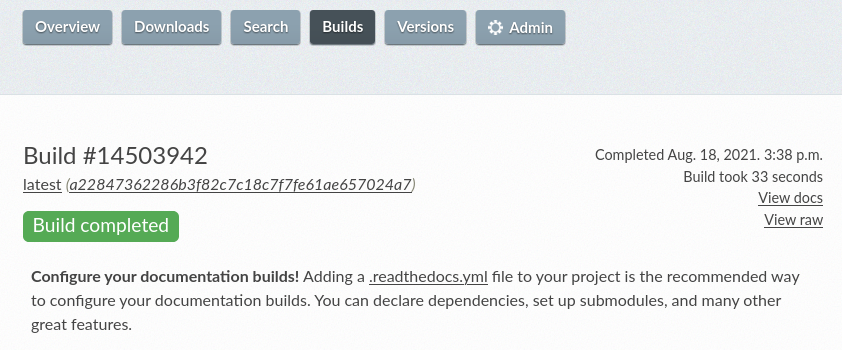
First successful documentation build
When the build finishes, you will see a green “Build completed” indicator, the completion date, the elapsed time, and a link to see the corresponding documentation. If you now click on View docs, you will see your documentation live!
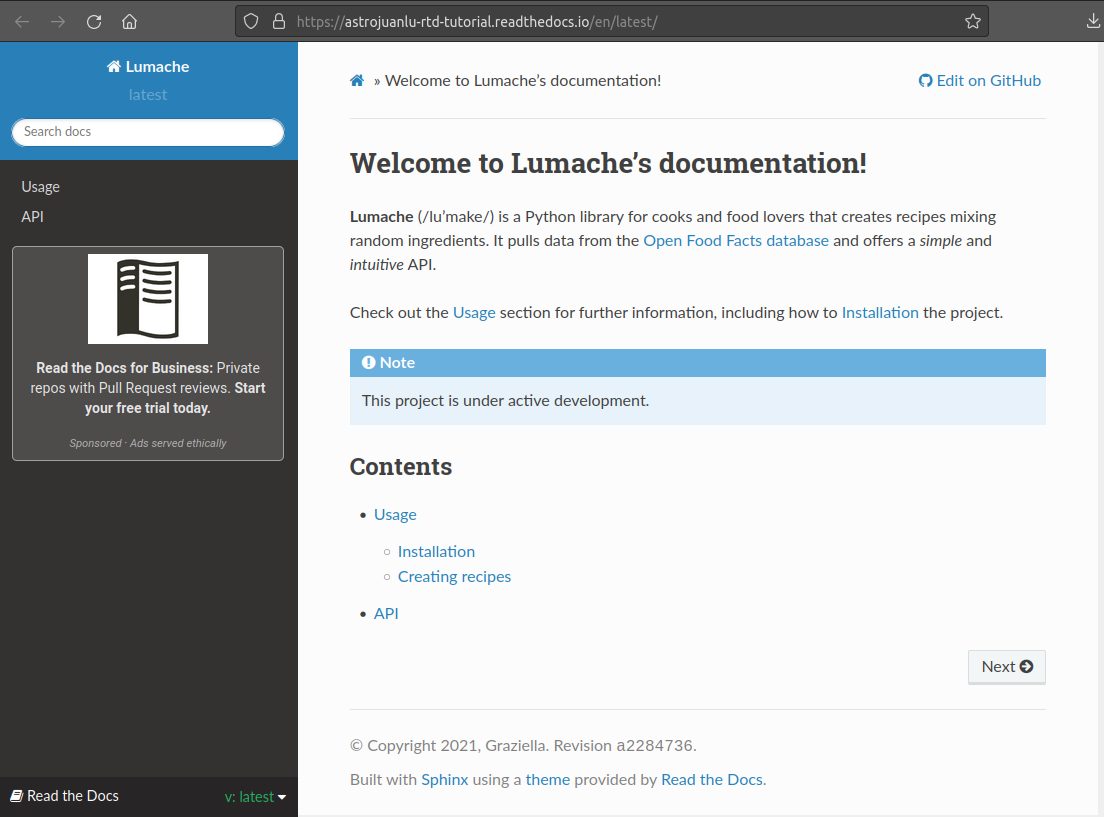
HTML documentation live on Read the Docs
Note
Advertisement is one of our main sources of revenue. If you want to learn more about how do we fund our operations and explore options to go ad-free, check out our Sustainability page.
If you don’t see the ad, you might be using an ad blocker. Our EthicalAds network respects your privacy, doesn’t target you, and tries to be as unobstrusive as possible, so we would like to kindly ask you to not block us ❤️
Basic configuration changes
You can now proceed to make some basic configuration adjustments. Navigate back to the project page and click on the ⚙ Admin button, which will open the Settings page.
First of all, add the following text in the description:
Lumache (/lu’make/) is a Python library for cooks and food lovers that creates recipes mixing random ingredients.
Then set the project homepage to https://world.openfoodfacts.org/,
and write food, python in the list of tags.
All this information will be shown on your project home.
After that, configure your email so you get a notification if the build fails. To do so, click on the Notifications link on the left, type the email where you would like to get the notification, and click the Add button. After that, your email will be shown under “Existing Notifications”.
Trigger a build from a pull request
Read the Docs allows you to trigger builds from GitHub pull requests and gives you a preview of how the documentation would look like with those changes.
To enable that functionality, first click on the Advanced Settings link on the left under the ⚙ Admin menu, check the “Build pull requests for this project” checkbox, and click the Save button at the bottom of the page.
Next, navigate to your GitHub repository, locate the file docs/source/index.rst,
and click on the ✏️ icon on the top-right with the tooltip “Edit this file”
to open a web editor (more information on their documentation).

File view on GitHub before launching the editor
In the editor, add the following sentence to the file:
Lumache has its documentation hosted on Read the Docs.
Write an appropriate commit message, and choose the “Create a new branch for this commit and start a pull request” option, typing a name for the new branch. When you are done, click the green Propose changes button, which will take you to the new pull request page, and there click the Create pull request button below the description.
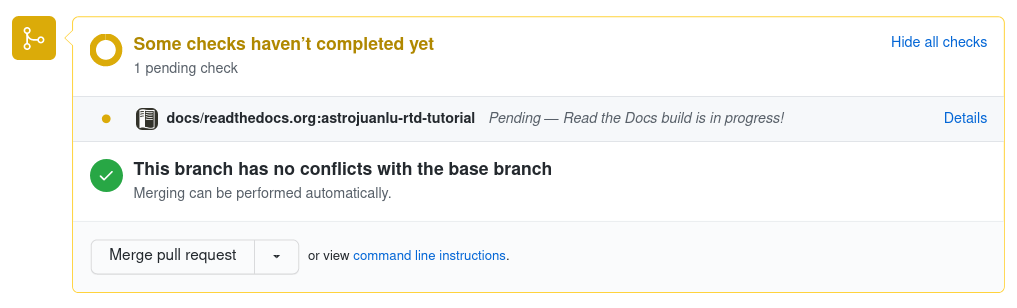
Read the Docs building the pull request from GitHub
After opening the pull request, a Read the Docs check will appear indicating that it is building the documentation for that pull request. If you click on the Details link while it is building, you will access the build logs, otherwise it will take you directly to the documentation. When you are satisfied, you can merge the pull request!
Customizing the build process
The Settings page of the project home allows you
to change some global configuration values of your project.
In addition, you can further customize the building process
using the .readthedocs.yaml configuration file.
This has several advantages:
The configuration lives next to your code and documentation, tracked by version control.
It can be different for every version (more on versioning in the next section).
Some configurations are only available using the config file.
Read the Docs works without this configuration by making some decisions on your behalf. For example, what Python version to use, how to install the requirements, and others.
Tip
Settings that apply to the entire project are controlled in the web dashboard, while settings that are version or build specific are better in the YAML file.
Upgrading the Python version
For example, to explicitly use Python 3.8 to build your project,
navigate to your GitHub repository, click on the Add file button,
and add a .readthedocs.yaml file with these contents to the root of your project:
version: 2

build:
  os: "ubuntu-20.04"
  tools:
    python: "3.8"
The purpose of each key is:
versionMandatory, specifies version 2 of the configuration file.
build.osRequired to specify the Python version, states the name of the base image.
build.tools.pythonDeclares the Python version to be used.
After you commit these changes, go back to your project home,
navigate to the “Builds” page, and open the new build that just started.
You will notice that one of the lines contains python3.8:
if you click on it, you will see the full output of the corresponding command,
stating that it used Python 3.8.6 to create the virtual environment.
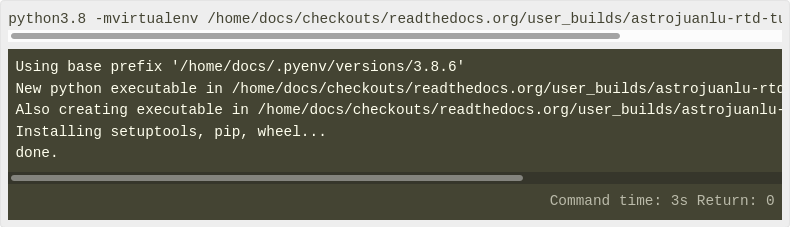
Read the Docs build using Python 3.8
Making warnings more visible
If you navigate to your HTML documentation, you will notice that the index page looks correct, but actually the API section is empty. This is a very common issue with Sphinx, and the reason is stated in the build logs. On the build page you opened before, click on the View raw link on the top right, which opens the build logs in plain text, and you will see several warnings:
WARNING: [autosummary] failed to import 'lumache': no module named lumache
...
WARNING: autodoc: failed to import function 'get_random_ingredients' from module 'lumache'; the following exception was raised:
No module named 'lumache'
WARNING: autodoc: failed to import exception 'InvalidKindError' from module 'lumache'; the following exception was raised:
No module named 'lumache'
To spot these warnings more easily and allow you to address them,
you can add the sphinx.fail_on_warning option to your Read the Docs configuration file.
For that, navigate to GitHub, locate the .readthedocs.yaml file you created earlier,
click on the ✏️ icon, and add these contents:
version: 2

build:
  os: "ubuntu-20.04"
  tools:
    python: "3.8"

sphinx:
  fail_on_warning: true
At this point, if you navigate back to your “Builds” page,
you will see a Failed build, which is exactly the intended result:
the Sphinx project is not properly configured yet,
and instead of rendering an empty API page, now the build fails.
The reason sphinx.ext.autosummary and sphinx.ext.autodoc
fail to import the code is because it is not installed.
Luckily, the .readthedocs.yaml also allows you to specify
which requirements to install.
To install the library code of your project,
go back to editing .readthedocs.yaml on GitHub and modify it as follows:
python:
  # Install our python package before building the docs
  install:
    - method: pip
      path: .
With this change, Read the Docs will install the Python code
before starting the Sphinx build, which will finish seamlessly.
If you go now to the API page of your HTML documentation,
you will see the lumache summary!
Enabling PDF and EPUB builds
Sphinx can build several other formats in addition to HTML, such as PDF and EPUB. You might want to enable these formats for your project so your users can read the documentation offline.
To do so, add this extra content to your .readthedocs.yaml:
sphinx:
  fail_on_warning: true

formats:
  - pdf
  - epub
After this change, PDF and EPUB downloads will be available both from the “Downloads” section of the project home, as well as the flyout menu.
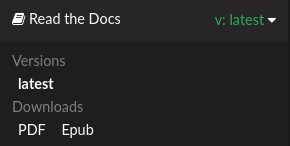
Downloads available from the flyout menu
Versioning documentation
Read the Docs allows you to have several versions of your documentation,
in the same way that you have several versions of your code.
By default, it creates a latest version
that points to the default branch of your version control system
(main in the case of this tutorial),
and that’s why the URLs of your HTML documentation contain the string /latest/.
Creating a new version
Let’s say you want to create a 1.0 version of your code,
with a corresponding 1.0 version of the documentation.
For that, first navigate to your GitHub repository, click on the branch selector,
type 1.0.x, and click on “Create branch: 1.0.x from ‘main’”
(more information on their documentation).
Next, go to your project home, click on the Versions button, and under “Active Versions” you will see two entries:
The
latestversion, pointing to themainbranch.A new
stableversion, pointing to theorigin/1.0.xbranch.
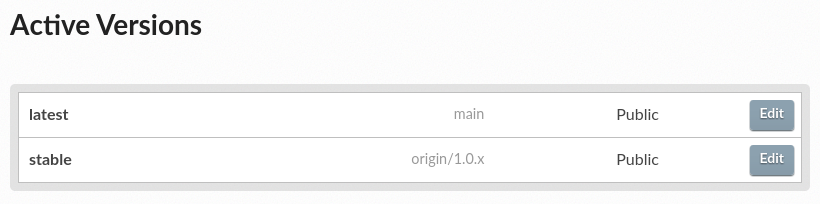
List of active versions of the project
Right after you created your branch,
Read the Docs created a new special version called stable pointing to it,
and started building it. When the build finishes,
the stable version will be listed in the flyout menu
and your readers will be able to choose it.
Note
Read the Docs follows some rules
to decide whether to create a stable version pointing to your new branch or tag.
To simplify, it will check if the name resembles a version number
like 1.0, 2.0.3 or 4.x.
Now you might want to set stable as the default version,
rather than latest,
so that users see the stable documentation
when they visit the root URL of your documentation
(while still being able to change the version in the flyout menu).
For that, go to the Advanced Settings link
under the ⚙ Admin menu of your project home,
choose stable in the “Default version*” dropdown,
and hit Save at the bottom.
Done!
Modifying versions
Both latest and stable are now active, which means that
they are visible for users, and new builds can be triggered for them.
In addition to these, Read the Docs also created an inactive 1.0.x
version, which will always point to the 1.0.x branch of your repository.
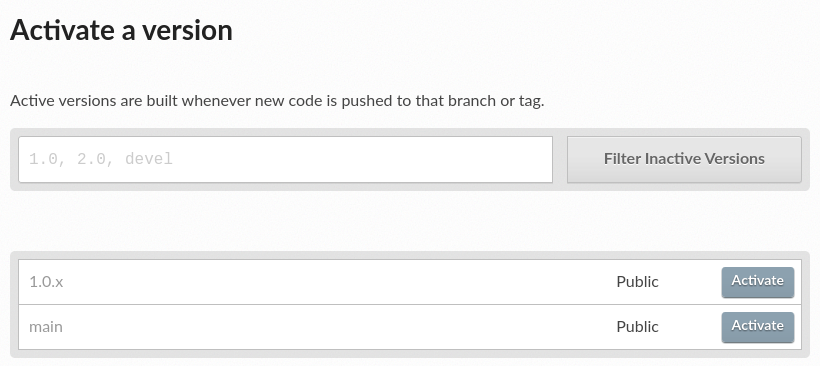
List of inactive versions of the project
Let’s activate the 1.0.x version.
For that, go to the “Versions” on your project home,
locate 1.0.x under “Activate a version”,
and click on the Activate button.
This will take you to a new page with two checkboxes,
“Active” and “Hidden”. Check only “Active”,
and click Save.
After you do this, 1.0.x will appear on the “Active Versions” section,
and a new build will be triggered for it.
Note
You can read more about hidden versions in our documentation.
Show a warning for old versions
When your project matures, the number of versions might increase. Sometimes you will want to warn your readers when they are browsing an old or outdated version of your documentation.
To showcase how to do that, let’s create a 2.0 version of the code:
navigate to your GitHub repository, click on the branch selector,
type 2.0.x, and click on “Create branch: 2.0.x from ‘main’”.
This will trigger two things:
Since
2.0.xis your newest branch,stablewill switch to tracking it.A new
2.0.xversion will be created on your Read the Docs project.Since you already have an active
stableversion,2.0.xwill be activated.
From this point, 1.0.x version is no longer the most up to date one.
To display a warning to your readers, go to the ⚙ Admin menu of your project home,
click on the Advanced Settings link on the left,
enable the “Show version warning” checkbox, and click the Save button.
If you now browse the 1.0.x documentation, you will see a warning on top
encouraging you to browse the latest version instead. Neat!
Warning for old versions
Getting insights from your projects
Once your project is up and running, you will probably want to understand how readers are using your documentation, addressing some common questions like:
what pages are the most visited pages?
what search terms are the most frequently used?
are readers finding what they look for?
Read the Docs offers you some analytics tools to find out the answers.
Browsing Traffic Analytics
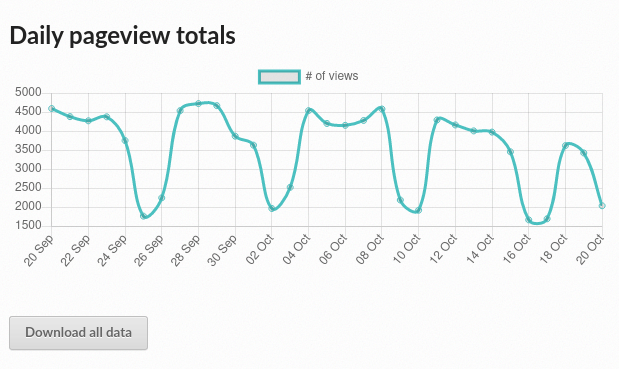
The Traffic Analytics view shows the top viewed documentation pages of the past 30 days, plus a visualization of the daily views during that period. To generate some artificial views on your newly created project, you can first click around the different pages of your project, which will be accounted immediately for the current day statistics.
To see the Traffic Analytics view, go back the project page again, click on the ⚙ Admin button, and then click on the Traffic Analytics section. You will see the list of pages in descending order of visits, as well as a plot similar to the one below.
Traffic Analytics plot
Note
The Traffic Analytics view explained above gives you a simple overview of how your readers browse your documentation. It has the advantage that it stores no identifying information about your visitors, and therefore it respects their privacy. However, you might want to get more detailed data by enabling Google Analytics. Notice though that we take some extra measures to respect user privacy when they visit projects that have Google Analytics enabled, and this might reduce the number of visits counted.
Finally, you can also download this data for closer inspection. To do that, scroll to the bottom of the page and click on the Download all data button. That will prompt you to download a CSV file that you can process any way you want.
Browsing Search Analytics
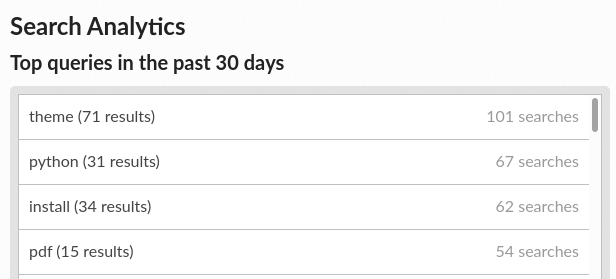
Apart from traffic analytics, Read the Docs also offers the possibility to inspect what search terms your readers use on your documentation. This can inform decisions on what areas to reinforce, or what parts of your project are less understood or more difficult to find.
To generate some artificial search statistics on the project,
go to the HTML documentation, locate the Sphinx search box on the left,
type ingredients, and press the Enter key.
You will be redirected to the search results page, which will show two entries.
Next, go back to the ⚙ Admin section of your project page,
and then click on the Search Analytics section.
You will see a table with the most searched queries
(including the ingredients one you just typed),
how many results did each query return, and how many times it was searched.
Below the queries table, you will also see a visualization
of the daily number of search queries during the past 30 days.
Most searched terms
Like the Traffic Analytics, you can also download the whole dataset in CSV format by clicking on the Download all data button.
Where to go from here
This is the end of the tutorial. You started by forking a GitHub repository and importing it on Read the Docs, building its HTML documentation, and then went through a series of steps to customize the build process, tweak the project configuration, and add new versions.
Here you have some resources to continue learning about documentation and Read the Docs:
You can learn more about the functionality of the platform by going over our Main Features page.
To make the most of the documentation generators that are supported, you can read the Sphinx tutorial or the MkDocs User Guide.
Display example projects and read the source code in Example projects.
Whether you are a documentation author, a project administrator, a developer, or a designer, you can follow our how-to guides that cover specific tasks, available under Guides.
You can check out some of the Advanced features of Read the Docs, like Subprojects or Automation Rules, to name a few.
For private project support and other enterprise features, you can use our commercial service (and if in doubt, check out Choosing Between Our Two Platforms).
Do you want to join a global community of fellow
documentarians? Check out Write the Docs and its Slack workspace.Do you want to contribute to Read the Docs? We greatly appreciate it! Check out Contributing to Read the Docs.
Happy documenting!
Getting Started with Sphinx
Sphinx is a powerful documentation generator that has many great features for writing technical documentation including:
Generate web pages, printable PDFs, documents for e-readers (ePub), and more all from the same sources
You can use reStructuredText or Markdown to write documentation
An extensive system of cross-referencing code and documentation
Syntax highlighted code samples
A vibrant ecosystem of first and third-party extensions
If you want to learn more about how to create your first Sphinx project, read on. If you are interested in exploring the Read the Docs platform using an already existing Sphinx project, check out Read the Docs tutorial.
Quick start
See also
If you already have a Sphinx project, check out our Importing Your Documentation guide.
Assuming you have Python already, install Sphinx:
pip install sphinx
Create a directory inside your project to hold your docs:
cd /path/to/project
mkdir docs
Run sphinx-quickstart in there:
cd docs
sphinx-quickstart
This quick start will walk you through creating the basic configuration; in most cases, you
can just accept the defaults. When it’s done, you’ll have an index.rst, a
conf.py and some other files. Add these to revision control.
Now, edit your index.rst and add some information about your project.
Include as much detail as you like (refer to the reStructuredText syntax
or this template if you need help). Build them to see how they look:
make html
Your index.rst has been built into index.html
in your documentation output directory (typically _build/html/index.html).
Open this file in your web browser to see your docs.

Your Sphinx project is built
Edit your files and rebuild until you like what you see, then commit your changes and push to your public repository. Once you have Sphinx documentation in a public repository, you can start using Read the Docs by importing your docs.
Warning
We strongly recommend to pin the Sphinx version used for your project to build the docs to avoid potential future incompatibilities.
Using Markdown with Sphinx
You can use Markdown using MyST and reStructuredText in the same Sphinx project. We support this natively on Read the Docs, and you can do it locally:
pip install myst-parser
Then in your conf.py:
extensions = ['myst_parser']
You can now continue writing your docs in .md files and it will work with Sphinx.
Read the Getting started with MyST in Sphinx docs for additional instructions.
Get inspired!
You might learn more and find the first ingredients for starting your own documentation project by looking at Example projects - view live example renditions and copy & paste from the accompanying source code.
External resources
Here are some external resources to help you learn more about Sphinx.
Getting Started with MkDocs
MkDocs is a documentation generator that focuses on speed and simplicity. It has many great features including:
Preview your documentation as you write it
Easy customization with themes and extensions
Writing documentation with Markdown
Note
MkDocs is a great choice for building technical documentation. However, Read the Docs also supports Sphinx, another tool for writing and building documentation.
Quick start
See also
If you already have a Mkdocs project, check out our Importing Your Documentation guide.
Assuming you have Python already, install MkDocs:
pip install mkdocs
Setup your MkDocs project:
mkdocs new .
This command creates mkdocs.yml which holds your MkDocs configuration,
and docs/index.md which is the Markdown file
that is the entry point for your documentation.
You can edit this index.md file to add more details about your project
and then you can build your documentation:
mkdocs serve
This command builds your Markdown files into HTML and starts a development server to browse your documentation. Open up http://127.0.0.1:8000/ in your web browser to see your documentation. You can make changes to your Markdown files and your docs will automatically rebuild.
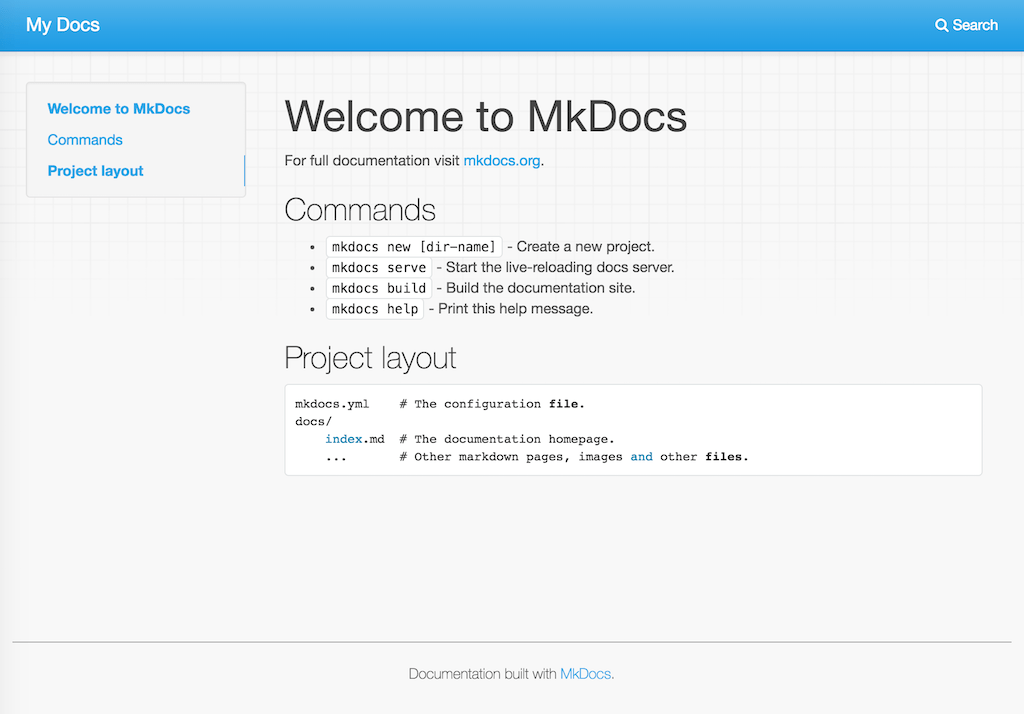
Your MkDocs project is built
Once you have your documentation in a public repository such as GitHub, Bitbucket, or GitLab, you can start using Read the Docs by importing your docs.
Warning
We strongly recommend to pin the MkDocs version used for your project to build the docs to avoid potential future incompatibilities.
Get inspired!
You might learn more and find the first ingredients for starting your own documentation project by looking at Example projects - view live example renditions and copy & paste from the accompanying source code.
External resources
Here are some external resources to help you learn more about MkDocs.
Importing Your Documentation
To import a public documentation repository, visit your Read the Docs dashboard and click Import. For private repositories, please use Read the Docs for Business.
Automatically import your docs
If you have connected your Read the Docs account to GitHub, Bitbucket, or GitLab, you will see a list of your repositories that we are able to import. To import one of these projects, just click the import icon next to the repository you’d like to import. This will bring up a form that is already filled with your project’s information. Feel free to edit any of these properties, and then click Next to build your documentation.

Importing a repository
Manually import your docs
If you do not have a connected account, you will need to select Import Manually and enter the information for your repository yourself. You will also need to manually configure the webhook for your repository as well. When importing your project, you will be asked for the repository URL, along with some other information for your new project. The URL is normally the URL or path name you’d use to checkout, clone, or branch your repository. Some examples:
Git:
https://github.com/ericholscher/django-kong.gitMercurial:
https://bitbucket.org/ianb/pipSubversion:
http://varnish-cache.org/svn/trunkBazaar:
lp:pasta
Add an optional homepage URL and some tags, and then click Next.
Once your project is created, you’ll need to manually configure the repository webhook if you would like to have new changes trigger builds for your project on Read the Docs. Go to your project’s Admin > Integrations page to configure a new webhook, or see our steps for webhook creation for more information on this process.
Note
The Admin page can be found at https://readthedocs.org/dashboard/<project-slug>/edit/.
You can access all of the project settings from the admin page sidebar.

Building your documentation
Within a few seconds of completing the import process, your code will automatically be fetched from your repository, and the documentation will be built. Check out our Build process page to learn more about how Read the Docs builds your docs, and to troubleshoot any issues that arise.
Some documentation projects require additional configuration to build
such as specifying a certain version of Python or installing additional dependencies.
You can configure these settings in a .readthedocs.yaml file.
See our Configuration File docs for more details.
It is also important to note that the default version of Sphinx is v1.8.5.
We recommend to set the version your project uses explicitily.
Read the Docs will host multiple versions of your code. You can read more about how to use this well on our Versioned Documentation page.
If you have any more trouble, don’t hesitate to reach out to us. The Site Support page has more information on getting in touch.
Choosing Between Our Two Platforms
Users often ask what the differences are between Read the Docs Community and Read the Docs for Business.
While many of our features are available on both of these platforms, there are some key differences between our two platforms.
Read the Docs Community
Read the Docs Community is exclusively for hosting open source documentation. We support open source communities by providing free documentation building and hosting services, for projects of all sizes.
Important points:
Open source project hosting is always free
All documentation sites include advertising
Only supports public VCS repositories
All documentation is publicly accessible to the world
Less build time and fewer build resources (memory & CPU)
Email support included only for issues with our platform
Documentation is organized by projects
You can sign up for an account at https://readthedocs.org.
Read the Docs for Business
Read the Docs for Business is meant for companies and users who have more complex requirements for their documentation project. This can include commercial projects with private source code, projects that can only be viewed with authentication, and even large scale projects that are publicly available.
Important points:
Hosting plans require a paid subscription plan
There is no advertising on documentation sites
Allows importing private and public repositories from VCS
Supports private versions that require authentication to view
Supports team authentication, including SSO with Google, GitHub, GitLab, and Bitbucket
More build time and more build resources (memory & CPU)
Includes 24x5 email support, with 24x7 SLA support available
Documentation is organized by organization, giving more control over permissions
You can sign up for an account at https://readthedocs.com.
Questions?
If you have a question about which platform would be best, email us at support@readthedocs.org.
Read the Docs feature overview
Learn more about configuring your automated documentation builds and some of the core features of Read the Docs.
Overview of core features: Main Features | VCS Integrations | Custom Domains | Versioned Documentation | Downloadable Documentation | Documentation Hosting Features | Server Side Search | Traffic Analytics | Preview Documentation from Pull Requests | Build Notifications and Webhooks | User-defined Redirects | Security Log
Connecting with GitHub, BitBucket, or GitLab: Connecting your VCS account
Read the Docs build process: Configuration reference | Build process | Build customization | Environment Variables | Badges
Troubleshooting: Site Support | Frequently asked questions
Main Features
Read the Docs offers a number of platform features that are possible because we both build and host documentation for you.
Automatic Documentation Deployment
We integrate with GitHub, BitBucket, and GitLab. We automatically create webhooks in your repository, which tell us whenever you push a commit. We will then build and deploy your docs every time you push a commit. This enables a workflow that we call Continuous Documentation:
Once you set up your Read the Docs project, your users will always have up-to-date documentation.
Learn more about VCS Integrations.
Custom Domains & White Labeling
When you import a project to Read the Docs, we assign you a URL based on your project name. You are welcome to use this URL, but we also fully support custom domains for all our documentation projects.
Learn more about Custom Domains.
Versioned Documentation
We support multiple versions of your documentation, so that users can find the exact docs for the version they are using. We build this on top of the version control system that you’re already using. Each version on Read the Docs is just a tag or branch in your repository.
You don’t need to change how you version your code, we work with whatever process you are already using. If you don’t have a process, we can recommend one.
Learn more about Versioned Documentation.
Downloadable Documentation
Read the Docs supports building multiple formats for Sphinx-based projects:
PDF
ePub
Zipped HTML
This means that every commit that you push will automatically update your PDFs as well as your HTML.
This feature is great for users who are about to get on a plane and want offline docs, as well as being able to ship your entire set of documentation as one file.
Learn more about Downloadable Documentation.
Full-Text Search
We provide search across all the projects that we host. This actually comes in two different search experiences: dashboard search on the Read the Docs dashboard and in-doc search on documentation sites, using your own theme and our search results.
We offer a number of search features:
Search across subprojects
Search results land on the exact content you were looking for
Search across projects you have access to (available on Read the Docs for Business)
A full range of search operators including exact matching and excluding phrases.
Learn more about Server Side Search.
Open Source and Customer Focused
Read the Docs cares deeply about our customers and our community. As part of that commitment, all of the source code for Read the Docs is open source. This means there’s no vendor lock-in, and you are welcome to contribute the features you want or run your own instance.
Our bootstrapped company is owned and controlled by the founders, and fully funded by our customers and advertisers. That allows us to focus 100% of our attention on building the best possible product for you.
Learn more About Read the Docs.
Configuration File
In addition to using the admin panel of your project to configure your project,
you can use a configuration file in the root of your project.
The configuration file should be named .readthedocs.yaml.
Note
Some other variants like readthedocs.yaml, .readthedocs.yml, etc
are deprecated.
The main advantages of using a configuration file over the web interface are:
Settings are per version rather than per project.
Settings live in your VCS.
They enable reproducible build environments over time.
Some settings are only available using a configuration file
Tip
Using a configuration file is the recommended way of using Read the Docs.
Configuration File V2
Read the Docs supports configuring your documentation builds with a YAML file.
The configuration file must be in the root directory of your project
and be named .readthedocs.yaml.
All options are applied to the version containing this file. Below is an example YAML file which shows the most common configuration options:
# .readthedocs.yaml
# Read the Docs configuration file
# See https://docs.readthedocs.io/en/stable/config-file/v2.html for details

# Required
version: 2

# Set the version of Python and other tools you might need
build:
  os: ubuntu-20.04
  tools:
    python: "3.9"
    # You can also specify other tool versions:
    # nodejs: "16"
    # rust: "1.55"
    # golang: "1.17"

# Build documentation in the docs/ directory with Sphinx
sphinx:
   configuration: docs/conf.py

# If using Sphinx, optionally build your docs in additional formats such as PDF
# formats:
#    - pdf

# Optionally declare the Python requirements required to build your docs
python:
   install:
   - requirements: docs/requirements.txt
# .readthedocs.yaml
# Read the Docs configuration file
# See https://docs.readthedocs.io/en/stable/config-file/v2.html for details

# Required
version: 2

# Set the version of Python and other tools you might need
build:
  os: ubuntu-20.04
  tools:
    python: "3.9"

mkdocs:
  configuration: mkdocs.yml

# Optionally declare the Python requirements required to build your docs
python:
   install:
   - requirements: docs/requirements.txt
Supported settings
Read the Docs validates every configuration file. Any configuration option that isn’t supported will make the build fail. This is to avoid typos and provide feedback on invalid configurations.
Warning
When using a v2 configuration file, the local settings from the web interface are ignored.
version
- Required
true
Example:
version: 2
Warning
If you don’t provide the version, v1 will be used.
formats
Additional formats of the documentation to be built, apart from the default HTML.
- Type
list- Options
htmlzip,pdf,epub,all- Default
[]
Example:
version: 2

# Default
formats: []
version: 2

# Build PDF & ePub
formats:
  - epub
  - pdf
Note
You can use the all keyword to indicate all formats.
version: 2

# Build all formats
formats: all
Warning
At the moment, only Sphinx supports additional formats.
pdf, epub, and htmlzip output is not yet supported when using MkDocs.
python
Configuration of the Python environment to be used.
version: 2

python:
  install:
    - requirements: docs/requirements.txt
    - method: pip
      path: .
      extra_requirements:
        - docs
    - method: setuptools
      path: another/package
  system_packages: true
Warning
This option is now deprecated and replaced by build.tools.python. See python.version (legacy) for the description of this option.
List of installation methods of packages and requirements. You can have several of the following methods.
- Type
list- Default
[]
Install packages from a requirements file.
The path to the requirements file, relative to the root of the project.
- Key
requirements- Type
path- Required
true
Example:
version: 2

python:
  version: "3.7"
  install:
    - requirements: docs/requirements.txt
    - requirements: requirements.txt
Warning
If you are using a Conda environment to
manage the build, this setting will not have any effect. Instead
add the extra requirements to the environment file of Conda.
Install the project using python setup.py install or pip install.
The path to the package, relative to the root of the project.
- Key
path- Type
path- Required
true
The installation method.
- Key
method- Options
pip,setuptools- Default
pip
Extra requirements section to install in addition to the package dependencies.
Warning
You need to install your project with pip to use extra_requirements.
- Key
extra_requirements- Type
list- Default
[]
Example:
version: 2

python:
  version: "3.7"
  install:
    - method: pip
      path: .
      extra_requirements:
        - docs
    - method: setuptools
      path: package
With the previous settings, Read the Docs will execute the next commands:
pip install .[docs]
python package/setup.py install
Give the virtual environment access to the global site-packages directory.
- Type
bool- Default
false
Warning
If you are using a Conda environment to manage the build, this setting will not have any effect, since the virtual environment creation is managed by Conda.
conda
Configuration for Conda support.
version: 2

conda:
  environment: environment.yml
The path to the Conda environment file, relative to the root of the project.
- Type
path- Required
true
build
Configuration for the documentation build process. This allows you to specify the base Read the Docs image used to build the documentation, and control the versions of several tools: Python, Node.js, Rust, and Go.
version: 2

build:
  os: ubuntu-20.04
  tools:
    python: "3.9"
    nodejs: "16"
    rust: "1.55"
    golang: "1.17"
The Docker image used for building the docs. Image names refer to the operating system Read the Docs uses to build them.
Note
Arbitrary Docker images are not supported.
- Type
string- Options
ubuntu-20.04,ubuntu-22.04- Required
true
Version specifiers for each tool. It must contain at least one tool.
- Type
dict- Options
python,nodejs,rust,golang- Required
true
Python version to use. You can use several interpreters and versions, from CPython, PyPy, Miniconda, and Mamba.
Note
If you use Miniconda3 or Mambaforge, you can select the Python version
using the environment.yml file. See our Conda Support guide
for more information.
- Type
string- Options
2.73(last stable CPython version)3.63.73.83.93.103.11pypy3.7pypy3.8pypy3.9miniconda3-4.7mambaforge-4.10
Node.js version to use.
- Type
string- Options
141618
Rust version to use.
- Type
string- Options
1.551.61
Go version to use.
- Type
string- Options
1.171.18
List of APT packages to install. Our build servers run Ubuntu 18.04, with the default set of package repositories installed. We don’t currently support PPA’s or other custom repositories.
- Type
list- Default
[]
version: 2

build:
  apt_packages:
    - libclang
    - cmake
Note
When possible avoid installing Python packages using apt (python3-numpy for example),
use pip or Conda instead.
Commands to be run before or after a Read the Docs pre-defined build jobs. This allows you to run custom commands at a particular moment in the build process. See Build customization for more details.
version: 2

build:
  os: ubuntu-22.04
  tools:
    python: "3.10"
  jobs:
    pre_create_environment:
      - echo "Command run at 'pre_create_environment' step"
    post_build:
      - echo "Command run at 'post_build' step"
      - echo `date`
Note
Each key under build.jobs must be a list of strings.
build.os and build.tools are also required to use build.jobs.
- Type
dict- Allowed keys
post_checkout,pre_system_dependencies,post_system_dependencies,pre_create_environment,post_create_environment,pre_install,post_install,pre_build,post_build- Required
false- Default
{}
Specify a list of commands that Read the Docs will run on the build process.
When build.commands is used, none of the pre-defined build jobs will be executed.
(see Build customization for more details).
This allows you to run custom commands and control the build process completely.
The _readthedocs/html directory (relative to the checkout’s path) will be uploaded and hosted by Read the Docs.
Warning
This feature is in a beta phase and could suffer incompatible changes or even removed completely in the near feature. It does not yet support some of the Read the Docs’ integrations like the flyout menu, search and ads. However, integrating all of them is part of the plan. Use it under your own responsibility.
version: 2

build:
  os: ubuntu-22.04
  tools:
    python: "3.10"
  commands:
    - pip install pelican
    - pelican --settings docs/pelicanconf.py --output _readthedocs/html/ docs/
Note
build.os and build.tools are also required when using build.commands.
- Type
list- Required
false- Default
[]
sphinx
Configuration for Sphinx documentation (this is the default documentation type).
version: 2

sphinx:
  builder: html
  configuration: conf.py
  fail_on_warning: true
Note
If you want to pin Sphinx to a specific version,
use a requirements.txt or environment.yml file
(see Requirements file and conda.environment).
If you are using a metadata file to describe code dependencies
like setup.py, pyproject.toml, or similar,
you can use the extra_requirements option
(see Packages).
This also allows you to override the default pinning done by Read the Docs
if your project was created before October 2020.
The builder type for the Sphinx documentation.
- Type
string- Options
html,dirhtml,singlehtml- Default
html
Note
The htmldir builder option was renamed to dirhtml to use the same name as sphinx.
Configurations using the old name will continue working.
The path to the conf.py file, relative to the root of the project.
- Type
path- Default
null
If the value is null,
Read the Docs will try to find a conf.py file in your project.
Turn warnings into errors
(-W and --keep-going options).
This means the build fails if there is a warning and exits with exit status 1.
- Type
bool- Default
false
mkdocs
Configuration for MkDocs documentation.
version: 2

mkdocs:
  configuration: mkdocs.yml
  fail_on_warning: false
Note
If you want to pin MkDocs to a specific version,
use a requirements.txt or environment.yml file
(see Requirements file and conda.environment).
If you are using a metadata file to describe code dependencies
like setup.py, pyproject.toml, or similar,
you can use the extra_requirements option
(see Packages).
This also allows you to override the default pinning done by Read the Docs
if your project was created before March 2021.
The path to the mkdocs.yml file, relative to the root of the project.
- Type
path- Default
null
If the value is null,
Read the Docs will try to find a mkdocs.yml file in your project.
Turn warnings into errors. This means that the build stops at the first warning and exits with exit status 1.
- Type
bool- Default
false
submodules
VCS submodules configuration.
Note
Only Git is supported at the moment.
Warning
You can’t use include and exclude settings for submodules at the same time.
version: 2

submodules:
  include:
    - one
    - two
  recursive: true
List of submodules to be included.
- Type
list- Default
[]
Note
You can use the all keyword to include all submodules.
version: 2

submodules:
  include: all
List of submodules to be excluded.
- Type
list- Default
[]
Note
You can use the all keyword to exclude all submodules.
This is the same as include: [].
version: 2

submodules:
  exclude: all
Do a recursive clone of the submodules.
- Type
bool- Default
false
Note
This is ignored if there aren’t submodules to clone.
search
Settings for more control over Server Side Search.
version: 2

search:
  ranking:
    api/v1/*: -1
    api/v2/*: 4
  ignore:
    - 404.html
Set a custom search rank over pages matching a pattern.
- Type
mapof patterns to ranks- Default
{}
Patterns are matched against the final html pages produced by the build
(you should try to match index.html, not docs/index.rst).
Patterns can include some special characters:
*matches everything?matches any single character[seq]matches any character inseq
The rank can be an integer number between -10 and 10 (inclusive). Pages with a rank closer to -10 will appear further down the list of results, and pages with a rank closer to 10 will appear higher in the list of results. Note that 0 means normal rank, not no rank.
If you are looking to completely ignore a page, check search.ignore.
version: 2

search:
  ranking:
    # Match a single file
    tutorial.html: 2

    # Match all files under the api/v1 directory
    api/v1/*: -5

    # Match all files that end with tutorial.html
    '*/tutorial.html': 3
Note
The final rank will be the last pattern to match the page.
Tip
Is better to decrease the rank of pages you want to deprecate, rather than increasing the rank of the other pages.
Don’t index files matching a pattern. This is, you won’t see search results from these files.
- Type
listof patterns- Default
['search.html', 'search/index.html', '404.html', '404/index.html']
Patterns are matched against the final html pages produced by the build
(you should try to match index.html, not docs/index.rst).
Patterns can include some special characters:
*matches everything?matches any single character[seq]matches any character inseq
version: 2

search:
   ignore:
     # Ignore a single file
     - 404.html

     # Ignore all files under the search/ directory
     - search/*

     # Ignore all files that end with ref.html
     - '*/ref.html'
version: 2

search:
   ignore:
     # Custom files to ignore
     - file.html
     - api/v1/*

     # Defaults
     - search.html
     - search/index.html
     - 404.html
     - 404/index.html'
Note
Since Read the Docs fallbacks to the original search engine when no results are found, you may still see search results from ignored pages.
Schema
You can see the complete schema here.
Legacy build specification
The legacy build specification used a different set of Docker images,
and only allowed you to specify the Python version.
It remains supported for backwards compatibility reasons.
Check out the build above
for an alternative method that is more flexible.
version: 2

build:
  image: latest
  apt_packages:
    - libclang
    - cmake

python:
  version: "3.7"
The legacy build specification also supports
the apt_packages key described above.
Warning
When using the new specification,
the build.image and python.version options cannot be used.
Doing so will error the build.
build (legacy)
The Docker image used for building the docs.
- Type
string- Options
stable,latest- Default
latest
Each image support different Python versions and has different packages installed, as defined here:
The Python version (this depends on build.image (legacy)).
- Type
string- Default
3
Note
Make sure to use quotes (") to make it a string.
We previously supported using numbers here,
but that approach is deprecated.
Warning
If you are using a Conda environment to manage the build, this setting will not have any effect, as the Python version is managed by Conda.
Migrating from v1
Changes
The version setting is required. See version.
The default value of the formats setting has changed to
[]and it doesn’t include the values from the web interface.The top setting
requirements_filewas moved topython.installand we don’t try to find a requirements file if the option isn’t present. See Requirements file.The setting
conda.filewas renamed toconda.environment. See conda.environment.The
build.imagesetting has been replaced bybuild.os. See build.os. Alternatively, you can use the legacybuild.imagethat now has only two options:latest(default) andstable.The settings
python.setup_py_installandpython.pip_installwere replaced bypython.install. And now it accepts a path to the package. See Packages.The setting
python.use_system_site_packageswas renamed topython.system_packages. See python.system_packages.The build will fail if there are invalid keys (strict mode).
Warning
Some values from the web interface are no longer respected, please see Migrating from the web interface if you have settings there.
New settings
Migrating from the web interface
This should be pretty straightforward, just go to the Admin > Advanced settings, and find their respective setting in here.
Not all settings in the web interface are per version, but are per project. These settings aren’t supported via the configuration file.
NameRepository URLRepository typeLanguageProgramming languageProject homepageTagsSingle versionDefault branchDefault versionShow versions warningPrivacy levelAnalytics code
VCS Integrations
Read the Docs provides integrations with several VCS providers to detect changes to your documentation and versions, mainly using webhooks. Integrations are configured with your repository provider, such as GitHub, Bitbucket or GitLab, and with each change to your repository, Read the Docs is notified. When we receive an integration notification, we determine if the change is related to an active version for your project, and if it is, a build is triggered for that version.
You’ll find a list of configured integrations on your project’s Admin dashboard, under Integrations. You can select any of these integrations to see the integration detail page. This page has additional configuration details and a list of HTTP exchanges that have taken place for the integration, including the Payload URL needed by the repository provider such as GitHub, GitLab, or Bitbucket.
Integration Creation
If you have connected your Read the Docs account to GitHub, Bitbucket, or GitLab, an integration will be set up automatically for your repository. However, if your project was not imported through a connected account, you may need to manually configure an integration for your project.
To manually set up an integration, go to Admin > Integrations > Add integration dashboard page and select the integration type you’d like to add. After you have added the integration, you’ll see a link to information about the integration.
As an example, the URL pattern looks like this: https://readthedocs.org/api/v2/webhook/<project-name>/<id>/.
Use this URL when setting up a new integration with your provider – these steps vary depending on the provider.
Note
If your account is connected to the provider, we’ll try to setup the integration automatically. If something fails, you can still setup the integration manually.
GitHub
Go to the Settings page for your project
Click Webhooks > Add webhook
For Payload URL, use the URL of the integration on Read the Docs, found on the project’s Admin > Integrations page. You may need to prepend https:// to the URL.
For Content type, both application/json and application/x-www-form-urlencoded work
Leave the Secrets field blank
Select Let me select individual events, and mark Branch or tag creation, Branch or tag deletion, Pull requests and Pushes events
Ensure Active is enabled; it is by default
Finish by clicking Add webhook. You may be prompted to enter your GitHub password to confirm your action.
You can verify if the webhook is working at the bottom of the GitHub page under Recent Deliveries. If you see a Response 200, then the webhook is correctly configured. For a 403 error, it’s likely that the Payload URL is incorrect.
Note
The webhook token, intended for the GitHub Secret field, is not yet implemented.
Bitbucket
Go to the Settings > Webhooks > Add webhook page for your project
For URL, use the URL of the integration on Read the Docs, found on the Admin > Integrations page
Under Triggers, Repository push should be selected
Finish by clicking Save
GitLab
Go to the Settings > Webhooks page for your project
For URL, use the URL of the integration on Read the Docs, found on the Admin > Integrations page
Leave the default Push events selected, additionally mark Tag push events and Merge request events.
Finish by clicking Add Webhook
Gitea
These instructions apply to any Gitea instance.
Warning
This isn’t officially supported, but using the “GitHub webhook” is an effective workaround, because Gitea uses the same payload as GitHub. The generic webhook is not compatible with Gitea. See issue #8364 for more details. Official support may be implemented in the future.
On Read the Docs:
Manually create a “GitHub webhook” integration (this will show a warning about the webhook not being correctly set up, that will go away when the webhook is configured in Gitea)
On your Gitea instance:
Go to the Settings > Webhooks page for your project on your Gitea instance
Create a new webhook of type “Gitea”
For URL, use the URL of the integration on Read the Docs, found on the Admin > Integrations page
Leave the default HTTP Method as POST
For Content type, both application/json and application/x-www-form-urlencoded work
Leave the Secret field blank
Select Choose events, and mark Branch or tag creation, Branch or tag deletion and Push events
Ensure Active is enabled; it is by default
Finish by clicking Add Webhook
Test the webhook with Delivery test
Finally, on Read the Docs, check that the warnings have disappeared and the delivery test triggered a build.
Using the generic API integration
For repositories that are not hosted with a supported provider, we also offer a generic API endpoint for triggering project builds. Similar to webhook integrations, this integration has a specific URL, which can be found on the project’s Integrations dashboard page (Admin > Integrations).
Token authentication is required to use the generic endpoint, you will find this token on the integration details page. The token should be passed in as a request parameter, either as form data or as part of JSON data input.
Parameters
This endpoint accepts the following arguments during an HTTP POST:
- branches
The names of the branches to trigger builds for. This can either be an array of branch name strings, or just a single branch name string.
Default: latest
- token
The integration token found on the project’s Integrations dashboard page (Admin > Integrations).
For example, the cURL command to build the dev branch, using the token
1234, would be:
curl -X POST -d "branches=dev" -d "token=1234" https://readthedocs.org/api/v2/webhook/example-project/1/
A command like the one above could be called from a cron job or from a hook inside Git, Subversion, Mercurial, or Bazaar.
Authentication
This endpoint requires authentication. If authenticating with an integration token, a check will determine if the token is valid and matches the given project. If instead an authenticated user is used to make this request, a check will be performed to ensure the authenticated user is an owner of the project.
Debugging webhooks
If you are experiencing problems with an existing webhook, you may be able to use the integration detail page to help debug the issue. Each project integration, such as a webhook or the generic API endpoint, stores the HTTP exchange that takes place between Read the Docs and the external source. You’ll find a list of these exchanges in any of the integration detail pages.
Resyncing webhooks
It might be necessary to re-establish a webhook if you are noticing problems. To resync a webhook from Read the Docs, visit the integration detail page and follow the directions for re-syncing your repository webhook.
Payload validation
If your project was imported through a connected account, we create a secret for every integration that offers a way to verify that a webhook request is legitimate. Currently, GitHub and GitLab offer a way to check this.
Troubleshooting
Webhook activation failed. Make sure you have the necessary permissions
If you find this error, make sure your user has permissions over the repository. In case of GitHub, check that you have granted access to the Read the Docs OAuth App to your organization.
My project isn’t automatically building
If your project isn’t automatically building, you can check your integration on Read the Docs to see the payload sent to our servers. If there is no recent activity on your Read the Docs project webhook integration, then it’s likely that your VCS provider is not configured correctly. If there is payload information on your Read the Docs project, you might need to verify that your versions are configured to build correctly.
Either way, it may help to either resync your webhook integration (see Resyncing webhooks for information on this process), or set up an entirely new webhook integration.
Custom Domains
Custom domains allow you to serve your documentation from your own domain. This is great for maintaining a consistent brand for your documentation and application.
By default, your documentation is served from a Read the Docs subdomain using the project’s slug:
<slug>.readthedocs.iofor Read the Docs Community<slug>.readthedocs-hosted.comfor Read the Docs for Business.
For example if you import your project and it gets the slug example-docs, it will be served from https://example-docs.readthedocs.io.
Contents
Adding a custom domain
To setup your custom domain, follow these steps:
Go the Admin tab of your project.
Click on Domains.
Enter your domain.
Mark the Canonical option if you want use this domain as your canonical domain.
Click on Add.
At the top of the next page you’ll find the value of the DNS record that you need to point your domain to. For Read the Docs Community this is
readthedocs.io, and for Read the Docs for Business the record is in the form of<hash>.domains.readthedocs.com.Note
For a subdomain like
docs.example.comadd a CNAME record, and for a root domain likeexample.comuse an ANAME or ALIAS record.
By default, we provide a validated SSL certificate for the domain, managed by Cloudflare. The SSL certificate issuance should happen within a few minutes, but might take up to one hour. See SSL certificate issue delays for more troubleshooting options.
As an example, our blog’s DNS record looks like this:
dig +short CNAME blog.readthedocs.com
readthedocs.io.
Warning
We don’t support pointing subdomains or root domains to a project using A records. DNS A records require a static IP address and our IPs may change without notice.
Removing a custom domain
To remove a custom domain:
Go the Admin tab of your project.
Click on Domains.
Click the Remove button next to the domain.
Click Confirm on the confirmation page.
Warning
Once a domain is removed, your previous documentation domain is no longer served by Read the Docs, and any request for it will return a 404 Not Found!
Strict Transport Security (HSTS) and other custom headers
By default, we do not return a Strict Transport Security header (HSTS) for user custom domains. This is a conscious decision as it can be misconfigured in a not easily reversible way. For both Read the Docs Community and Read the Docs for Business, HSTS and other custom headers can be set upon request.
We always return the HSTS header with a max-age of at least one year
for our own domains including *.readthedocs.io, *.readthedocs-hosted.com, readthedocs.org and readthedocs.com.
Please contact Site Support if you want to add a custom header to your domain.
Multiple documentation sites as sub-folders of a domain
You may host multiple documentation repositories as sub-folders of a single domain.
For example, docs.example.org/projects/repo1 and docs.example.org/projects/repo2.
This is a way to boost the SEO of your website.
See Subprojects for more information.
Troubleshooting
SSL certificate issue delays
The status of your domain validation and certificate can always be seen on the details page for your domain under Admin > Domains > YOURDOMAIN.TLD (details).
Domains are usually validated and a certificate issued within minutes. However, if you setup the domain in Read the Docs without provisioning the necessary DNS changes and then update DNS hours or days later, this can cause a delay in validating because there is an exponential back-off in validation.
Tip
Loading the domain details in the Read the Docs dashboard and saving the domain again will force a revalidation.
Migrating from GitBook
If your custom domain was previously used in GitBook, contact GitBook support (via live chat in their website) to remove the domain name from their DNS Zone in order for your domain name to work with Read the Docs, else it will always redirect to GitBook.
Versioned Documentation
Read the Docs supports multiple versions of your repository.
On initial import,
we will create a latest version.
This will point at the default branch defined in your VCS control
(by default, main on Git and default in Mercurial).
If your project has any tags or branches with a name following semantic versioning,
we also create a stable version, tracking your most recent release.
If you want a custom stable version,
create either a tag or branch in your project with that name.
When you have VCS Integrations configured for your repository, we will automatically build each version when you push a commit.
How we envision versions working
In the normal case,
the latest version will always point to the most up to date development code.
If you develop on a branch that is different than the default for your VCS,
you should set the Default Branch to that branch.
You should push a tag for each version of your project.
These tags should be numbered in a way that is consistent with semantic versioning.
This will map to your stable branch by default.
Note
We in fact are parsing your tag names against the rules given by
PEP 440. This spec allows “normal” version numbers like 1.4.2 as
well as pre-releases. An alpha version or a release candidate are examples
of pre-releases and they look like this: 2.0a1.
We only consider non pre-releases for the stable version of your
documentation.
If you have documentation changes on a long-lived branch, you can build those too. This will allow you to see how the new docs will be built in this branch of the code. Generally you won’t have more than 1 active branch over a long period of time. The main exception here would be release branches, which are branches that are maintained over time for a specific release number.
Version States
States define the visibility of a version across the site. You can change the states of a version from the Versions tab of your project.
Active
Active
Docs for this version are visible
Builds can be triggered for this version
Inactive
Docs for this version aren’t visible
Builds can’t be triggered for this version
When you deactivate a version, its docs are removed.
Privacy levels
Note
Privacy levels are only supported on Read the Docs for Business.
Public
It means that everything is available to be seen by everyone.
Private
Private versions are available only to people who have permissions to see them. They will not display on any list view, and will 404 when you link them to others. If you want to share your docs temporarily, see Sharing.
In addition, if you want other users to view the build page of your public versions, you’ll need to the set the privacy level of your project to public.
Logging out
When you log in to a documentation site, you will be logged in until close your browser. To log out, click on the Log out link in your documentation’s flyout menu. This is usually located in the bottom right or bottom left, depending on the theme design. This will log you out from the current domain, but not end any other session that you have active.
Version warning
This is a banner that appears on the top of every page of your docs that aren’t stable or latest. This banner has a text with a link redirecting the users to the latest version of your docs.
This feature is disabled by default on new projects, you can enable it in the admin section of your docs (Admin > Advanced Settings).
Note
The banner will be injected in an HTML element with the main role or in the main tag.
For example:
<div role="main">
  <!-- The banner would be injected here -->
  ...
</div>
<main>
  <!-- The banner would be injected here -->
  ...
</main>
Redirects on root URLs
When a user hits the root URL for your documentation,
for example https://pip.readthedocs.io/,
they will be redirected to the Default version.
This defaults to latest,
but could also point to your latest released version.
Downloadable Documentation
Read the Docs supports building multiple formats for Sphinx-based projects:
PDF
ePub
Zipped HTML
This means that every commit that you push will automatically update your PDFs as well as your HTML.
This is enabled by the formats key in our config file. A simple example is here:
# Build PDF & ePub
formats:
  - epub
  - pdf
If you want to see an example, you can download the Read the Docs documentation in the following formats:
Use cases
This functionality is great for anyone who needs documentation when they aren’t connected to the internet. Users who are about to get on a plane can grab a PDF and have the entire doc set ready for their trip.
The other value is having the entire docset in a single file. You can send a user an email with a single PDF or ePub and they’ll have all the docs in one place.
Deleting downloadable content
The entries in the Downloads section of your project dashboard reflect the formats specified in your config file for each active version.
This means that if you wish to remove downloadable content for a given version, you can do so by removing the matching formats key from your config file.
Documentation Hosting Features
The main way that users interact with your documentation is via the hosted HTML that we serve. We support a number of important features that you would expect for a documentation host.
Contents
Subdomain support
Every project has a subdomain that is available to serve its documentation based on it’s slug.
If you go to <slug>.readthedocs.io, it should show you the latest version of your documentation,
for example https://docs.readthedocs.io.
For Read the Docs for Business the subdomain looks like <slug>.readthedocs-hosted.com.
See also
Content Delivery Network (CDN)
A CDN is used for making documentation pages faster for your users. This is done by caching the documentation page content in multiple data centers around the world, and then serving docs from the data center closest to the user.
We support CDN’s on both of our sites, as we talk about below.
On Read the Docs Community, we are able to provide a CDN to all the projects that we host. This service is graciously sponsored by CloudFlare.
We bust the cache on the CDN when the following actions happen:
Your Project is saved
Your Domain is saved
A new version is built
On Read the Docs for Business, we offer a CDN as part of our Pro plan and above. Please contact support@readthedocs.com to discuss how we can enable this for you.
Sitemaps
Sitemaps allows us to inform search engines about URLs that are available for crawling and communicate them additional information about each URL of the project:
when it was last updated,
how often it changes,
how important it is in relation to other URLs in the site, and
what translations are available for a page.
Read the Docs automatically generates a sitemap for each project that hosts
to improve results when performing a search on these search engines.
This allow us to prioritize results based on the version number, for example
to show stable as the top result followed by latest and then all the project’s
versions sorted following semantic versioning.
Custom Not Found (404) Pages
If you want your project to use a custom page for not found pages instead of the “Maze Found” default,
you can put a 404.html at the top level of your project’s HTML output.
When a 404 is returned,
Read the Docs checks if there is a 404.html in the root of your project’s output
corresponding to the current version
and uses it if it exists.
Otherwise, it tries to fall back to the 404.html page
corresponding to the default version of the project.
We recommend the sphinx-notfound-page extension,
which Read the Docs maintains.
It automatically creates a 404.html page for your documentation,
matching the theme of your project.
See its documentation for how to install and customize it.
Custom robots.txt Pages
robots.txt files allow you to customize how your documentation is indexed in search engines. We automatically generate one for you, which automatically hides versions which are set to Hidden.
The robots.txt file will be served from the default version of your Project.
This is because the robots.txt file is served at the top-level of your domain,
so we must choose a version to find the file in.
The default version is the best place to look for it.
Sphinx and Mkdocs both have different ways of outputting static files in the build:
Sphinx
Sphinx uses html_extra_path option to add static files to the output.
You need to create a robots.txt file and put it under the path defined in html_extra_path.
MkDocs
MkDocs needs the robots.txt to be at the directory defined at docs_dir config.
Server Side Search
Read the Docs provides full-text search across all of the pages of all projects, this is powered by Elasticsearch. You can search all projects at https://readthedocs.org/search/, or search only on your project from the Search tab of your project.
We override the default search engine of your project with our search engine to provide you better results within your project. We fallback to the built-in search engine from your project if our search engine doesn’t return any results, just in case we missed something 😄
Search features
We offer a number of benefits compared to other documentation hosts:
- Search across subprojects
Subprojects allow you to host multiple discrete projects on a single domain. Every subproject hosted on that same domain is included in the search results of the main project.
- Search results land on the exact content you were looking for
We index every heading in the document, allowing you to get search results exactly to the content that you are searching for. Try this out by searching for “full-text search”.
- Full control over which results should be listed first
Set a custom rank per page, allowing you to deprecate content, and always show relevant content to your users first. See search.ranking.
- Search across projects you have access to (Read the Docs for Business)
This allows you to search across all the projects you access to in your Dashboard. Don’t remember where you found that document the other day? No problem, you can search across them all.
- Special query syntax for more specific results.
We support a full range of search queries. You can see some examples in our Search query syntax guide.
- Configurable.
Tweak search results according to your needs using a configuration file.
Search Analytics
Know what your users are looking for in your docs. To see a list of the top queries and an overview from the last month, go to the Admin tab of your project, and then click on Search Analytics.
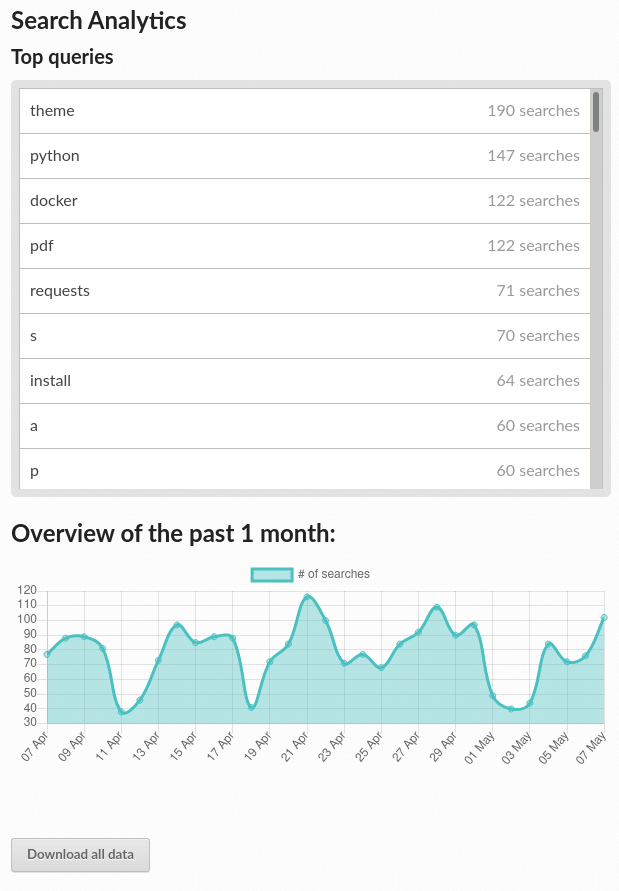
Search analytics demo
API
If you are using Read the Docs for Business you will need to replace https://readthedocs.org/ with https://readthedocs.com/ in all the URLs used in the following examples. Check Authentication and authorization if you are using private versions.
Warning
This API isn’t stable yet, some small things may change in the future.
- GET /api/v2/search/
Return a list of search results for a project, including results from its Subprojects. Results are divided into sections with highlights of the matching term.
- Query Parameters
q – Search query
project – Project slug
version – Version slug
page – Jump to a specific page
page_size – Limits the results per page, default is 50
- Response JSON Object
type (string) – The type of the result, currently page is the only type.
project (string) – The project slug
project_alias (string) – Alias of the project if it’s a subproject.
version (string) – The version slug
title (string) – The title of the page
domain (string) – Canonical domain of the resulting page
path (string) – Path to the resulting page
highlights (object) – An object containing a list of substrings with matching terms. Note that the text is HTML escaped with the matching terms inside a <span> tag.
blocks (object) –
A list of block objects containing search results from the page. Currently, there are two types of blocks:
section: A page section with a linkable anchor (
idattribute).domain: A Sphinx domain with a linkable anchor (
idattribute).
Example request:
$ curl "https://readthedocs.org/api/v2/search/?project=docs&version=latest&q=server%20side%20search"import requests URL = 'https://readthedocs.org/api/v2/search/' params = { 'q': 'server side search', 'project': 'docs', 'version': 'latest', } response = requests.get(URL, params=params) print(response.json())
Example response:
{ "count": 41, "next": "https://readthedocs.org/api/v2/search/?page=2&project=read-the-docs&q=server+side+search&version=latest", "previous": null, "results": [ { "type": "page", "project": "docs", "project_alias": null, "version": "latest", "title": "Server Side Search", "domain": "https://docs.readthedocs.io", "path": "/en/latest/server-side-search.html", "highlights": { "title": [ "<span>Server</span> <span>Side</span> <span>Search</span>" ] }, "blocks": [ { "type": "section", "id": "server-side-search", "title": "Server Side Search", "content": "Read the Docs provides full-text search across all of the pages of all projects, this is powered by Elasticsearch.", "highlights": { "title": [ "<span>Server</span> <span>Side</span> <span>Search</span>" ], "content": [ "You can <span>search</span> all projects at https://readthedocs.org/<span>search</span>/" ] } }, { "type": "domain", "role": "http:get", "name": "/_/api/v2/search/", "id": "get--_-api-v2-search-", "content": "Retrieve search results for docs", "highlights": { "name": [""], "content": ["Retrieve <span>search</span> results for docs"] } } ] }, ] }
Traffic Analytics
Traffic Analytics lets you see which documents your users are reading. This allows you to understand how your documentation is being used, so you can focus on expanding and updating parts people are reading most.
To see a list of the top pages from the last month, go to the Admin tab of your project, and then click on Traffic Analytics.
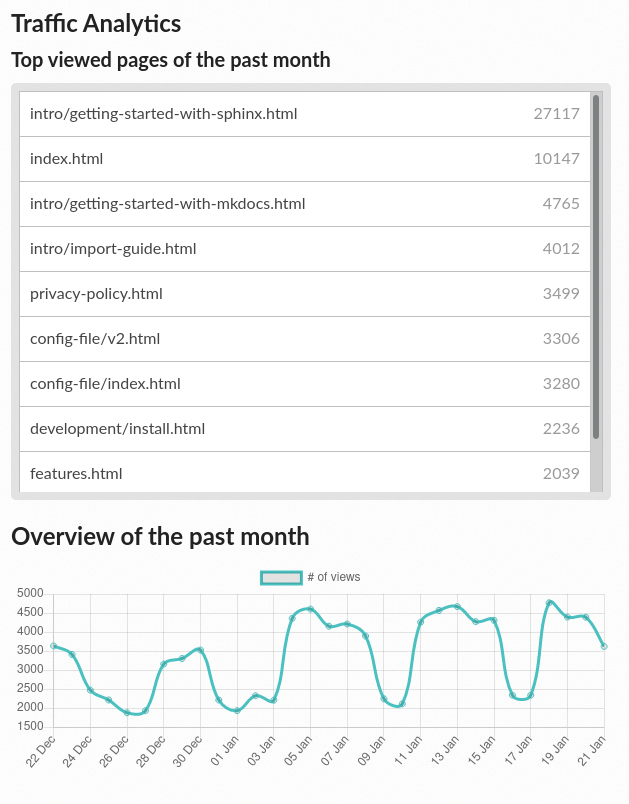
Traffic analytics demo
You can also access to analytics data from search results.
Note
The amount of analytics data stored for download depends which site you’re using:
On the Community site, the last 90 days are stored.
- On the Commercial one, it goes from 30 to infinite storage
(check out the pricing page).
Enabling Google Analytics on your Project
Read the Docs has native support for Google Analytics. You can enable it by:
Going to Admin > Advanced Settings in your project.
Fill in the Analytics code heading with your Google Tracking ID (example
UA-123456674-1)
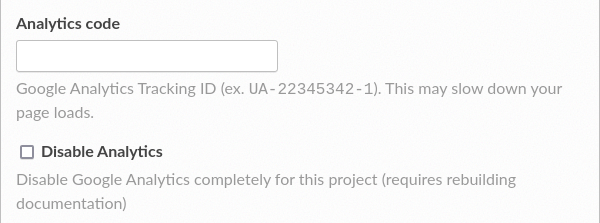
Options to manage Google Analytics
Once your documentation rebuilds it will include your Analytics tracking code and start sending data. Google Analytics usually takes 60 minutes, and sometimes can take up to a day before it starts reporting data.
Note
Read the Docs takes some extra precautions with analytics to protect user privacy. As a result, users with Do Not Track enabled will not be counted for the purpose of analytics.
For more details, see the Do Not Track section of our privacy policy.
Disabling Google Analytics on your project
Google Analytics can be completely disabled on your own projects. To disable Google Analytics:
Going to Admin > Advanced Settings in your project.
Check the box Disable Analytics.
Your documentation will need to be rebuilt for this change to take effect.
Preview Documentation from Pull Requests
Your project can be configured to build and host documentation for every new pull request. Previewing changes to your documentation during review makes it easier to catch documentation formatting and display issues introduced in pull requests.
Features
- Build on pull request events
We create and build a new version when a pull request is opened, and rebuild the version whenever a new commit is pushed.
- Build status report
Your project’s pull request build status will show as one of your pull request’s checks. This status will update as the build is running, and will show a success or failure status when the build completes.
GitHub build status reporting
- Warning banner
A warning banner is shown at the top of documentation pages to let readers know that this version isn’t the main version for the project.
Note
Warning banners are available only for Sphinx projects.
Configuration
To enable this feature for your project, your Read the Docs account needs to be connected to an account with a supported VCS provider. See Limitations for more information.
If your account is already connected:
Go to your project dashboard
Go to Admin, then Advanced settings
Enable the Build pull requests for this project option
Click on Save
Privacy levels
Note
Privacy levels are only supported on Read the Docs for Business.
By default, all docs built from pull requests are private. To change their privacy level:
Go to your project dashboard
Go to Admin, then Advanced settings
Select your option in Privacy level of builds from pull requests
Click on Save
Privacy levels work the same way as normal versions.
Limitations
Only available for GitHub and GitLab currently. Bitbucket is not yet supported.
To enable this feature, your Read the Docs account needs to be connected to an account with your VCS provider.
Builds from pull requests have the same memory and time limitations as regular builds.
Additional formats like PDF and EPUB aren’t built, to reduce build time.
Search queries will default to the default experience for your tool. This is a feature we plan to add, but don’t want to overwhelm our search indexes used in production.
The built documentation is kept for 90 days after the pull request has been closed or merged.
Troubleshooting
- No new builds are started when I open a pull request
The most common cause is that your repository’s webhook is not configured to send Read the Docs pull request events. You’ll need to re-sync your project’s webhook integration to reconfigure the Read the Docs webhook.
To resync your project’s webhook, go to your project’s admin dashboard, Integrations, and then select the webhook integration for your provider. Follow the directions on to re-sync the webhook, or create a new webhook integration.
You may also notice this behavior if your Read the Docs account is not connected to your VCS provider account, or if it needs to be reconnected. You can (re)connect your account by going to your Username dropdown, Settings, then to Connected Services.
- Build status is not being reported to your VCS provider
If opening a pull request does start a new build, but the build status is not being updated with your VCS provider, then your connected account may have out dated or insufficient permisisons.
Make sure that you have granted access to the Read the Docs OAuth App for your personal or organization GitHub account. You can also try reconnecting your account with your VCS provider.
Build Notifications and Webhooks
Note
Currently we don’t send notifications or trigger webhooks on builds from pull requests.
Email notifications
Read the Docs allows you to configure emails that can be sent on failing builds. This makes sure you know when your builds have failed.
Take these steps to enable build notifications using email:
Go to Admin > Notifications in your project.
Fill in the Email field under the New Email Notifications heading
Submit the form
You should now get notified by email when your builds fail!
Build Status Webhooks
Read the Docs can also send webhooks when builds are triggered, successful or failed.
Take these steps to enable build notifications using a webhook:
Go to Admin > Webhooks in your project.
Fill in the URL field and select what events will trigger the webhook
Modify the payload or leave the default (see below)
Click on Save
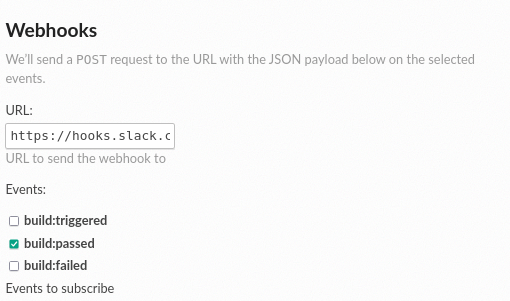
URL and events for a webhook
Every time one of the checked events triggers, Read the Docs will send a POST request to your webhook URL. The default payload will look like this:
{
    "event": "build:triggered",
    "name": "docs",
    "slug": "docs",
    "version": "latest",
    "commit": "2552bb609ca46865dc36401dee0b1865a0aee52d",
    "build": "15173336",
    "start_date": "2021-11-03T16:23:14",
    "build_url": "https://readthedocs.org/projects/docs/builds/15173336/",
    "docs_url": "https://docs.readthedocs.io/en/latest/"
}
When a webhook is sent, a new entry will be added to the “Recent Activity” table. By clicking on each individual entry, you will see the server response, the webhook request, and the payload.
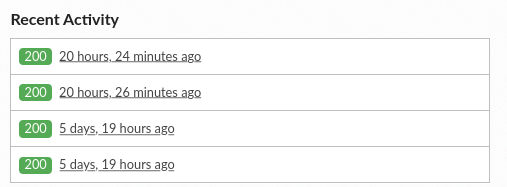
Activity of a webhook
Custom payload examples
You can customize the payload of the webhook to suit your needs, as long as it is valid JSON. Below you have a couple of examples, and in the following section you will find all the available variables.
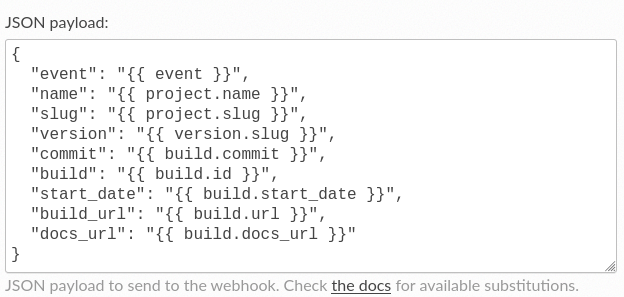
Custom payload
Slack
{
  "attachments": [
    {
      "color": "#db3238",
      "blocks": [
        {
          "type": "section",
          "text": {
            "type": "mrkdwn",
            "text": "*Read the Docs build failed*"
          }
        },
        {
          "type": "section",
          "fields": [
            {
              "type": "mrkdwn",
              "text": "*Project*: <{{ project.url }}|{{ project.name }}>"
            },
            {
              "type": "mrkdwn",
              "text": "*Version*: {{ version.name }} ({{ build.commit }})"
            },
            {
              "type": "mrkdwn",
              "text": "*Build*: <{{ build.url }}|{{ build.id }}>"
            }
          ]
        }
      ]
    }
  ]
}
More information on the Slack Incoming Webhooks documentation.
Discord
{
  "username": "Read the Docs",
  "content": "Read the Docs build failed",
  "embeds": [
    {
      "title": "Build logs",
      "url": "{{ build.url }}",
      "color": 15258703,
      "fields": [
        {
          "name": "*Project*",
          "value": "{{ project.url }}",
          "inline": true
        },
        {
          "name": "*Version*",
          "value": "{{ version.name }} ({{ build.commit }})",
          "inline": true
        },
        {
          "name": "*Build*",
          "value": "{{ build.url }}"
        }
      ]
    }
  ]
}
More information on the Discord webhooks documentation.
Variable substitutions reference
{{ event }}Event that triggered the webhook, one of
build:triggered,build:failed, orbuild:passed.{{ build.id }}Build ID.
{{ build.commit }}Commit corresponding to the build, if present (otherwise
"").{{ build.url }}URL of the build, for example
https://readthedocs.org/projects/docs/builds/15173336/.{{ build.docs_url }}URL of the documentation corresponding to the build, for example
https://docs.readthedocs.io/en/latest/.{{ build.start_date }}Start date of the build (UTC, ISO format), for example
2021-11-03T16:23:14.{{ organization.name }}Organization name (Commercial only).
{{ organization.slug }}Organization slug (Commercial only).
{{ project.slug }}Project slug.
{{ project.name }}Project name.
{{ project.url }}URL of the project dashboard.
{{ version.slug }}Version slug.
{{ version.name }}Version name.
Validating the payload
After you add a new webhook, Read the Docs will generate a secret key for it
and uses it to generate a hash signature (HMAC-SHA256) for each payload
that is included in the X-Hub-Signature header of the request.
Webhook secret
We highly recommend using this signature to verify that the webhook is coming from Read the Docs. To do so, you can add some custom code on your server, like this:
import hashlib
import hmac
import os


def verify_signature(payload, request_headers):
    """
    Verify that the signature of payload is the same as the one coming from request_headers.
    """
    digest = hmac.new(
        key=os.environ["WEBHOOK_SECRET"].encode(),
        msg=payload.encode(),
        digestmod=hashlib.sha256,
    )
    expected_signature = digest.hexdigest()

    return hmac.compare_digest(
        request_headers["X-Hub-Signature"].encode(),
        expected_signature.encode(),
    )
Legacy webhooks
Webhooks created before the custom payloads functionality was added to Read the Docs send a payload with the following structure:
{
    "name": "Read the Docs",
    "slug": "rtd",
    "build": {
        "id": 6321373,
        "commit": "e8dd17a3f1627dd206d721e4be08ae6766fda40",
        "state": "finished",
        "success": false,
        "date": "2017-02-15 20:35:54"
    }
}
To migrate to the new webhooks and keep a similar structure, you can use this payload:
{
    "name": "{{ project.name }}",
    "slug": "{{ project.slug }}",
    "build": {
        "id": "{{ build.id }}",
        "commit": "{{ build.commit }}",
        "state": "{{ event }}",
        "date": "{{ build.start_date }}"
    }
}
Security Log
Security logs allow you to see what has happened recently in your organization or account. We store the IP address and the browser’s User-Agent on each event, so that you can confirm this access was from the intended person.
User security log
We store user security logs from the last 90 days, and track the following events:
Authentication on the dashboard
Authentication on documentation pages (Read the Docs for Business only)
Authentication failures and successes are both tracked.
To access your logs:
Click on Username dropdown
Click on Settings
Click on Security Log
Organization security log
Note
This feature exists only on Read the Docs for Business.
We store logs according to your plan, check our pricing page for more details. We track the following events:
Authentication on documentation pages from your organization
User access to every documentation page from your organization (Enterprise plans only)
Authentication failures and successes are both tracked.
To access your organization logs:
Click on Organizations from your user dropdown
Click on your organization
Click on Settings
Click on Security Log
Connecting Your VCS Account
If you are going to import repositories from GitHub, Bitbucket, or GitLab, you should connect your Read the Docs account to your repository host first. Connecting your account allows for:
Easier importing of your repositories
Automatically configure your repository VCS Integrations which allow Read the Docs to build your docs on every change to your repository
Log into Read the Docs with your GitHub, Bitbucket, or GitLab credentials
If you signed up or logged in to Read the Docs with your GitHub, Bitbucket, or GitLab credentials, you’re all done. Your account is connected.
To connect a social account, go to your Username dropdown > Settings > Connected Services. From here, you’ll be able to connect to your GitHub, Bitbucket or GitLab account. This process will ask you to authorize a connection to Read the Docs, that allows us to read information about and clone your repositories.
Permissions for connected accounts
Read the Docs does not generally ask for write permission to your repositories’ code (with one exception detailed below) and since we only connect to public repositories we don’t need special permissions to read them. However, we do need permissions for authorizing your account so that you can login to Read the Docs with your connected account credentials and to setup VCS Integrations which allow us to build your documentation on every change to your repository.
GitHub
Read the Docs requests the following permissions (more precisely, OAuth scopes) when connecting your Read the Docs account to GitHub.
- Read access to your email address (
user:email) We ask for this so you can create a Read the Docs account and login with your GitHub credentials.
- Administering webhooks (
admin:repo_hook) We ask for this so we can create webhooks on your repositories when you import them into Read the Docs. This allows us to build the docs when you push new commits.
- Read access to your organizations (
read:org) We ask for this so we know which organizations you have access to. This allows you to filter repositories by organization when importing repositories.
- Repository status (
repo:status) Repository statuses allow Read the Docs to report the status (eg. passed, failed, pending) of pull requests to GitHub. This is used for a feature currently in beta testing that builds documentation on each pull request similar to a continuous integration service.
Note
Read the Docs for Business
asks for one additional permission (repo) to allow access to private repositories
and to allow us to setup SSH keys to clone your private repositories.
Unfortunately, this is the permission for read/write control of the repository
but there isn’t a more granular permission
that only allows setting up SSH keys for read access.
GitHub permission troubleshooting
Repositories not in your list to import.
Many organizations require approval for each OAuth application that is used, or you might have disabled it in the past for your personal account. This can happen at the personal or organization level, depending on where the project you are trying to access has permissions from.
You need to make sure that you have granted access to the Read the Docs OAuth App to your personal GitHub account. If you do not see Read the Docs in the OAuth App settings, you might need to disconnect and reconnect the GitHub service.
See also
GitHub docs on requesting access to your personal OAuth for step-by-step instructions.
You need to make sure that you have granted access to the Read the Docs OAuth App to your organization GitHub account. If you don’t see “Read the Docs” listed, then you might need to connect GitHub to your social accounts as noted above.
See also
GitHub doc on requesting access to your organization OAuth for step-by-step instructions.
Bitbucket
For similar reasons to those above for GitHub, we request permissions for:
Reading your account information including your email address
Read access to your team memberships
Read access to your repositories
Read and write access to webhooks
GitLab
Like the others, we request permissions for:
Reading your account information (
read_user)API access (
api) which is needed to create webhooks in GitLab
Build process
Once a project has been imported and a build is triggered, Read the Docs executes specific pre-defined jobs to build the project’s documentation and update the hosted content. This page explains in detail what happens behind the scenes, and an overview of how you can change this process.
Understanding what’s going on
Understanding how your content is built helps with debugging the problems that may appear in the process. It also allows you customize the steps of the build process.
Note
All the steps are run inside a Docker container with the image the project defines in build.os, and all the Environment Variables defined are exposed to them.
The following are the pre-defined jobs executed by Read the Docs:
- checkout
Checks out project’s code from the URL’s repository defined for this project. It will use
git clone,hg clone, etc depending on the version control system you choose.- system_dependencies
Installs operating system & system-level dependencies. This includes specific version of languages (e.g. Python, Node.js, Go, Rust) and also
aptpackages.At this point, build.tools can be used to define a language version, and build.apt_packages to define
aptpackages.- create_environment
Creates a Python environment to install all the dependencies in an isolated and reproducible way. Depending on what’s defined by the project a virtualenv or a conda environment (conda) will be used.
- install
Install default common dependencies.
If the project has extra Python requirements, python.install can be used to specify them.
Tip
We strongly recommend pinning all the versions required to build the documentation to avoid unexpected build errors.
- build
Runs the main command to build the documentation for each of the formats declared (formats). It will use Sphinx (sphinx) or MkDocs (mkdocs) depending on the project.
- upload
Once the build process finishes successfully, the resulting artifacts are uploaded to our servers, and the CDN is purged so the newer version of the documentation is served.
See also
If there are extra steps required to build the documentation, or you need to execute additional commands to integrate with other tools, it’s possible to run user-defined commands and customize the build process.
Build resources
Every build has limited resources to avoid misuse of the platform. Currently, these build limits are:
15 minutes build time
3GB of memory
2 concurrent builds
We can increase build limits on a per-project basis. Send an email to support@readthedocs.org providing a good reason why your documentation needs more resources.
If your business is hitting build limits hosting documentation on Read the Docs, please consider Read the Docs for Business which has much higher build resources.
30 minutes build time
7GB of memory
Concurrent builds vary based on your pricing plan
If you are having trouble with your documentation builds, you can reach our support at support@readthedocs.com.
Build customization
Read the Docs has a well-defined build process that works for many projects, but we offer additional customization to support more uses of our platform. This page explains how to extend the build process using user-defined build jobs to execute custom commands, and also how to override the build process completely:
- Extend the build process
If you are using Sphinx or Mkdocs and need to execute additional commands.
- Override the build process
If you want full control over your build. This option supports any tool that generates HTML as part of the build.
Table of contents
Extend the build process
In the normal build process,
the pre-defined jobs checkout, system_dependencies, create_environment, install, build and upload are executed.
However, Read the Docs exposes extra jobs to users so they can customize the build process by running shell commands.
These extra jobs are:
Step |
Customizable jobs |
|---|---|
Checkout |
|
System dependencies |
|
Create environment |
|
Install |
|
Build |
|
Upload |
There are no customizable jobs currently |
Note
Currently, the pre-defined jobs (checkout, system_dependencies, etc) executed by Read the Docs cannot be overridden or skipped.
These jobs can be declared by using a Configuration File with the build.jobs key on it. Let’s say the project requires commands to be executed before installing any dependency into the Python environment and after the build has finished. In that case, a config file similar to this one can be used:
version: 2
build:
  os: "ubuntu-20.04"
  tools:
    python: "3.10"
  jobs:
    pre_install:
      - bash ./scripts/pre_install.sh
    post_build:
      - curl -X POST \
        -F "project=${READTHEDOCS_PROJECT}" \
        -F "version=${READTHEDOCS_VERSION}" https://example.com/webhooks/readthedocs/
There are some caveats to knowing when using user-defined jobs:
The current working directory is at the root of your project’s cloned repository
Environment variables are expanded in the commands (see Environment Variables)
Each command is executed in a new shell process, so modifications done to the shell environment do not persist between commands
Any command returning non-zero exit code will cause the build to fail immediately
build.osandbuild.toolsare required when usingbuild.jobs
build.jobs examples
We’ve included some common examples where using build.jobs will be useful. These examples may require some adaptation for each projects’ use case, we recommend you use them as a starting point.
Unshallow clone
Read the Docs does not perform a full clone on checkout job to reduce network data and speed up the build process.
Because of this, extensions that depend on the full Git history will fail.
To avoid this, it’s possible to unshallow the clone done by Read the Docs:
version: 2
build:
  os: "ubuntu-20.04"
  tools:
    python: "3.10"
  jobs:
    post_checkout:
      - git fetch --unshallow
Generate documentation from annotated sources with Doxygen
It’s possible to run Doxygen as part of the build process to generate documentation from annotated sources:
version: 2
build:
  os: "ubuntu-20.04"
  tools:
    python: "3.10"
  jobs:
    pre_build:
    # Note that this HTML won't be automatically uploaded,
    # unless your documentation build includes it somehow.
      - doxygen
Use MkDocs extensions with extra required steps
There are some MkDocs extensions that require specific commands to be run to generate extra pages before performing the build. For example, pydoc-markdown
version: 2
build:
  os: "ubuntu-20.04"
  tools:
    python: "3.10"
  jobs:
    pre_build:
      - pydoc-markdown --build --site-dir "$PWD/_build/html"
Avoid having a dirty Git index
Read the Docs needs to modify some files before performing the build to be able to integrate with some of its features. Because of this reason, it could happen the Git index gets dirty (it will detect modified files). In case this happens and the project is using any kind of extension that generates a version based on Git metadata (like setuptools_scm), this could cause an invalid version number to be generated. In that case, the Git index can be updated to ignore the files that Read the Docs has modified.
version: 2
build:
  os: "ubuntu-20.04"
  tools:
    python: "3.10"
  jobs:
    pre_install:
      - git update-index --assume-unchanged environment.yml docs/conf.py
Perform a check for broken links
Sphinx comes with a linkcheck builder that checks for broken external links included in the project’s documentation. This helps ensure that all external links are still valid and readers aren’t linked to non-existent pages.
version: 2
build:
  os: "ubuntu-20.04"
  tools:
    python: "3.10"
  jobs:
    pre_build:
      - python -m sphinx -b linkcheck docs/ _build/linkcheck
Support Git LFS (Large File Storage)
In case the repository contains large files that are tracked with Git LFS,
there are some extra steps required to be able to download their content.
It’s possible to use post_checkout user-defined job for this.
version: 2
build:
  os: "ubuntu-20.04"
  tools:
    python: "3.10"
  jobs:
    post_checkout:
      # Download and uncompress the binary
      # https://git-lfs.github.com/
      - wget https://github.com/git-lfs/git-lfs/releases/download/v3.1.4/git-lfs-linux-amd64-v3.1.4.tar.gz
      - tar xvfz git-lfs-linux-amd64-v3.1.4.tar.gz
      # Modify LFS config paths to point where git-lfs binary was downloaded
      - git config filter.lfs.process "`pwd`/git-lfs filter-process"
      - git config filter.lfs.smudge  "`pwd`/git-lfs smudge -- %f"
      - git config filter.lfs.clean "`pwd`/git-lfs clean -- %f"
      # Make LFS available in current repository
      - ./git-lfs install
      # Download content from remote
      - ./git-lfs fetch
      # Make local files to have the real content on them
      - ./git-lfs checkout
Install Node.js dependencies
It’s possible to install Node.js together with the required dependencies by using user-defined build jobs.
To setup it, you need to define the version of Node.js to use and install the dependencies by using build.jobs.post_install:
version: 2
build:
  os: "ubuntu-22.04"
  tools:
    python: "3.9"
    nodejs: "16"
  jobs:
    post_install:
      # Install dependencies defined in your ``package.json``
      - npm ci
      # Install any other extra dependencies to build the docs
      - npm install -g jsdoc
Install dependencies with Poetry
Projects managed with Poetry,
can use the post_create_environment user-defined job to use Poetry for installing Python dependencies.
Take a look at the following example:
version: 2

build:
  os: "ubuntu-22.04"
  tools:
    python: "3.10"
  jobs:
    post_create_environment:
      # Install poetry
      # https://python-poetry.org/docs/#osx--linux--bashonwindows-install-instructions
      - curl -sSL https://raw.githubusercontent.com/python-poetry/poetry/master/get-poetry.py | python -
      # Tell poetry to not use a virtual environment
      - $HOME/.poetry/bin/poetry config virtualenvs.create false
      # Install project's dependencies
      - $HOME/.poetry/bin/poetry install

sphinx:
  configuration: docs/conf.py
Override the build process
Warning
This feature is in a beta phase and could suffer incompatible changes or even removed completely in the near feature. It does not yet support some of the Read the Docs’ features like the flyout menu, and ads. However, we do plan to support these features in the future. Use this feature at your own risk.
If your project requires full control of the build process, and extending the build process is not enough, all the commands executed during builds can be overridden using the build.commands configuration file key.
As Read the Docs does not have control over the build process,
you are responsible for running all the commands required to install requirements and build your project properly.
Once the build process finishes, the contents of the _readthedocs/html/ directory will be hosted.
build.commands examples
This section contains some examples that showcase what is possible with build.commands. Note that you may need to modify and adapt these examples depending on your needs.
Pelican
Pelican is a well-known static site generator that’s commonly used for blogs and landing pages. If you are building your project with Pelican you could use a configuration file similar to the following:
version: 2
build:
  os: "ubuntu-22.04"
  tools:
    python: "3.10"
  commands:
    - pip install pelican[markdown]
    - pelican --settings docs/pelicanconf.py --output _readthedocs/html/ docs/
Docsify
Docsify generates documentation websites on the fly, without the need to build static HTML. These projects can be built using a configuration file like this:
version: 2
build:
  os: "ubuntu-22.04"
  tools:
    nodejs: "16"
  commands:
    - mkdir --parents _readthedocs/html/
    - cp --recursive docs/* _readthedocs/html/
Search support
Read the Docs will automatically index the content of all your HTML files, respecting the search options from your config file.
You can access the search results from the Search tab of your project, or by using the search API.
Note
In order for Read the Docs to index your HTML files correctly, they should follow some of the conventions described at Server Side Search Integration.
Environment Variables
Read the Docs supports two types of environment variables in project builds:
Both are merged together during the build process and are exposed to all of the executed commands. There are two exceptions for user-defined environment variables however:
User-defined variables are not available during the checkout step of the build process
User-defined variables that are not marked as public will not be available in pull request builds
Default environment variables
Read the Docs builders set the following environment variables automatically for each documentation build:
- READTHEDOCS
Whether the build is running inside Read the Docs.
- Default
True
- READTHEDOCS_VERSION
The slug of the version being built, such as
latest,stable, or a branch name likefeature-1234. For pull request builds, the value will be the pull request number.
- READTHEDOCS_VERSION_NAME
The verbose name of the version being built, such as
latest,stable, or a branch name likefeature/1234.
- READTHEDOCS_VERSION_TYPE
The type of the version being built.
- Values
branch,tag,external(for pull request builds), orunknown
- READTHEDOCS_LANGUAGE
The locale name, or the identifier for the locale, for the project being built. This value comes from the project’s configured language.
- Examples
en,it,de_AT,es,pt_BR
User-defined environment variables
If extra environment variables are needed in the build process (like an API token), you can define them from the project’s settings page:
Go to your project’s Admin > Environment Variables
Click on Add Environment Variable
Fill the
NameandValueCheck the Public option if you want to expose this environment variable to builds from pull requests.
Warning
If you mark this option, any user that can create a pull request on your repository will be able to see the value of this environment variable.
Click on Save
Note
Once you create an environment variable, you won’t be able to see its value anymore.
After adding an environment variable, you can read it from your build process, for example in your Sphinx’s configuration file:
import os
import requests

# Access to our custom environment variables
username = os.environ.get('USERNAME')
password = os.environ.get('PASSWORD')

# Request a username/password protected URL
response = requests.get(
    'https://httpbin.org/basic-auth/username/password',
    auth=(username, password),
)
You can also use any of these variables from user-defined build jobs in your project’s configuration file:
version: 2
build:
  os: ubuntu-22.04
  tools:
    python: 3.10
  jobs:
    post_install:
      - curl -u ${USERNAME}:${PASSWORD} https://httpbin.org/basic-auth/username/password
Badges
Badges let you show the state of your documentation to your users. They are great for embedding in your README, or putting inside your actual doc pages.
Status Badges
They will display in green for passing, red for failing, and yellow for unknown states.
Here are a few examples:


You can see it in action in the Read the Docs README. They will link back to your project’s documentation page on Read the Docs.
Style
Now you can pass the style GET argument,
to get custom styled badges same as you would for shields.io.
If no argument is passed, flat is used as default.
STYLE |
BADGE |
|---|---|
flat |
|
flat-square |
|
for-the-badge |
|
plastic |
|
social |
Project Pages
You will now see badges embedded in your project page. The default badge will be pointed at the default version you have specified for your project. The badge URLs look like this:
https://readthedocs.org/projects/pip/badge/?version=latest&style=plastic
You can replace the version argument with any version that you want to show a badge for. If you click on the badge icon, you will be given snippets for RST, Markdown, and HTML; to make embedding it easier.
If you leave the version argument off, it will default to your latest version. This is probably best to include in your README, since it will stay up to date with your Read the Docs project:
https://readthedocs.org/projects/pip/badge/
Site Support
Usage Questions
If you have questions about how to use Read the Docs, or have an issue that
isn’t related to a bug, Stack Overflow is the best place to ask. Tag
questions with read-the-docs so other folks can find them easily.
Good questions for Stack Overflow would be:
“What is the best way to structure the table of contents across a project?”
“How do I structure translations inside of my project for easiest contribution from users?”
“How do I use Sphinx to use SVG images in HTML output but PNG in PDF output?”
You might also find the answers you are looking for in our documentation guides. These provide step-by-step solutions to common user requirements.
User Support
If you need a specific request for your project or account, like more resources, change of the project’s slug or username.
Please fill out the form at https://readthedocs.org/support/, and we will reply as soon as possible.
Please fill out the form at https://readthedocs.com/support/, and we will reply within 1 business day for most plans.
Bug Reports
If you have an issue with the actual functioning of the site, you can file bug reports on our GitHub issue tracker. You can also contribute to Read the Docs, as the code is open source.
Priority Support
We offer priority support with Read the Docs for Business and we have a dedicated team that responds to support requests during business hours.
Frequently Asked Questions
My project isn’t building correctly
First, you should check out the Builds tab of your project.
That records all of the build attempts that RTD has made to build your project.
If you see ImportError messages for custom Python modules,
see our section on My documentation requires additional dependencies.
If you are still seeing errors because of C library dependencies, please see I get import errors on libraries that depend on C modules.
Help, my build passed but my documentation page is 404 Not Found!
This often happens because you don’t have an index.html file being generated.
Make sure you have one of the following files:
index.rst
index.md
At the top level of your built documentation, otherwise we aren’t able to serve a “default” index page.
To test if your docs actually built correctly,
you can navigate to a specific page (/en/latest/README.html for example).
My documentation requires additional dependencies
For most Python dependencies, you can can specify a requirements file which details your dependencies. See our guide on Using a configuration file. You can also set your project documentation to install your project itself as a dependency.
Your build may depend on extensions that require additional system packages to be installed. If you are using a Configuration File you can add libraries with apt to the Ubuntu-based builder .
If your project or its dependencies rely on C libraries that cannot be installed this way, see I get import errors on libraries that depend on C modules.
My project requires some additional settings
If this is just a dependency issue, see My documentation requires additional dependencies.
Read the Docs offers some settings which can be used for a variety of purposes. To enable these settings, please send an email to support@readthedocs.org and we will change the settings for the project. Read more about these settings here.
I get import errors on libraries that depend on C modules
Note
Another use case for this is when you have a module with a C extension.
This happens because the build system does not have the dependencies for
building your project, such as C libraries needed by some Python packages (e.g.
libevent or mysql). For libraries that cannot be installed via apt in the builder there is another way to
successfully build the documentation despite missing dependencies.
With Sphinx you can use the built-in autodoc_mock_imports for mocking. If
such libraries are installed via setup.py, you also will need to remove all
the C-dependent libraries from your install_requires in the RTD environment.
How do I change behavior when building with Read the Docs?
When RTD builds your project, it sets the READTHEDOCS environment
variable to the string 'True'. So within your Sphinx conf.py file, you
can vary the behavior based on this. For example:
import os
on_rtd = os.environ.get('READTHEDOCS') == 'True'
if on_rtd:
    html_theme = 'default'
else:
    html_theme = 'nature'
The READTHEDOCS variable is also available in the Sphinx build
environment, and will be set to True when building on RTD:
{% if READTHEDOCS %}
Woo
{% endif %}
How do I host multiple projects on one custom domain?
We support the concept of subprojects, which allows multiple projects to share a single domain. If you add a subproject to a project, that documentation will be served under the parent project’s subdomain or custom domain.
For example,
Kombu is a subproject of Celery,
so you can access it on the celery.readthedocs.io domain:
https://celery.readthedocs.io/projects/kombu/en/latest/
This also works the same for custom domains:
http://docs..org/projects/kombu/en/latest/
You can add subprojects in the project admin dashboard.
For details on custom domains, see our documentation on Custom Domains.
Where do I need to put my docs for RTD to find it?
Read the Docs will crawl your project looking for a conf.py. Where it finds the conf.py,
it will run sphinx-build in that directory.
So as long as you only have one set of sphinx documentation in your project, it should Just Work.
You can specify an exact path to your documentation using a Read the Docs Configuration File.
I want to use the Blue/Default Sphinx theme
We think that our theme is badass,
and better than the default for many reasons.
Some people don’t like change though 😄,
so there is a hack that will let you keep using the default theme.
If you set the html_style variable in your conf.py,
it should default to using the default theme.
The value of this doesn’t matter, and can be set to /default.css for default behavior.
I want to use the Read the Docs theme locally
There is a repository for that: https://github.com/readthedocs/sphinx_rtd_theme. Simply follow the instructions in the README.
Image scaling doesn’t work in my documentation
Image scaling in docutils depends on PIL. PIL is installed in the system that RTD runs on. However, if you are using the virtualenv building option, you will likely need to include PIL in your requirements for your project.
I want comments in my docs
RTD doesn’t have explicit support for this. That said, a tool like Disqus (and the sphinxcontrib-disqus plugin) can be used for this purpose on RTD.
How do I support multiple languages of documentation?
See the section on Localization of Documentation.
Does Read the Docs work well with “legible” docstrings?
Yes. One criticism of Sphinx is that its annotated docstrings are too
dense and difficult for humans to read. In response, many projects
have adopted customized docstring styles that are simultaneously
informative and legible. The
NumPy
and
Google
styles are two popular docstring formats. Fortunately, the default
Read the Docs theme handles both formats just fine, provided
your conf.py specifies an appropriate Sphinx extension that
knows how to convert your customized docstrings. Two such extensions
are numpydoc and
napoleon. Only
napoleon is able to handle both docstring formats. Its default
output more closely matches the format of standard Sphinx annotations,
and as a result, it tends to look a bit better with the default theme.
Note
To use these extensions you need to specify the dependencies on your project by following this guide.
Can I document a Python package that is not at the root of my repository?
Yes. The most convenient way to access a Python package for example via
Sphinx’s autoapi in your documentation is to use the Install your project
inside a virtualenv using setup.py install option in the admin panel of
your project. However this assumes that your setup.py is in the root of
your repository.
If you want to place your package in a different directory or have multiple
Python packages in the same project, then create a pip requirements file. You
can specify the relative path to your package inside the file.
For example you want to keep your Python package in the src/python
directory, then create a requirements.txt file with the
following contents:
src/python/
Please note that the path must be relative to the working directory where pip is launched,
rather than the directory where the requirements file is located.
Therefore, even if you want to move the requirements file to a requirements/ directory,
the example path above would work.
You can customize the path to your requirements file and any other installed dependency using a Read the Docs Configuration File.
I need to install a package in a environment with pinned versions
To ensure proper installation of a Python package, the pip install method will automatically upgrade every dependency to its most recent version in case they aren’t pinned by the package definition.
If instead you’d like to pin your dependencies outside the package, you can add this line to your requirements or environment file (if you are using Conda).
In your requirements.txt file:
# path to the directory containing setup.py relative to the project root
-e .
In your Conda environment file (environment.yml):
# path to the directory containing setup.py relative to the environment file
-e ..
Can I use Anaconda Project and anaconda-project.yml?
Yes. With anaconda-project>=0.8.4 you can use the Anaconda Project configuration
file anaconda-project.yaml (or anaconda-project.yml) directly in place of a
Conda environment file by using dependencies: as an alias for packages:.
I.e., your anaconda-project.yaml file can be used as a conda.environment config
in the .readthedocs.yaml config file if it contains:
dependencies:
  - python=3.9
  - scipy
  ...
How can I avoid search results having a deprecated version of my docs?
If readers search something related to your docs in Google, it will probably return the most relevant version of your documentation. It may happen that this version is already deprecated and you want to stop Google indexing it as a result, and start suggesting the latest (or newer) one.
To accomplish this, you can add a robots.txt file to your documentation’s root so it ends up served at the root URL of your project
(for example, https://yourproject.readthedocs.io/robots.txt).
We have documented how to set this up in our Custom robots.txt Pages docs.
Can I remove advertising from my documentation?
How do I change my project slug (the URL your docs are served at)?
We don’t support allowing folks to change the slug for their project. You can update the name which is shown on the site, but not the actual URL that documentation is served.
The main reason for this is that all existing URLs to the content will break. You can delete and re-create the project with the proper name to get a new slug, but you really shouldn’t do this if you have existing inbound links, as it breaks the internet.
If that isn’t enough, you can request the change sending an email to support@readthedocs.org.
How do I change the version slug of my project?
We don’t support allowing folks to change the slug for their versions. But you can rename the branch/tag to achieve this. If that isn’t enough, you can request the change sending an email to support@readthedocs.org.
What commit of Read the Docs is in production?
We deploy readthedocs.org from the rel branch in our GitHub repository.
You can see the latest commits that have been deployed by looking on GitHub: https://github.com/readthedocs/readthedocs.org/commits/rel
We also keep an up-to-date changelog.
How can I deploy Jupyter Book projects on Read the Docs?
According to its own documentation,
Jupyter Book is an open source project for building beautiful, publication-quality books and documents from computational material.
Even though Jupyter Book leverages Sphinx “for almost everything that it
does”,
it purposedly hides Sphinx conf.py files from the user,
and instead generates them on the fly from its declarative _config.yml.
As a result, you need to follow some extra steps
to make Jupyter Book work on Read the Docs.
As described in the official documentation, you can manually convert your Jupyter Book project to Sphinx with the following configuration:
 build:
     jobs:
         pre_build:
         # Generate the Sphinx configuration for this Jupyter Book so it builds.
         - "jupyter-book config sphinx docs/"
How-to Guides
These guides will help walk you through specific use cases related to Read the Docs itself, documentation tools like Sphinx and MkDocs and how to write successful documentation.
For documentation authors: Cross-referencing with Sphinx | Link to Other Projects’ Documentation With Intersphinx | How to use Jupyter notebooks in Sphinx | More guides for authors
For project administrators: Technical Documentation Search Engine Optimization (SEO) Guide | Manage Translations for Sphinx projects | Using advanced search features | Using Private Git Submodules | More guides for administrators
For developers and designers: Installing Private Python Packages | Adding Custom CSS or JavaScript to Sphinx Documentation | Reproducible Builds | Embedding Content From Your Documentation | Conda Support | More guides for developers and designers
Guides for documentation authors
These guides offer some tips and tricks to author documentation with the tools supported on Read the Docs. Only reStructuredText or Markdown knowledge and minimal configuration tweaking are needed.
For an introduction to Sphinx and Mkdocs, have a look at our Getting Started with Sphinx and Getting Started with MkDocs.
Cross-referencing with Sphinx
When writing documentation you often need to link to other pages of your documentation, other sections of the current page, or sections from other pages.
An easy way is just to use the raw URL that Sphinx generates for each page/section. This works, but it has some disadvantages:
Links can change, so they are hard to maintain.
Links can be verbose and hard to read, so it is unclear what page/section they are linking to.
There is no easy way to link to specific sections like paragraphs, figures, or code blocks.
URL links only work for the html version of your documentation.
Instead, Sphinx offers a powerful way to linking to the different elements of the document, called cross-references. Some advantages of using them:
Use a human-readable name of your choice, instead of a URL.
Portable between formats: html, PDF, ePub.
Sphinx will warn you of invalid references.
You can cross reference more than just pages and section headers.
This page describes some best-practices for cross-referencing with Sphinx with two markup options: reStructuredText and MyST (Markdown).
If you are not familiar with reStructuredText, check reStructuredText Primer for a quick introduction.
If you want to learn more about the MyST Markdown dialect, check out Core Syntax.
Table of contents
Getting started
Explicit targets
Cross referencing in Sphinx uses two components, references and targets.
references are pointers in your documentation to other parts of your documentation.
targets are where the references can point to.
You can manually create a target in any location of your documentation, allowing you to reference it from other pages. These are called explicit targets.
For example, one way of creating an explicit target for a section is:
.. _My target:

Explicit targets
~~~~~~~~~~~~~~~~

Reference `My target`_.
(My_target)=
## Explicit targets

Reference [](My_target).
Then the reference will be rendered as My target.
You can also add explicit targets before paragraphs (or any other part of a page).
Another example, add a target to a paragraph:
.. _target to paragraph:

An easy way is just to use the final link of the page/section.
This works, but it has :ref:`some disadvantages <target to paragraph>`:
(target_to_paragraph)=

An easy way is just to use the final link of the page/section.
This works, but it has [some disadvantages](target_to_paragraph):
Then the reference will be rendered as: some disadvantages.
You can also create in-line targets within an element on your page, allowing you to, for example, reference text within a paragraph.
For example, an in-line target inside a paragraph:
You can also create _`in-line targets` within an element on your page,
allowing you to, for example, reference text *within* a paragraph.
Then you can reference it using `in-line targets`_,
that will be rendered as: in-line targets.
Implicit targets
You may also reference some objects by name without explicitly giving them one by using implicit targets.
When you create a section, a footnote, or a citation, Sphinx will create a target with the title as the name:
For example, to reference the previous section
you can use `Explicit targets`_.
For example, to reference the previous section
you can use [](#explicit-targets).
Note
This requires setting myst_heading_anchors = 2 in your conf.py,
see Auto-generated header anchors.
The reference will be rendered as: Explicit targets.
Cross-referencing using roles
All targets seen so far can be referenced only from the same page. Sphinx provides some roles that allow you to reference any explicit target from any page.
Note
Since Sphinx will make all explicit targets available globally, all targets must be unique.
You can see the complete list of cross-referencing roles at Cross-referencing syntax. Next, you will explore the most common ones.
The ref role
The ref role can be used to reference any explicit targets. For example:
- :ref:`my target`.
- :ref:`Target to paragraph <target to paragraph>`.
- :ref:`Target inside a paragraph <in-line targets>`.
- {ref}`my target`.
- {ref}`Target to paragraph <target_to_paragraph>`.
That will be rendered as:
The ref role also allow us to reference code blocks:
.. _target to code:

.. code-block:: python

   # Add the extension
   extensions = [
      'sphinx.ext.autosectionlabel',
   ]

   # Make sure the target is unique
   autosectionlabel_prefix_document = True
We can reference it using :ref:`code <target to code>`,
that will be rendered as: code.
The doc role
The doc role allows us to link to a page instead of just a section.
The target name can be relative to the page where the role exists, or relative
to your documentation’s root folder (in both cases, you should omit the extension).
For example, to link to a page in the same directory as this one you can use:
- :doc:`intersphinx`
- :doc:`/guides/intersphinx`
- :doc:`Custom title </guides/intersphinx>`
- {doc}`intersphinx`
- {doc}`/guides/intersphinx`
- {doc}`Custom title </guides/intersphinx>`
That will be rendered as:
Tip
Using paths relative to your documentation root is recommended, so you avoid changing the target name if the page is moved.
The numref role
The numref role is used to reference numbered elements of your documentation.
For example, tables and images.
To activate numbered references, add this to your conf.py file:
# Enable numref
numfig = True
Next, ensure that an object you would like to reference has an explicit target.
For example, you can create a target for the next image:
Link me!
.. _target to image:

.. figure:: /img/logo.png
   :alt: Logo
   :align: center
   :width: 240px

   Link me!
(target_to_image)=

```{figure} /img/logo.png
:alt: Logo
:align: center
:width: 240px
```
Finally, reference it using :numref:`target to image`,
that will be rendered as Fig. N.
Sphinx will enumerate the image automatically.
Automatically label sections
Manually adding an explicit target to each section and making sure is unique is a big task! Fortunately, Sphinx includes an extension to help us with that problem, autosectionlabel.
To activate the autosectionlabel extension, add this to your conf.py file:
# Add the extension
extensions = [
   'sphinx.ext.autosectionlabel',
]

# Make sure the target is unique
autosectionlabel_prefix_document = True
Sphinx will create explicit targets for all your sections,
the name of target has the form {path/to/page}:{title-of-section}.
For example, you can reference the previous section using:
- :ref:`guides/cross-referencing-with-sphinx:explicit targets`.
- :ref:`Custom title <guides/cross-referencing-with-sphinx:explicit targets>`.
- {ref}`guides/cross-referencing-with-sphinx:explicit targets`.
- {ref}`Custom title <guides/cross-referencing-with-sphinx:explicit targets>`.
That will be rendered as:
Invalid targets
If you reference an invalid or undefined target Sphinx will warn us.
You can use the -W option when building your docs
to fail the build if there are any invalid references.
On Read the Docs you can use the sphinx.fail_on_warning option.
Finding the reference name
When you build your documentation, Sphinx will generate an inventory of all
explicit and implicit links called objects.inv. You can list all of these targets to
explore what is available for you to reference.
List all targets for built documentation with:
python -m sphinx.ext.intersphinx <link>
Where <link> is either a URL or a local path that points to your inventory file
(usually in _build/html/objects.inv).
For example, to see all targets from the Read the Docs documentation:
python -m sphinx.ext.intersphinx https://docs.readthedocs.io/en/stable/objects.inv
Cross-referencing targets in other documentation sites
You can reference to docs outside your project too! See Link to Other Projects’ Documentation With Intersphinx.
Link to Other Projects’ Documentation With Intersphinx
You may be familiar with using the :ref: role to link to any location of your docs. It helps you to keep all links within your docs up to date and warns you if a reference target moves or changes so you can ensure that your docs don’t have broken cross-references.
Sometimes you may need to link to a specific section of another project’s documentation.
While you could just hyperlink directly, there is a better way.
Intersphinx allows you to use all cross-reference roles from Sphinx with objects in other projects.
That is, you could use the :ref: role to link to sections of other documentation projects.
Sphinx will ensure that your cross-references to the other project exist and will raise a warning if they are deleted or changed so you can keep your docs up to date.
Note
You can also use Sphinx’s linkcheck builder to check for broken links.
By default it will also check the validity of #anchors in links.
sphinx-build -b linkcheck . _build/linkcheck
See all the options for the linkcheck builder.
Using Intersphinx
To use Intersphinx you need to add it to the list of extensions in your conf.py file.
# conf.py file

extensions = [
    'sphinx.ext.intersphinx',
]
And use the intersphinx_mapping configuration to indicate the name and link of the projects you want to use.
# conf.py file

intersphinx_mapping = {
    'sphinx': ('https://www.sphinx-doc.org/en/master/', None),
}
Now you can use the sphinx name with a cross-reference role:
- :ref:`sphinx:ref-role`
- :ref:`:ref: role <sphinx:ref-role>`
- :doc:`sphinx:usage/extensions/intersphinx`
- :doc:`Intersphinx <sphinx:usage/extensions/intersphinx>`
- {ref}`sphinx:ref-role`
- {ref}`:ref: role <sphinx:ref-role>`
- {doc}`sphinx:usage/extensions/intersphinx`
- {doc}`Intersphinx <sphinx:usage/extensions/intersphinx>`
Result:
Note
You can get the targets used in Intersphinx by inspecting the source file of the project or using this utility provided by Intersphinx:
python -msphinx.ext.intersphinx https://www.sphinx-doc.org/en/master/objects.inv
Intersphinx in Read the Docs
You can use Intersphinx to link to subprojects, translations, another version or any other project hosted in Read the Docs. For example:
# conf.py file

intersphinx_mapping = {
    # Links to "v2" version of the "docs" project.
    'docs-v2': ('https://docs.readthedocs.io/en/v2', None),
    # Links to the French translation of the "docs" project.
    'docs-fr': ('https://docs.readthedocs.io/fr/latest', None),
    # Links to the "apis" subproject of the "docs" project.
    'sub-apis': ('https://docs.readthedocs.io/projects/apis/en/latest', None),
}
Intersphinx with private projects
If you are using Read the Docs for Business, Intersphinx will not be able to fetch the inventory file from private docs.
Intersphinx supports URLs with Basic Authorization, which Read the Docs supports using a token. You need to generate a token for each project you want to use with Intersphinx.
Go the project you want to use with Intersphinx
Click Admin > Sharing
Select
HTTP Header TokenSet an expiration date long enough to use the token when building your project
Click on
Share!.
Now we can add the link to the private project with the token like:
# conf.py file

intersphinx_mapping = {
    # Links to a private project named "docs"
    'docs': ('https://<token-for-docs>:@readthedocs-docs.readthedocs-hosted.com/en/latest', None),
    # Links to the private French translation of the "docs" project
    'docs': ('https://<token-for-fr-translation>:@readthedocs-docs.readthedocs-hosted.com/fr/latest', None),
    # Links to the private "apis" subproject of the "docs" project
    'docs': ('https://<token-for-apis>:@readthedocs-docs.readthedocs-hosted.com/projects/apis/en/latest', None),
}
Note
Sphinx will strip the token from the URLs when generating the links.
You can use your tokens with environment variables,
so you don’t have to hard code them in your conf.py file.
See Environment Variables to use environment variables inside Read the Docs.
For example,
if you create an environment variable named RTD_TOKEN_DOCS with the token from the “docs” project.
You can use it like this:
# conf.py file

import os
RTD_TOKEN_DOCS = os.environ.get('RTD_TOKEN_DOCS')

intersphinx_mapping = {
    # Links to a private project named "docs"
    'docs': (f'https://{RTD_TOKEN_DOCS}:@readthedocs-docs.readthedocs-hosted.com/en/latest', None),
}
Note
Another way of using Intersphinx with private projects is to download the inventory file and keep it in sync when the project changes.
The inventory file is by default located at objects.inv, for example https://readthedocs-docs.readthedocs-hosted.com/en/latest/objects.inv.
# conf.py file

intersphinx_mapping = {
    # Links to a private project named "docs" using a local inventory file.
    'docs': ('https://readthedocs-docs.readthedocs-hosted.com/en/latest', 'path/to/local/objects.inv'),
}
How to use Jupyter notebooks in Sphinx
Jupyter notebooks are a popular tool to describe computational narratives that mix code, prose, images, interactive components, and more. Embedding them in your Sphinx project allows using these rich documents as documentation, which can provide a great experience for tutorials, examples, and other types of technical content. There are a few extensions that allow integrating Jupyter and Sphinx, and this document will explain how to achieve some of the most commonly requested features.
Including classic .ipynb notebooks in Sphinx documentation
There are two main extensions that add support Jupyter notebooks as source files in Sphinx:
nbsphinx and MyST-NB. They have similar intent and basic functionality:
both can read notebooks in .ipynb and additional formats supported by jupytext,
and are configured in a similar way
(see Existing relevant extensions for more background on their differences).
First of all, create a Jupyter notebook using the editor of your liking (for example, JupyterLab).
For example, source/notebooks/Example 1.ipynb:
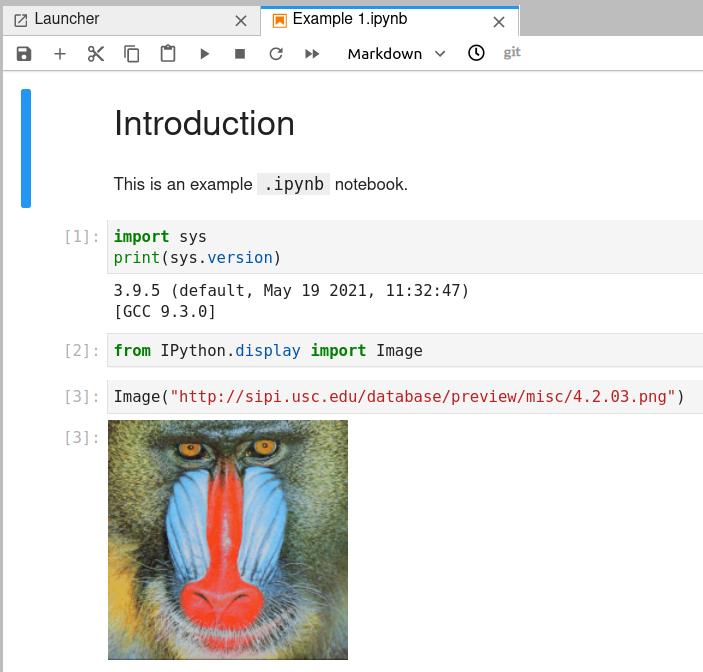
Example Jupyter notebook created on JupyterLab
Next, you will need to enable one of the extensions, as follows:
Finally, you can include the notebook in any toctree. For example, add this to your root document:
.. toctree::
   :maxdepth: 2
   :caption: Contents:

   notebooks/Example 1
```{toctree}
---
maxdepth: 2
caption: Contents:
---
notebooks/Example 1
```
The notebook will render as any other HTML page in your documentation
after doing make html.
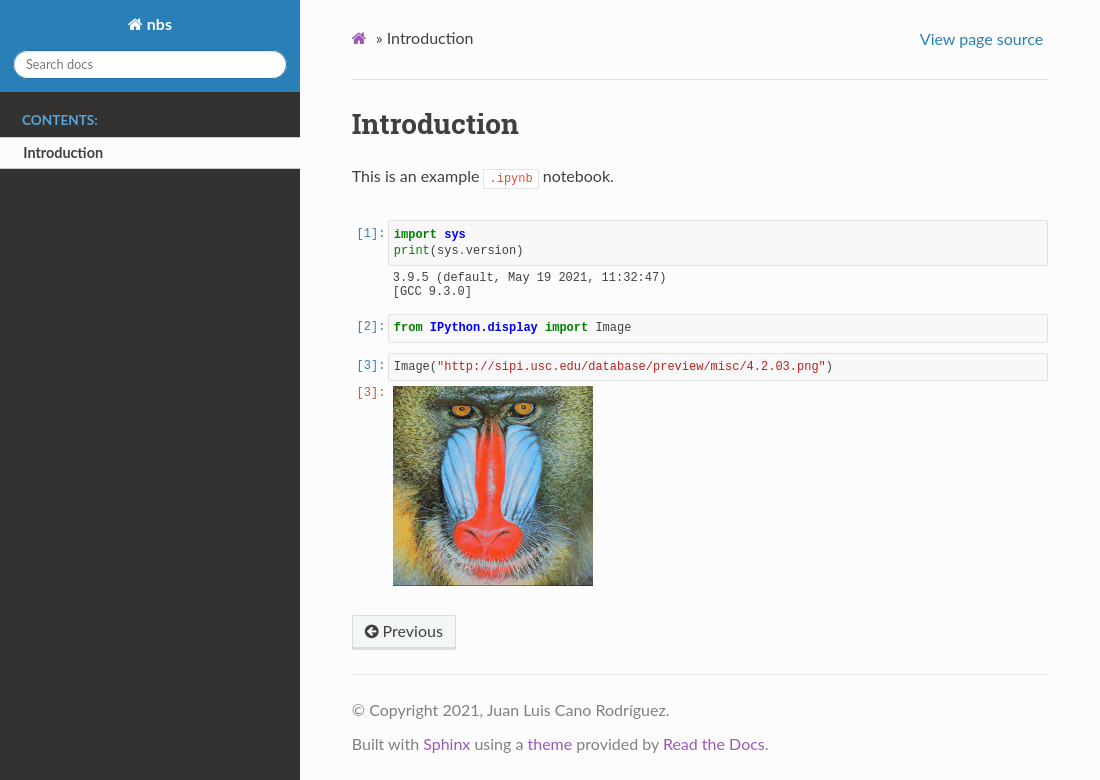
Example Jupyter notebook rendered on HTML by nbsphinx
To further customize the rendering process among other things, refer to the nbsphinx or MyST-NB documentation.
Rendering interactive widgets
Widgets are eventful python objects that have a representation in the browser and that you can use to build interactive GUIs for your notebooks. Basic widgets using ipywidgets include controls like sliders, textboxes, and buttons, and more complex widgets include interactive maps, like the ones provided by ipyleaflet.
You can embed these interactive widgets on HTML Sphinx documentation. For this to work, it’s necessary to save the widget state before generating the HTML documentation, otherwise the widget will appear as empty. Each editor has a different way of doing it:
The classical Jupyter Notebook interface provides a “Save Notebook Widget State” action in the “Widgets” menu, as explained in the ipywidgets documentation. You need to click it before exporting your notebook to HTML.
JupyterLab provides a “Save Widget State Automatically” option in the “Settings” menu. You need to leave it checked so that widget state is automatically saved.
In Visual Studio Code it’s not possible to save the widget state at the time of writing (June 2021).
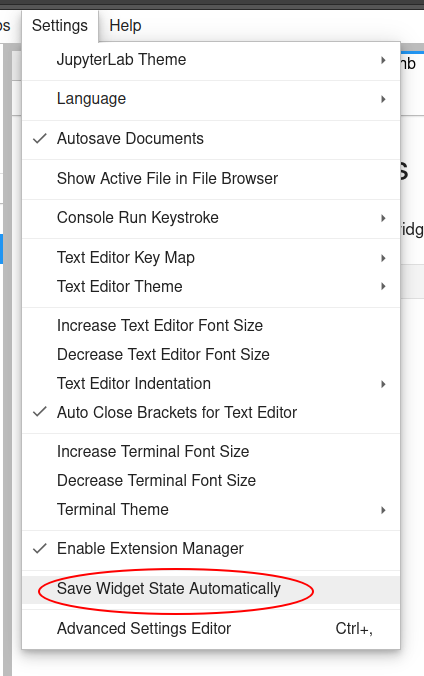
JupyterLab option to save the interactive widget state automatically
For example, if you create a notebook with a simple List.html#IntSlider IntSlider widget from ipywidgets and save the widget state, the slider will render correctly in Sphinx.
Interactive widget rendered in HTML by Sphinx
To see more elaborate examples:
ipyleaflet provides several widgets for interactive maps, and renders live versions of them in their documentation.
PyVista is used for scientific 3D visualization with several interactive backends and examples in their documentation as well.
Warning
Although widgets themselves can be embedded in HTML,
events
require a backend (kernel) to execute.
Therefore, @interact, .observe, and related functionalities relying on them
will not work as expected.
Note
If your widgets need some additional JavaScript libraries,
you can add them using add_js_file().
Using notebooks in other formats
For example, this is how a simple notebook looks like in MyST Markdown format:
---
jupytext:
text_representation:
   extension: .md
   format_name: myst
   format_version: 0.13
   jupytext_version: 1.10.3
kernelspec:
display_name: Python 3
language: python
name: python3
---

# Plain-text notebook formats

This is a example of a Jupyter notebook stored in MyST Markdown format.

```{code-cell} ipython3
import sys
print(sys.version)
```

```{code-cell} ipython3
from IPython.display import Image
```

```{code-cell} ipython3
Image("http://sipi.usc.edu/database/preview/misc/4.2.03.png")
```
To render this notebook in Sphinx
you will need to add this to your conf.py:
nbsphinx_custom_formats = {
    ".md": ["jupytext.reads", {"fmt": "mystnb"}],
}
nb_custom_formats = {
    ".md": ["jupytext.reads", {"fmt": "mystnb"}],
}
Notice that the Markdown format does not store the outputs of the computation. Sphinx will automatically execute notebooks without outputs, so in your HTML documentation they appear as complete.
Creating galleries of examples using notebooks
nbsphinx has support for creating thumbnail galleries from a list of Jupyter notebooks. This functionality relies on Sphinx-Gallery and extends it to work with Jupyter notebooks rather than Python scripts.
To use it, you will need to install both nbsphinx and Sphinx-Gallery,
and modify your conf.py as follows:
extensions = [
   'nbsphinx',
   'sphinx_gallery.load_style',
]
After doing that, there are two ways to create the gallery:
From a reStructuredText source file, using the
.. nbgallery::directive, as showcased in the documentation.From a Jupyter notebook, adding a
"nbsphinx-gallery"tag to the metadata of a cell. Each editor has a different way of modifying the cell metadata (see figure below).
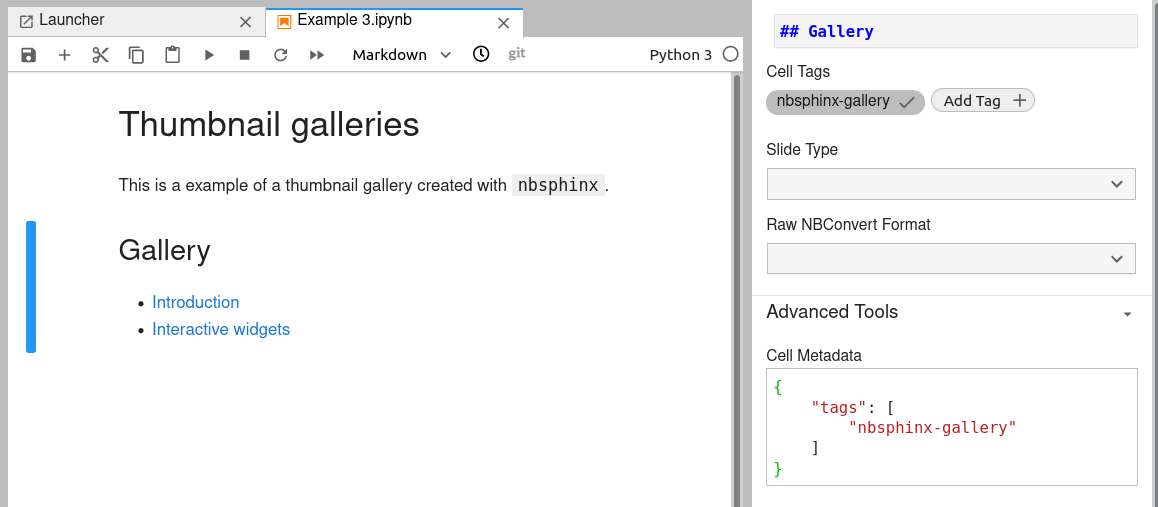
Panel to modify cell metadata in JupyterLab
For example, this reST markup would create a thumbnail gallery with generic images as thumbnails, thanks to the Sphinx-Gallery default style:
Thumbnails gallery
==================

.. nbgallery::
   notebooks/Example 1
   notebooks/Example 2
# Thumbnails gallery

```{nbgallery}
notebooks/Example 1
notebooks/Example 2
```
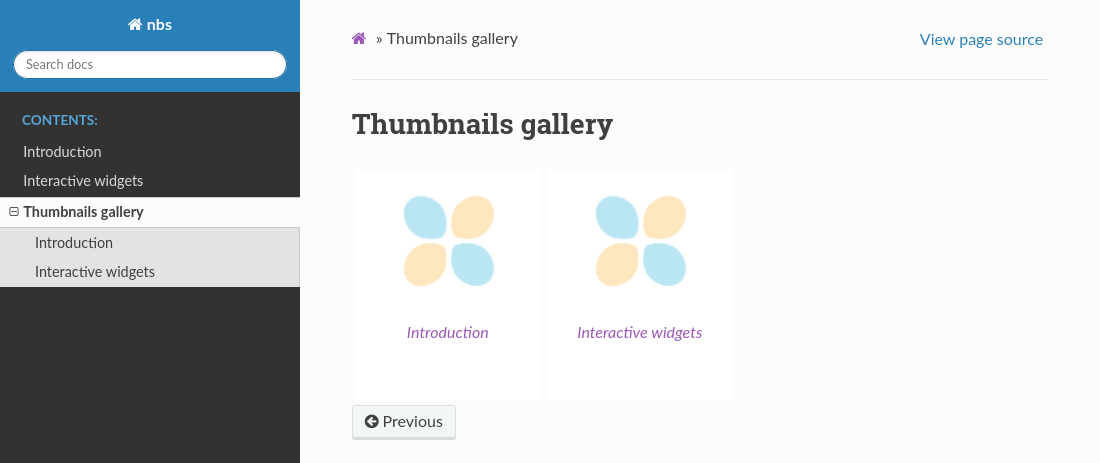
Simple thumbnail gallery created using nbsphinx
To see some examples of notebook galleries in the wild:
poliastro offers tools for interactive Astrodynamics in Python, and features several examples and how-to guides using notebooks and displays them in an appealing thumbnail gallery. In addition, poliastro uses unpaired MyST Notebooks to reduce repository size and improve integration with git.
Qiskit is a framework for quantum computing that leverages
nbgalleryfor its tutorials and uses a highly customized style to match the branding of the website.
Background
Existing relevant extensions
In the first part of this document we have seen that nbsphinx and MyST-NB are similar. However, there are some differences between them:
nsphinx uses pandoc to convert the Markdown from Jupyter notebooks to reStructuredText and then to docutils AST, whereas MyST-NB uses MyST-Parser to directly convert the Markdown text to docutils AST. Therefore, nbsphinx assumes pandoc flavored Markdown, whereas MyST-NB uses MyST flavored Markdown. Both Markdown flavors are mostly equal, but they have some differences.
nbsphinx executes each notebook during the parsing phase, whereas MyST-NB can execute all notebooks up front and cache them with jupyter-cache. This can result in shorter build times when notebooks are modified if using MyST-NB.
nbsphinx provides functionality to create thumbnail galleries, whereas MyST-NB does not have such functionality at the moment (see Creating galleries of examples using notebooks for more information about galleries).
MyST-NB allows embedding Python objects coming from the notebook in the documentation (read their “glue” documentation for more information) and provides more sophisticated error reporting than the one nbsphinx has.
The visual appearance of code cells and their outputs is slightly different: nbsphinx renders the cell numbers by default, whereas MyST-NB doesn’t.
Deciding which one to use depends on your use case. As general recommendations:
If you want to use other notebook formats or generate a thumbnail gallery from your notebooks, nbsphinx is the right choice.
If you want to leverage a more optimized execution workflow and a more streamlined parsing mechanism, as well as some of the unique MyST-NB functionalities, you should use MyST-NB.
Alternative notebook formats
Jupyter notebooks in .ipynb format
(as described in the nbformat
documentation)
are by far the most widely used for historical reasons.
However, to compensate some of the disadvantages of the .ipynb format
(like cumbersome integration with version control systems),
jupytext offers other formats
based on plain text rather than JSON.
As a result, there are three modes of operation:
Using classic
.ipynbnotebooks. It’s the most straightforward option, since all the tooling is prepared to work with them, and does not require additional pieces of software. It is therefore simpler to manage, since there are fewer moving parts. However, it requires some care when working with Version Control Systems (like git), by doing one of these things:Clear outputs before commit. Minimizes conflicts, but might defeat the purpose of notebooks themselves, since the computation results are not stored.
Use tools like nbdime (open source) or ReviewNB (proprietary) to improve the review process.
Use a different collaboration workflow that doesn’t involve notebooks.
Replace
.ipynbnotebooks with a text-based format. These formats behave better under version control and they can also be edited with normal text editors that do not support cell-based JSON notebooks. However, text-based formats do not store the outputs of the cells, and this might not be what you want.Pairing
.ipynbnotebooks with a text-based format, and putting the text-based file in version control, as suggested in the jupytext documentation. This solution has the best of both worlds. In some rare cases you might experience synchronization issues between both files.
These approaches are not mutually exclusive, nor you have to use a single format for all your notebooks. For the examples in this document, we have used the MyST Markdown format.
If you are using alternative formats for Jupyter notebooks, you can include them in your Sphinx documentation using either nbsphinx or MyST-NB (see Existing relevant extensions for more information about the differences between them).
Migrating from reStructuredText to MyST Markdown
Sphinx is usually associated with reStructuredText, the markup language designed for the CPython project in the early ’00s. However, for quite some time Sphinx has been compatible with Markdown as well, thanks to a number of extensions.
The most powerful of such extensions is MyST-Parser, which implements a CommonMark-compliant, extensible Markdown dialect with support for the Sphinx roles and directives that make it so useful.
In this guide, you will find how you can start writing Markdown in your existing reStructuredText project, or migrate it completely.
If, instead of migrating, you are starting a new project from scratch,
have a look at Get Started.
If you are starting a project for Jupyter, you can start with Jupyter Book, which uses MyST-Parser, see the official Jupyter Book tutorial: Create your first book
Writing your content both in reStructuredText and MyST
It is useful to ask whether a migration is necessary in the first place. Doing bulk migrations of large projects with lots of work in progress will create conflicts for ongoing changes. On the other hand, your writers might prefer to have some files in Markdown and some others in reStructuredText, for whatever reason. Luckily, Sphinx supports reading both types of markup at the same time without problems.
To start using MyST in your existing Sphinx project, first install the `myst-parser` Python package and then enable it on your configuration:
extensions = [
    # Your existing extensions
    ...,
    "myst_parser",
]
Your reStructuredText documents will keep rendering,
and you will be able to add MyST documents with the .md extension
that will be processed by MyST-Parser.
As an example, this guide is written in MyST while the rest of the Read the Docs documentation is written in reStructuredText.
Note
By default, MyST-Parser registers the .md suffix for MyST source files.
If you want to use a different suffix, you can do so by changing your
source_suffix configuration value in conf.py.
Converting existing reStructuredText documentation to MyST
To convert existing reST documents to MyST, you can use
the rst2myst CLI script shipped by RST-to-MyST.
The script supports converting the documents one by one,
or scanning a series of directories to convert them in bulk.
After installing `rst-to-myst`, you can run the script as follows:
$ rst2myst convert docs/source/index.rst  # Converts index.rst to index.md
$ rst2myst convert docs/**/*.rst  # Convert every .rst file under the docs directory
This will create a .md MyST file for every .rst source file converted.
Advanced usage of rst2myst
The rst2myst accepts several flags to modify its behavior.
All of them have sensible defaults, so you don’t have to specify them
unless you want to.
These are a few options you might find useful:
-d, --dry-runOnly verify that the script would work correctly, without actually writing any files.
-R, --replace-filesReplace the
.rstfiles by their.mdequivalent, rather than writing a new.mdfile next to the old.rstone.
You can read the full list of options in the `rst2myst` documentation.
Enabling optional syntax
Some reStructuredText syntax will require you to enable certain MyST plugins.
For example, to write reST definition lists, you need to add a
myst_enable_extensions variable to your Sphinx configuration, as follows:
myst_enable_extensions = [
    "deflist",
]
You can learn more about other MyST-Parser plugins in their documentation.
Writing reStructuredText syntax within MyST
There is a small chance that rst2myst does not properly understand a piece of reST syntax,
either because there is a bug in the tool
or because that syntax does not have a MyST equivalent yet.
For example, as explained in the documentation,
the sphinx.ext.autodoc extension is incompatible with MyST.
Fortunately, MyST supports an eval-rst directive
that will parse the content as reStructuredText, rather than MyST.
For example:
```{eval-rst}
.. note::

   Complete MyST migration.

```
will produce the following result:
Note
Complete MyST migration.
As a result, this allows you to conduct a gradual migration, at the expense of having heterogeneous syntax in your source files. In any case, the HTML output will be the same.
Guides for project administrators
These guides cover common use cases relevant for managing documentation projects, using the Read the Docs web interface, and making changes to the configuration files.
For an introduction to Read the Docs, have a look at our Read the Docs tutorial.
Technical Documentation Search Engine Optimization (SEO) Guide
This guide will help you optimize your documentation for search engines with the goal of increasing traffic to your docs. While you optimize your docs to make them more crawler friendly for search engine spiders, it’s important to keep in mind that your ultimate goal is to make your docs more discoverable for your users. You’re trying to make sure that when a user types a question into a search engine that is answerable by your documentation, that your docs appear in the results.
This guide isn’t meant to be your only resource on SEO, and there’s a lot of SEO topics not covered here. For additional reading, please see the external resources section.
While many of the topics here apply to all forms of technical documentation, this guide will focus on Sphinx, which is the most common documentation authoring tool on Read the Docs, as well as improvements provided by Read the Docs itself.
Table of contents
SEO Basics
Search engines like Google and Bing crawl through the internet following links in an attempt to understand and build an index of what various pages and sites are about. This is called “crawling” or “indexing”. When a person sends a query to a search engine, the search engine evaluates this index using a number of factors and attempts to return the results most likely to answer that person’s question.
How search engines “rank” sites based on a person’s query is part of their secret sauce. While some search engines publish the basics of their algorithms (see Google’s published details on PageRank), few search engines give all of the details in an attempt to prevent users from gaming the rankings with low value content which happens to rank well.
Both Google and Bing publish a set of guidelines to help make sites easier to understand for search engines and rank better. To summarize some of the most important aspects as they apply to technical documentation, your site should:
Use descriptive and accurate titles in the HTML
<title>tag. For Sphinx, the<title>comes from the first heading on the page.Ensure your URLs are descriptive. They are displayed in search results. Sphinx uses the source filename without the file extension as the URL.
Make sure the words your readers would search for to find your site are actually included on your pages.
Avoid low content pages or pages with very little original content.
Avoid tactics that attempt to increase your search engine ranking without actually improving content.
Google specifically warns about automatically generated content although this applies primarily to keyword stuffing and low value content. High quality documentation generated from source code (eg. auto generated API documentation) seems OK.
While both Google and Bing discuss site performance as an important factor in search result ranking, this guide is not going to discuss it in detail. Most technical documentation that uses Sphinx or Read the Docs generates static HTML and the performance is typically decent relative to most of the internet.
Optimizing your docs for search engine spiders
Once a crawler or spider finds your site, it will follow links and redirects in an attempt to find any and all pages on your site. While there are a few ways to guide the search engine in its crawl for example by using a sitemap or a robots.txt file which we’ll discuss shortly, the most important thing is making sure the spider can follow links on your site and get to all your pages.
Avoid orphan pages
Sphinx calls pages that don’t have links to them “orphans” and will throw a warning while building documentation that contains an orphan unless the warning is silenced with the orphan directive:
$ make html
sphinx-build -b html -d _build/doctrees . _build/html
Running Sphinx v1.8.5
...
checking consistency... /path/to/file.rst: WARNING: document isn't included in any toctree
done
...
build finished with problems, 1 warning.
You can make all Sphinx warnings into errors during your build process
by setting SPHINXOPTS = -W --keep-going in your Sphinx Makefile.
Avoid uncrawlable content
While typically this isn’t a problem with technical documentation, try to avoid content that is “hidden” from search engines. This includes content hidden in images or videos which the crawler may not understand. For example, if you do have a video in your docs, make sure the rest of that page describes the content of the video.
When using images, make sure to set the image alt text or set a caption on figures. For Sphinx, the image and figure directives support this:
.. image:: your-image.png
    :alt: A description of this image

.. figure:: your-image.png

    A caption for this figure
Redirects
Redirects tell search engines when content has moved.
For example, if this guide moved from guides/technical-docs-seo-guide.html to guides/sphinx-seo-guide.html,
there will be a time period where search engines will still have the old URL in their index
and will still be showing it to users.
This is why it is important to update your own links within your docs as well as redirecting.
If the hostname moved from docs.readthedocs.io to docs.readthedocs.org, this would be even more important!
Read the Docs supports a few different kinds of user defined redirects that should cover all the different cases such as redirecting a certain page for all project versions, or redirecting one version to another.
Canonical URLs
Anytime very similar content is hosted at multiple URLs, it is pretty important to set a canonical URL. The canonical URL tells search engines where the original version your documentation is even if you have multiple versions on the internet (for example, incomplete translations or deprecated versions).
Read the Docs supports setting the canonical URL if you are using a custom domain under Admin > Domains in the Read the Docs dashboard.
Use a robots.txt file
A robots.txt file is readable by crawlers
and lives at the root of your site (eg. https://docs.readthedocs.io/robots.txt).
It tells search engines which pages to crawl or not to crawl
and can allow you to control how a search engine crawls your site.
For example, you may want to request that search engines
ignore unsupported versions of your documentation
while keeping those docs online in case people need them.
By default, Read the Docs serves a robots.txt for you.
To customize this file, you can create a robots.txt file
that is written to your documentation root on your default branch/version.
See the Google’s documentation on robots.txt for additional details.
Use a sitemap.xml file
A sitemap is a file readable by crawlers that contains a list of pages and other files on your site and some metadata or relationships about them (eg. https://docs.readthedocs.io/sitemap.xml). A good sitemaps provides information like how frequently a page or file is updated or any alternate language versions of a page.
Read the Docs generates a sitemap for you that contains the last time your documentation was updated as well as links to active versions, subprojects, and translations your project has. We have a small separate guide on sitemaps.
See the Google docs on building a sitemap.
Use meta tags
Using a meta description allows you to customize how your pages look in search engine result pages.
Typically search engines will use the first few sentences of a page if no meta description is provided. In Sphinx, you can customize your meta description using the following RestructuredText:
.. meta::
    :description lang=en:
        Adding additional CSS or JavaScript files to your Sphinx documentation
        can let you customize the look and feel of your docs or add additional functionality.
Google search engine results showing a customized meta description
Moz.com, an authority on search engine optimization, makes the following suggestions for meta descriptions:
Your meta description should have the most relevant content of the page. A searcher should know whether they’ve found the right page from the description.
The meta description should be between 150-300 characters and it may be truncated down to around 150 characters in some situations.
Meta descriptions are used for display but not for ranking.
Search engines don’t always use your customized meta description if they think a snippet from the page is a better description.
Measure, iterate, & improve
Search engines (and soon, Read the Docs itself) can provide useful data that you can use to improve your docs’ ranking on search engines.
Search engine feedback
Google Search Console and Bing Webmaster Tools are tools for webmasters to get feedback about the crawling of their sites (or docs in our case). Some of the most valuable feedback these provide include:
Google and Bing will show pages that were previously indexed that now give a 404 (or more rarely a 500 or other status code). These will remain in the index for some time but will eventually be removed. This is a good opportunity to create a redirect.
These tools will show any crawl issues with your documentation.
Search Console and Webmaster Tools will highlight security issues found or if Google or Bing took action against your site because they believe it is spammy.
Analytics tools
A tool like Google Analytics can give you feedback about the search terms people use to find your docs, your most popular pages, and lots of other useful data.
Search term feedback can be used to help you optimize content for certain keywords or for related keywords. For Sphinx documentation, or other technical documentation that has its own search features, analytics tools can also tell you the terms people search for within your site.
Knowing your popular pages can help you prioritize where to spend your SEO efforts. Optimizing your already popular pages can have a significant impact.
External resources
Here are a few additional resources to help you learn more about SEO and rank better with search engines.
Manage Translations for Sphinx projects
This guide walks through the process needed to manage translations of your documentation. Once this work is done, you can setup your project under Read the Docs to build each language of your documentation by reading Localization of Documentation.
Overview
There are many different ways to manage documentation in multiple languages by using different tools or services. All of them have their pros and cons depending on the context of your project or organization.
In this guide we will focus our efforts around two different methods: manual and using Transifex.
In both methods, we need to follow these steps to translate our documentation:
Create translatable files (
.potand.poextensions) from source languageTranslate the text on those files from source language to target language
Build the documentation in target language using the translated texts
Besides these steps, once we have published our first translated version of our documentation, we will want to keep it updated from the source language. At that time, the workflow would be:
Update our translatable files from source language
Translate only new and modified texts in source language into target language
Build the documentation using the most up to date translations
Create translatable files
To generate these .pot files it’s needed to run this command from your docs/ directory:
sphinx-build -b gettext . _build/gettext
Tip
We recommend configuring Sphinx to use gettext_uuid as True
and also gettext_compact as False to generate .pot files.
This command will leave the generated files under _build/gettext.
Translate text from source language
Manually
We recommend using sphinx-intl tool for this workflow.
First, you need to install it:
pip install sphinx-intl
As a second step, we want to create a directory with each translated file per target language (in this example we are using Spanish/Argentina and Portuguese/Brazil). This can be achieved with the following command:
sphinx-intl update -p _build/gettext -l es_AR -l pt_BR
This command will create a directory structure similar to the following
(with one .po file per .rst file in your documentation):
locale
├── es_AR
│   └── LC_MESSAGES
│       └── index.po
└── pt_BR
    └── LC_MESSAGES
        └── index.po
Now, you can just open those .po files with a text editor and translate them taking care of no breaking the reST notation.
Example:
# b8f891b8443f4a45994c9c0a6bec14c3
#: ../../index.rst:4
msgid ""
"Read the Docs hosts documentation for the open source community."
"It supports :ref:`Sphinx <sphinx>` docs written with reStructuredText."
msgstr ""
"FILL HERE BY TARGET LANGUAGE FILL HERE BY TARGET LANGUAGE FILL HERE "
"BY TARGET LANGUAGE :ref:`Sphinx <sphinx>` FILL HERE."
Using Transifex
Transifex is a platform that simplifies the manipulation of .po files and offers many useful features to make the translation process as smooth as possible.
These features includes a great web based UI, Translation Memory, collaborative translation, etc.
You need to create an account in their service and a new project before start.
After that, you need to install the transifex-client tool which will help you in the process to upload source files, update them and also download translated files. To do this, run this command:
pip install transifex-client
After installing it, you need to configure your account. For this, you need to create an API Token for your user to access this service through the command line. This can be done under your User’s Settings.
Now, you need to setup it to use this token:
tx init --token $TOKEN --no-interactive
The next step is to map every .pot file you have created in the previous step to a resource under Transifex.
To achieve this, you need to run this command:
tx config mapping-bulk \
    --project $TRANSIFEX_PROJECT \
    --file-extension '.pot' \
    --source-file-dir docs/_build/gettext \
    --source-lang en \
    --type PO \
    --expression 'locale/<lang>/LC_MESSAGES/{filepath}/{filename}.po' \
    --execute
This command will generate a file at .tx/config with all the information needed by the transifext-client tool to keep your translation synchronized.
Finally, you need to upload these files to Transifex platform so translators can start their work. To do this, you can run this command:
tx push --source
Now, you can go to your Transifex’s project and check that there is one resource per .rst file of your documentation.
After the source files are translated using Transifex, you can download all the translations for all the languages by running:
tx pull --all
This command will leave the .po files needed for building the documentation in the target language under locale/<lang>/LC_MESSAGES.
Warning
It’s important to use always the same method to translate the documentation and do not mix them. Otherwise, it’s very easy to end up with inconsistent translations or losing already translated text.
Build the documentation in target language
Finally, to build our documentation in Spanish(Argentina) we need to tell Sphinx builder the target language with the following command:
sphinx-build -b html -D language=es_AR . _build/html/es_AR
Note
There is no need to create a new conf.py to redefine the language for the Spanish version of this documentation,
but you need to set locale_dirs to ["locale"] for Sphinx to find the translated content.
After running this command, the Spanish(Argentina) version of your documentation will be under _build/html/es_AR.
Summary
Update sources to be translated
Once you have done changes in your documentation, you may want to make these additions/modifications available for translators so they can update it:
Create the
.potfiles:sphinx-build -b gettext . _build/gettextPush new files to Transifex
tx push --sources
Build documentation from up to date translation
When translators have finished their job, you may want to update the documentation by pulling the changes from Transifex:
Pull up to date translations from Transifex:
tx pull --allCommit and push these changes to our repo
git add locale/
git commit -m "Update translations"
git push
The last git push will trigger a build per translation defined as part of your project under Read the Docs and make it immediately available.
Using advanced search features
Read the Docs uses Server Side Search to power our search. This guide explains how to add a “search as you type” feature to your documentation, and how to use advanced query syntax to get more accurate results.
Table of contents
Enable “search as you type” in your documentation
readthedocs-sphinx-search is a Sphinx extension that integrates your documentation more closely with the search implementation of Read the Docs. It adds a clean and minimal full-page search UI that supports a search as you type feature.
To try this feature, you can press / (forward slash) and start typing or just visit these URLs:
Search query syntax
Read the Docs uses the Simple Query String feature from Elasticsearch. This means that as the search query becomes more complex, the results yielded become more specific.
Exact phrase search
If a query is wrapped in " (double quotes),
then only those results where the phrase is exactly matched will be returned.
Example queries:
Exact phrase search with slop value
~N (tilde N) after a phrase signifies slop amount.
It can be used to match words that are near one another.
Example queries:
Prefix query
* (asterisk) at the end of any term signifies a prefix query.
It returns the results containing the words with specific prefix.
Example queries:
Fuzzy query
~N after a word signifies edit distance (fuzziness).
This type of query is helpful when the exact spelling of the keyword is unknown.
It returns results that contain terms similar to the search term as measured by a Levenshtein edit distance.
Example queries:
Build complex queries
The search query syntaxes described in the previous sections can be used with one another to build complex queries.
For example:
Hide a Version and Keep its Docs Online
If you manage a project with a lot of versions, the version (flyout) menu of your docs can be easily overwhelmed and hard to navigate.
Overwhelmed flyout menu
You can deactivate the version to remove its docs,
but removing its docs isn’t always an option.
To not list a version in the flyout menu while keeping its docs online, you can mark it as hidden.
Go to the Versions tab of your project, click on Edit and mark the Hidden option.
Users that have a link to your old version will still be able to see your docs.
And new users can see all your versions (including hidden versions) in the versions tab of your project at https://readthedocs.org/projects/<your-project>/versions/
Check the docs about versions’ states for more information.
Deprecating Content
When you deprecate a feature from your project, you may want to deprecate its docs as well, and stop your users from reading that content.
Deprecating content may sound as easy as delete it, but doing that will break existing links, and you don’t necessary want to make the content inaccessible. Here you’ll find some tips on how to use Read the Docs to deprecate your content progressively and in non harmful ways.
Deprecating versions
If you have multiple versions of your project, it makes sense to have its documentation versioned as well. For example, if you have the following versions and want to deprecate v1.
https://project.readthedocs.io/en/v1/https://project.readthedocs.io/en/v2/https://project.readthedocs.io/en/v3/
For cases like this you can hide a version. Hidden versions won’t be listed in the versions menu of your docs, and they will be listed in a robots.txt file to stop search engines of showing results for that version.
Users can still see all versions in the dashboard of your project. To hide a version go to your project and click on Versions > Edit, and mark the Hidden option. Check Version States for more information.
Note
If the versions of your project follow the semver convention, you can activate the Version warning option for your project. A banner with a warning and linking to the stable version will be shown on all versions that are lower than the stable one.
Deprecating pages
You may not always want to deprecate a version, but deprecate some pages. For example, if you have documentation about two APIs and you want to deprecate v1:
https://project.readthedocs.io/en/latest/api/v1.htmlhttps://project.readthedocs.io/en/latest/api/v2.html
A simple way is just adding a warning at the top of the page, this will warn users visiting that page, but it won’t stop users from being redirected to that page from search results. You can add an entry of that page in a custom robots.txt file to avoid search engines of showing those results. For example:
# robots.txt

User-agent: *

Disallow: /en/latest/api/v1.html # Deprecated API
But your users will still see search results from that page if they use the search from your docs. With Read the Docs you can set a custom rank per pages. For example:
# .readthedocs.yaml

version: 2
search:
   ranking:
      api/v1.html: -1
This won’t hide results from that page, but it will give priority to results from other pages.
Tip
You can make use of Sphinx directives
(like warning, deprecated, versionchanged)
or MkDocs admonitions
to warn your users about deprecated content.
Moving and deleting pages
After you have deprecated a feature for a while, you may want to get rid of its documentation, that’s OK, you don’t have to maintain that content forever. But be aware that users may have links of that page saved, and it will be frustrating and confusing for them to get a 404.
To solve that problem you can create a redirect to a page with a similar feature/content,
like redirecting to the docs of the v2 of your API when your users visit the deleted docs from v1,
this is a page redirect from /api/v1.html to /api/v2.html.
See User-defined Redirects.
Sphinx PDFs with Unicode
Sphinx offers different LaTeX engines that have better support for Unicode characters
and non-European languages like Japanese or Chinese.
By default Sphinx uses pdflatex,
which does not have good support for Unicode characters and may make the PDF builder fail.
To build your documentation in PDF format, you need to configure Sphinx properly in your project’s conf.py.
Read the Docs will execute the proper commands depending on these settings.
There are several settings that can be defined (all the ones starting with latex_),
to modify Sphinx and Read the Docs behavior to make your documentation to build properly.
For docs that are not written in Chinese or Japanese,
and if your build fails from a Unicode error,
then try xelatex as the latex_engine instead of the default pdflatex in your conf.py:
latex_engine = 'xelatex'
When Read the Docs detects that your documentation is in Chinese or Japanese, it automatically adds some defaults for you.
For Chinese projects, it appends to your conf.py these settings:
latex_engine = 'xelatex'
latex_use_xindy = False
latex_elements = {
    'preamble': '\\usepackage[UTF8]{ctex}\n',
}
And for Japanese projects:
latex_engine = 'platex'
latex_use_xindy = False
Tip
You can always override these settings if you define them by yourself in your conf.py file.
Note
xindy is currently not supported by Read the Docs,
but we plan to support it in the near future.
Manually Importing Private Repositories
Warning
This guide is for users of Read the Docs for Business. If you are using GitHub, GitLab, or Bitbucket, we recommend connecting your account and importing your project from https://readthedocs.com/dashboard/import instead of importing it manually.
If you are using an unsupported integration, or don’t want to connect your account, you’ll need to do some extra steps in order to have your project working.
Manually import your project using an SSH URL
Allow access to your project using an SSH key
Setup a webhook to build your documentation on every commit
Table of contents
Importing your project
Fill the Repository URL field with the SSH form of your repository’s URL, e.g
git@github.com:readthedocs/readthedocs.org.gitFill the other required fields
Click Next
Giving access to your project with an SSH key
After importing your project the build will fail, because Read the Docs doesn’t have access to clone your repository. To give access, you’ll need to add your project’s public SSH key to your VCS provider.
Copy your project’s public key
You can find the public SSH key of your Read the Docs project by:
Going to the Admin tab of your project
Click on SSH Keys
Click on the fingerprint of the SSH key (it looks like
6d:ca:6d:ca:6d:ca:6d:ca)Copy the text from the Public key section
Note
The private part of the SSH key is kept secret.
Add the public key to your project
For GitHub, you can use deploy keys with read only access.
Go to your project on GitHub
Click on Settings
Click on Deploy Keys
Click on Add deploy key
Put a descriptive title and paste the public SSH key from your Read the Docs project
Click on Add key
For GitLab, you can use deploy keys with read only access.
Go to your project on GitLab
Click on Settings
Click on Repository
Expand the Deploy Keys section
Put a descriptive title and paste the public SSH key from your Read the Docs project
Click on Add key
For Bitbucket, you can use access keys with read only access.
Go your project on Bitbucket
Click on Repository Settings
Click on Access keys
Click on Add key
Put a descriptive label and paste the public SSH key from your Read the Docs project
Click on Add SSH key
For Azure DevOps, you can use SSH key authentication.
Go your Azure DevOps page
Click on User settings
Click on SSH public keys
Click on New key
Put a descriptive name and paste the public SSH key from your Read the Docs project
Click on Add
If you are not using any of the above providers, Read the Docs will still generate a pair of SSH keys. You’ll need to add the public SSH key from your Read the Docs project to your repository. Refer to your provider’s documentation for the steps required to do this.
Webhooks
To build your documentation on every commit, you’ll need to manually add a webhook, see VCS Integrations. If you are using an unsupported integration, you may need to setup a custom integration using our generic webhook.
Guides for developers and designers
These guides are helpful for developers and designers seeking to extend the authoring tools or customize the documentation appearance.
Installing Private Python Packages
Warning
This guide is for Read the Docs for Business.
Read the Docs uses pip to install your Python packages. If you have private dependencies, you can install them from a private Git repository or a private repository manager.
From a Git repository
Pip supports installing packages from a Git repository using the URI form:
git+https://gitprovider.com/user/project.git@{version}
Or if your repository is private:
git+https://{token}@gitprovider.com/user/project.git@{version}
Where version can be a tag, a branch, or a commit.
And token is a personal access token with read only permissions from your provider.
To install the package, you need to add the URI in your requirements file. Pip will automatically expand environment variables in your URI, so you don’t have to hard code the token in the URI. See using environment variables in Read the Docs for more information.
Note
You have to use the POSIX format for variable names (only uppercase letters and _ are allowed),
and including a dollar sign and curly brackets around the name (${API_TOKEN})
for pip to be able to recognize them.
Below you can find how to get a personal access token from our supported providers. We will be using environment variables for the token.
GitHub
You need to create a personal access token with the repo scope.
Check the GitHub documentation
on how to create a personal token.
URI example:
git+https://${GITHUB_USER}:${GITHUB_TOKEN}@github.com/user/project.git@{version}
Warning
GitHub doesn’t support tokens per repository. A personal token will grant read and write access to all repositories the user has access to. You can create a machine user to give read access only to the repositories you need.
GitLab
You need to create a deploy token with the read_repository scope for the repository you want to install the package from.
Check the GitLab documentation
on how to create a deploy token.
URI example:
git+https://${GITLAB_TOKEN_USER}:${GITLAB_TOKEN}@gitlab.com/user/project.git@{version}
Here GITLAB_TOKEN_USER is the user from the deploy token you created, not your GitLab user.
Bitbucket
You need to create an app password with Read repositories permissions.
Check the Bitbucket documentation
on how to create an app password.
URI example:
git+https://${BITBUCKET_USER}:${BITBUCKET_APP_PASSWORD}@bitbucket.org/user/project.git@{version}'
Here BITBUCKET_USER is your Bitbucket user.
Warning
Bitbucket doesn’t support app passwords per repository. An app password will grant read access to all repositories the user has access to.
From a repository manager other than PyPI
Pip by default will install your packages from PyPI.
If you are using a repository manager like pypiserver, or Nexus Repository,
you need to set the --index-url option.
You have two ways of set that option:
Set the
PIP_INDEX_URLenvironment variable in Read the Docs with the index URL. See https://pip.pypa.io/en/stable/reference/requirements-file-format#using-environment-variables.Put
--index-url=https://my-index-url.com/at the top of your requirements file. See Requirements File Format.
Note
Check your repository manager’s documentation to obtain the appropriate index URL.
Using Private Git Submodules
Warning
This guide is for Read the Docs for Business.
Read the Docs uses SSH keys (with read only permissions) in order to clone private repositories. A SSH key is automatically generated and added to your main repository, but not to your submodules. In order to give Read the Docs access to clone your submodules you’ll need to add the public SSH key to each repository of your submodules.
Note
You can manage which submodules Read the Docs should clone using a configuration file. See submodules.
Make sure you are using
SSHURLs for your submodules (git@github.com:readthedocs/readthedocs.org.gitfor example) in your.gitmodulesfile, nothttpURLs.
Table of contents
GitHub
Since GitHub doesn’t allow you to reuse a deploy key across different repositories, you’ll need to use machine users to give read access to several repositories using only one SSH key.
Remove the SSH deploy key that was added to the main repository on GitHub
Go to your project on GitHub
Click on Settings
Click on Deploy Keys
Delete the key added by
Read the Docs Commercial (readthedocs.com)
Create a GitHub user and give it read only permissions to all the necessary repositories. You can do this by adding the account as:
Attach the public SSH key from your project on Read the Docs to the GitHub user you just created
Go to the user’s settings
Click on SSH and GPG keys
Click on New SSH key
Put a descriptive title and paste the public SSH key from your Read the Docs project
Click on Add SSH key
Azure DevOps
Azure DevOps does not have per-repository SSH keys, but keys can be added to a user instead. As long as this user has access to your main repository and all its submodules, Read the Docs can clone all the repositories with the same key.
Others
GitLab and Bitbucket allow you to reuse the same SSH key across different repositories. Since Read the Docs already added the public SSH key on your main repository, you only need to add it to each submodule repository.
Adding Custom CSS or JavaScript to Sphinx Documentation
Adding additional CSS or JavaScript files to your Sphinx documentation can let you customize the look and feel of your docs or add additional functionality. For example, with a small snippet of CSS, your documentation could use a custom font or have a different background color.
If your custom stylesheet is _static/css/custom.css,
you can add that CSS file to the documentation using the
Sphinx option html_css_files:
## conf.py

# These folders are copied to the documentation's HTML output
html_static_path = ['_static']

# These paths are either relative to html_static_path
# or fully qualified paths (eg. https://...)
html_css_files = [
    'css/custom.css',
]
A similar approach can be used to add JavaScript files:
html_js_files = [
    'js/custom.js',
]
Note
The Sphinx HTML options html_css_files and html_js_files
were added in Sphinx 1.8.
Unless you have a good reason to use an older version,
you are strongly encouraged to upgrade.
Sphinx is almost entirely backwards compatible.
Overriding or replacing a theme’s stylesheet
The above approach is preferred for adding additional stylesheets or JavaScript, but it is also possible to completely replace a Sphinx theme’s stylesheet with your own stylesheet.
If your replacement stylesheet exists at _static/css/yourtheme.css,
you can replace your theme’s CSS file by setting html_style in your conf.py:
## conf.py

html_style = 'css/yourtheme.css'
If you only need to override a few styles on the theme, you can include the theme’s normal CSS using the CSS @import rule .
/** css/yourtheme.css **/

/* This line is theme specific - it includes the base theme CSS */
@import '../alabaster.css';  /* for Alabaster */
/*@import 'theme.css';       /* for the Read the Docs theme */

body {
    /* ... */
}
See also
You can also add custom classes to your html elements. See Docutils Class and this related Sphinx footnote… for more information.
Reproducible Builds
Your docs depend on tools and other dependencies to be built. If your docs don’t have reproducible builds, an update in a dependency can break your builds when least expected, or make your docs look different from your local version. This guide will help you to keep your builds working over time, and in a reproducible way.
Contents
Building your docs
To test your build process, you can build them locally in a clean environment (this is without any dependencies installed). Then you should make sure you are running those same steps on Read the Docs.
You can configure how your project is built from the web interface (Admin tab), or by using a configuration file (recommended). If you aren’t familiar with these tools, check our docs:
Note
You can see the exact commands that are run on Read the Docs by going to the Builds tab of your project.
Using a configuration file
If you use the web interface to configure your project, the options are applied to all versions and builds of your docs, and can be lost after changing them over time. Using a configuration file provides you per version settings, and those settings live in your repository.
A configuration file with explicit dependencies looks like this:
version: 2

build:
  os: "ubuntu-20.04"
  tools:
    python: "3.9"

# Build from the docs/ directory with Sphinx
sphinx:
  configuration: docs/conf.py

# Explicitly set the version of Python and its requirements
python:
  install:
    - requirements: docs/requirements.txt
# Defining the exact version will make sure things don't break
sphinx==4.2.0
sphinx_rtd_theme==1.0.0
readthedocs-sphinx-search==0.1.1
Don’t rely on implicit dependencies
By default Read the Docs will install the tool you chose to build your docs, and other dependencies, this is done so new users can build their docs without much configuration.
We highly recommend not to assume these dependencies will always be present or that their versions won’t change. Always declare your dependencies explicitly using a configuration file, for example:
- ✅ Good:
Your project is declaring the Python version explicitly, and its dependencies using a requirements file.
.readthedocs.yaml¶version: 2 build: os: "ubuntu-20.04" tools: python: "3.9" sphinx: configuration: docs/conf.py python: install: - requirements: docs/requirements.txt
- ❌ Bad:
Your project is relying on the default Python version and default installed dependencies.
.readthedocs.yaml¶version: 2 sphinx: configuration: docs/conf.py
Pinning dependencies
As you shouldn’t rely on implicit dependencies, you shouldn’t rely on undefined versions of your dependencies. Some examples:
- ✅ Good:
The specified versions will be used for all your builds, in all platforms, and won’t be updated unexpectedly.
docs/requirements.txt¶sphinx==4.2.0 sphinx_rtd_theme==1.0.0 readthedocs-sphinx-search==0.1.1
docs/environment.yaml¶name: docs channels: - conda-forge - defaults dependencies: - sphinx==4.2.0 - nbsphinx==0.8.1 - pip: - sphinx_rtd_theme==1.0.0
- ❌ Bad:
The latest or any other already installed version will be used, and your builds can fail or change unexpectedly any time.
docs/requirements.txt¶sphinx sphinx_rtd_theme readthedocs-sphinx-search
docs/environment.yaml¶name: docs channels: - conda-forge - defaults dependencies: - sphinx - nbsphinx - pip: - sphinx_rtd_theme
Check the pip user guide for more information about requirements files, or our Conda docs about environment files.
Tip
Remember to update your docs’ dependencies from time to time to get new improvements and fixes. It also makes it easy to manage in case a version reaches its end of support date.
Pinning transitive dependencies
Once you have pinned your own dependencies, the next things to worry about are the dependencies of your dependencies. These are called transitive dependencies, and they can upgrade without warning if you do not pin these packages as well.
We recommend pip-tools to help address this problem.
It allows you to specify a requirements.in file with your first-level dependencies,
and it generates a requirements.txt file with the full set of transitive dependencies.
- ✅ Good:
All your transitive dependencies will stay defined, which ensures new package releases will not break your docs.
docs/requirements.in¶sphinx==4.2.0
docs/requirements.txt¶# This file is autogenerated by pip-compile with python 3.7 # To update, run: # # pip-compile docs.in # alabaster==0.7.12 # via sphinx babel==2.10.1 # via sphinx certifi==2021.10.8 # via requests charset-normalizer==2.0.12 # via requests docutils==0.17.1 # via sphinx idna==3.3 # via requests imagesize==1.3.0 # via sphinx importlib-metadata==4.11.3 # via sphinx jinja2==3.1.2 # via sphinx markupsafe==2.1.1 # via jinja2 packaging==21.3 # via sphinx pygments==2.11.2 # via sphinx pyparsing==3.0.8 # via packaging pytz==2022.1 # via babel requests==2.27.1 # via sphinx snowballstemmer==2.2.0 # via sphinx sphinx==4.4.0 # via -r docs.in sphinxcontrib-applehelp==1.0.2 # via sphinx sphinxcontrib-devhelp==1.0.2 # via sphinx sphinxcontrib-htmlhelp==2.0.0 # via sphinx sphinxcontrib-jsmath==1.0.1 # via sphinx sphinxcontrib-qthelp==1.0.3 # via sphinx sphinxcontrib-serializinghtml==1.1.5 # via sphinx typing-extensions==4.2.0 # via importlib-metadata urllib3==1.26.9 # via requests zipp==3.8.0 # via importlib-metadata
Embedding Content From Your Documentation
Read the Docs allows you to embed content from any of the projects we host and specific allowed external domains
(currently, ['docs\\.python\\.org', 'docs\\.scipy\\.org', 'docs\\.sympy\\.org', 'numpy\\.org'])
This allows reuse of content across sites, making sure the content is always up to date.
There are a number of uses cases for embedding content, so we’ve built our integration in a way that enables users to build on top of it. This guide will show you some of our favorite integrations:
Contextualized tooltips on documentation pages
Tooltips on your own documentation are really useful to add more context to the current page the user is reading. You can embed any content that is available via reference in Sphinx, including:
Python object references
Full documentation pages
Sphinx references
Term definitions
We built a Sphinx extension called sphinx-hoverxref on top of our Embed API
you can install in your project with minimal configuration.
Here is an example showing a tooltip when you hover with the mouse a reference:
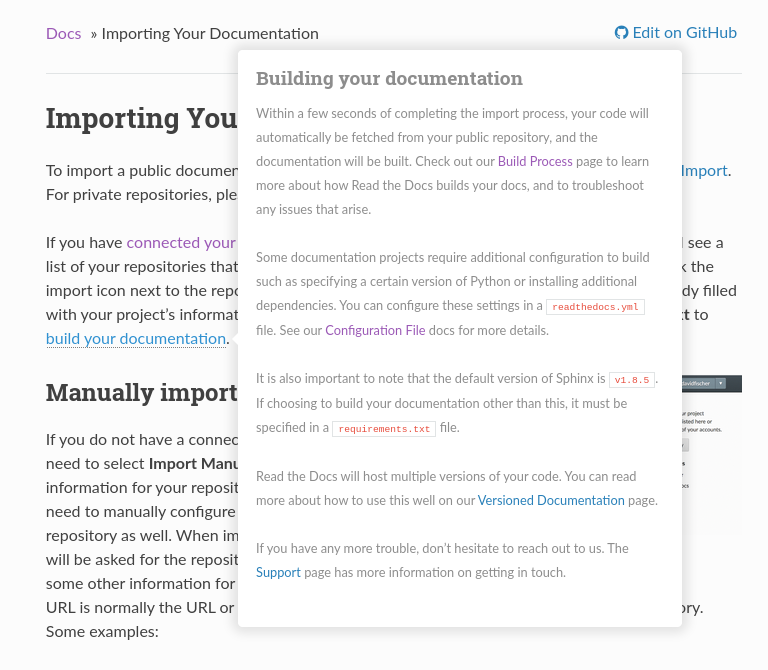
Tooltip shown when hovering on a reference using sphinx-hoverxref.
You can find more information about this extension, how to install and configure it in the hoverxref documentation.
Inline help on application website
This allows us to keep the official documentation as the single source of truth, while having great inline help in our application website as well. On the “Automation Rules” admin page we could embed the content of our Automation Rules documentation page and be sure it will be always up to date.
Note
We recommend you point at tagged releases instead of latest. Tags don’t change over time, so you don’t have to worry about the content you are embedding disappearing.
The following example will fetch the section “Creating an automation rule” in page automation-rules.html
from our own docs and will populate the content of it into the #help-container div element.
<script type="text/javascript">
var params = {
  'url': 'https://docs.readthedocs.io/en/latest/automation-rules.html%23creating-an-automation-rule',
  // 'doctool': 'sphinx',
  // 'doctoolversion': '4.2.0',
};
var url = 'https://readthedocs.org/api/v3/embed/?' + $.param(params);
$.get(url, function(data) {
  $('#help-container').content(data['content']);
});
</script>

<div id="help-container"></div>
You can modify this example to subscribe to .onclick Javascript event,
and show a modal when the user clicks in a “Help” link.
Tip
Take into account that if the title changes, your section argument will break.
To avoid that, you can manually define Sphinx references above the sections you don’t want to break.
For example,
.. in your .rst document file

.. _unbreakable-section-reference:

Creating an automation rule
---------------------------

This is the text of the section.
.. in your .md document file

(unbreakable-section-reference)=
## Creating an automation rule

This is the text of the section.
To link to the section “Creating an automation rule” you can send section=unbreakable-section-reference.
If you change the title it won’t break the embedded content because the label for that title will still be unbreakable-section-reference.
Please, take a look at the Sphinx :ref: role documentation for more information about how to create references.
Calling the Embed API directly
Embed API lives under https://readthedocs.org/api/v3/embed/ URL and accept the URL of the content you want to embed.
Take a look at its own documentation to find out more details.
You can click on the following links and check a live response directly in the browser as examples:
Note
All relative links to pages contained in the remote content will continue to point at the remote page.
Conda Support
Read the Docs supports Conda as an environment management tool, along with Virtualenv. Conda support is useful for people who depend on C libraries, and need them installed when building their documentation.
This work was funded by Clinical Graphics – many thanks for their support of open source.
Activating Conda
Conda support is available using a Configuration File, see conda.
Our Docker images use Miniconda, a minimal conda installer.
After specifying your project requirements using a conda environment.yml file,
Read the Docs will create the environment (using conda env create)
and add the core dependencies needed to build the documentation.
Creating the environment.yml
There are several ways of exporting a conda environment:
conda env exportwill produce a complete list of all the packages installed in the environment with their exact versions. This is the best option to ensure reproducibility, but can create problems if done from a different operative system than the target machine, in our case Ubuntu Linux.conda env export --from-historywill only include packages that were explicitly requested in the environment, excluding the transitive dependencies. This is the best option to maximize cross-platform compatibility, however it may include packages that are not needed to build your docs.And finally, you can also write it by hand. This allows you to pick exactly the packages needed to build your docs (which also results in faster builds) and overcomes some limitations in the conda exporting capabilities.
For example, using the second method for an existing environment:
$ conda activate rtd38
(rtd38) $ conda env export --from-history | tee environment.yml
name: rtd38
channels:
  - defaults
  - conda-forge
dependencies:
  - rasterio==1.2
  - python=3.8
  - pytorch-cpu=1.7
prefix: /home/docs/.conda/envs/rtd38
Read the Docs will override the name and prefix of the environment when creating it,
so they can have any value, or not be present at all.
Tip
Bear in mind that rasterio==1.2 (double ==) will install version 1.2.0,
whereas python=3.8 (single =) will fetch the latest 3.8.* version,
which is 3.8.8 at the time of writing.
Warning
Pinning Sphinx and other Read the Docs core dependencies
is not yet supported by default when using conda (see this GitHub issue for discussion).
If your project needs it, request that we enable the CONDA_APPEND_CORE_REQUIREMENTS
feature flag.
Effective use of channels
Conda packages are usually hosted on https://anaconda.org/, a registration-free artifact archive maintained by Anaconda Inc. Contrary to what happens with the Python Package Index, different users can potentially host the same package in the same repository, each of them using their own channel. Therefore, when installing a conda package, conda also needs to know which channels to use, and which ones take precedence.
If not specified, conda will use defaults, the channel maintained by Anaconda Inc.
and subject to Anaconda Terms of Service. It contains well-tested versions of the most widely used
packages. However, some packages are not available on the defaults channel,
and even if they are, they might not be on their latest versions.
As an alternative, there are channels maintained by the community that have a broader selection
of packages and more up-to-date versions of them, the most popular one being conda-forge.
To use the conda-forge channel when specifying your project dependencies, include it in the list
of channels in environment.yml, and conda will rank them in order of appearance.
To maximize compatibility, we recommend putting conda-forge above defaults:
name: rtd38
channels:
  - conda-forge
  - defaults
dependencies:
  - python=3.8
  # Rest of the dependencies
Tip
If you want to opt out the defaults channel completely, replace it by nodefaults
in the list of channels. See the relevant conda docs for more information.
Making builds faster with mamba
One important thing to note is that, when enabling the conda-forge channel,
the conda dependency solver requires a large amount of RAM and long solve times.
This is a known issue due to the sheer amount of packages available in conda-forge.
As an alternative, you can instruct Read the Docs to use mamba, a drop-in replacement for conda that is much faster and reduces the memory consumption of the dependency solving process.
To do that, add a .readthedocs.yaml configuration file
with these contents:
version: 2

build:
  os: "ubuntu-20.04"
  tools:
    python: "mambaforge-4.10"

conda:
  environment: environment.yml
You can read more about the build.tools.python configuration in our documentation.
Mixing conda and pip packages
There are valid reasons to use pip inside a conda environment: some dependency
might not be available yet as a conda package in any channel,
or you might want to avoid precompiled binaries entirely.
In either case, it is possible to specify the subset of packages
that will be installed with pip in the environment.yml file. For example:
name: rtd38
channels:
  - conda-forge
  - defaults
dependencies:
  - rasterio==1.2
  - python=3.8
  - pytorch-cpu=1.7
  - pip>=20.1  # pip is needed as dependency
  - pip:
    - black==20.8b1
The conda developers recommend in their best practices to install as many requirements as possible with conda, then use pip to minimize possible conflicts and interoperability issues.
Warning
Notice that conda env export --from-history does not include packages installed with pip,
see this conda issue for discussion.
Compiling your project sources
If your project contains extension modules written in a compiled language (C, C++, FORTRAN) or server-side JavaScript, you might need special tools to build it from source that are not readily available on our Docker images, such as a suitable compiler, CMake, Node.js, and others.
Luckily, conda is a language-agnostic package manager, and many of these development tools
are already packaged on conda-forge or more specialized channels.
For example, this conda environment contains the required dependencies to compile Slycot on Read the Docs:
name: slycot38
channels:
  - conda-forge
  - defaults
dependencies:
  - python=3.8
  - cmake
  - numpy
  - compilers
Troubleshooting
If you have problems on the environment creation phase, either because the build runs out of memory or time or because some conflicts are found, you can try some of these mitigations:
Reduce the number of channels in
environment.yml, even leavingconda-forgeonly and opting out of the defaults addingnodefaults.Constrain the package versions as much as possible to reduce the solution space.
Use mamba, an alternative package manager fully compatible with conda packages.
And, if all else fails, request more resources.
Custom Installs
If you are running a custom installation of Read the Docs,
you will need the conda executable installed somewhere on your PATH.
Because of the way conda works,
we can’t safely install it as a normal dependency into the normal Python virtualenv.
Warning
Installing conda into a virtualenv will override the activate script,
making it so you can’t properly activate that virtualenv anymore.
Specifying your dependencies with Poetry
Declaring your project metadata
Poetry is a PEP 517-compliant build backend, which means that
it can generate your project
metadata
using a standardized interface that can be consumed directly by pip.
To do that, first make sure that
the build-system section of your pyproject.toml
declares the build backend as follows:
[build-system]
requires = ["poetry_core>=1.0.0"]
build-backend = "poetry.core.masonry.api"
Then, you will be able to install it on Read the Docs just using pip, with a configuration like this:
version: 2

build:
  os: ubuntu-20.04
  tools:
    python: "3.9"

python:
  install:
    - method: pip
      path: .
For example, the rich Python library uses Poetry to declare its library dependencies and installs itself on Read the Docs with pip.
Locking your dependencies
With your pyproject.toml file you are free to specify the dependency
versions
that are most appropriate for your project,
either by leaving them unpinned or setting some constraints.
However, to achieve Reproducible Builds
it is better that you lock your dependencies,
so that the decision to upgrade any of them is yours.
Poetry does this using poetry.lock files
that contain the exact versions of all your transitive dependencies
(that is, all the dependencies of your dependencies).
The first time you run poetry install in your project directory
Poetry will generate a new poetry.lock
file
with the versions available at that moment.
You can then commit your poetry.lock to version
control
so that Read the Docs also uses these exact dependencies.
My Build is Using Too Many Resources
We limit build resources to make sure that users don’t overwhelm our build systems. If you are running into this issue, there are a couple fixes that you might try.
Note
The current build limits can be found on our Build process page.
Reduce formats you’re building
You can change the formats of docs that you’re building with our Configuration File, see formats.
In particular, the htmlzip takes up a decent amount of memory and time,
so disabling that format might solve your problem.
Reduce documentation build dependencies
A lot of projects reuse their requirements file for their documentation builds. If there are extra packages that you don’t need for building docs, you can create a custom requirements file just for documentation. This should speed up your documentation builds, as well as reduce your memory footprint.
Use mamba instead of conda
If you need conda packages to build your documentation, you can use mamba as a drop-in replacement to conda, which requires less memory and is noticeably faster.
Document Python modules API statically
If you are installing a lot of Python dependencies just to document your Python modules API using sphinx.ext.autodoc,
you can give a try to sphinx-autoapi Sphinx’s extension instead which should produce the exact same output but running statically.
This could drastically reduce the memory and bandwidth required to build your docs.
Requests more resources
If you still have problems building your documentation, we can increase build limits on a per-project basis, sending an email to support@readthedocs.org providing a good reason why your documentation needs more resources.
Adding “Edit Source” links on your Sphinx theme
Read the Docs injects some extra variables in the Sphinx html_context
that are used by our Sphinx theme to display “edit source” links at the top of all pages.
You can use these variables in your own Sphinx theme as well.
More information can be found on Sphinx documentation.
GitHub
If you want to integrate GitHub, these are the required variables to put into
your conf.py:
html_context = {
    "display_github": True, # Integrate GitHub
    "github_user": "MyUserName", # Username
    "github_repo": "MyDoc", # Repo name
    "github_version": "master", # Version
    "conf_py_path": "/source/", # Path in the checkout to the docs root
}
They can be used like this:
{% if display_github %}
    <li><a href="https://github.com/{{ github_user }}/{{ github_repo }}
    /blob/{{ github_version }}{{ conf_py_path }}{{ pagename }}.rst">
    Show on GitHub</a></li>
{% endif %}
Bitbucket
If you want to integrate Bitbucket, these are the required variables to put into
your conf.py:
html_context = {
    "display_bitbucket": True, # Integrate Bitbucket
    "bitbucket_user": "MyUserName", # Username
    "bitbucket_repo": "MyDoc", # Repo name
    "bitbucket_version": "master", # Version
    "conf_py_path": "/source/", # Path in the checkout to the docs root
}
They can be used like this:
{% if display_bitbucket %}
    <a href="https://bitbucket.org/{{ bitbucket_user }}/{{ bitbucket_repo }}
    /src/{{ bitbucket_version}}{{ conf_py_path }}{{ pagename }}.rst'"
    class="icon icon-bitbucket"> Edit on Bitbucket</a>
{% endif %}
Gitlab
If you want to integrate Gitlab, these are the required variables to put into
your conf.py:
html_context = {
    "display_gitlab": True, # Integrate Gitlab
    "gitlab_user": "MyUserName", # Username
    "gitlab_repo": "MyDoc", # Repo name
    "gitlab_version": "master", # Version
    "conf_py_path": "/source/", # Path in the checkout to the docs root
}
They can be used like this:
{% if display_gitlab %}
    <a href="https://{{ gitlab_host|default("gitlab.com") }}/
    {{ gitlab_user }}/{{ gitlab_repo }}/blob/{{ gitlab_version }}
    {{ conf_py_path }}{{ pagename }}{{ suffix }}" class="fa fa-gitlab">
    Edit on GitLab</a>
{% endif %}
Additional variables
'pagename'- Sphinx variable representing the name of the page you’re on.
Read the Docs for Science
Documentation and technical writing are broad fields. Their tools and practices have grown relevant to most scientific activities. This includes building publications, books, educational resources, interactive data science, resources for data journalism and full-scale websites for research projects and courses.
Let’s explore the overlap of features for software documentation and academic writing. Here’s a brief overview of some features that people in science and academic writing love about Read the Docs:
🪄 Easy to use
Documentation code doesn’t have to be written by a programmer. In fact, documentation coding languages are designed and developed so you don’t have to be a programmer, and there are many writing aids that makes it easy to abstract from code and focus on content.
Getting started is also made easy:
All new to this? Take the official Jupyter Book Tutorial
Curious for practical code? See Example projects
Familiar with Sphinx? See How to use Jupyter notebooks in Sphinx
🔋 Batteries included: Graphs, computations, formulas, maps, diagrams and more
Take full advantage of getting all the richness of Jupyter Notebook combined with Sphinx and the giant ecosystem of extensions for both of these.
Here are some examples:
Use symbols familiar from math and physics, build advanced proofs. See also: sphinx-proof
Present results with plots, graphs, images and let users interact directly with your datasets and algorithms. See also: Matplotlib, Interactive Data Visualizations
Graphs, tables etc. are computed when the latest version of your project is built and published as a stand-alone website. All code examples on your website are validated each time you build.
📚 Bibliographies and external links
Maintain bibliography databases directly as code and have external links automatically verified.
Using extensions for Sphinx such as the popular sphinxcontrib-bibtex extension, you can maintain your bibliography with Sphinx directly or refer to entries .bib files, as well as generating entire Bibliography sections from those files.
📜 Modern themes and classic PDF outputs
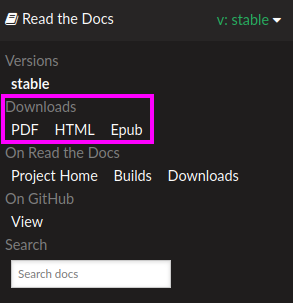
Use the latest state-of-the-art themes for web and have PDFs and e-book formats automatically generated.
New themes are improving every day, and when you write documentation based on Jupyter Book and Sphinx, you will separate your contents and semantics from your presentation logic. This way, you can keep up with the latest theme updates or try new themes.
Another example of the benefits from separating content and presentation logic: Your documentation also transforms into printable books and eBooks.
📐 Widgets, widgets and more widgets
Design your science project’s layout and components with widgets from a rich eco-system of open-source extensions built for many purposes. Special widgets help users display and interact with graphs, maps and more. Several extensions are built and invented by the science community.
⚙️ Automatic builds
Build and publish your project for every change made through Git (GitHub, GitLab, Bitbucket etc). Preview changes via pull requests. Receive notifications when something is wrong. How does this work? Have a look at this video:
💬 Collaboration and community
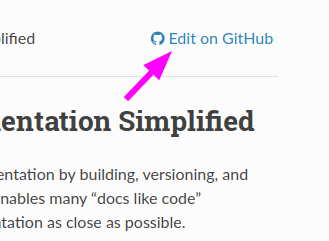
Science and academia have a big kinship with software developers: We ❤️ community. Our solutions and projects become better when we foster inclusivity and active participation. Read the Docs features easy access for readers to suggest changes via your git platform (GitHub, GitLab, Bitbucket etc.). But not just any unqualified feedback. Instead, the code and all the tools are available for your community to forge qualified contributions.
Your readers can become your co-authors!
Discuss changes via pull request and track all changes in your project’s version history.
Using git does not mean that anyone can go and change your code and your published project. The full ownership and permission handling remains in your hands. Project and organization owners on your git platform govern what is released and who has access to approve and build changes.
🔎 Full search and analytics
Read the Docs comes with a number of features bundled in that you would have to configure if you were hosting documentation elsewhere.
- Super-fast text search
Your documentation is automatically indexed and gets its own search function.
- Traffic statistics
Have full access to your traffic data and have quick access to see which of your pages are most popular.
- Search analytics
What are people searching for and do they get hits? From each search query in your documentation, we collect a neat little statistic that can help to improve the discoverability and relevance of your documentation.
- SEO - Don’t reinvent Search Engine Optimization
Use built-in SEO best-practices from Sphinx, its themes and Read the Docs hosting. This can give you a good ranking on search engines as a direct outcome of simply writing and publishing your documentation project.
🌱 Grow your own solutions
The eco-system is open source and makes it accessible for anyone with Python skills to build their own extensions.
We want science communities to use Read the Docs and to be part of the documentation community 💞
Getting started: Jupyter Book
Jupyter Book on Read the Docs brings you the rich experience of computated Jupyter documents built together with a modern documentation tool. The results are beautiful and automatically deployed websites, built with Sphinx and Executable Book + all the extensions available in this ecosystem.
Here are some popular activities that are well-supported by Jupyter Book:
Publications and books
Course and research websites
Interactive classroom activities
Data science software documentation
Visit the gallery of solutions built with Jupyter Book »
Ready to get started?
All new to this? Take the official Jupyter Book Tutorial »
Curious for practical code? See the list of Example Projects »
Familiar with Sphinx? Read How to use Jupyter notebooks in Sphinx »
Examples and users
Read the Docs community for science is already big and keeps growing. The Jupyter Project itself and the many sub-projects of Jupyter are built and published with Read the Docs.
Example projects
Need inspiration?
Want to bootstrap a new documentation project?
Want to showcase your own solution?
The following example projects show a rich variety of uses of Read the Docs. You can use them for inspiration, for learning and for recipies to start your own documentation projects. View the rendered version of each project and then head over to the Git source to see how it’s done and reuse the code.
Sphinx and MkDocs examples
Topic |
Framework |
Links |
Description |
|---|---|---|---|
Basic Sphinx |
Sphinx |
Sphinx example with versioning and Python doc autogeneration |
|
Basic MkDocs |
MkDocs |
Basic example of using MkDocs |
|
Jupyter Book |
Jupyter Book and Sphinx |
Jupyter Book with popular integrations configured |
Real-life examples

We maintain an Awesome List where you can contribute new shiny examples of using Read the Docs. Please refer to the instructions on how to submit new entries on Awesome Read the Docs Projects.
Contributing an example project
We would love to add more examples that showcase features of Read the Docs or great tools or methods to build documentation projects.
We require that an example project:
is hosted and maintained by you in its own Git repository,
example-<topic>.contains a README.
uses a
.readthedocs.yamlconfiguration.is added to the above list by opening a PR targeting examples.rst.
We recommend that your project:
has continuous integration and PR builds.
is versioned as a real software project, i.e. using git tags.
covers your most important scenarios, but references external real-life projects whenever possible.
has a minimal tech stack – or whatever you feel comfortable about maintaining.
copies from an existing example project as a template to get started.
We’re excited to see what you come up with!
Advanced features of Read the Docs
Read the Docs offers many advanced features and options. Learn more about these integrations and how you can get the most out of your documentation and Read the Docs.
Advanced project configuration: Subprojects | Single version docs | Flyout Menu | Feature Flags
Multi-language documentation: Translations and localization
Redirects: Automatic redirects
Versions Automation rules
Topic specific guides: How-to guides
Extending Read the Docs: REST API
Subprojects
Projects can be configured in a nested manner, by configuring a project as a subproject of another project. This allows for documentation projects to share a search index and a namespace or custom domain, but still be maintained independently.
For example, a parent project, Foo is set up with a subproject, Bar. The
documentation for Foo will be available at:
https://foo.readthedocs.io/en/latest/
The documentation for Bar will be available under this same path:
https://foo.readthedocs.io/projects/bar/en/latest/
Adding a subproject
In the admin dashboard for your project, select “Subprojects” from the menu. From this page you can add a subproject by typing in the project slug.
Subproject aliases
You can use an alias for the subproject when it is created. This allows you to override the URL that is used to access it, giving more configurability to how you want to structure your projects.
Custom domain on subprojects
Adding a custom domain to a subproject is not allowed, since your documentation will always be served from the domain of the parent project.
Search
Search on the parent project will include results from its subprojects.
If you search on the v1 version of the parent project,
results from the v1 version of its subprojects will be included,
or from the default version for subprojects that don’t have a v1 version.
This is currently the only way to share search results between projects, we do not yet support sharing search results between sibling subprojects or arbitrary projects.
Single Version Documentation
Single Version Documentation lets you serve your docs at a root domain.
By default, all documentation served by Read the Docs has a root of /<language>/<version>/.
But, if you enable the “Single Version” option for a project, its documentation will instead be served at /.
Warning
This means you can’t have translations or multiple versions for your documentation.
You can see a live example of this at http://www.contribution-guide.org
Enabling
You can toggle the “Single Version” option on or off for your project in the Project Admin page. Check your dashboard for a list of your projects.
Effects
Links pointing to the root URL of the project will now point to the proper URL.
For example, if pip was set as a “Single Version” project,
then links to its documentation would point to https://pip.readthedocs.io/
rather than redirecting to https://pip.readthedocs.io/en/latest/.
Warning
Documentation at /<language>/<default_version>/ will stop working.
Remember to set canonical URLs
to tell search engines like Google what to index,
and to create User-defined Redirects to avoid broken incoming links.
Flyout Menu
When you are using a Read the Docs site, you will likely notice that we embed a menu on all the documentation pages we serve. This is a way to expose the functionality of Read the Docs on the page, without having to have the documentation theme integrate it directly.
Functionality
The flyout menu provides access to the following bits of Read the Docs functionality:
A version switcher that shows users all of the active, unhidden versions they have access to.
Downloadable formats for the current version, including HTML & PDF downloads that are enabled by the project.
Links to the Read the Docs dashboard for the project.
Links to your VCS provider that allow the user to quickly find the exact file that the documentation was rendered from.
A search bar that gives users access to our Server Side Search of the current version.
Closed

The flyout when it’s closed
Open
The opened flyout
Feature Flags
Read the Docs offers some additional flag settings which are disabled by default for every project and can only be enabled by contacting us through our support form or reaching out to the administrator of your service.
Available Flags
CONDA_APPEND_CORE_REQUIREMENTS: Append Read the Docs core requirements to environment.yml file
Makes Read the Docs to install all the requirements at once on conda create step.
This helps users to pin dependencies on conda and to improve build time.
DONT_OVERWRITE_SPHINX_CONTEXT: Do not overwrite context vars in conf.py with Read the Docs context
DONT_CREATE_INDEX: Do not create index.md or README.rst if the project does not have one.
When Read the Docs detects that your project doesn’t have an index.md or README.rst,
it auto-generate one for you with instructions about how to proceed.
In case you are using a static HTML page as index or an generated index from code, this behavior could be a problem. With this feature flag you can disable that.
Localization of Documentation
Note
This feature only applies to Sphinx documentation. We are working to bring it to our other documentation backends.
Read the Docs supports hosting your docs in multiple languages. There are two different things that we support:
A single project written in another language
A project with translations into multiple languages
Single project in another language
It is easy to set the Language of your project. On the project Admin page (or Import page), simply select your desired Language from the dropdown. This will tell Read the Docs that your project is in the language. The language will be represented in the URL for your project.
For example,
a project that is in Spanish will have a default URL of /es/latest/ instead of /en/latest/.
Note
You must commit the .po files for Read the Docs to translate your documentation.
Project with multiple translations
This situation is a bit more complicated.
To support this,
you will have one parent project and a number of projects marked as translations of that parent.
Let’s use phpmyadmin as an example.
The main phpmyadmin project is the parent for all translations.
Then you must create a project for each translation,
for example phpmyadmin-spanish.
You will set the Language for phpmyadmin-spanish to Spanish.
In the parent projects Translations page,
you will say that phpmyadmin-spanish is a translation for your project.
This has the results of serving:
phpmyadminathttp://phpmyadmin.readthedocs.io/en/latest/phpmyadmin-spanishathttp://phpmyadmin.readthedocs.io/es/latest/
It also gets included in the Read the Docs flyout:
Note
The default language of a custom domain is determined by the language of the parent project that the domain was configured on. See Custom Domains for more information.
Note
You can include multiple translations in the same repository,
with same conf.py and .rst files,
but each project must specify the language to build for those docs.
Note
You can read Manage Translations for Sphinx projects to understand the whole process for a documentation with multiples languages in the same repository and how to keep the translations updated on time.
User-defined Redirects
You can set up redirects for a project in your project dashboard’s Redirects page.
Table of contents
Quick summary
Go to the Admin tab of your project.
From the left navigation menu, select Redirects.
In the form box “Redirect Type” select the type of redirect you want. See below for detail.
Depending on the redirect type you select, enter
From URLand/orTo URLas needed.When finished, click the Add button.
Your redirects will be effective immediately.
Features
By default, redirects are followed only if the requested page doesn’t exist (404 File Not Found error), if you need to apply a redirect for files that exist, mark the Force redirect option. This option is only available on some plan levels. Please ask support if you need it for some reason.
Page redirects and Exact redirects can redirect to URLs outside Read the Docs, just include the protocol in
To URL, e.ghttps://example.com.
Redirect types
We offer a few different type of redirects based on what you want to do.
Prefix redirects
The most useful and requested feature of redirects was when migrating to Read the Docs from an old host. You would have your docs served at a previous URL, but that URL would break once you moved them. Read the Docs includes a language and version slug in your documentation, but not all documentation is hosted this way.
Say that you previously had your docs hosted at https://docs.example.com/dev/,
you move docs.example.com to point at Read the Docs.
So users will have a bookmark saved to a page at https://docs.example.com/dev/install.html.
You can now set a Prefix Redirect that will redirect all 404’s with a prefix to a new place. The example configuration would be:
Type: Prefix Redirect
From URL: /dev/
Your users query would now redirect in the following manner:
docs.example.com/dev/install.html ->
docs.example.com/en/latest/install.html
Where en and latest are the default language and version values for your project.
Note
If you were hosting your docs without a prefix, you can create a / Prefix Redirect,
which will prepend /$lang/$version/ to all incoming URLs.
Page redirects
A more specific case is when you move a page around in your docs. The old page will start 404’ing, and your users will be confused. Page Redirects let you redirect a specific page.
Say you move the example.html page into a subdirectory of examples: examples/intro.html.
You would set the following configuration:
Type: Page Redirect
From URL: /example.html
To URL: /examples/intro.html
Page Redirects apply to all versions of you documentation.
Because of this,
the / at the start of the From URL doesn’t include the /$lang/$version prefix (e.g.
/en/latest), but just the version-specific part of the URL.
If you want to set redirects only for some languages or some versions, you should use
Exact redirects with the fully-specified path.
Exact redirects
Exact Redirects are for redirecting a single URL, taking into account the full URL (including language and version).
You can also redirect a subset of URLs by including the $rest keyword
at the end of the From URL.
Exact redirects examples
Say you’re moving docs.example.com to Read the Docs and want to redirect traffic
from an old page at https://docs.example.com/dev/install.html to a new URL
of https://docs.example.com/en/latest/installing-your-site.html.
The example configuration would be:
Type: Exact Redirect
From URL: /dev/install.html
To URL:   /en/latest/installing-your-site.html
Your users query would now redirect in the following manner:
docs.example.com/dev/install.html ->
docs.example.com/en/latest/installing-your-site.html
Note that you should insert the desired language for “en” and version for “latest” to achieve the desired redirect.
Exact Redirects could be also useful to redirect a whole sub-path to a different one by using a special $rest keyword in the “From URL”.
Let’s say that you want to redirect your readers of your version 2.0 of your documentation under /en/2.0/ because it’s deprecated,
to the newest 3.0 version of it at /en/3.0/.
This example would be:
Type: Exact Redirect
From URL: /en/2.0/$rest
To URL: /en/3.0/
The readers of your documentation will now be redirected as:
docs.example.com/en/2.0/dev/install.html ->
docs.example.com/en/3.0/dev/install.html
Similarly, if you maintain several branches of your documentation (e.g. 3.0 and
latest) and decide to move pages in latest but not the older branches, you can use
Exact Redirects to do so.
You can use an exact redirect to migrate your documentation to another domain, for example:
Type: Exact Redirect
From URL: /$rest
To URL: https://newdocs.example.com/
Force Redirect: True
Then all pages will redirect to the new domain, for example
https://docs.example.com/en/latest/install.html will redirect to
https://newdocs.example.com/en/latest/install.html.
Sphinx redirects
We also support redirects for changing the type of documentation Sphinx is building.
If you switch between HTMLDir and HTML, your URL’s will change.
A page at /en/latest/install.html will be served at /en/latest/install/,
or vice versa.
The built in redirects for this will handle redirecting users appropriately.
Automatic Redirects
Read the Docs supports redirecting certain URLs automatically. This is an overview of the set of redirects that are fully supported and will work into the future.
Redirecting to a Page
You can link to a specific page and have it redirect to your default version.
This is done with the /page/ URL prefix.
You can reach this page by going to https://docs.readthedocs.io/page/automatic-redirects.html.
This allows you to create links that are always up to date.
Another way to handle this is the latest version.
You can set your latest version to a specific version and just always link to latest.
You can read more about this in our versions page.
Root URL
A link to the root of your documentation will redirect to the default version, as set in your project settings. For example:
docs.readthedocs.io -> docs.readthedocs.io/en/latest/
www.pip-installer.org -> www.pip-installer.org/en/latest/
This only works for the root URL, not for internal pages. It’s designed to redirect people from http://pip.readthedocs.io/ to the default version of your documentation, since serving up a 404 here would be a pretty terrible user experience. (If your “develop” branch was designated as your default version, then it would redirect to http://pip.readthedocs.io/en/develop.) But, it’s not a universal redirecting solution. So, for example, a link to an internal page like http://pip.readthedocs.io/usage.html doesn’t redirect to http://pip.readthedocs.io/en/latest/usage.html.
The reasoning behind this is that RTD organizes the URLs for docs so that multiple translations and multiple versions of your docs can be organized logically and consistently for all projects that RTD hosts. For the way that RTD views docs, http://pip.readthedocs.io/en/latest/ is the root directory for your default documentation in English, not http://pip.readthedocs.io/. Just like http://pip.readthedocs.io/en/develop/ is the root for your development documentation in English.
Among all the multiple versions of docs, you can choose which is the “default” version for RTD to display, which usually corresponds to the git branch of the most recent official release from your project.
rtfd.io
Links to rtfd.io are treated the same way as above. They redirect the root URL to the default version of the project. They are intended to be easy and short for people to type.
You can reach these docs at https://docs.rtfd.io.
Supported Top-Level Redirects
Note
These “implicit” redirects are supported for legacy reasons. We will not be adding support for any more magic redirects. If you want additional redirects, they should live at a prefix like Redirecting to a Page
The main challenge of URL routing in Read the Docs is handling redirects correctly. Both in the interest of redirecting older URLs that are now obsolete, and in the interest of handling “logical-looking” URLs (leaving out the lang_slug or version_slug shouldn’t result in a 404), the following redirects are supported:
/          -> /en/latest/
/en/       -> /en/latest/
/latest/   -> /en/latest/
The language redirect will work for any of the defined LANGUAGE_CODES we support.
The version redirect will work for supported versions.
Automation Rules
Automation rules allow project maintainers to automate actions on new branches and tags on repositories.
Creating an automation rule
Go to your project dashboard
Click Admin > Automation Rules
Click on Add Rule
Fill in the fields
Click Save
How do they work?
When a new tag or branch is pushed to your repository, Read the Docs creates a new version.
All rules are evaluated for this version, in the order they are listed. If the version matches the version type and the pattern in the rule, the specified action is performed on that version.
Note
Versions can match multiple rules, and all matching actions will be performed on the version.
Predefined matches
Automation rules support several predefined version matches:
Any version: All new versions will match the rule.
SemVer versions: All new versions that follow semantic versioning will match the rule.
User defined matches
If none of the above predefined matches meet your use case, you can use a Custom match.
The custom match should be a valid Python regular expression. Each new version will be tested against this regular expression.
Actions
When a rule matches a new version, the specified action is performed on that version. Currently, the following actions are available:
Activate version: Activates and builds the version.
Hide version: Hides the version. If the version is not active, activates it and builds the version. See Version States.
Make version public: Sets the version’s privacy level to public. See Privacy levels.
Make version private: Sets the version’s privacy level to private. See Privacy levels.
Set version as default: Sets the version as default, i.e. the version of your project that
/redirects to. See more in Root URL. It also activates and builds the version.Delete version: When a branch or tag is deleted from your repository, Read the Docs will delete it only if isn’t active. This action allows you to delete active versions when a branch or tag is deleted from your repository.
Note
The default version isn’t deleted even if it matches a rule. You can use the
Set version as defaultaction to change the default version before deleting the current one.
Note
If your versions follow PEP 440, Read the Docs activates and builds the version if it’s greater than the current stable version. The stable version is also automatically updated at the same time. See more in Versioned Documentation.
Order
The order your rules are listed in Admin > Automation Rules matters. Each action will be performed in that order, so first rules have a higher priority.
You can change the order using the up and down arrow buttons.
Note
New rules are added at the end (lower priority).
Examples
Activate only new branches that belong to the 1.x release
Custom match:
^1\.\d+$Version type:
BranchAction:
Activate version
Delete an active version when a branch is deleted
Match:
Any versionVersion type:
BranchAction:
Delete version
Canonical URLs
A canonical URL allows you to specify the preferred version of a web page to prevent duplicated content. They are mainly used by search engines to link users to the correct version and domain of your documentation.
If canonical URL’s aren’t used, it’s easy for outdated documentation to be the top search result for various pages in your documentation. This is not a perfect solution for this problem, but generally people finding outdated documentation is a big problem, and this is one of the suggested ways to solve it from search engines.
How Read the Docs generates canonical URLs
The canonical URL takes into account:
The default version of your project (usually “latest” or “stable”).
The canonical custom domain if you have one, otherwise the default subdomain will be used.
For example, if you have a project named example-docs
with a custom domain https://docs.example.com,
then your documentation will be served at https://example-docs.readthedocs.io and https://docs.example.com.
Without specifying a canonical URL, a search engine like Google will index both domains.
You’ll want to use https://docs.example.com as your canonical domain.
This means that when Google indexes a page like https://example-docs.readthedocs.io/en/latest/,
it will know that it should really point at https://docs.example.com/en/latest/,
thus avoiding duplicating the content.
Note
If you want your custom domain to be set as the canonical, you need to set Canonical: This domain is the primary one where the documentation is served from in the Admin > Domains section of your project settings.
Implementation
The canonical URL is set in HTML with a link element.
For example, this page has a canonical URL of:
<link rel="canonical" href="https://docs.readthedocs.io/en/stable/canonical-urls.html" />
Sphinx
If you are using Sphinx,
Read the Docs will set the value of the html_baseurl setting (if isn’t already set) to your canonical domain.
If you already have html_baseurl set, you need to ensure that the value is correct.
Mkdocs
For MkDocs this isn’t done automatically, but you can use the site_url setting to set a similar value.
Warning
If you change your default version or canonical domain, you’ll need to re-build all your versions in order to update their canonical URL to the new one.
Public API
This section of the documentation details the public API usable to get details of projects, builds, versions and other details from Read the Docs.
API v3
The Read the Docs API uses REST. JSON is returned by all API responses including errors and HTTP response status codes are to designate success and failure.
Table of contents
Resources
This section shows all the resources that are currently available in APIv3. There are some URL attributes that applies to all of these resources:
- ?fields=
Specify which fields are going to be returned in the response.
- ?omit=
Specify which fields are going to be omitted from the response.
- ?expand=
Some resources allow to expand/add extra fields on their responses (see Project details for example).
Tip
You can browse the full API by accessing its root URL: https://readthedocs.org/api/v3/
Tip
You can browse the full API by accessing its root URL: https://readthedocs.com/api/v3/
Note
If you are using Read the Docs for Business take into account that you will need to replace https://readthedocs.org/ by https://readthedocs.com/ in all the URLs used in the following examples.
Projects
- GET /api/v3/projects/
Retrieve a list of all the projects for the current logged in user.
Example request:
$ curl -H "Authorization: Token <token>" https://readthedocs.org/api/v3/projects/import requests URL = 'https://readthedocs.org/api/v3/projects/' TOKEN = '<token>' HEADERS = {'Authorization': f'token {TOKEN}'} response = requests.get(URL, headers=HEADERS) print(response.json())
Example response:
{
    "count": 25,
    "next": "/api/v3/projects/?limit=10&offset=10",
    "previous": null,
    "results": [{
        "id": 12345,
        "name": "Pip",
        "slug": "pip",
        "created": "2010-10-23T18:12:31+00:00",
        "modified": "2018-12-11T07:21:11+00:00",
        "language": {
            "code": "en",
            "name": "English"
        },
        "programming_language": {
            "code": "py",
            "name": "Python"
        },
        "repository": {
            "url": "https://github.com/pypa/pip",
            "type": "git"
        },
        "default_version": "stable",
        "default_branch": "master",
        "subproject_of": null,
        "translation_of": null,
        "urls": {
            "documentation": "http://pip.pypa.io/en/stable/",
            "home": "https://pip.pypa.io/"
        },
        "tags": [
            "distutils",
            "easy_install",
            "egg",
            "setuptools",
            "virtualenv"
        ],
        "users": [
            {
                "username": "dstufft"
            }
        ],
        "active_versions": {
            "stable": "{VERSION}",
            "latest": "{VERSION}",
            "19.0.2": "{VERSION}"
        },
        "_links": {
            "_self": "/api/v3/projects/pip/",
            "versions": "/api/v3/projects/pip/versions/",
            "builds": "/api/v3/projects/pip/builds/",
            "subprojects": "/api/v3/projects/pip/subprojects/",
            "superproject": "/api/v3/projects/pip/superproject/",
            "redirects": "/api/v3/projects/pip/redirects/",
            "translations": "/api/v3/projects/pip/translations/"
        }
    }]
}
- Query Parameters
language (string) – language code as
en,es,ru, etc.programming_language (string) – programming language code as
py,js, etc.
The
resultsin response is an array of project data, which is same asGET /api/v3/projects/(string:project_slug)/.Note
Read the Docs for Business, also accepts
- Query Parameters
expand (string) – with
organizationandteams.
- GET /api/v3/projects/(string: project_slug)/
Retrieve details of a single project.
Example request:
$ curl -H "Authorization: Token <token>" https://readthedocs.org/api/v3/projects/pip/import requests URL = 'https://readthedocs.org/api/v3/projects/pip/' TOKEN = '<token>' HEADERS = {'Authorization': f'token {TOKEN}'} response = requests.get(URL, headers=HEADERS) print(response.json())
Example response:
{
    "id": 12345,
    "name": "Pip",
    "slug": "pip",
    "created": "2010-10-23T18:12:31+00:00",
    "modified": "2018-12-11T07:21:11+00:00",
    "language": {
        "code": "en",
        "name": "English"
    },
    "programming_language": {
        "code": "py",
        "name": "Python"
    },
    "repository": {
        "url": "https://github.com/pypa/pip",
        "type": "git"
    },
    "default_version": "stable",
    "default_branch": "master",
    "subproject_of": null,
    "translation_of": null,
    "urls": {
        "documentation": "http://pip.pypa.io/en/stable/",
        "home": "https://pip.pypa.io/"
    },
    "tags": [
        "distutils",
        "easy_install",
        "egg",
        "setuptools",
        "virtualenv"
    ],
    "users": [
        {
            "username": "dstufft"
        }
    ],
    "active_versions": {
        "stable": "{VERSION}",
        "latest": "{VERSION}",
        "19.0.2": "{VERSION}"
    },
    "_links": {
        "_self": "/api/v3/projects/pip/",
        "versions": "/api/v3/projects/pip/versions/",
        "builds": "/api/v3/projects/pip/builds/",
        "subprojects": "/api/v3/projects/pip/subprojects/",
        "superproject": "/api/v3/projects/pip/superproject/",
        "redirects": "/api/v3/projects/pip/redirects/",
        "translations": "/api/v3/projects/pip/translations/"
    }
}
- Query Parameters
expand (string) – allows to add/expand some extra fields in the response. Allowed values are
active_versions,active_versions.last_buildandactive_versions.last_build.config. Multiple fields can be passed separated by commas.
Note
Read the Docs for Business, also accepts
- Query Parameters
expand (string) – with
organizationandteams.
- POST /api/v3/projects/
Import a project under authenticated user.
Example request:
$ curl \
  -X POST \
  -H "Authorization: Token <token>" https://readthedocs.org/api/v3/projects/ \
  -H "Content-Type: application/json" \
  -d @body.json
import requests
import json
URL = 'https://readthedocs.org/api/v3/projects/'
TOKEN = '<token>'
HEADERS = {'Authorization': f'token {TOKEN}'}
data = json.load(open('body.json', 'rb'))
response = requests.post(
    URL,
    json=data,
    headers=HEADERS,
)
print(response.json())
The content of
body.jsonis like,{ "name": "Test Project", "repository": { "url": "https://github.com/readthedocs/template", "type": "git" }, "homepage": "http://template.readthedocs.io/", "programming_language": "py", "language": "es" }
Example response:
Note
Read the Docs for Business, also accepts
- Request JSON Object
organization (string) – required organization’s slug under the project will be imported.
teams (string) – optional teams’ slugs the project will belong to.
- PATCH /api/v3/projects/(string: project_slug)/
Update an existing project.
Example request:
$ curl \
  -X PATCH \
  -H "Authorization: Token <token>" https://readthedocs.org/api/v3/projects/pip/ \
  -H "Content-Type: application/json" \
  -d @body.json
import requests
import json
URL = 'https://readthedocs.org/api/v3/projects/pip/'
TOKEN = '<token>'
HEADERS = {'Authorization': f'token {TOKEN}'}
data = json.load(open('body.json', 'rb'))
response = requests.patch(
    URL,
    json=data,
    headers=HEADERS,
)
print(response.json())
The content of
body.jsonis like,{ "name": "New name for the project", "repository": { "url": "https://github.com/readthedocs/readthedocs.org", "type": "git" }, "language": "ja", "programming_language": "py", "homepage": "https://readthedocs.org/", "default_version": "v0.27.0", "default_branch": "develop", "analytics_code": "UA000000", "analytics_disabled": false, "single_version": false, "external_builds_enabled": true, }
- Status Codes
204 No Content – Updated successfully
Versions
Versions are different versions of the same project documentation.
The versions for a given project can be viewed in a project’s version page. For example, here is the Pip project’s version page. See Versioned Documentation for more information.
- GET /api/v3/projects/(string: project_slug)/versions/
Retrieve a list of all versions for a project.
Example request:
$ curl -H "Authorization: Token <token>" https://readthedocs.org/api/v3/projects/pip/versions/import requests URL = 'https://readthedocs.org/api/v3/projects/pip/versions/' TOKEN = '<token>' HEADERS = {'Authorization': f'token {TOKEN}'} response = requests.get(URL, headers=HEADERS) print(response.json())
Example response:
{
    "count": 25,
    "next": "/api/v3/projects/pip/versions/?limit=10&offset=10",
    "previous": null,
    "results": ["VERSION"]
}
- Query Parameters
active (boolean) – return only active versions
built (boolean) – return only built versions
privacy_level (string) – return versions with specific privacy level (
publicorprivate)slug (string) – return versions with matching slug
type (string) – return versions with specific type (
branchortag)verbose_name (string) – return versions with matching version name
- GET /api/v3/projects/(string: project_slug)/versions/(string: version_slug)/
Retrieve details of a single version.
Example request:
$ curl -H "Authorization: Token <token>" https://readthedocs.org/api/v3/projects/pip/versions/stable/import requests URL = 'https://readthedocs.org/api/v3/projects/pip/versions/stable/' TOKEN = '<token>' HEADERS = {'Authorization': f'token {TOKEN}'} response = requests.get(URL, headers=HEADERS) print(response.json())
Example response:
{
    "id": 71652437,
    "slug": "stable",
    "verbose_name": "stable",
    "identifier": "3a6b3995c141c0888af6591a59240ba5db7d9914",
    "ref": "19.0.2",
    "built": true,
    "active": true,
    "hidden": false,
    "type": "tag",
    "last_build": "{BUILD}",
    "downloads": {
        "pdf": "https://pip.readthedocs.io/_/downloads/pdf/pip/stable/",
        "htmlzip": "https://pip.readthedocs.io/_/downloads/htmlzip/pip/stable/",
        "epub": "https://pip.readthedocs.io/_/downloads/epub/pip/stable/"
    },
    "urls": {
        "dashboard": {
            "edit": "https://readthedocs.org/dashboard/pip/version/stable/edit/"
        },
        "documentation": "https://pip.pypa.io/en/stable/",
        "vcs": "https://github.com/pypa/pip/tree/19.0.2"
    },
    "_links": {
        "_self": "/api/v3/projects/pip/versions/stable/",
        "builds": "/api/v3/projects/pip/versions/stable/builds/",
        "project": "/api/v3/projects/pip/"
    }
}
- Response JSON Object
ref (string) – the version slug where the
stableversion points to.nullwhen it’s not the stable version.built (boolean) – the version has at least one successful build.
- Query Parameters
expand (string) – allows to add/expand some extra fields in the response. Allowed values are
last_buildandlast_build.config. Multiple fields can be passed separated by commas.
- PATCH /api/v3/projects/(string: project_slug)/versions/(string: version_slug)/
Update a version.
Example request:
$ curl \
  -X PATCH \
  -H "Authorization: Token <token>" https://readthedocs.org/api/v3/projects/pip/versions/0.23/ \
  -H "Content-Type: application/json" \
  -d @body.json
import requests
import json
URL = 'https://readthedocs.org/api/v3/projects/pip/versions/0.23/'
TOKEN = '<token>'
HEADERS = {'Authorization': f'token {TOKEN}'}
data = json.load(open('body.json', 'rb'))
response = requests.patch(
    URL,
    json=data,
    headers=HEADERS,
)
print(response.json())
The content of
body.jsonis like,{ "active": true, "hidden": false }
- Status Codes
204 No Content – Updated successfully
Builds
Builds are created by Read the Docs whenever a Project has its documentation built.
Frequently this happens automatically via a web hook but can be triggered manually.
Builds can be viewed in the build page for a project. For example, here is Pip’s build page. See Build process for more information.
- GET /api/v3/projects/(str: project_slug)/builds/(int: build_id)/
Retrieve details of a single build for a project.
Example request:
$ curl -H "Authorization: Token <token>" https://readthedocs.org/api/v3/projects/pip/builds/8592686/?expand=config
import requests
URL = 'https://readthedocs.org/api/v3/projects/pip/builds/8592686/?expand=config'
TOKEN = '<token>'
HEADERS = {'Authorization': f'token {TOKEN}'}
response = requests.get(URL, headers=HEADERS)
print(response.json())
Example response:
{
    "id": 8592686,
    "version": "latest",
    "project": "pip",
    "created": "2018-06-19T15:15:59+00:00",
    "finished": "2018-06-19T15:16:58+00:00",
    "duration": 59,
    "state": {
        "code": "finished",
        "name": "Finished"
    },
    "success": true,
    "error": null,
    "commit": "6f808d743fd6f6907ad3e2e969c88a549e76db30",
    "config": {
        "version": "1",
        "formats": [
            "htmlzip",
            "epub",
            "pdf"
        ],
        "python": {
            "version": 3,
            "install": [
                {
                    "requirements": ".../stable/tools/docs-requirements.txt"
                }
            ],
            "use_system_site_packages": false
        },
        "conda": null,
        "build": {
            "image": "readthedocs/build:latest"
        },
        "doctype": "sphinx_htmldir",
        "sphinx": {
            "builder": "sphinx_htmldir",
            "configuration": ".../stable/docs/html/conf.py",
            "fail_on_warning": false
        },
        "mkdocs": {
            "configuration": null,
            "fail_on_warning": false
        },
        "submodules": {
            "include": "all",
            "exclude": [],
            "recursive": true
        }
    },
    "_links": {
        "_self": "/api/v3/projects/pip/builds/8592686/",
        "project": "/api/v3/projects/pip/",
        "version": "/api/v3/projects/pip/versions/latest/"
    }
}
- Response JSON Object
created (string) – The ISO-8601 datetime when the build was created.
finished (string) – The ISO-8601 datetime when the build has finished.
duration (integer) – The length of the build in seconds.
state (string) – The state of the build (one of
triggered,building,installing,cloning,finishedorcancelled)error (string) – An error message if the build was unsuccessful
- Query Parameters
expand (string) – allows to add/expand some extra fields in the response. Allowed value is
config.
- GET /api/v3/projects/(str: project_slug)/builds/
Retrieve list of all the builds on this project.
Example request:
$ curl -H "Authorization: Token <token>" https://readthedocs.org/api/v3/projects/pip/builds/import requests URL = 'https://readthedocs.org/api/v3/projects/pip/builds/' TOKEN = '<token>' HEADERS = {'Authorization': f'token {TOKEN}'} response = requests.get(URL, headers=HEADERS) print(response.json())
Example response:
{
    "count": 15,
    "next": "/api/v3/projects/pip/builds?limit=10&offset=10",
    "previous": null,
    "results": ["BUILD"]
}
- Query Parameters
commit (string) – commit hash to filter the builds returned by commit
running (boolean) – filter the builds that are currently building/running
- POST /api/v3/projects/(string: project_slug)/versions/(string: version_slug)/builds/
Trigger a new build for the
version_slugversion of this project.Example request:
$ curl \
  -X POST \
  -H "Authorization: Token <token>" https://readthedocs.org/api/v3/projects/pip/versions/latest/builds/
import requests
URL = 'https://readthedocs.org/api/v3/projects/pip/versions/latest/builds/'
TOKEN = '<token>'
HEADERS = {'Authorization': f'token {TOKEN}'}
response = requests.post(URL, headers=HEADERS)
print(response.json())
Example response:
{
    "build": "{BUILD}",
    "project": "{PROJECT}",
    "version": "{VERSION}"
}
- Status Codes
202 Accepted – the build was triggered
Subprojects
Projects can be configured in a nested manner, by configuring a project as a subproject of another project. This allows for documentation projects to share a search index and a namespace or custom domain, but still be maintained independently. See Subprojects for more information.
- GET /api/v3/projects/(str: project_slug)/subprojects/(str: alias_slug)/
Retrieve details of a subproject relationship.
Example request:
$ curl -H "Authorization: Token <token>" https://readthedocs.org/api/v3/projects/pip/subprojects/subproject-alias/import requests URL = 'https://readthedocs.org/api/v3/projects/pip/subprojects/subproject-alias/' TOKEN = '<token>' HEADERS = {'Authorization': f'token {TOKEN}'} response = requests.get(URL, headers=HEADERS) print(response.json())
Example response:
{
    "alias": "subproject-alias",
    "child": ["PROJECT"],
    "_links": {
        "parent": "/api/v3/projects/pip/"
    }
}
- GET /api/v3/projects/(str: project_slug)/subprojects/
Retrieve a list of all sub-projects for a project.
Example request:
$ curl -H "Authorization: Token <token>" https://readthedocs.org/api/v3/projects/pip/subprojects/import requests URL = 'https://readthedocs.org/api/v3/projects/pip/subprojects/' TOKEN = '<token>' HEADERS = {'Authorization': f'token {TOKEN}'} response = requests.get(URL, headers=HEADERS) print(response.json())
Example response:
{
    "count": 25,
    "next": "/api/v3/projects/pip/subprojects/?limit=10&offset=10",
    "previous": null,
    "results": ["SUBPROJECT RELATIONSHIP"]
}
- POST /api/v3/projects/(str: project_slug)/subprojects/
Create a subproject relationship between two projects.
Example request:
$ curl \
  -X POST \
  -H "Authorization: Token <token>" https://readthedocs.org/api/v3/projects/pip/subprojects/ \
  -H "Content-Type: application/json" \
  -d @body.json
import requests
import json
URL = 'https://readthedocs.org/api/v3/projects/pip/subprojects/'
TOKEN = '<token>'
HEADERS = {'Authorization': f'token {TOKEN}'}
data = json.load(open('body.json', 'rb'))
response = requests.post(
    URL,
    json=data,
    headers=HEADERS,
)
print(response.json())
The content of
body.jsonis like,{ "child": "subproject-child-slug", "alias": "subproject-alias" }
Note
childmust be a project that you have access to. Or if you are using Read the Docs for Business, additionally the project must be under the same organization as the parent project.Example response:
- Response JSON Object
child (string) – slug of the child project in the relationship.
alias (string) – optional slug alias to be used in the URL (e.g
/projects/<alias>/en/latest/). If not provided, child project’s slug is used as alias.
- Status Codes
201 Created – Subproject created successfully
- DELETE /api/v3/projects/(str: project_slug)/subprojects/(str: alias_slug)/
Delete a subproject relationship.
Example request:
$ curl \
  -X DELETE \
  -H "Authorization: Token <token>" https://readthedocs.org/api/v3/projects/pip/subprojects/subproject-alias/
import requests
URL = 'https://readthedocs.org/api/v3/projects/pip/subprojects/subproject-alias/'
TOKEN = '<token>'
HEADERS = {'Authorization': f'token {TOKEN}'}
response = requests.delete(URL, headers=HEADERS)
print(response.json())
- Status Codes
204 No Content – Subproject deleted successfully
Translations
Translations are the same version of a Project in a different language. See Localization of Documentation for more information.
- GET /api/v3/projects/(str: project_slug)/translations/
Retrieve a list of all translations for a project.
Example request:
$ curl -H "Authorization: Token <token>" https://readthedocs.org/api/v3/projects/pip/translations/import requests URL = 'https://readthedocs.org/api/v3/projects/pip/translations/' TOKEN = '<token>' HEADERS = {'Authorization': f'token {TOKEN}'} response = requests.get(URL, headers=HEADERS) print(response.json())
Example response:
{
    "count": 25,
    "next": "/api/v3/projects/pip/translations/?limit=10&offset=10",
    "previous": null,
    "results": [{
        "id": 12345,
        "name": "Pip",
        "slug": "pip",
        "created": "2010-10-23T18:12:31+00:00",
        "modified": "2018-12-11T07:21:11+00:00",
        "language": {
            "code": "en",
            "name": "English"
        },
        "programming_language": {
            "code": "py",
            "name": "Python"
        },
        "repository": {
            "url": "https://github.com/pypa/pip",
            "type": "git"
        },
        "default_version": "stable",
        "default_branch": "master",
        "subproject_of": null,
        "translation_of": null,
        "urls": {
            "documentation": "http://pip.pypa.io/en/stable/",
            "home": "https://pip.pypa.io/"
        },
        "tags": [
            "distutils",
            "easy_install",
            "egg",
            "setuptools",
            "virtualenv"
        ],
        "users": [
            {
                "username": "dstufft"
            }
        ],
        "active_versions": {
            "stable": "{VERSION}",
            "latest": "{VERSION}",
            "19.0.2": "{VERSION}"
        },
        "_links": {
            "_self": "/api/v3/projects/pip/",
            "versions": "/api/v3/projects/pip/versions/",
            "builds": "/api/v3/projects/pip/builds/",
            "subprojects": "/api/v3/projects/pip/subprojects/",
            "superproject": "/api/v3/projects/pip/superproject/",
            "redirects": "/api/v3/projects/pip/redirects/",
            "translations": "/api/v3/projects/pip/translations/"
        }
    }]
}
The
resultsin response is an array of project data, which is same asGET /api/v3/projects/(string:project_slug)/.
Redirects
Redirects allow the author to redirect an old URL of the documentation to a new one. This is useful when pages are moved around in the structure of the documentation set. See User-defined Redirects for more information.
- GET /api/v3/projects/(str: project_slug)/redirects/(int: redirect_id)/
Retrieve details of a single redirect for a project.
Example request
$ curl -H "Authorization: Token <token>" https://readthedocs.org/api/v3/projects/pip/redirects/1/import requests URL = 'https://readthedocs.org/api/v3/projects/pip/redirects/1/' TOKEN = '<token>' HEADERS = {'Authorization': f'token {TOKEN}'} response = requests.get(URL, headers=HEADERS) print(response.json())
Example response
{
    "pk": 1,
    "created": "2019-04-29T10:00:00Z",
    "modified": "2019-04-29T12:00:00Z",
    "project": "pip",
    "from_url": "/docs/",
    "to_url": "/documentation/",
    "type": "page",
    "_links": {
        "_self": "/api/v3/projects/pip/redirects/1/",
        "project": "/api/v3/projects/pip/"
    }
}
- GET /api/v3/projects/(str: project_slug)/redirects/
Retrieve list of all the redirects for this project.
Example request
$ curl -H "Authorization: Token <token>" https://readthedocs.org/api/v3/projects/pip/redirects/import requests URL = 'https://readthedocs.org/api/v3/projects/pip/redirects/' TOKEN = '<token>' HEADERS = {'Authorization': f'token {TOKEN}'} response = requests.get(URL, headers=HEADERS) print(response.json())
Example response
{
    "count": 25,
    "next": "/api/v3/projects/pip/redirects/?limit=10&offset=10",
    "previous": null,
    "results": ["REDIRECT"]
}
- POST /api/v3/projects/(str: project_slug)/redirects/
Create a redirect for this project.
Example request:
$ curl \
  -X POST \
  -H "Authorization: Token <token>" https://readthedocs.org/api/v3/projects/pip/redirects/ \
  -H "Content-Type: application/json" \
  -d @body.json
import requests import json URL = 'https://readthedocs.org/api/v3/projects/pip/redirects/' TOKEN = '<token>' HEADERS = {'Authorization': f'token {TOKEN}'} data = json.load(open('body.json', 'rb')) response = requests.post( URL, json=data, headers=HEADERS, ) print(response.json())
The content of
body.jsonis like,{ "from_url": "/docs/", "to_url": "/documentation/", "type": "page" }
Note
typecan be one ofprefix,page,exact,sphinx_htmlandsphinx_htmldir.Depending on the
typeof the redirect, some fields may not be needed:prefixtype does not requireto_url.pageandexacttypes requirefrom_urlandto_url.sphinx_htmlandsphinx_htmldirtypes do not requirefrom_urlandto_url.
Example response:
- Status Codes
201 Created – redirect created successfully
- PUT /api/v3/projects/(str: project_slug)/redirects/(int: redirect_id)/
Update a redirect for this project.
Example request:
$ curl \ -X PUT \ -H "Authorization: Token <token>" https://readthedocs.org/api/v3/projects/pip/redirects/1/ \ -H "Content-Type: application/json" \ -d @body.json
import requests import json URL = 'https://readthedocs.org/api/v3/projects/pip/redirects/1/' TOKEN = '<token>' HEADERS = {'Authorization': f'token {TOKEN}'} data = json.load(open('body.json', 'rb')) response = requests.put( URL, json=data, headers=HEADERS, ) print(response.json())
The content of
body.jsonis like,{ "from_url": "/docs/", "to_url": "/documentation.html", "type": "page" }
Example response:
- DELETE /api/v3/projects/(str: project_slug)/redirects/(int: redirect_id)/
Delete a redirect for this project.
Example request:
$ curl \ -X DELETE \ -H "Authorization: Token <token>" https://readthedocs.org/api/v3/projects/pip/redirects/1/
import requests URL = 'https://readthedocs.org/api/v3/projects/pip/redirects/1/' TOKEN = '<token>' HEADERS = {'Authorization': f'token {TOKEN}'} response = requests.delete(URL, headers=HEADERS) print(response.json())
- Status Codes
204 No Content – Redirect deleted successfully
Environment Variables
Environment Variables are variables that you can define for your project. These variables are used in the build process when building your documentation. They are for example useful to define secrets in a safe way that can be used by your documentation to build properly. Environment variables can also be made public, allowing for them to be used in PR builds. See Environment Variables.
- GET /api/v3/projects/(str: project_slug)/environmentvariables/(int: environmentvariable_id)/
Retrieve details of a single environment variable for a project.
Example request
$ curl -H "Authorization: Token <token>" https://readthedocs.org/api/v3/projects/pip/environmentvariables/1/import requests URL = 'https://readthedocs.org/api/v3/projects/pip/environmentvariables/1/' TOKEN = '<token>' HEADERS = {'Authorization': f'token {TOKEN}'} response = requests.get(URL, headers=HEADERS) print(response.json())
Example response
{ "_links": { "_self": "https://readthedocs.org/api/v3/projects/project/environmentvariables/1/", "project": "https://readthedocs.org/api/v3/projects/project/" }, "created": "2019-04-29T10:00:00Z", "modified": "2019-04-29T12:00:00Z", "pk": 1, "project": "project", "public": false, "name": "ENVVAR" }
- GET /api/v3/projects/(str: project_slug)/environmentvariables/
Retrieve list of all the environment variables for this project.
Example request
$ curl -H "Authorization: Token <token>" https://readthedocs.org/api/v3/projects/pip/environmentvariables/import requests URL = 'https://readthedocs.org/api/v3/projects/pip/environmentvariables/' TOKEN = '<token>' HEADERS = {'Authorization': f'token {TOKEN}'} response = requests.get(URL, headers=HEADERS) print(response.json())
Example response
{ "count": 15, "next": "/api/v3/projects/pip/environmentvariables/?limit=10&offset=10", "previous": null, "results": ["ENVIRONMENTVARIABLE"] }
- POST /api/v3/projects/(str: project_slug)/environmentvariables/
Create an environment variable for this project.
Example request:
$ curl \ -X POST \ -H "Authorization: Token <token>" https://readthedocs.org/api/v3/projects/pip/environmentvariables/ \ -H "Content-Type: application/json" \ -d @body.json
import requests import json URL = 'https://readthedocs.org/api/v3/projects/pip/environmentvariables/' TOKEN = '<token>' HEADERS = {'Authorization': f'token {TOKEN}'} data = json.load(open('body.json', 'rb')) response = requests.post( URL, json=data, headers=HEADERS, ) print(response.json())
The content of
body.jsonis like,{ "name": "MYVAR", "value": "My secret value" }
Example response:
See Environment Variable details
- Status Codes
201 Created – Environment variable created successfully
- DELETE /api/v3/projects/(str: project_slug)/environmentvariables/(int: environmentvariable_id)/
Delete an environment variable for this project.
Example request:
$ curl \ -X DELETE \ -H "Authorization: Token <token>" https://readthedocs.org/api/v3/projects/pip/environmentvariables/1/
import requests URL = 'https://readthedocs.org/api/v3/projects/pip/environmentvariables/1/' TOKEN = '<token>' HEADERS = {'Authorization': f'token {TOKEN}'} response = requests.delete(URL, headers=HEADERS) print(response.json())
- Request Headers
Authorization – token to authenticate.
- Status Codes
204 No Content – Environment variable deleted successfully
Organizations
Note
The /api/v3/organizations/ endpoint is only available in Read the Docs for Business currently.
We plan to have organizations on Read the Docs Community in a near future and we will add support for this endpoint at the same time.
- GET /api/v3/organizations/
Retrieve a list of all the organizations for the current logged in user.
Example request:
$ curl -H "Authorization: Token <token>" https://readthedocs.com/api/v3/organizations/import requests URL = 'https://readthedocs.com/api/v3/organizations/' TOKEN = '<token>' HEADERS = {'Authorization': f'token {TOKEN}'} response = requests.get(URL, headers=HEADERS) print(response.json())
Example response:
{ "count": 1, "next": null, "previous": null, "results": [ { "_links": { "_self": "https://readthedocs.com/api/v3/organizations/pypa/", "projects": "https://readthedocs.com/api/v3/organizations/pypa/projects/" }, "created": "2019-02-22T21:54:52.768630Z", "description": "", "disabled": false, "email": "pypa@psf.org", "modified": "2020-07-02T12:35:32.418423Z", "name": "Python Package Authority", "owners": [ { "username": "dstufft" } ], "slug": "pypa", "url": "https://github.com/pypa/" } }
- GET /api/v3/organizations/(string: organization_slug)/
Retrieve details of a single organization.
Example request:
$ curl -H "Authorization: Token <token>" https://readthedocs.com/api/v3/organizations/pypa/import requests URL = 'https://readthedocs.com/api/v3/organizations/pypa/' TOKEN = '<token>' HEADERS = {'Authorization': f'token {TOKEN}'} response = requests.get(URL, headers=HEADERS) print(response.json())
Example response:
{ "_links": { "_self": "https://readthedocs.com/api/v3/organizations/pypa/", "projects": "https://readthedocs.com/api/v3/organizations/pypa/projects/" }, "created": "2019-02-22T21:54:52.768630Z", "description": "", "disabled": false, "email": "pypa@psf.com", "modified": "2020-07-02T12:35:32.418423Z", "name": "Python Package Authority", "owners": [ { "username": "dstufft" } ], "slug": "pypa", "url": "https://github.com/pypa/" }
- GET /api/v3/organizations/(string: organization_slug)/projects/
Retrieve list of projects under an organization.
Example request:
$ curl -H "Authorization: Token <token>" https://readthedocs.com/api/v3/organizations/pypa/projects/import requests URL = 'https://readthedocs.com/api/v3/organizations/pypa/projects/' TOKEN = '<token>' HEADERS = {'Authorization': f'token {TOKEN}'} response = requests.get(URL, headers=HEADERS) print(response.json())
Example response:
{ "count": 1, "next": null, "previous": null, "results": [ { "_links": { "_self": "https://readthedocs.com/api/v3/projects/pypa-pip/", "builds": "https://readthedocs.com/api/v3/projects/pypa-pip/builds/", "environmentvariables": "https://readthedocs.com/api/v3/projects/pypa-pip/environmentvariables/", "redirects": "https://readthedocs.com/api/v3/projects/pypa-pip/redirects/", "subprojects": "https://readthedocs.com/api/v3/projects/pypa-pip/subprojects/", "superproject": "https://readthedocs.com/api/v3/projects/pypa-pip/superproject/", "translations": "https://readthedocs.com/api/v3/projects/pypa-pip/translations/", "versions": "https://readthedocs.com/api/v3/projects/pypa-pip/versions/" }, "created": "2019-02-22T21:59:13.333614Z", "default_branch": "master", "default_version": "latest", "homepage": null, "id": 2797, "language": { "code": "en", "name": "English" }, "modified": "2019-08-08T16:27:25.939531Z", "name": "pip", "programming_language": { "code": "py", "name": "Python" }, "repository": { "type": "git", "url": "https://github.com/pypa/pip" }, "slug": "pypa-pip", "subproject_of": null, "tags": [], "translation_of": null, "urls": { "builds": "https://readthedocs.com/projects/pypa-pip/builds/", "documentation": "https://pypa-pip.readthedocs-hosted.com/en/latest/", "home": "https://readthedocs.com/projects/pypa-pip/", "versions": "https://readthedocs.com/projects/pypa-pip/versions/" } } ] }
Remote Organizations
Remote Organizations are the VCS organizations connected via
GitHub, GitLab and BitBucket.
- GET /api/v3/remote/organizations/
Retrieve a list of all Remote Organizations for the authenticated user.
Example request:
$ curl -H "Authorization: Token <token>" https://readthedocs.org/api/v3/remote/organizations/import requests URL = 'https://readthedocs.org/api/v3/remote/organizations/' TOKEN = '<token>' HEADERS = {'Authorization': f'token {TOKEN}'} response = requests.get(URL, headers=HEADERS) print(response.json())
Example response:
{ "count": 20, "next": "api/v3/remote/organizations/?limit=10&offset=10", "previous": null, "results": [ { "avatar_url": "https://avatars.githubusercontent.com/u/12345?v=4", "created": "2019-04-29T10:00:00Z", "modified": "2019-04-29T12:00:00Z", "name": "Organization Name", "pk": 1, "slug": "organization", "url": "https://github.com/organization", "vcs_provider": "github" } ] }
The
resultsin response is an array of remote organizations data.- Query Parameters
name (string) – return remote organizations with containing the name
vcs_provider (string) – return remote organizations for specific vcs provider (
github,gitlaborbitbucket)
- Request Headers
Authorization – token to authenticate.
Remote Repositories
Remote Repositories are the importable repositories connected via
GitHub, GitLab and BitBucket.
- GET /api/v3/remote/repositories/
Retrieve a list of all Remote Repositories for the authenticated user.
Example request:
$ curl -H "Authorization: Token <token>" https://readthedocs.org/api/v3/remote/repositories/?expand=projects,remote_organization
import requests URL = 'https://readthedocs.org/api/v3/remote/repositories/?expand=projects,remote_organization' TOKEN = '<token>' HEADERS = {'Authorization': f'token {TOKEN}'} response = requests.get(URL, headers=HEADERS) print(response.json())
Example response:
{ "count": 20, "next": "api/v3/remote/repositories/?expand=projects,remote_organization&limit=10&offset=10", "previous": null, "results": [ { "remote_organization": { "avatar_url": "https://avatars.githubusercontent.com/u/12345?v=4", "created": "2019-04-29T10:00:00Z", "modified": "2019-04-29T12:00:00Z", "name": "Organization Name", "pk": 1, "slug": "organization", "url": "https://github.com/organization", "vcs_provider": "github" }, "project": [{ "id": 12345, "name": "project", "slug": "project", "created": "2010-10-23T18:12:31+00:00", "modified": "2018-12-11T07:21:11+00:00", "language": { "code": "en", "name": "English" }, "programming_language": { "code": "py", "name": "Python" }, "repository": { "url": "https://github.com/organization/project", "type": "git" }, "default_version": "stable", "default_branch": "master", "subproject_of": null, "translation_of": null, "urls": { "documentation": "http://project.readthedocs.io/en/stable/", "home": "https://readthedocs.org/projects/project/" }, "tags": [ "test" ], "users": [ { "username": "dstufft" } ], "_links": { "_self": "/api/v3/projects/project/", "versions": "/api/v3/projects/project/versions/", "builds": "/api/v3/projects/project/builds/", "subprojects": "/api/v3/projects/project/subprojects/", "superproject": "/api/v3/projects/project/superproject/", "redirects": "/api/v3/projects/project/redirects/", "translations": "/api/v3/projects/project/translations/" } }], "avatar_url": "https://avatars3.githubusercontent.com/u/test-organization?v=4", "clone_url": "https://github.com/organization/project.git", "created": "2019-04-29T10:00:00Z", "description": "This is a test project.", "full_name": "organization/project", "html_url": "https://github.com/organization/project", "modified": "2019-04-29T12:00:00Z", "name": "project", "pk": 1, "ssh_url": "git@github.com:organization/project.git", "vcs": "git", "vcs_provider": "github", "default_branch": "master", "private": false, "admin": true } ] }
The
resultsin response is an array of remote repositories data.- Query Parameters
name (string) – return remote repositories containing the name
vcs_provider (string) – return remote repositories for specific vcs provider (
github,gitlaborbitbucket)organization (string) – return remote repositories for specific remote organization (using remote organization
slug)expand (string) – allows to add/expand some extra fields in the response. Allowed values are
projectsandremote_organization. Multiple fields can be passed separated by commas.
- Request Headers
Authorization – token to authenticate.
Embed
- GET /api/v3/embed/
Retrieve HTML-formatted content from documentation page or section. Read Embedding Content From Your Documentation to know more about how to use this endpoint.
Example request:
curl https://readthedocs.org/api/v3/embed/?url=https://docs.readthedocs.io/en/latest/features.html%23read-the-docs-featuresExample response:
{ "url": "https://docs.readthedocs.io/en/latest/features.html#read-the-docs-features", "fragment": "read-the-docs-features", "content": "<div class=\"section\" id=\"read-the-docs-features\">\n<h1>Read the Docs ...", "external": false }
- Response JSON Object
url (string) – URL of the document.
fragment (string) – fragmet part of the URL used to query the page.
content (string) – HTML content of the section.
external (string) – whether or not the page is hosted on Read the Docs or externally.
- Query Parameters
url (string) – full URL of the document (with optional fragment) to fetch content from.
doctool (string) – optional documentation tool key name used to generate the target documentation (currently, only
sphinxis accepted)doctoolversion (string) – optional documentation tool version used to generate the target documentation (e.g.
4.2.0).
Note
Passing
?doctool=and?doctoolversion=may improve the response, since the endpoint will know more about the exact structure of the HTML and can make better decisions.
Additional APIs
API v2
The Read the Docs API uses REST. JSON is returned by all API responses including errors and HTTP response status codes are to designate success and failure.
Warning
API v2 is planned to be deprecated soon, though we have not yet set a time frame for deprecation yet. We will alert users with our plans when we do.
For now, API v2 is still used by some legacy application operations still, but we highly recommend Read the Docs users use API v3 instead.
Some improvements in API v3 are:
Token based authentication
Easier to use URLs which no longer use numerical ids
More common user actions are exposed through the API
Improved error reporting
See its full documentation at API v3.
Resources
Projects
Projects are the main building block of Read the Docs. Projects are built when there are changes to the code and the resulting documentation is hosted and served by Read the Docs.
As an example, this documentation is part of the Docs project which has documentation at https://docs.readthedocs.io.
You can always view your Read the Docs projects in your project dashboard.
- GET /api/v2/project/
Retrieve a list of all Read the Docs projects.
Example request:
curl https://readthedocs.org/api/v2/project/?slug=pipExample response:
{ "count": 1, "next": null, "previous": null, "results": [PROJECTS] }
- Response JSON Object
next (string) – URI for next set of Projects.
previous (string) – URI for previous set of Projects.
count (integer) – Total number of Projects.
results (array) – Array of
Projectobjects.
- Query Parameters
slug (string) – Narrow the results by matching the exact project slug
- GET /api/v2/project/(int: id)/
Retrieve details of a single project.
{ "id": 6, "name": "Pip", "slug": "pip", "programming_language": "py", "default_version": "stable", "default_branch": "master", "repo_type": "git", "repo": "https://github.com/pypa/pip", "description": "Pip Installs Packages.", "language": "en", "documentation_type": "sphinx_htmldir", "canonical_url": "http://pip.pypa.io/en/stable/", "users": [USERS] }
- Response JSON Object
id (integer) – The ID of the project
name (string) – The name of the project.
slug (string) – The project slug (used in the URL).
programming_language (string) – The programming language of the project (eg. “py”, “js”)
default_version (string) – The default version of the project (eg. “latest”, “stable”, “v3”)
default_branch (string) – The default version control branch
repo_type (string) – Version control repository of the project
repo (string) – The repository URL for the project
description (string) – An RST description of the project
language (string) – The language code of this project
documentation_type (string) – An RST description of the project
canonical_url (string) – The canonical URL of the default docs
users (array) – Array of
UserIDs who are maintainers of the project.
- Status Codes
200 OK – no error
404 Not Found – There is no
Projectwith this ID
- GET /api/v2/project/(int: id)/active_versions/
Retrieve a list of active versions (eg. “latest”, “stable”, “v1.x”) for a single project.
{ "versions": [VERSION, VERSION, ...] }
- Response JSON Object
versions (array) – Version objects for the given
Project
See the Version detail call for the format of the
Versionobject.
Versions
Versions are different versions of the same project documentation
The versions for a given project can be viewed in a project’s version screen. For example, here is the Pip project’s version screen.
- GET /api/v2/version/
Retrieve a list of all Versions for all projects
{ "count": 1000, "previous": null, "results": [VERSIONS], "next": "https://readthedocs.org/api/v2/version/?limit=10&offset=10" }
- Response JSON Object
next (string) – URI for next set of Versions.
previous (string) – URI for previous set of Versions.
count (integer) – Total number of Versions.
results (array) – Array of
Versionobjects.
- Query Parameters
project__slug (string) – Narrow to the versions for a specific
Projectactive (boolean) – Pass
trueorfalseto show only active or inactive versions. By default, the API returns all versions.
- GET /api/v2/version/(int: id)/
Retrieve details of a single version.
{ "id": 1437428, "slug": "stable", "verbose_name": "stable", "built": true, "active": true, "type": "tag", "identifier": "3a6b3995c141c0888af6591a59240ba5db7d9914", "privacy_level": "public", "downloads": { "pdf": "//readthedocs.org/projects/pip/downloads/pdf/stable/", "htmlzip": "//readthedocs.org/projects/pip/downloads/htmlzip/stable/", "epub": "//readthedocs.org/projects/pip/downloads/epub/stable/" }, "project": {PROJECT}, }
- Response JSON Object
id (integer) – The ID of the version
verbose_name (string) – The name of the version.
slug (string) – The version slug.
built (string) – Whether this version has been built
active (string) – Whether this version is still active
type (string) – The type of this version (typically “tag” or “branch”)
identifier (string) – A version control identifier for this version (eg. the commit hash of the tag)
downloads (array) – URLs to downloads of this version’s documentation
project (object) – Details of the
Projectfor this version.
- Status Codes
200 OK – no error
404 Not Found – There is no
Versionwith this ID
Builds
Builds are created by Read the Docs whenever a Project has its documentation built.
Frequently this happens automatically via a web hook but can be triggered manually.
Builds can be viewed in the build screen for a project. For example, here is Pip’s build screen.
- GET /api/v2/build/
Retrieve details of builds ordered by most recent first
Example request:
curl https://readthedocs.org/api/v2/build/?project__slug=pipExample response:
{ "count": 100, "next": null, "previous": null, "results": [BUILDS] }
- Response JSON Object
next (string) – URI for next set of Builds.
previous (string) – URI for previous set of Builds.
count (integer) – Total number of Builds.
results (array) – Array of
Buildobjects.
- Query Parameters
project__slug (string) – Narrow to builds for a specific
Projectcommit (string) – Narrow to builds for a specific
commit
- GET /api/v2/build/(int: id)/
Retrieve details of a single build.
{ "id": 7367364, "date": "2018-06-19T15:15:59.135894", "length": 59, "type": "html", "state": "finished", "success": true, "error": "", "commit": "6f808d743fd6f6907ad3e2e969c88a549e76db30", "docs_url": "http://pip.pypa.io/en/latest/", "project": 13, "project_slug": "pip", "version": 3681, "version_slug": "latest", "commands": [ { "description": "", "start_time": "2018-06-19T20:16:00.951959", "exit_code": 0, "build": 7367364, "command": "git remote set-url origin git://github.com/pypa/pip.git", "run_time": 0, "output": "", "id": 42852216, "end_time": "2018-06-19T20:16:00.969170" }, ... ], ... }
- Response JSON Object
id (integer) – The ID of the build
date (string) – The ISO-8601 datetime of the build.
length (integer) – The length of the build in seconds.
type (string) – The type of the build (one of “html”, “pdf”, “epub”)
state (string) – The state of the build (one of “triggered”, “building”, “installing”, “cloning”, or “finished”)
success (boolean) – Whether the build was successful
error (string) – An error message if the build was unsuccessful
commit (string) – A version control identifier for this build (eg. the commit hash)
docs_url (string) – The canonical URL of the build docs
project (integer) – The ID of the project being built
project_slug (string) – The slug for the project being built
version (integer) – The ID of the version of the project being built
version_slug (string) – The slug for the version of the project being built
commands (array) – Array of commands for the build with details including output.
- Status Codes
200 OK – no error
404 Not Found – There is no
Buildwith this ID
Some fields primarily used for UI elements in Read the Docs are omitted.
Embed
- GET /api/v2/embed/
Retrieve HTML-formatted content from documentation page or section.
Example request:
curl https://readthedocs.org/api/v2/embed/?project=docs&version=latest&doc=features&path=features.htmlor
curl https://readthedocs.org/api/v2/embed/?url=https://docs.readthedocs.io/en/latest/features.htmlExample response:
{ "content": [ "<div class=\"section\" id=\"read-the-docs-features\">\n<h1>Read the Docs..." ], "headers": [ { "Read the Docs features": "#" }, { "Automatic Documentation Deployment": "#automatic-documentation-deployment" }, { "Custom Domains & White Labeling": "#custom-domains-white-labeling" }, { "Versioned Documentation": "#versioned-documentation" }, { "Downloadable Documentation": "#downloadable-documentation" }, { "Full-Text Search": "#full-text-search" }, { "Open Source and Customer Focused": "#open-source-and-customer-focused" } ], "url": "https://docs.readthedocs.io/en/latest/features", "meta": { "project": "docs", "version": "latest", "doc": "features", "section": "read the docs features" } }
- Response JSON Object
content (string) – HTML content of the section.
headers (object) – section’s headers in the document.
url (string) – URL of the document.
meta (object) – meta data of the requested section.
- Query Parameters
project (string) – Read the Docs project’s slug.
doc (string) – document to fetch content from.
version (string) – optional Read the Docs version’s slug (default:
latest).section (string) – optional section within the document to fetch.
path (string) – optional full path to the document including extension.
url (string) – full URL of the document (and section) to fetch content from.
Note
You can call this endpoint by sending at least
projectanddocorurlattribute.
Undocumented resources and endpoints
There are some undocumented endpoints in the API. These should not be used and could change at any time. These include:
The search API (
/api/v2/search/)Endpoints for returning footer and version data to be injected into docs. (
/api/v2/footer_html)Endpoints used for advertising (
/api/v2/sustainability/)Any other endpoints not detailed above.
Read the Docs for Business
Read the Docs has a commercial offering with improved support and additional features.
Read the Docs for Business: Organizations | Single Sign On | Project Privacy Level | Sharing externally
Read the Docs for Business
Read the Docs is our community solution for open source projects at readthedocs.org and we offer Read the Docs for Business for building and hosting commercial documentation at readthedocs.com. Features in this section are specific to Read the Docs for Business.
- Private repositories and private documentation
The largest difference between the community solution and our commercial offering is the ability to connect to private repositories, to restrict documentation access to certain users, or to share private documentation via private hyperlinks.
- Additional build resources
Do you have a complicated build process that uses large amounts of CPU, memory, disk, or networking resources? Our commercial offering has much higher default resources that result in faster documentation build times and we can increase it further for very demanding projects.
- Priority support
We have a dedicated support team that responds to support requests during business hours. If you need a quick turnaround, please signup for readthedocs.com.
- Advertising-free
All commercially hosted documentation is always ad-free.
Organizations
Note
This feature only exists on Read the Docs for Business.
Organizations allow you to segment who has access to what projects in your company. Your company will be represented as an Organization, let’s use ACME Corporation as our example.
ACME has a few people inside their organization, some who need full access and some who just need access to one project.
Member Types
Owners – Get full access to both view and edit the Organization and all Projects
Members – Get access to a subset of the Organization projects
Teams – Where you give members access to a set of projects.
The best way to think about this relationship is:
Owners will create Teams to assign permissions to all Members.
Warning
Owners, Members and Teams behave differently if you are using SSO with VCS provider (GitHub, Bitbucket or GitLab)
Team Types
You can create two types of Teams:
Admins – These teams have full access to administer the projects in the team. They are allowed to change all of the settings, set notifications, and perform any action under the Admin tab.
Read Only – These teams are only able to read and search inside the documents.
Example
ACME would set up Owners of their organization, for example Frank Roadrunner would be an owner. He has full access to the organization and all projects.
Wile E. Coyote is a contractor, and will just have access to the new project Road Builder.
Roadrunner would set up a Team called Contractors. That team would have Read Only access to the Road Builder project. Then he would add Wile E. Coyote to the team. This would give him access to just this one project inside the organization.
Single Sign-On
Note
This feature only exists on Read the Docs for Business.
Single sign-on is supported on Read the Docs for Business for all users. SSO will allow you to grant permissions to your organization’s projects in an easy way.
Currently, we support two different types of single sign-on:
Authentication and authorization are managed by the identity provider (e.g. GitHub, Bitbucket or GitLab)
Authentication (only) is managed by the identity provider (e.g. an active Google Workspace account with a verified email address)
Users can log out by using the Log Out link in the RTD flyout menu.
SSO with VCS provider (GitHub, Bitbucket or GitLab)
Using an identity provider that supports authentication and authorization allows you to manage who has access to projects on Read the Docs, directly from the provider itself. If a user needs access to your documentation project on Read the Docs, that user just needs to be granted permissions in the VCS repository associated with the project.
You can enable this feature in your organization by going to your organization’s detail page > Settings > Authorization and selecting GitHub, GitLab or Bitbucket as provider.
Note the users created under Read the Docs must have their GitHub, Bitbucket or GitLab account connected in order to make SSO work. You can read more about granting permissions on GitHub.
Warning
Once you enable this option, your existing Read the Docs teams will not be used.
Grant access to read the documentation
By granting read (or more) permissions to a user in the VCS repository you are giving access to read the documentation of the associated project on Read the Docs to that user.
Grant access to administrate a project
By granting write permission to a user in the VCS repository you are giving access to read the documentation and to be an administrator of the associated project on Read the Docs to that user.
Grant access to import a project
When SSO with a VCS provider is enabled, only owners of the Read the Docs organization can import projects. Adding users as owners of your organization will give them permissions to import projects.
Note that to be able to import a project, that user must have admin permissions in the VCS repository associated.
Revoke access to a project
If a user should not have access anymore to a project, for any reason, a VCS repository’s admin (e.g. user with Admin role on GitHub for that specific repository) can revoke access to the VCS repository and this will be automatically reflected in Read the Docs.
The same process is followed in case you need to remove admin access, but still want that user to have access to read the documentation. Instead of revoking access completely, just need lower down permissions to read only.
SSO with Google Workspace
Note
Google Workspace was formerly called G Suite
Using your company’s Google email address (e.g. employee@company.com) allows you to
manage authentication for your organization’s members.
As this identity provider does not provide authorization over each repositories/projects per user,
permissions are managed by the internal Read the Docs’s teams authorization system.
By default, users that sign up with a Google account do not have any permissions over any project. However, you can define which teams users matching your company’s domain email address will auto-join when they sign up. Read the following sections to learn how to grant read and admin access.
You can enable this feature in your organization by going to your organization’s detail page > Settings > Authorization and selecting Google as provider and specifying your Google Workspace domain in the Domain field.
Grant access to read a project
You can add a user under a read-only team to grant read permissions to all the projects under that team. This can be done under your organization’s detail page > Teams > Read Only > Invite Member.
To avoid this repetitive task for each employee of your company, the owner of the Read the Docs organization can mark one or many teams for users matching the company’s domain email to join these teams automaically when they sign up.
For example, you can create a team with the projects that all employees of your company should have access to
and mark it as Auto join users with an organization’s email address to this team.
Then all users that sign up with their employee@company.com email will automatically join this team and have read access to those projects.
Grant access to administer a project
You can add a user under an admin team to grant admin permissions to all the projects under that team. This can be done under your organization’s detail page > Teams > Admins > Invite Member.
Grant access to users to import a project
Making the user member of any admin team under your organization (as mentioned in the previous section), they will be granted access to import a project.
Note that to be able to import a project, that user must have admin permissions in the GitHub, Bitbucket or GitLab repository associated, and their social account connected with Read the Docs.
Revoke user’s access to a project
To revoke access to a project for a particular user, you should remove that user from the team that contains that project. This can be done under your organization’s detail page > Teams > Read Only and click Remove next to the user you want to revoke access.
Revoke user’s access to all the projects
By disabling the Google Workspace account with email employee@company.com,
you revoke access to all the projects that user had access and disable login on Read the Docs completely for that user.
Project Privacy Level
Note
This feature only exists on Read the Docs for Business.
By default, only users that belong to your organization can see the dashboard of your project and its builds.
If you want users outside your organization and anonymous users to be able to see the dashboard of your project,
and the build output of public versions you can set the privacy level of your project to Public.
Go the Admin tab of your project.
Click on Advanced Settings.
Change to Privacy level to
Public.
Note
To control access to the documentation itself, see Privacy levels.
The Read the Docs project and organization
Learn about Read the Docs, the project and the company, and find out how you can get involved and contribute to the development and success of Read the Docs and the larger software documentation ecosystem.
Policies & Process: Security | DMCA takedown policy | Policy for abandoned projects | Release notes & changelog
The people and philosophy behind Read the Docs: About Us | Team | Open source philosophy | Our story
Financial and material support: Advertising | Sponsors
Legal documents: Terms of service | Privacy policy | Data processing agreement
Getting involved with Read the Docs: Glossary | /gsoc`| :doc:`Developer Documentation
Security
Security is very important to us at Read the Docs. We follow generally accepted industry standards to protect the personal information submitted to us, both during transmission and once we receive it. In the spirit of transparency, we are committed to responsible reporting and disclosure of security issues.
Account security
All traffic is encrypted in transit so your login is protected.
Read the Docs stores only one-way hashes of all passwords. Nobody at Read the Docs has access to your passwords.
Account login is protected from brute force attacks with rate limiting.
While most projects and docs on Read the Docs are public, we treat your private repositories and private documentation as confidential and Read the Docs employees may only view them with your explicit permission in response to your support requests, or when required for security purposes.
You can read more about account privacy in our Privacy Policy.
Reporting a security issue
If you believe you’ve discovered a security issue at Read the Docs, please contact us at security@readthedocs.org (optionally using our PGP key). We request that you please not publicly disclose the issue until it has been addressed by us.
You can expect:
We will respond acknowledging your email typically within one business day.
We will follow up if and when we have confirmed the issue with a timetable for the fix.
We will notify you when the issue is fixed.
We will add the issue to our security issue archive.
PGP key
You may use this PGP key
to securely communicate with us and to verify signed messages you receive from us.
Security issue archive
Version 5.19.0
Version 5.19.0 fixes an issue that allowed a malicious user to fetch internal and private information from a logged user in readthedocs.org/readthedocs.com by creating a malicious site hosted on readthedocs.io/readthedocs-hosted.com or from any custom domain registered in the platform.
It would have required the attacker to get a logged in user to visit an attacker controlled web page, which could then have made GET API requests on behalf of the user. This vulnerability was found by our team as part of a routine security audit, and there is no indication it was exploited.
The issue was found by the Read the Docs team.
Version 5.14.0
Version 5.14.0 fixes an issue where that affected new code that removed multiple slashes in URL paths. The issue allowed the creation of hyperlinks that looked like they would go to a documentation domain on Read the Docs (either *.readthedocs.io or a custom docs domain)) but instead went to a different domain.
This issue was reported by Splunk after it was reported by a security audit.
Version 3.5.1
Version 3.5.1 fixed an issue that affected projects with “prefix” or “sphinx” user-defined redirects.
The issue allowed the creation of hyperlinks that looked like they would go to a documentation domain
on Read the Docs (either *.readthedocs.io or a custom docs domain) but instead went to a different domain.
This issue was reported by Peter Thomassen and the desec.io DNS security project and was funded by SSE.
Version 3.2.0
Version 3.2.0 resolved an issue where a specially crafted request could result in a DNS query to an arbitrary domain.
This issue was found by Cyber Smart Defence who reported it as part of a security audit to a firm running a local installation of Read the Docs.
Release 2.3.0
Version 2.3.0 resolves a security issue with translations on our community hosting site that allowed users to modify the hosted path of a target project by adding it as a translation project of their own project. A check was added to ensure project ownership before adding the project as a translation.
In order to add a project as a translation now, users must now first be granted ownership in the translation project.
DMCA Takedown Policy
These are the guidelines that Read the Docs follows when handling DMCA takedown requests and takedown counter requests. If you are a copyright holder wishing to submit a takedown request, or an author that has been notified of a takedown request, please familiarize yourself with our process. You will be asked to confirm that you have reviewed information if you submit a request or counter request.
We aim to keep this entire process as transparent as possible. Our process is modeled after GitHub’s DMCA takedown process, which we appreciate for its focus on transparency and fairness. All requests and counter requests will be posted to this page below, in the Request Archive. These requests will be redacted to remove all identifying information, except for Read the Docs user and project names.
Takedown Process
Here are the steps the Read the Docs will follow in the takedown request process:
- Copyright holder submits a request
This request, if valid, will be posted publicly on this page, down below. The author affected by the takedown request will be notified with a link to the takedown request.
For more information on submitting a takedown request, see: Submitting a Request
- Author is contacted
The author of the content in question will be asked to make changes to the content specified in the takedown request. The author will have 24 hours to make these changes. The copyright holder will be notified if and when this process begins
- Author acknowledges changes have been made
The author must notify Read the Docs that changes have been made within 24 hours of receiving a takedown request. If the author does not respond to this request, the default action will be to disable the Read the Docs project and remove any hosted versions
- Copyright holder review
If the author has made changes, the copyright holder will be notified of these changes. If the changes are sufficient, no further action is required, though copyright holders are welcome to submit a formal retraction. If the changes are not sufficient, the author’s changes can be rejected. If the takedown request requires alteration, a new request must be submitted. If Read the Docs does not receive a review response from the copyright holder within 2 weeks, the default action at this step is to assume the takedown request has been retracted.
- Content may be disabled
If the author does not respond to a request for changes, or if the copyright holder has rejected the author’s changes during the review process, the documentation project in question will be disabled.
- Author submits a counter request
If the author believes their content was disabled as a result of a mistake, a counter request may be submitted. It would be advised that authors seek legal council before continuing. If the submitted counter request is sufficiently detailed, this counter will also be added to this page. The copyright holder will be notified, with a link to this counter request.
For more information on submitting a counter request, see: Submitting a Counter
- Copyright holder may file legal action
At this point, if the copyright holder wishes to keep the offending content disabled, the copyright holder must file for legal action ordering the author refrain from infringing activities on Read the Docs. The copyright holder will have 2 weeks to supply Read the Docs with a copy of a valid legal complaint against the author. The default action here, if the copyright holder does not respond to this request, is to re-enable the author’s project.
Submitting a Request
Your request must:
- Acknowledge this process
You must first acknowledge you are familiar with our DMCA takedown request process. If you do not acknowledge that you are familiar with our process, you will be instructed to review this information.
- Identify the infringing content
You should list URLs to each piece of infringing content. If you allege that the entire project is infringing on copyrights you hold, please specify the entire project as infringing.
- Identify infringement resolution
You will need to specify what a user must do in order to avoid having the rest of their content disabled. Be as specific as possible with this. Specify if this means adding attribution, identify specific files or content that should be removed, or if you allege the entire project is infringing, your should be specific as to why it is infringing.
- Include your contact information
Include your name, email, physical address, and phone number.
- Include your signature
This can be a physical or electronic signature.
Please complete this takedown request template and send it to: support@readthedocs.com
Submitting a Counter
Your counter request must:
- Acknowledge this process
You must first acknowledge you are familiar with our DMCA takedown request process. If you do not acknowledge that you are familiar with our process, you will be instructed to review this information.
- Identify the infringing content that was removed
Specify URLs in the original takedown request that you wish to challenge.
- Include your contact information
Include your name, email, physical address, and phone number.
- Include your signature
This can be a physical or electronic signature.
Requests can be submitted to: support@readthedocs.com
Request Archive
For better transparency into copyright ownership and the DMCA takedown process, Read the Docs maintains this archive of previous DMCA takedown requests. This is modeled after GitHub’s DMCA archive.
The following DMCA takedown requests have been submitted:
2022-06-07
Note
The project maintainer was notified about this report and instructed to submit a counter if they believed this request was invalid. The user removed the project manually, and no further action was required.
- Are you the copyright owner or authorized to act on the copyright owner’s behalf?
Yes
- What work was allegedly infringed? If possible, please provide a URL:
- What files or project should be taken down? You should list URLs to each piece of infringing content. If you allege that the entire project is infringing on copyrights you hold, please specify the entire project as infringing:
- Is the work licensed under an open source license?
No
- What would be the best solution for the alleged infringement?
Complete Removal.
- Do you have the alleged infringer’s contact information? Yes. If so, please provide it:
[private]
- Type (or copy and paste) the following statement: “I have a good faith belief that use of the copyrighted materials described above on the infringing web pages is not authorized by the copyright owner, or its agent, or the law. I have taken fair use into consideration.”
I have a good faith belief that use of the copyrighted materials described above on the infringing web pages is not authorized by the copyright owner, or its agent, or the law. I have taken fair use into consideration.
- Type (or copy and paste) the following statement: “I swear, under penalty of perjury, that the information in this notification is accurate and that I am the copyright owner, or am authorized to act on behalf of the owner, of an exclusive right that is allegedly infringed.”
I swear, under penalty of perjury, that the information in this notification is accurate and that I am the copyright owner, or am authorized to act on behalf of the owner, of an exclusive right that is allegedly infringed.
- Please confirm that you have read our Takedown Policy: https://docs.readthedocs.io/en/latest/dmca/index.html
Yes
- So that we can get back to you, please provide either your telephone number or physical address:
[private]
- Please type your full legal name below to sign this request:
[private]
Policy for Abandoned Projects
This policy describes the process by which a Read the Docs project name may be changed.
Rationale
Conflict between the current use of the name and a different suggested use of the same name occasionally arise. This document aims to provide general guidelines for solving the most typical cases of such conflicts.
Specification
The main idea behind this policy is that Read the Docs serves the community. Every user is invited to upload content under the Terms of Use, understanding that it is at the sole risk of the user.
While Read the Docs is not a backup service, the core team of Read the Docs does their best to keep that content accessible indefinitely in its published form. However, in certain edge cases the greater community’s needs might outweigh the individual’s expectation of ownership of a project name.
The use cases covered by this policy are:
- Abandoned projects
Renaming a project so that the original project name can be used by a different project
- Active projects
Resolving disputes over a name
Implementation
Reachability
The user of Read the Docs is solely responsible for being reachable by the core team for matters concerning projects that the user owns. In every case where contacting the user is necessary, the core team will try to do so at least three times, using the following means of contact:
E-mail address on file in the user’s profile
E-mail addresses found in the given project’s documentation
E-mail address on the project’s home page
The core team will stop trying to reach the user after six weeks and the user will be considered unreachable.
Abandoned projects
A project is considered abandoned when ALL of the following are met:
Owner is unreachable (see Reachability)
The project has no proper documentation being served (no successful builds) or does not have any releases within the past twelve months
No activity from the owner on the project’s home page (or no home page found).
All other projects are considered active.
Renaming of an abandoned project
Projects are never renamed solely on the basis of abandonment.
An abandoned project can be renamed (by appending -abandoned and a
uniquifying integer if needed) for purposes of reusing the name when ALL of the
following are met:
The project has been determined abandoned by the rules described above
The candidate is able to demonstrate their own failed attempts to contact the existing owner
The candidate is able to demonstrate that the project suggested to reuse the name already exists and meets notability requirements
The candidate is able to demonstrate why a fork under a different name is not an acceptable workaround
The project has fewer than 100 monthly pageviews
The core team does not have any additional reservations.
Name conflict resolution for active projects
The core team of Read the Docs are not arbiters in disputes around active projects. The core team recommends users to get in touch with each other and solve the issue by respectful communication.
Prior art
The Python Package Index (PyPI) policy for claiming abandoned packages (PEP-0541) heavily influenced this policy.
Changelog
Version 8.4.0
- Date
August 16, 2022
@benjaoming: Docs: sphinxcontrib-video was added incorrectly (#9501)
@agjohnson: Fix typo in build concurrency logging (#9499)
@stsewd: Custom urlconf: support serving static files (#9496)
@humitos: Build: unpin Pillow for unsupported Python versions (#9473)
@benjaoming: Docs: Read the Docs for Science - new alternative with sphinx-design (#9460)
@stsewd: Ask for confirmation when adding a user to a project/organization/team (#9440)
Version 8.3.7
- Date
August 09, 2022
@humitos: Build: unpin Pillow for unsupported Python versions (#9473)
@stsewd: Redirects: check only for hostname and path for infinite redirects (#9463)
@benjaoming: Fix missing indentation on reStructuredText badge code (#9404)
@stsewd: Embed JS: fix incompatibilities with sphinx 6.x (jquery removal) (#9359)
Version 8.3.6
- Date
August 02, 2022
@stsewd: Build: use correct build environment for build.commands (#9454)
@benjaoming: Docs: Fixes warnings and other noisy build messages (#9453)
@ericholscher: Release 8.3.5 (#9452)
@humitos: GitHub Action: add link to Pull Request preview (#9450)
@humitos: OAuth: add logging for GitHub RemoteRepository (#9449)
@benjaoming: Docs: Adds Jupyter Book to examples table (#9446)
@humitos: Docs:
poetryexample onbuild.jobssection (#9445)
Version 8.3.5
- Date
July 25, 2022
@humitos: GitHub Action: add link to Pull Request preview (#9450)
@humitos: OAuth: add logging for GitHub RemoteRepository (#9449)
@benjaoming: Docs: Adds Jupyter Book to examples table (#9446)
@humitos: Docs:
poetryexample onbuild.jobssection (#9445)@agjohnson: Update env var docs (#9443)
@ericholscher: Update dev domain to
devthedocs.org(#9442)@humitos: Docs: mention
docsifyon “Build customization” (#9439)
Version 8.3.4
- Date
July 19, 2022
Version 8.3.3
- Date
July 12, 2022
@davidfischer: Stickybox ad fix (#9421)
@humitos: OAuth: unify the exception used for the user message (#9415)
@humitos: Docs: improve the flyout page to include a full example (#9413)
@humitos: OAuth: resync
RemoteRepositoryweekly for active users (#9410)@stsewd: Analytics: make sure there is only one record with version=None (#9408)
@agjohnson: Add frontend team codeowners rules (#9407)
@naveensrinivasan: chore: Included githubactions in the dependabot config (#9396)
@benjaoming: Docs: Add an examples section (#9371)
Version 8.3.2
- Date
July 05, 2022
@neilnaveen: chore: Set permissions for GitHub actions (#9394)
@stsewd: Telemetry: skip listing conda packages on non-conda envs (#9390)
@ericholscher: UX: Improve DUPLICATED_RESERVED_VERSIONS error (#9383)
@ericholscher: Release 8.3.1 (#9379)
@ericholscher: Properly log build exceptions in Celery (#9375)
@humitos: Middleware: use regular
HttpResponseand log the suspicious operation (#9366)@ericholscher: Add an explicit flyout placement option (#9357)
@stsewd: PR previews: Warn users when enabling the feature on incompatible projects (#9291)
Version 8.3.1
- Date
June 27, 2022
@ericholscher: Properly log build exceptions in Celery (#9375)
@humitos: Development: default value for environment variable (#9370)
@humitos: Middleware: use regular
HttpResponseand log the suspicious operation (#9366)@humitos: Development: remove silent and use long attribute name (#9363)
@ericholscher: Fix glossary ordering (#9362)
@benjaoming: Do not list feature overview twice (#9361)
@agjohnson: Release 8.3.0 (#9358)
@ericholscher: Add an explicit flyout placement option (#9357)
@humitos: Development: allow to pass
--ngrokwhen starting up (#9353)@humitos: Development: avoid path collision when running multiple builders (#9352)
@humitos: Security: avoid requests with NULL characters (0x00) on GET (#9350)
@humitos: Build: handle 422 response on send build status (#9347)
@benjaoming: Updates and fixes to Development Install guide (#9319)
@agjohnson: Add DMCA takedown request for project dicom-standard (#9311)
Version 8.3.0
- Date
June 20, 2022
@humitos: Security: avoid requests with NULL characters (0x00) on GET (#9350)
@stsewd: Subscriptions: log subscription id when canceling (#9340)
@stsewd: Search: support section titles inside header tags (#9339)
@humitos: Local development: use
nodemonto watch files instead ofwatchmedo(#9338)@humitos: EmbedAPI: clean images (
src) properly from inside a tooltip (#9337)@stsewd: Gold: log if the subscription has more than one item (#9334)
@humitos: EmbedAPI: handle special case for Sphinx manual references (#9333)
@benjaoming: Add
mcclient towebcontainer (#9331)@humitos: Translations: migrate
tx/configto new client’s version format (#9327)@benjaoming: Docs: Improve scoping of two potentially overlapping Triage sections (#9302)
Version 8.2.0
- Date
June 14, 2022
@ericholscher: Docs: Small edits to add a couple keywords and clarify headings (#9329)
@humitos: Translations: integrate Transifex into our Docker tasks (#9326)
@stsewd: Subscriptions: handle subscriptions with multiple products/plans/items (#9320)
@benjaoming: Update the team page (#9309)
@ericholscher: Release 8.1.2 (#9300)
@ericholscher: Fix Docs CI (#9299)
@agjohnson: Update mentions of our roadmap to be current (#9293)
@stsewd: lsremote: set max split when parsing remotes (#9292)
@humitos: Tests: make
tests-embedapirequire regulartestsfirst (#9289)@ericholscher: Truncate output that we log from commands to 10 lines (#9286)
Version 8.1.2
- Date
June 06, 2022
@ericholscher: Fix Docs CI (#9299)
@agjohnson: Update mentions of our roadmap to be current (#9293)
@stsewd: lsremote: set max split when parsing remotes (#9292)
@humitos: Tests: make
tests-embedapirequire regulartestsfirst (#9289)@agjohnson: Update 8.1.1 changelog with hotfixes (#9288)
@stsewd: Cancel build: get build from the current project (#9287)
@saadmk11: Remote repository: Add user admin action for syncing remote repositories (#9272)
Version 8.1.1
- Date
Jun 1, 2022
Version 8.1.0
- Date
May 24, 2022
@humitos: Assets: update
package-lock.jsonwith newer versions (#9262)@agjohnson: Improve contributing dev doc (#9260)
@agjohnson: Update translations, pull from Transifex (#9259)
@humitos: Build: solve problem with sanitized output (#9257)
@humitos: Docs: improve “Environment Variables” page (#9256)
@humitos: Docs: jsdoc example using
build.jobsandbuild.tools(#9241)@stsewd: Docker environment: check for None on stdout/stderr response (#9238)
@stsewd: Proxied static files: use its own storage class (#9237)
@ericholscher: Release 8.0.2 (#9234)
@humitos: Development: only pull the images required (#9182)
@stsewd: Proxito: serve static files from the same domain as the docs (#9168)
@humitos: Project: use
RemoteRepositoryto definedefault_branch(#8988)@humitos: Design doc: forward path to a future builder (#8190)
Version 8.0.2
- Date
May 16, 2022
@agjohnson: Disable codecov annotations (#9186)
@choldgraf: Note sub-folders with a single domain. (#9185)
@stsewd: BuildCommand: add option to merge or not stderr with stdout (#9184)
@agjohnson: Fix bumpver issue (#9181)
@agjohnson: Release 8.0.1 (#9180)
@agjohnson: Spruce up docs on pull request builds (#9177)
@ericholscher: Fix RTD branding in the code (#9175)
@agjohnson: Fix copy issues on model fields (#9170)
@stsewd: Proxito: serve static files from the same domain as the docs (#9168)
@stsewd: User: delete organizations where the user is the last owner (#9164)
@ericholscher: Add a basic djstripe integration (#9087)
@stsewd: Custom domains: don’t allow adding a custom domain on subprojects (#8953)
Version 8.0.1
- Date
May 09, 2022
@ericholscher: Fix RTD branding in the code (#9175)
@ericholscher: Remove our old out-dated architecture diagram (#9169)
@humitos: Docs: mention
ubuntu-22.04as a valid option (#9166)@ericholscher: Initial test of adding plan to CDN (#9163)
@ericholscher: Fix links in docs from the build page refactor (#9162)
@ericholscher: Note build.jobs required other keys (#9160)
@ericholscher: Add docs showing pip-tools usage on dependencies (#9158)
@ericholscher: Expierment with pip-tools for our docs.txt requirements (#9124)
@ericholscher: Add a basic djstripe integration (#9087)
Version 8.0.0
- Date
May 03, 2022
Note
We are upgrading to Ubuntu 22.04 LTS and also to Python 3.10.
Projects using Mamba with the old feature flag, and now removed, CONDA_USES_MAMBA,
have to update their .readthedocs.yaml file to use build.tools.python: mambaforge-4.10
to continue using Mamba to create their environment.
See more about build.tools.python at https://docs.readthedocs.io/en/stable/config-file/v2.html#build-tools-python
@humitos: Mamba: remove CONDA_USES_MAMBA feature flag (#9153)
@ericholscher: Remove prebuild step so docs keep working (#9143)
@ericholscher: Release 7.6.2 (#9140)
@humitos: Docs: feature documentation for
build.jobs(#9138)@humitos: External versions: save state (open / closed) (#9128)
@OriolAbril: add note on setting locale_dirs (#8972)
Version 7.6.2
- Date
April 25, 2022
@stsewd: Analytics: add feature flag to skip tracking 404s (#9131)
@humitos: External versions: save state (open / closed) (#9128)
@stsewd: git: respect SKIP_SYNC_* flags when using lsremote (#9125)
@agjohnson: Release 7.6.1 (#9123)
@pyup-bot: pyup: Scheduled weekly dependency update for week 16 (#9121)
@thomasrockhu-codecov: ci: add informational Codecov status checks (#9119)
@stsewd: Build: use gvisor for projects using build.jobs (#9114)
@humitos: Docs: call
linkcheckSphinx builder for our docs (#9091)
Version 7.6.1
- Date
April 19, 2022
Version 7.6.0
- Date
April 12, 2022
@stsewd: Celery: workaround fix for bug on retrying builds (#9096)
@ericholscher: Try to fix .com tests (#9092)
@humitos: Notification: don’t send it on build retry (#9086)
@humitos: Build: bugfix
RepositoryError.CLONE_ERRORmessage (#9083)@stsewd: Proxito: only check for index files if there is a version (#9079)
@stsewd: Adapt scripts and docs to make use of the new github personal tokens (#9078)
@ericholscher: Release 7.5.1 (#9074)
@pyup-bot: pyup: Scheduled weekly dependency update for week 14 (#9073)
@agjohnson: Add gVisor runtime option for build containers (#9066)
@humitos: Proxito: do not serve non-existent versions (#9048)
@humitos: SyncRepositoryTask: rate limit to 1 per minute per project (#9021)
@humitos: Build: implement
build.jobsconfig file key (#9016)
Version 7.5.1
- Date
April 04, 2022
@humitos: Build: use same hack for VCS and build environments (#9055)
@ericholscher: Fix jinja2 on embed tests (#9053)
@jsquyres: director.py: restore READTHEDOCS_VERSION_[TYPE|NAME] (#9052)
@ericholscher: Fix tests around jinja2 (#9050)
@humitos: Build: do not send VCS build status on specific exceptions (#9049)
@humitos: Proxito: do not serve non-existent versions (#9048)
@agjohnson: Release 7.5.0 (#9047)
@humitos: Build: Mercurial (
hg) compatibility with old versions (#9042)@eyllanesc: Fixes link (#9041)
@ericholscher: Fix jinja2 pinning on Sphinx 1.8 feature flagged projects (#9036)
@humitos: SyncRepositoryTask: rate limit to 1 per minute per project (#9021)
@humitos: Build: use same build environment for setup and build (#9018)
@humitos: Build: implement
build.jobsconfig file key (#9016)@abravalheri: Improve displayed version name when building from PR (#8237)
Version 7.5.0
- Date
March 28, 2022
@humitos: Build: Mercurial (
hg) compatibility with old versions (#9042)@eyllanesc: Fixes link (#9041)
@ericholscher: Fix jinja2 pinning on Sphinx 1.8 feature flagged projects (#9036)
@agjohnson: Add bumpver configuration (#9029)
@davidfischer: Update the community ads application link (#9028)
@ericholscher: Don’t use master branch explicitly in requirements (#9025)
@humitos: GitHub OAuth: use bigger pages to make fewer requests (#9020)
@humitos: Build: use same build environment for setup and build (#9018)
@pyup-bot: pyup: Scheduled weekly dependency update for week 11 (#9012)
@humitos: Build: allow users to use Ubuntu 22.04 LTS (#9009)
@humitos: Build: proof of concept for pre/post build commands (
build.jobs) (#9002)
Version 7.4.2
- Date
March 14, 2022
@agjohnson: Release 7.4.1 (#9004)
@pyup-bot: pyup: Scheduled weekly dependency update for week 10 (#9003)
@humitos: API: validate
RemoteRepositorywhen creating aProject(#8983)@dogukanteber: Use django-storages’ manifest files class instead of the overriden class (#8781)
@abravalheri: Improve displayed version name when building from PR (#8237)
Version 7.4.1
- Date
March 07, 2022
@humitos: Requirements: remove
django-permissions-policy(#8987)@stsewd: Archive builds: avoid filtering by commands__isnull (#8986)
@humitos: API: validate
RemoteRepositorywhen creating aProject(#8983)@humitos: Celery: trigger
archive_buildsfrequently with a lower limit (#8981)@pyup-bot: pyup: Scheduled weekly dependency update for week 09 (#8977)
@stsewd: MkDocs: allow None on extra_css/extra_javascript (#8976)
@stsewd: Docs: warn about custom domains on subprojects (#8945)
@dogukanteber: Use django-storages’ manifest files class instead of the overriden class (#8781)
@nienn: Docs: Add links to documentation on creating custom classes (#8466)
@stsewd: Integrations: allow to pass more data about external versions (#7692)
Version 7.4.0
- Date
March 01, 2022
@humitos: Celery: increase timeout limit for
sync_remote_repositoriestask (#8974)@agjohnson: Fix a couple integration admin bugs (#8964)
@humitos: Build: allow NULL when updating the config (#8962)
@agjohnson: Release 7.3.0 (#8957)
@pyup-bot: pyup: Scheduled weekly dependency update for week 08 (#8954)
@humitos: Requirements: upgrade gitpython because of security issue (#8950)
@agjohnson: Pin storages with boto3 (#8947)
@humitos: Build: reset build error before start building (#8943)
@humitos: Django3: use new JSON fields instead of old TextFields (#8934)
@humitos: Build: ability to cancel a running build from dashboard (#8850)
Version 7.3.0
- Date
February 21, 2022
@humitos: Requirements: upgrade gitpython because of security issue (#8950)
@agjohnson: Pin storages with boto3 (#8947)
@humitos: Build: reset build error before start building (#8943)
@humitos: Django3: use new JSON fields instead of old TextFields (#8934)
@agjohnson: Tune build config migration (#8931)
@humitos: Build: use
ubuntu-20.04image for setup VCS step (#8930)@humitos: Sentry and Celery: do not log
RepositoryErrorin Sentry (#8928)@ericholscher: Add x-hoverxref-version to CORS (#8927)
@humitos: Deploy: avoid locking the table when adding new JSON field (#8926)
@pyup-bot: pyup: Scheduled weekly dependency update for week 07 (#8915)
Version 7.2.1
- Date
February 15, 2022
@humitos: Build: do not send notifications on known failed builds (#8918)
@humitos: Celery: use
on_retryto handleBuildMaxConcurrencyError(#8917)@agjohnson: Throw an exception from Celery retry() (#8905)
@agjohnson: Reduce verbose logging on generic command failure (#8904)
@humitos: Build: allow to not record commands on sync_repository_task (#8899)
@stsewd: Support for CDN when privacy levels are enabled (#8896)
@ericholscher: Don’t be so excited always in our emails :) (#8888)
@humitos: Django3: delete old JSONField and use the new ones (#8869)
@humitos: Django3: add new
django.db.models.JSONField(#8868)
Version 7.2.0
- Date
February 08, 2022
@ericholscher: Don’t be so excited always in our emails :) (#8888)
@stsewd: CI: Don’t install debug tools when running tests (#8882)
@agjohnson: Fix issue with build task routing and config argument (#8877)
@humitos: Celery: use an internal namespace to store build task’s data (#8874)
@agjohnson: Release 7.1.2 (#8873)
@agjohnson: Release 7.1.1 (#8872)
@humitos: Task router: check new config
build.tools.pythonfor conda (#8855)
Version 7.1.2
- Date
January 31, 2022
Version 7.1.1
- Date
January 31, 2022
@humitos: Task router: check new config
build.tools.pythonfor conda (#8855)@stsewd: AuditLog: always fill organization id & slug (#8846)
@humitos: Docs: remove beta warning from config file’s
buildkey (#8843)@agjohnson: Fix more casing issues (#8842)
@agjohnson: Update choosing a platform doc (#8837)
@pyup-bot: pyup: Scheduled weekly dependency update for week 04 (#8835)
Version 7.1.0
- Date
January 25, 2022
@astrojuanlu: Detail what URLs are expected in issue template (#8832)
@humitos: Cleanup: delete unused Django management commands (#8830)
@simonw: Canonical can point as stable, not just latest (#8828)
@davidfischer: Use stickybox ad placement on RTD themed projects (#8823)
@ericholscher: Quiet the Unresolver logging (#8822)
@stsewd: Workaround for HttpExchange queries casting IDs as uuid/int wrongly (#8821)
@ericholscher: Release 7.0.0 (#8818)
@pyup-bot: pyup: Scheduled weekly dependency update for week 03 (#8817)
Version 7.0.0
This is our 7th major version! This is because we are upgrading to Django 3.2 LTS.
- Date
January 17, 2022
@agjohnson: Release 6.3.3 (#8806)
@agjohnson: Fix linting issue on project private view (#8805)
@pyup-bot: pyup: Scheduled weekly dependency update for week 02 (#8804)
@astrojuanlu: Remove explicit username from tutorial (#8803)
@humitos: Bitbucket: update to match latest API changes (#8801)
@stsewd: API v3: check if the name generates a valid slug (#8791)
@astrojuanlu: Make commercial docs more visible (#8780)
@davidfischer: Make the analytics cookie a session cookie (#8694)
@ericholscher: Add ability to rebuild a specific build (#6995)
Version 6.3.3
- Date
January 10, 2022
@pyup-bot: pyup: Scheduled weekly dependency update for week 02 (#8804)
@astrojuanlu: Remove explicit username from tutorial (#8803)
@humitos: Bitbucket: update to match latest API changes (#8801)
@ericholscher: Mention subproject aliases (#8785)
@humitos: Config file: system_site_packages overwritten from project’s setting (#8783)
@astrojuanlu: Make commercial docs more visible (#8780)
@humitos: Spam: allow to mark a project as (non)spam manually (#8779)
@davidfischer: Make the analytics cookie a session cookie (#8694)
Version 6.3.2
- Date
January 04, 2022
@cagatay-y: Fix broken link in edit-source-links-sphinx.rst (#8788)
@pyup-bot: pyup: Scheduled weekly dependency update for week 52 (#8787)
@astrojuanlu: Cap setuptools even if installed packages are ignored (#8777)
@pyup-bot: pyup: Scheduled weekly dependency update for week 51 (#8776)
@astrojuanlu: Follow up to dev docs split (#8774)
@stsewd: API v3: improve message when using the API on the browser (#8768)
@stsewd: API v3: don’t include subproject_of on subprojects (#8767)
@davidfischer: Use ad client stickybox feature on RTD’s own docs (#8766)
@stsewd: API v3: explicitly test with RTD_ALLOW_ORGANIZATIONS=False (#8765)
@ericholscher: Release 6.3.1 (#8763)
@stsewd: Skip slug check when editing an organization (#8760)
@ericholscher: Fix EA branding in docs (#8758)
@pyup-bot: pyup: Scheduled weekly dependency update for week 50 (#8757)
@astrojuanlu: Add MyST Markdown examples everywhere (#8752)
Version 6.3.1
- Date
December 14, 2021
@stsewd: Don’t run spam rules check after ban action (#8756)
@astrojuanlu: Add MyST Markdown examples everywhere (#8752)
@astrojuanlu: Update mambaforge to latest version (#8749)
@astrojuanlu: Remove sphinx-doc.org from external domains (#8747)
@humitos: Log: use structlog-sentry to send logs to Sentry (#8732)
@agjohnson: Release 6.3.0 (#8730)
@stsewd: Custom Domain: make cname_target configurable (#8728)
@stsewd: Test external serving for projects with
--in slug (#8716)@astrojuanlu: Add guide to migrate from reST to MyST (#8714)
@astrojuanlu: Avoid future breakage of
setup.pyinvokations (#8711)@humitos: structlog: migrate application code to better logging (#8705)
@ericholscher: Add ability to rebuild a specific build (#6995)
Version 6.3.0
- Date
November 29, 2021
@humitos: Tests: run tests with Python3.8 in CircleCI (#8718)
@stsewd: Test external serving for projects with
--in slug (#8716)@astrojuanlu: Avoid future breakage of
setup.pyinvokations (#8711)@humitos: structlog: migrate application code to better logging (#8705)
@astrojuanlu: Add guide on Poetry (#8702)
Version 6.2.1
- Date
November 23, 2021
@agjohnson: Fix issue with PR build hostname parsing (#8700)
@ericholscher: Fix sharing titles (#8695)
@humitos: Spam: make admin filters easier to understand (#8688)
@astrojuanlu: Clarify how to pin the Sphinx version (#8687)
@stsewd: Docs: update docs about search on subprojects (#8683)
@pyup-bot: pyup: Scheduled weekly dependency update for week 46 (#8680)
Version 6.2.0
- Date
November 16, 2021
@rokroskar: docs: update faq to mention apt for dependencies (#8676)
@astrojuanlu: Add entry on Jupyter Book to the FAQ (#8669)
@humitos: Spam: sort admin filters and show threshold (#8666)
@humitos: Spam: check for spam rules after user is banned (#8664)
@humitos: Spam: use 410 - Gone status code when blocked (#8661)
@astrojuanlu: Upgrade readthedocs-sphinx-search (#8660)
@agjohnson: Release 6.1.2 (#8657)
@astrojuanlu: Update requirements pinning (#8655)
@stsewd: Historical records: set the change reason explicitly on the instance (#8627)
Version 6.1.2
- Date
November 08, 2021
@astrojuanlu: Update requirements pinning (#8655)
@ericholscher: Fix GitHub permissions required (#8654)
@stsewd: Organizations: allow to add owners by email (#8651)
@pyup-bot: pyup: Scheduled weekly dependency update for week 44 (#8645)
@astrojuanlu: Document generic webhooks (#8609)
Version 6.1.1
- Date
November 02, 2021
@agjohnson: Drop beta from title of build config option (#8637)
@astrojuanlu: Remove mentions to old Python version specification (#8635)
@Arthur-Milchior: Correct an example (#8628)
@davidfischer: Inherit theme template (#8626)
@astrojuanlu: Clarify duration of extra DNS records (#8625)
@astrojuanlu: Promote mamba more in the documentation, hide
CONDA_USES_MAMBA(#8624)@davidfischer: Floating ad placement for docs.readthedocs.io (#8621)
@stsewd: Audit: track downloads separately from page views (#8619)
Version 6.1.0
- Date
October 26, 2021
@astrojuanlu: Clarify docs (#8608)
@astrojuanlu: New Read the Docs tutorial, part III (and finale?) (#8605)
@humitos: SSO: re-sync VCS accounts for SSO organization daily (#8601)
@humitos: Django Action: re-sync SSO organization’s users (#8600)
@pyup-bot: pyup: Scheduled weekly dependency update for week 42 (#8598)
@saadmk11: Don’t show the rebuild option on closed/merged Pull Request builds (#8590)
@carltongibson: Adjust Django intersphinx link to stable version. (#8589)
@astrojuanlu: Documentation names cleanup (#8586)
@adamtheturtle: Fix typo “interpreters” (#8583)
@ericholscher: Small fixes to asdf image upload script (#8578)
@humitos: EmbedAPIv3: docs for endpoint and guide updated (#8566)
@stsewd: Domain: allow to disable domain creation/update (#8020)
Version 6.0.0
- Date
October 13, 2021
This release includes the upgrade of some base dependencies:
Python version from 3.6 to 3.8
Ubuntu version from 18.04 LTS to 20.04 LTS
Starting from this release, all the Read the Docs code will be tested and QAed on these versions.
Version 5.25.1
- Date
October 11, 2021
@astrojuanlu: Small fixes (#8564)
@deepto98: Moved authenticated_classes definitions from API classes to AuthenticatedClassesMixin (#8562)
@humitos: Build: update ca-certificates before cloning (#8559)
@humitos: Build: support Python 3.10.0 stable release (#8558)
@astrojuanlu: Document new
buildspecification (#8547)@astrojuanlu: Add checkbox to subscribe new users to newsletter (#8546)
Version 5.25.0
- Date
October 05, 2021
@humitos: Docs: comment about how to add a new tool/version for builders (#8548)
@astrojuanlu: Add checkbox to subscribe new users to newsletter (#8546)
@humitos: Script tools cache: fix environment variables (#8541)
@humitos: EmbedAPIv3: proxy URLs to be available under
/_/(#8540)@humitos: Requirement: ping django-redis-cache to git tag (#8536)
@pyup-bot: pyup: Scheduled weekly dependency update for week 39 (#8531)
@astrojuanlu: Promote and restructure guides (#8528)
@stsewd: HistoricalRecords: add additional fields (ip and browser) (#8490)
Version 5.24.0
- Date
September 28, 2021
Version 5.23.6
- Date
September 20, 2021
@astrojuanlu: Change newsletter form (#8509)
@stsewd: Contact users: Allow to pass additional context to each email (#8507)
@astrojuanlu: Update onboarding (#8504)
@astrojuanlu: List default installed dependencies (#8503)
@astrojuanlu: Clarify that the development installation instructions are for Linux (#8494)
@astrojuanlu: Add virtual env instructions to local installation (#8488)
@astrojuanlu: New Read the Docs tutorial, part II (#8473)
Version 5.23.5
- Date
September 14, 2021
@humitos: Organization: only mark artifacts cleaned as False if they are True (#8481)
@astrojuanlu: Fix link to version states documentation (#8475)
@pzhlkj6612: Docs: update the links to the dependency management content of setuptools docs (#8470)
@stsewd: Permissions: avoid using project.users, use proper permissions instead (#8458)
@astrojuanlu: New Read the Docs tutorial, part I (#8428)
Version 5.23.4
- Date
September 07, 2021
@pzhlkj6612: Docs: update the links to the dependency management content of setuptools docs (#8470)
@stsewd: Permissions: avoid using project.users, use proper permissions instead (#8458)
@stsewd: Add templatetag to filter by admin projects (#8456)
@stsewd: Support form: don’t allow to change the email (#8455)
@stsewd: Search: show only results from the current role_name being filtered (#8454)
@pyup-bot: pyup: Scheduled weekly dependency update for week 35 (#8451)
@stsewd: API v3 (subprojects): filter by correct owner/organization (#8446)
@astrojuanlu: Rework Team page (#8441)
@mforbes: Added note about how to use Anaconda Project. (#8436)
@stsewd: Contact users: pass user and domain in the context (#8430)
@astrojuanlu: New Read the Docs tutorial, part I (#8428)
@stsewd: API: fix subprojects creation when organizaions are enabled (#8393)
@stsewd: QuerySets: filter permissions by organizations (#8298)
Version 5.23.3
- Date
August 30, 2021
Version 5.23.2
- Date
August 24, 2021
@astrojuanlu: Add MyST (Markdown) examples to “cross referencing with Sphinx” guide (#8437)
@saadmk11: Added Search and Filters for
RemoteRepositoryandRemoteOrganizationadmin list page (#8431)@agjohnson: Try out codeowners (#8429)
@humitos: Proxito: do not log response header for each custom domain request (#8427)
@stsewd: Allow cookies from cross site requests to avoid problems with iframes (#8422)
@ericholscher: Don’t filter on large items in the auditing sidebar. (#8417)
@astrojuanlu: Fix YAML extension (#8416)
@ericholscher: Release 5.23.1 (#8415)
@stsewd: Audit: attach project from the request if available (#8414)
@pyup-bot: pyup: Scheduled weekly dependency update for week 33 (#8411)
@cclauss: Fix typos discovered by codespell in /docs (#8409)
@stsewd: Support: update contact information via Front webhook (#8406)
@stsewd: Allow users to remove themselves from a project (#8384)
Version 5.23.1
- Date
August 16, 2021
@cclauss: Fix typos discovered by codespell in /docs (#8409)
@ericholscher: Add CSP header to the domain options (#8388)
Version 5.23.0
- Date
August 09, 2021
@ericholscher: Only call analytics tracking of flyout when analytics are enabled (#8398)
@pyup-bot: pyup: Scheduled weekly dependency update for week 31 (#8385)
@DetectedStorm: Update LICENSE (#5125)
Version 5.22.0
- Date
August 02, 2021
@pzhlkj6612: Docs: fix typo in versions.rst: -> need (#8383)
@ericholscher: Remove clickjacking middleware for proxito (#8378)
@humitos: Add support for Python3.10 on
testingDocker image (#8328)@stsewd: Analytics: don’t fail if the page was created in another request (#8310)
Version 5.21.0
- Date
July 27, 2021
@ericholscher: Build out the MyST section of the getting started (#8371)
@astrojuanlu: Update common (#8368)
@astrojuanlu: Redirect users to appropriate support channels using template chooser (#8366)
@humitos: Proxito: return user-defined HTTP headers on custom domains (#8360)
@ericholscher: Release 5.20.3 (#8356)
@stsewd: Track model changes with django-simple-history (#8355)
Version 5.20.3
- Date
July 19, 2021
Version 5.20.2
- Date
July 13, 2021
@humitos: psycopg2: pin to a compatible version with Django 2.2 (#8335)
@stsewd: Contact owners: use correct organization to filter (#8325)
@pyup-bot: pyup: Scheduled weekly dependency update for week 27 (#8317)
@mongolsteppe: Fixing minor error (#8313)
@The-Compiler: Add link to redirect docs (#8308)
@ericholscher: Add docs about setting up permissions for GH apps & orgs (#8305)
@stsewd: Slugify: don’t generate slugs with trailing
-(#8302)@ericholscher: Increase guide depth (#8300)
@humitos: PR build status: re-try up to 3 times if it fails for some reason (#8296)
@SethFalco: feat: add json schema (#8294)
@pyup-bot: pyup: Scheduled weekly dependency update for week 26 (#8293)
@stsewd: Organizations: validate that a correct slug is generated (#8292)
@astrojuanlu: Add new guide about Jupyter in Sphinx (#8283)
@humitos: oauth webhook: check the
Projecthas aRemoteRepository(#8282)@stsewd: Allow to email users from a management command (#8243)
@astrojuanlu: Add proposal for new Sphinx and RTD tutorials (#8106)
@stsewd: Allow to change the privacy level of external versions (#7825)
Version 5.20.1
- Date
June 28, 2021
@stsewd: Organizations: validate that a correct slug is generated (#8292)
@humitos: oauth webhook: check the
Projecthas aRemoteRepository(#8282)@stsewd: Search: ask for confirmation when running reindex_elasticsearch (#8275)
@saadmk11: Hit Elasticsearch only once for each search query through the APIv2 (#8228)
@astrojuanlu: Add proposal for new Sphinx and RTD tutorials (#8106)
Version 5.20.0
- Date
June 22, 2021
@humitos: Migration: fix RemoteRepository - Project data migration (#8271)
@ericholscher: Release 5.19.0 (#8266)
@humitos: Sync RemoteRepository for external collaborators (#8265)
@pyup-bot: pyup: Scheduled weekly dependency update for week 24 (#8262)
@humitos: Make
Project -> ForeignKey -> RemoteRepository(#8259)@agjohnson: Add basic security policy (#8254)
Version 5.19.0
Warning
This release contains a security fix to our CSRF settings: https://github.com/readthedocs/readthedocs.org/security/advisories/GHSA-3v5m-qmm9-3c6c
- Date
June 15, 2021
@ericholscher: Remove video from our Sphinx quickstart. (#8246)
@ericholscher: Remove “Markdown” from Mkdocs title (#8245)
@astrojuanlu: Make sustainability page more visible (#8244)
@stsewd: Builds: move send_build_status to builds/tasks.py (#8241)
@ericholscher: Don’t do any CORS checking on Embed API requests (#8226)
@agjohnson: Add project/build filters (#8142)
@humitos: Sign Up: limit the providers allowed to sign up (#8062)
@stsewd: Search: use multi-fields for Wildcard queries (#7613)
@ericholscher: Add ability to rebuild a specific build (#6995)
Version 5.18.0
- Date
June 08, 2021
@ericholscher: Backport manual indexes (#8235)
@ericholscher: Clean up SSO docs (#8233)
@ericholscher: Don’t do any CORS checking on Embed API requests (#8226)
@agjohnson: Update gitter channel name (#8217)
@ericholscher: Remove IRC from our docs (#8216)
@pyup-bot: pyup: Scheduled weekly dependency update for week 21 (#8206)
@akien-mga: Docs: Add section about deleting downloadable content (#8162)
@stsewd: Search: little optimization when saving search queries (#8132)
@akien-mga: Docs: Add some details to the User Defined Redirects (#7894)
@agjohnson: Add APIv3 version edit URL (#7594)
@saadmk11: Add List API Endpoint for
RemoteRepositoryandRemoteOrganization(#7510)
Version 5.17.0
- Date
May 24, 2021
@stsewd: Proxito: don’t require the middleware for proxied apis (#8203)
@ericholscher: Remove specific name from security page at user request (#8195)
@humitos: Docker: remove
volumes=argument when creating the container (#8194)@stsewd: API v2: allow listing when using private repos (#8192)
@stsewd: Proxito: redirect to main project from subprojects (#8187)
@pyup-bot: pyup: Scheduled weekly dependency update for week 20 (#8186)
@agjohnson: Add DPA to legal docs in documentation (#8130)
Version 5.16.0
- Date
May 18, 2021
@stsewd: QuerySets: check for .is_superuser instead of has_perm (#8181)
@humitos: Build: use
is_activemethod to know if the build should be skipped (#8179)@stsewd: Project: use IntegerField for
remote_repositoryfrom project form. (#8176)@stsewd: Docs: remove some lies from cross referencing guide (#8173)
@pyup-bot: pyup: Scheduled weekly dependency update for week 19 (#8170)
@stsewd: Querysets: include organizations in is_active check (#8163)
@davidfischer: Disable FLOC by introducing permissions policy header (#8145)
Version 5.15.0
- Date
May 10, 2021
@stsewd: Ads: don’t load script if a project is marked as ad_free (#8164)
@stsewd: Querysets: include organizations in is_active check (#8163)
@pyup-bot: pyup: Scheduled weekly dependency update for week 18 (#8153)
@stsewd: Search: default to search on default version of subprojects (#8148)
@humitos: Metrics: run metrics task every 30 minutes (#8138)
@humitos: web-celery: add logging for OOM debug on suspicious tasks (#8131)
@agjohnson: Fix a few style and grammar issues with SSO docs (#8109)
@stsewd: Embed: don’t fail while querying sections with bad id (#8084)
@stsewd: Design doc: allow to install packages using apt (#8060)
Version 5.14.3
- Date
April 26, 2021
@humitos: Metrics: run metrics task every 30 minutes (#8138)
@humitos: web-celery: add logging for OOM debug on suspicious tasks (#8131)
@stsewd: Celery router: check all
nlast builds for Conda (#8129)@jonels-msft: Include aria-label in flyout search box (#8127)
@stsewd: BuildCommand: don’t leak stacktrace to the user (#8121)
@stsewd: API (v2): use empty list in serializer’s exclude (#8120)
@astrojuanlu: Miscellaneous doc improvements (#8118)
@pyup-bot: pyup: Scheduled weekly dependency update for week 16 (#8117)
@agjohnson: Fix a few style and grammar issues with SSO docs (#8109)
Version 5.14.2
- Date
April 20, 2021
@stsewd: Sync versions: don’t fetch/return all versions (#8114)
@astrojuanlu: Improve contributing docs, take 2 (#8113)
@Harmon758: Docs: fix typo in config-file/v2.rst (#8102)
@cocobennett: Improve documentation on contributing to documentation (#8082)
Version 5.14.1
- Date
April 13, 2021
@cocobennett: Add page and page_size to server side api documentation (#8080)
@stsewd: Version warning banner: inject on role=”main” or main tag (#8079)
@stsewd: Conda: protect against None when appending core requirements (#8077)
@humitos: SSO: add small paragraph mentioning how to enable it on commercial (#8063)
@agjohnson: Add separate version create view and create view URL (#7595)
Version 5.14.0
- Date
April 06, 2021
This release includes a security update which was done in a private branch PR. See our security changelog for more details.
@pyup-bot: pyup: Scheduled weekly dependency update for week 14 (#8071)
@astrojuanlu: Clarify ad-free conditions (#8064)
@humitos: SSO: add small paragraph mentioning how to enable it on commercial (#8063)
@stsewd: Build environment: allow to run commands with a custom user (#8058)
@humitos: Design document for new Docker images structure (#7566)
Version 5.13.0
- Date
March 30, 2021
@ericholscher: Fix proxito slash redirect for leading slash (#8044)
@pyup-bot: pyup: Scheduled weekly dependency update for week 12 (#8038)
@flying-sheep: Add publicly visible env vars (#7891)
Version 5.12.2
- Date
March 23, 2021
@ericholscher: Standardize footerjs code (#8032)
@stsewd: Search: don’t leak data for projects with this feature disabled (#8029)
@ericholscher: Canonicalize all proxito slashes (#8028)
@ericholscher: Make pageviews analytics show top 25 pages (#8027)
@ericholscher: Add CSV header data for search analytics (#8026)
@humitos: Use
RemoteRepositoryrelation to match already imported projects (#8024)@stsewd: Builds: restart build commands before a new build (#7999)
@saadmk11: Remote Repository and Remote Organization Normalization (#7949)
Version 5.12.1
- Date
March 16, 2021
@pyup-bot: pyup: Scheduled weekly dependency update for week 11 (#8019)
@stsewd: Embed: Allow to override embed view for proxied use (#8018)
@humitos: RemoteRepository: Improvements to
sync_vcs_data.pyscript (#8017)@davidfischer: Fix AWS image so it looks sharp (#8009)
@humitos: Stripe Checkout: handle duplicated wehbook (#8002)
@saadmk11: Add __str__ to RemoteRepositoryRelation and RemoteOrganizationRelation and Use raw_id_fields in Admin (#8001)
@saadmk11: Remove duplicate results from RemoteOrganization API (#8000)
@ericholscher: Make SupportView login_required (#7997)
@ericholscher: Release 5.12.0 (#7996)
@pyup-bot: pyup: Scheduled weekly dependency update for week 10 (#7995)
@saadmk11: Remove json field from RemoteRepositoryRelation and RemoteOrganizationRelation model (#7993)
@humitos: Use independent Docker image to build assets (#7992)
@Pradhvan: Fixes typo in getting-started-with-sphinx: (#7991)
@humitos: Allow
donateapp to use Stripe Checkout for one-time donations (#7983)@ericholscher: Add proxito healthcheck (#7948)
@Pradhvan: Docs: Adds Myst to the getting started with sphinx (#7938)
Version 5.12.0
- Date
March 08, 2021
@pyup-bot: pyup: Scheduled weekly dependency update for week 10 (#7995)
@saadmk11: Remove json field from RemoteRepositoryRelation and RemoteOrganizationRelation model (#7993)
@humitos: Use independent Docker image to build assets (#7992)
@Pradhvan: Fixes typo in getting-started-with-sphinx: (#7991)
@stsewd: Search: use doctype from indexed pages instead of the db (#7984)
@humitos: Allow
donateapp to use Stripe Checkout for one-time donations (#7983)@stsewd: Docs: update expand_tabs to work with the latest version of sphinx-tabs (#7979)
@ericholscher: Fix build routing (#7978)
@stsewd: Builds: register tasks to delete inactive external versions (#7975)
@ericholscher: refactor footer, add jobs & status page (#7970)
@humitos: Upgrade
postgres-clientto v12 in Docker image (#7967)@saadmk11: Add management command to Load Project and RemoteRepository Relationship from JSON file (#7966)
@astrojuanlu: Update guide on conda support (#7965)
@stsewd: Search: make –queue required for management command (#7952)
@ericholscher: Add proxito healthcheck (#7948)
@Pradhvan: Docs: Adds Myst to the getting started with sphinx (#7938)
@ericholscher: Add a support form to the website (#7929)
@stsewd: Install latest mkdocs by default as we do with sphinx (#7869)
Version 5.11.0
- Date
March 02, 2021
@saadmk11: Add management command to Load Project and RemoteRepository Relationship from JSON file (#7966)
@saadmk11: Add Management Command to Dump Project and RemoteRepository Relationship in JSON format (#7957)
@davidfischer: Enable the cached template loader (#7953)
@FatGrizzly: Added warnings for previous gitbook users (#7945)
@ericholscher: Change our sponsored hosting from Azure -> AWS. (#7940)
@Pradhvan: Docs: Adds Myst to the getting started with sphinx (#7938)
@ericholscher: Add a support form to the website (#7929)
@fabianmp: Allow to use a different url for intersphinx object file download (#7807)
Version 5.10.0
- Date
February 23, 2021
@pyup-bot: pyup: Scheduled weekly dependency update for week 08 (#7941)
@PawelBorkar: Update license (#7934)
@humitos: Route external versions to the queue were default version was built (#7933)
@humitos: Pin jedi dependency to avoid breaking ipython (#7932)
@humitos: Use
adminuser for SLUMBER API on local environment (#7925)@pyup-bot: pyup: Scheduled weekly dependency update for week 07 (#7913)
@humitos: Router PRs builds to last queue where a build was executed (#7912)
@stsewd: Search: improve re-index management command (#7904)
@stsewd: Search: link to main project in subproject results (#7880)
@humitos: Upgrade Celery and friends to latest versions (#7786)
Version 5.9.0
- Date
February 16, 2021
Last Friday we migrated our site from Azure to AWS (read the blog post). This is the first release into our new AWS infra.
@humitos: Router PRs builds to last queue where a build was executed (#7912)
@davidfischer: Make storage classes into module level vars (#7908)
@pyup-bot: pyup: Scheduled weekly dependency update for week 06 (#7896)
@nedbat: Doc fix: two endpoints had ‘pip’ for the project_slug (#7895)
@stsewd: Set storage for BuildCommand and BuildEnvironment as private (#7893)
@pyup-bot: pyup: Scheduled weekly dependency update for week 05 (#7887)
@humitos: Add support for Python 3.9 on “testing” Docker image (#7885)
@pyup-bot: pyup: Scheduled weekly dependency update for week 04 (#7867)
@humitos: Log Stripe errors when trying to delete customer/subscription (#7853)
@humitos: Save builder when the build is concurrency limited (#7851)
@pyup-bot: pyup: Scheduled weekly dependency update for week 03 (#7840)
@humitos: Speed up concurrent builds by limited to 5 hours ago (#7839)
@saadmk11: Add Option to Enable External Builds Through Project Update API (#7834)
@stsewd: Docs: mention the version warning is for sphinx only (#7832)
@agjohnson: Hide design docs from documentation (#7826)
@stsewd: Update docs about preview from pull/merge requests (#7823)
@humitos: Register MetricsTask to send metrics to AWS CloudWatch (#7817)
@humitos: Use S3 (MinIO emulator) as storage backend (#7812)
@zachdeibert: Cloudflare to Cloudflare CNAME Records (#7801)
@humitos: Documentation for
/organizations/endpoint in commercial (#7800)@stsewd: Privacy Levels: migrate protected projects to private (#7608)
@pawamoy: Don’t lose python/name tags values in mkdocs.yml (#7507)
Version 5.8.5
- Date
January 18, 2021
@pyup-bot: pyup: Scheduled weekly dependency update for week 03 (#7840)
@humitos: Speed up concurrent builds by limited to 5 hours ago (#7839)
@saadmk11: Add Option to Enable External Builds Through Project Update API (#7834)
@stsewd: Docs: mention the version warning is for sphinx only (#7832)
@stsewd: PR preview: pass PR and build urls to sphinx context (#7828)
@agjohnson: Hide design docs from documentation (#7826)
@humitos: Log Stripe Resource fallback creation in Sentry (#7820)
@humitos: Register MetricsTask to send metrics to AWS CloudWatch (#7817)
@saadmk11: Add management command to Sync RemoteRepositories and RemoteOrganizations (#7803)
Version 5.8.4
- Date
January 12, 2021
Version 5.8.3
- Date
January 05, 2021
@humitos: Change query on
send_build_statustask for compatibility with .com (#7797)@ericholscher: Update build concurrency numbers for Business (#7794)
@pyup-bot: pyup: Scheduled weekly dependency update for week 01 (#7793)
@timgates42: docs: fix simple typo, -> translations (#7781)
@ericholscher: Release 5.8.2 (#7776)
@humitos: Use Python3.7 on conda base environment when using mamba (#7773)
@ericholscher: Migrate sync_versions from an API call to a task (#7548)
@humitos: Design document for RemoteRepository DB normalization (#7169)
Version 5.8.2
- Date
December 21, 2020
@humitos: Use Python3.7 on conda base environment when using mamba (#7773)
@humitos: Register StopBuilder task to be executed by builders (#7759)
@stsewd: Search: use alias to link to search results of subprojects (#7757)
@saadmk11: Set The Right Permissions on GitLab OAuth RemoteRepository (#7753)
@fabianmp: Allow to add additional binds to Docker build container (#7684)
Version 5.8.1
- Date
December 14, 2020
@saadmk11: Use “path_with_namespace” for GitLab RemoteRepository full_name Field (#7746)
@stsewd: Version sync: exclude external versions when deleting (#7742)
@stsewd: Search: limit number of sections and domains to 10K (#7741)
@stsewd: Traffic analytics: don’t pass context if the feature isn’t enabled (#7740)
@stsewd: Analytics: move page views to its own endpoint (#7739)
@stsewd: FeatureQuerySet: make check for date inclusive (#7737)
@saadmk11: Use remote_id and vcs_provider Instead of full_name to Get RemoteRepository (#7734)
@pyup-bot: pyup: Scheduled weekly dependency update for week 49 (#7730)
@saadmk11: Update parts of code that were using the old RemoteRepository model fields (#7728)
@stsewd: Builds: don’t delete them when a version is deleted (#7679)
@humitos: Use
mambaunder a feature flag to create conda environments (#6815)
Version 5.8.0
- Date
December 08, 2020
@stsewd: Search: use with_positions_offsets term vector for some fields (#7724)
@stsewd: Search: filter only active and built versions from subprojects (#7723)
@stsewd: Extra features: allow to display them conditionally (#7715)
@humitos: Define
pre/post_collectstaticsignals and send them (#7701)@davidfischer: Support the new Google analytics gtag.js (#7691)
@stsewd: External versions: delete after 3 months of being merged/closed (#7678)
@stsewd: Automation Rules: keep history of recent matches (#7658)
Version 5.7.0
- Date
December 01, 2020
@davidfischer: Ensure there is space for sidebar ads (#7716)
@humitos: Install six as core requirement for builds (#7710)
@ericholscher: Release 5.6.1 (#7695)
@stsewd: Sync versions: use stable version instead of querying all versions (#7380)
Version 5.6.5
- Date
November 23, 2020
@stsewd: Tests: mock update_docs_task to speed up tests (#7677)
@stsewd: Tests: create an organization when running in .com (#7673)
@davidfischer: Speed up the tag index page (#7671)
@davidfischer: Fix for out of order script loading (#7670)
@davidfischer: Set ad configuration values if using explicit placement (#7669)
@pyup-bot: pyup: Scheduled weekly dependency update for week 46 (#7668)
@stsewd: Tests: mock trigger build to speed up tests (#7661)
@stsewd: Remote repository: save and set default_branch (#7646)
@stsewd: Search: exclude some fields from source results (#7640)
@stsewd: Search: allow to search on different versions of subprojects (#7634)
@saadmk11: Add Initial Modeling with Through Model and Data Migration for RemoteRepository Model (#7536)
Version 5.6.4
- Date
November 16, 2020
@davidfischer: Fix for out of order script loading (#7670)
@davidfischer: Set ad configuration values if using explicit placement (#7669)
@pyup-bot: pyup: Scheduled weekly dependency update for week 46 (#7668)
@pyup-bot: pyup: Scheduled weekly dependency update for week 45 (#7655)
@stsewd: Automation rules: add delete version action (#7644)
@stsewd: Search: exclude some fields from source results (#7640)
@saadmk11: Add Initial Modeling with Through Model and Data Migration for RemoteRepository Model (#7536)
Version 5.6.3
- Date
November 10, 2020
Version 5.6.2
- Date
November 03, 2020
@davidfischer: Display sidebar ad when scrolled (#7621)
@humitos: Catch
requests.exceptions.ReadTimeoutwhen removing container (#7617)@humitos: Allow search and filter in Django Admin for Message model (#7615)
@stsewd: Search: respect feature flag in dashboard search (#7611)
@ericholscher: Release 5.6.1 (#7604)
Version 5.6.1
- Date
October 26, 2020
@agjohnson: Bump common to include docker task changes (#7597)
@agjohnson: Default to sphinx theme 0.5.0 when defaulting to latest sphinx (#7596)
@humitos: Use correct Cache-Tag (CDN) and X-RTD-Project header on subprojects (#7593)
@davidfischer: Ads JS hotfix (#7586)
@agjohnson: Add remoterepo query param (#7580)
@agjohnson: Undeprecate APIv2 in docs (#7579)
@agjohnson: Add settings and docker configuration for working with new theme (#7578)
@humitos: Add our
readthedocs_processordata to our notifications (#7565)@stsewd: Builds: always install latest version of our sphinx extension (#7542)
@ericholscher: Add future default true to Feature flags (#7524)
@stsewd: Add feature flag to not install the latest version of pip (#7522)
@davidfischer: No longer proxy RTD ads through RTD servers (#7506)
Version 5.6.0
- Date
October 19, 2020
@stsewd: Docs: show example of a requirements.txt file (#7563)
@pyup-bot: pyup: Scheduled weekly dependency update for week 40 (#7537)
@ericholscher: Add future default true to Feature flags (#7524)
@davidfischer: No longer proxy RTD ads through RTD servers (#7506)
@davidfischer: Allow projects to opt-out of analytics (#7175)
Version 5.5.3
- Date
October 13, 2020
@ericholscher: Add a reference to the Import guide at the start of Getting started (#7547)
Version 5.5.2
- Date
October 06, 2020
@stsewd: Domain: show created/modified date in admin (#7517)
@ericholscher: Revert “New docker image for builders: 8.0” (#7514)
@srijan-deepsource: Fix some code quality issues (#7494)
Version 5.5.1
- Date
September 28, 2020
Version 5.5.0
- Date
September 22, 2020
Version 5.4.3
- Date
September 15, 2020
Version 5.4.2
- Date
September 09, 2020
@humitos: Show “Connected Services” form errors to the user (#7469)
@humitos: Allow to extend OrganizationTeamBasicForm from -corporate (#7467)
@pyup-bot: pyup: Scheduled weekly dependency update for week 36 (#7465)
@stsewd: Remote repository: filter by account before deleting (#7454)
@humitos: Truncate the beginning of the commands’ output (#7449)
@davidfischer: Update links to advertising (#7443)
@humitos: Grab the correct name of RemoteOrganization to use in the query (#7430)
@pyup-bot: pyup: Scheduled weekly dependency update for week 35 (#7423)
@humitos: Mark a build as DUPLICATED (same version) only it’s close in time (#7420)
Version 5.4.1
- Date
September 01, 2020
@bmorrison4: Fix typo in docs/guides/adding-custom-css.rst (#7424)
@stsewd: Docker: install requirements from local changes (#7409)
@pyup-bot: pyup: Scheduled weekly dependency update for week 34 (#7406)
@saadmk11: build_url added to all API v3 build endpoints (#7373)
@humitos: Auto-join email users field for Team model (#7328)
@humitos: Sync RemoteRepository and RemoteOrganization in all VCS providers (#7310)
@stsewd: Page views: use origin URL instead of page name (#7293)
Version 5.4.0
- Date
August 25, 2020
Version 5.3.0
- Date
August 18, 2020
@humitos: Remove the comma added in logs that breaks grep parsing (#7393)
@stsewd: GitLab webhook: don’t fail on invalid payload (#7391)
@stsewd: External providers: better logging for GitLab (#7385)
@stsewd: Sync versions: little optimization when deleting versions (#7367)
@agjohnson: Add feature flag to just skip the sync version task entirely (#7366)
@agjohnson: Convert zip to list for templates (#7359)
Version 5.2.3
- Date
August 04, 2020
@davidfischer: Add a middleware for referrer policy (#7346)
@stsewd: Footer: don’t show the version warning for external version (#7340)
@ericholscher: Lower rank for custom install docs. (#7339)
@benjaoming: Argument list for “python -m virtualenv” without empty strings (#7330)
@stsewd: Docs: little improvements on getting start docs (#7316)
@stsewd: Docs: make it more clear search on subprojects (#7272)
Version 5.2.2
- Date
July 29, 2020
@agjohnson: Reduce robots.txt cache TTL (#7334)
@davidfischer: Use the privacy embed for YouTube (#7320)
@DougCal: re-worded text on top of “Import a Repository” (#7318)
@stsewd: Docs: make it clear the config file options are per version (#7314)
@humitos: Feature to disable auto-generated index.md/README.rst files (#7305)
@humitos: Enable SessionAuthentication on APIv3 endpoints (#7295)
@pyup-bot: pyup: Scheduled weekly dependency update for week 28 (#7287)
@humitos: Make “homepage” optional when updating a project (#7286)
@humitos: Allow users to set hidden on versions via APIv3 (#7285)
@humitos: Documentation for Single Sign-On feature on commercial (#7212)
Version 5.2.1
- Date
July 14, 2020
@davidfischer: Fix a case where “tags” is interpreted as a project slug (#7284)
@agjohnson: Fix versions (#7271)
@saadmk11: Automation rule to make versions hidden added (#7265)
@stsewd: Sphinx: add –keep-going when fail_on_warning is true (#7251)
@saadmk11: Don’t allow Domain name matching production domain to be created (#7244)
@humitos: Documentation for Single Sign-On feature on commercial (#7212)
Version 5.2.0
- Date
July 07, 2020
Version 5.1.5
- Date
July 01, 2020
@choldgraf: cross-linking build limitations for pr builds (#7248)
@humitos: Allow to extend Import Project page from corporate (#7234)
@humitos: Make RemoteRepository.full_name db_index=True (#7231)
@ericholscher: Re-add the rst filter that got removed (#7223)
Version 5.1.4
- Date
June 23, 2020
@stsewd: Search: index from html files for mkdocs projects (#7208)
@humitos: Use total_memory to calculate “time” Docker limit (#7203)
@davidfischer: Feature flag for using latest Sphinx (#7201)
@ericholscher: Mention that we don’t index search in PR builds (#7199)
@davidfischer: Add a feature flag to use latest RTD Sphinx ext (#7198)
@ericholscher: Release 5.1.3 (#7197)
@agjohnson: Use theme release 0.5.0rc1 for docs (#7037)
@humitos: Skip promoting new stable if current stable is not
machine=True(#6695)
Version 5.1.3
- Date
June 16, 2020
@davidfischer: Fix the project migration conflict (#7196)
@ericholscher: Document the fact that PR builds are now enabled on .org (#7187)
@ericholscher: Update sharing examples (#7179)
@davidfischer: Allow projects to opt-out of analytics (#7175)
@stsewd: Docs: install readthedocs-sphinx-search from pypi (#7174)
@ericholscher: Reduce logging in proxito middleware so it isn’t in Sentry (#7172)
@ericholscher: Release 5.1.2 (#7171)
@humitos: Use
CharField.choicesforBuild.status_code(#7166)@davidfischer: Store pageviews via signals, not tasks (#7106)
Version 5.1.2
- Date
June 09, 2020
@humitos: Use
CharField.choicesforBuild.status_code(#7166)@ericholscher: Reindex search on the
reindexqueue (#7161)@stsewd: Project search: Show original description when there isn’t highlight (#7160)
@ericholscher: Fix custom URLConf redirects (#7155)
@ericholscher: Allow
blank=Truefor URLConf (#7153)@stsewd: Project: make external_builds_enabled not null (#7144)
@saadmk11: Do not Pre-populate username field for account delete (#7143)
@davidfischer: Add feature flag to use the stock Sphinx builders (#7141)
@ericholscher: Move changes_files to before search indexing (#7138)
@stsewd: Proxito middleware: reset to original urlconf after request (#7137)
@ericholscher: Revert “Merge pull request #7101 from readthedocs/show-last-total” (#7133)
@ericholscher: Release 5.1.1 (#7129)
@humitos: Use “-j auto” on sphinx-build command to build in parallel (#7128)
@stsewd: Search: refactor API to not emulate a Django queryset (#7114)
@davidfischer: Store pageviews via signals, not tasks (#7106)
@stsewd: Search: don’t index line numbers from code blocks (#7104)
@ericholscher: Add a project-level configuration for PR builds (#7090)
@pyup-bot: pyup: Scheduled weekly dependency update for week 18 (#7012)
@stsewd: Allow to enable server side search for MkDocs (#6986)
@ericholscher: Add ability for users to set their own URLConf (#6963)
Version 5.1.1
- Date
May 26, 2020
@humitos: Add a tip in EmbedAPI to use Sphinx reference in section (#7099)
@ericholscher: Release 5.1.0 (#7098)
@ericholscher: Add a setting for storing pageviews (#7097)
@ericholscher: Fix the unresolver not working properly with root paths (#7093)
@ericholscher: Add a project-level configuration for PR builds (#7090)
@santos22: Fix tests ahead of django-dynamic-fixture update (#7073)
@ericholscher: Add ability for users to set their own URLConf (#6963)
@dojutsu-user: Store Pageviews in DB (#6121)
Version 5.1.0
- Date
May 19, 2020
This release includes one major new feature which is Pageview Analytics. This allows projects to see the pages in their docs that have been viewed in the past 30 days, giving them an idea of what pages to focus on when updating them.
This release also has a few small search improvements, doc updates, and other bugfixes as well.
@ericholscher: Add a setting for storing pageviews (#7097)
@ericholscher: Fix the unresolver not working properly with root paths (#7093)
@davidfischer: Document HSTS support (#7083)
@davidfischer: Canonical/HTTPS redirect fix (#7075)
@santos22: Fix tests ahead of django-dynamic-fixture update (#7073)
@stsewd: Sphinx Search: don’t skip indexing if one file fails (#7071)
@stsewd: Search: generate full link from the server side (#7070)
@ericholscher: Fix PR builds being marked built (#7069)
@ericholscher: Add a page about choosing between .com/.org (#7068)
@ericholscher: Release 5.0.0 (#7064)
@ericholscher: Docs: Refactor and simplify our docs (#7052)
@stsewd: Search Document: remove unused class methods (#7035)
@stsewd: RTDFacetedSearch: pass filters in one way only (#7032)
@dojutsu-user: Store Pageviews in DB (#6121)
Version 5.0.0
- Date
May 12, 2020
This release includes two large changes, one that is breaking and requires a major version upgrade:
We have removed our deprecated doc serving code that used
core/views,core/symlinks, andbuilds/syncers(#6535). All doc serving should now be done viaproxito. In production this has been the case for over a month, we have now removed the deprecated code from the codebase.We did a large documentation refactor that should make things nicer to read and highlights more of our existing features. This is the first of a series of new documentation additions we have planned
@ericholscher: Fix the caching of featured projects (#7054)
@ericholscher: Docs: Refactor and simplify our docs (#7052)
@stsewd: Mention using ssh URLs when using private submodules (#7046)
@ericholscher: Show project slug in Version admin (#7042)
@agjohnson: Use a high time limit for celery build task (#7029)
@ericholscher: Clean up build admin to make list display match search (#7028)
@agjohnson: Move docker limits back to setting (#7023)
@ericholscher: Release 4.1.8 (#7020)
@ericholscher: Cleanup unresolver logging (#7019)
@stsewd: Document about next when using a secret link (#7015)
@stsewd: Remove unused field project.version_privacy_level (#7011)
@ericholscher: Add proxito headers to redirect responses (#7007)
@humitos: Show a list of packages installed on environment (#6992)
@eric-wieser: Ensure invoked Sphinx matches importable one (#6965)
@ericholscher: Add an unresolver similar to our resolver (#6944)
@KengoTODA: Replace “PROJECT” with project object (#6878)
@humitos: Remove code replaced by El Proxito and stateless servers (#6535)
Version 4.1.8
- Date
May 05, 2020
This release adds a few new features and bugfixes.
The largest change is the addition of hidden versions,
which allows docs to be built but not shown to users on the site.
This will keep old links from breaking but not direct new users there.
We’ve also expanded the CDN support to make sure we’re passing headers on 3xx and 4xx responses. This will allow us to expand the timeout on our CDN.
We’ve also updated and added a good amount of documentation in this release, and we’re starting a larger refactor of our docs to help users understand the platform better.
@ericholscher: Cleanup unresolver logging (#7019)
@ericholscher: Add CDN to the installed apps (#7014)
@eric-wieser: Emit a better error if no feature flag is found (#7009)
@ericholscher: Add proxito headers to redirect responses (#7007)
@ericholscher: Add Priority 0 to Celery (#7006)
@ericholscher: Start storing JSON data for PR builds (#7001)
@yarikoptic: Add a note if build status is not being reported (#6999)
@davidfischer: Exclusively handle proxito HSTS from the backend (#6994)
@humitos: Mention concurrent builds limitation in “Build Process” (#6993)
@humitos: Show a list of packages installed on environment (#6992)
@ericholscher: Log sync_repository_task when we run it (#6987)
@ericholscher: Remove old SSL cert warning, since they now work. (#6985)
@agjohnson: More fixes for automatic Docker limits (#6982)
@davidfischer: Add details to our changelog for 4.1.7 (#6978)
@ericholscher: Release 4.1.7 (#6976)
@ericholscher: Catch infinite canonical redirects (#6973)
@eric-wieser: Ensure invoked Sphinx matches importable one (#6965)
@ericholscher: Add an unresolver similar to our resolver (#6944)
@humitos: Optimization on
sync_versionsto use ls-remote on Git VCS (#6930)@humitos: Split X-RTD-Version-Method header into two HTTP headers. (#6907)
@stsewd: Allow to override sign in and sign out views (#6901)
Version 4.1.7
- Date
April 28, 2020
As of this release, most documentation on Read the Docs Community is now behind Cloudflare’s CDN. It should be much faster for people further from US East. Please report any issues you experience with stale cached documentation (especially CSS/JS).
Another change in this release related to how custom domains are handled.
Custom domains will now redirect HTTP -> HTTPS if the Domain’s “HTTPS” flag is set.
Also, the subdomain URL (eg. <project>.readthedocs.io/...) should redirect to the custom domain
if the Domain’s “canonical” flag is set.
These flags are configurable in your project dashboard under Admin > Domains.
Many of the other changes related to improvements for our infrastructure to allow us to have autoscaling build and web servers. There were bug fixes for projects using versions tied to annotated git tags and custom user redirects will now send query parameters.
@ericholscher: Reduce proxito logging (#6970)
@ericholscher: Fix the trailing slash in our repo regexs (#6956)
@davidfischer: Add canonical to the Domain listview in the admin (#6954)
@davidfischer: Allow setting HSTS on a per domain basis (#6953)
@humitos: Refactor how we handle GitHub webhook events (#6949)
@humitos: Return 400 when importing an already existing project (#6948)
@humitos: Return max_concurrent_builds in ProjectAdminSerializer (#6946)
@tom-doerr: Update year (#6945)
@humitos: Revert “Use requests.head to query storage.exists” (#6941)
@ericholscher: Release 4.1.6 (#6940)
@stsewd: Remove note about search analytics being beta (#6939)
@stsewd: Add troubleshooting section for dev search docs (#6933)
@davidfischer: Index date and ID together on builds (#6926)
@davidfischer: CAA records are not only for users of Cloudflare DNS (#6925)
@davidfischer: Docs on supporting root domains (#6923)
@ericholscher: Add basic support for lower priority PR builds (#6921)
@ericholscher: Change the dashboard search to default to searching files (#6920)
@davidfischer: Canonicalize domains and redirect in proxito (#6905)
@zdover23: Made syntactical improvements and fixed some vocabulary issues. (#6825)
Version 4.1.6
- Date
April 21, 2020
@humitos: Do not override the domain of Azure Storage (#6928)
@humitos: Per-project concurrency and check before triggering the build (#6927)
@davidfischer: Remove note about underscore in domain (#6924)
@ericholscher: Improve logging around status setting on PR builds (#6912)
@ericholscher: Add hoverxref to our docs (#6911)
@ericholscher: Fix Cache-Tag header name (#6908)
@ericholscher: Include the project slug in the PR context (#6904)
@ericholscher: Fix single version infinite redirect (#6900)
@humitos: Use a custom Task Router to route tasks dynamically (#6849)
@zdover23: Made syntactical improvements and fixed some vocabulary issues. (#6825)
@stsewd: Force to use proxied API for footer and search (#6768)
@ericholscher: Only output debug logging from RTD app (#6717)
@ericholscher: Add ability to sort dashboard by modified date (#6680)
@stsewd: Protection against None when sending notifications (#6610)
Version 4.1.5
- Date
April 15, 2020
@ericholscher: Fix Cache-Tag header name (#6908)
@ericholscher: Fix single version infinite redirect (#6900)
@ericholscher: Release 4.1.4 (#6899)
@humitos: On Azure .exists blob timeout, log the exception and return False (#6895)
@ericholscher: Fix URLs like
/projects/subprojectfrom 404ing when they don’t end with a slash (#6888)@ericholscher: Allocate docker limits based on server size. (#6879)
Version 4.1.4
- Date
April 14, 2020
@humitos: On Azure .exists blob timeout, log the exception and return False (#6895)
@ericholscher: Fix URLs like
/projects/subprojectfrom 404ing when they don’t end with a slash (#6888)@ericholscher: Add CloudFlare Cache tags support (#6887)
@ericholscher: Allocate docker limits based on server size. (#6879)
@ericholscher: Make the status name in CI configurable via setting (#6877)
@ericholscher: Add 12 hour caching to our robots.txt serving (#6876)
@humitos: Filter triggered builds when checking concurrency (#6875)
@ericholscher: Fix issue with sphinx domain types with
:in them: (#6874)@stsewd: Make dashboard faster for projects with a lot of subprojects (#6873)
@ericholscher: Release 4.1.3 (#6872)
@stsewd: Don’t do unnecessary queries when listing subprojects (#6869)
@stsewd: Don’t do extra query if the project is a translation (#6865)
@stsewd: Reduce queries to storage to serve 404 pages (#6845)
@stsewd: Add checking the github oauth app in the troubleshooting page (#6827)
@humitos: Return full path URL (including
html) on/api/v2/docurl/endpoint (#6082)
Version 4.1.3
- Date
April 07, 2020
@stsewd: Don’t do unnecessary queries when listing subprojects (#6869)
@stsewd: Don’t do extra query if the project is a translation (#6865)
@ericholscher: Make development docs a bit easier to find (#6861)
@davidfischer: Add an advertising API timeout (#6856)
@humitos: Do not save pip cache when using CACHED_ENVIRONMENT (#6820)
@ericholscher: Denormalize from_url_without_rest onto the redirects model (#6780)
@davidfischer: Developer docs emphasize the Docker setup (#6682)
@davidfischer: Document setting up connected accounts in dev (#6681)
@humitos: Return full path URL (including
html) on/api/v2/docurl/endpoint (#6082)
Version 4.1.2
- Date
March 31, 2020
@humitos: Allow receiving
Nonefortemplate_htmlwhen sending emails (#6834)@ericholscher: Fix silly issue with sync_callback (#6830)
@ericholscher: Show the builder in the Build admin (#6826)
@ericholscher: Properly call sync_callback when there aren’t any MULTIPLE_APP_SERVERS settings (#6823)
@stsewd: Allow to override app from where to read templates (#6821)
@humitos: Do not save pip cache when using CACHED_ENVIRONMENT (#6820)
@ericholscher: Release 4.1.1 (#6818)
@humitos: Use watchman when calling
runserverin local development (#6813)@humitos: Show “Uploading” build state when uploading artifacts into storage (#6810)
@humitos: Update guide about building consuming too much resources (#6778)
Version 4.1.1
- Date
March 24, 2020
@stsewd: Respect order when serving 404 (version -> default_version) (#6805)
@humitos: Use storage.open API correctly for tar files (build cached envs) (#6799)
@humitos: Check 404 page once when slug and default_version is the same (#6796)
@humitos: Do not reset the build start time when running build env (#6794)
@humitos: Skip .cache directory for cached builds if it does not exist (#6791)
@ericholscher: Remove GET args from the path passed via proxito header (#6790)
@ericholscher: Release 4.1.0 (#6788)
@ericholscher: Revert “Add feature flag to just completely skip sync and symlink operations (#6689)” (#6781)
Version 4.1.0
- Date
March 17, 2020
@ericholscher: Properly proxy the Proxito headers via nginx/sendfile (#6782)
@ericholscher: Revert “Add feature flag to just completely skip sync and symlink operations (#6689)” (#6781)
@humitos: Upgrade django-storages to support URLs with more http methods (#6771)
@davidfischer: Use the hotfixed version of django-messages-extends (#6767)
@ericholscher: Release 4.0.3 (#6766)
@humitos: Pull/Push cached environment using storage (#6763)
@stsewd: Refactor search view to make use of permission_classes (#6761)
Version 4.0.3
- Date
March 10, 2020
@stsewd: Refactor search view to make use of permission_classes (#6761)
@ericholscher: Revert “Merge pull request #6739 from readthedocs/agj/docs-tos-pdf” (#6760)
@ericholscher: Expand the logic in our proxito mixin. (#6759)
@comradekingu: Spelling: “Set up your environment” (#6752)
@ericholscher: Release 4.0.2 (#6741)
@agjohnson: Add TOS PDF output (#6739)
@ericholscher: Don’t call virtualenv with
--no-site-packages(#6738)@GallowayJ: Drop mock dependency (#6723)
@humitos: New block on footer template to override from corporate (#6702)
@humitos: Point users to support email instead asking to open an issue (#6650)
Version 4.0.2
- Date
March 04, 2020
@ericholscher: Don’t call virtualenv with
--no-site-packages(#6738)@stsewd: Catch ConnectionError from request on api timing out (#6735)
@ericholscher: Release 4.0.1 (#6733)
@humitos: Improve Proxito 404 handler to render user-facing Maze when needed (#6726)
Version 4.0.1
- Date
March 03, 2020
@ericholscher: Add feature flag for branch & tag syncing to API. (#6729)
@stsewd: Be explicit on privacy level for search tests (#6713)
@stsewd: Make easy to run search tests in docker compose (#6711)
@davidfischer: Docker settings improvements (#6709)
@davidfischer: Workaround SameSite cookies (#6708)
@davidfischer: Figure out the host IP when using Docker (#6707)
@davidfischer: Pin the version of Azurite for docker-compose development (#6706)
@ericholscher: Release 4.0.0 (#6704)
@humitos: Rename docker settings to fix local environment (#6703)
@sduthil: API v3 doc: fix typos in URL for PATCH /versions/slug/ (#6698)
@humitos: Sort versions in-place to help performance (#6696)
@agjohnson: Add feature flag to just completely skip sync and symlink operations (#6689)
@humitos: Disable more loggings in development environment (#6683)
@davidfischer: Use x-forwarded-host in local docker environment (#6679)
@humitos: Allow user to set
build.image: testingin the config file (#6676)@agjohnson: Add azurite –loose option (#6669)
@davidfischer: Enable content security policy in report-only mode (#6642)
Version 4.0.0
- Date
February 25, 2020
This release upgrades our codebase to run on Django 2.2. This is a breaking change, so we have released it as our 4th major version.
@ericholscher: Release 3.12.0 (#6674)
@davidfischer: Show message if version list truncated (#6276)
Version 3.12.0
- Date
February 18, 2020
This version has two major changes:
It updates our default docker images to stable=5.0 and latest=6.0.
It changes our PR builder domain to
readthedocs.build@humitos: Use PUBLIC_DOMAIN_USES_HTTPS for resolver tests (#6673)
@ericholscher: Remove old docker settings (#6670)
@ericholscher: Initial attempt to serve PR builds at
readthedocs.build(#6629)@ericholscher: Remove re-authing of users on downloads. (#6619)
@stsewd: Don’t trigger a sync twice on creation/deletion for GitHub (#6614)
@s-weigand: Add linkcheck test for the docs (#6543)
Version 3.11.6
- Date
February 04, 2020
@ericholscher: Note we aren’t doing GSOC in 2020 (#6618)
@ericholscher: only serve x-rtd-slug project if it exists (#6617)
@ericholscher: Add check for a single_version project having a version_slug for PR builds (#6615)
@ericholscher: Raise exception when we get an InfiniteRedirect (#6609)
@ericholscher: Release 3.11.5 (#6608)
@humitos: Avoid infinite redirect on El Proxito on 404 (#6606)
@stsewd: Don’t error when killing/removing non-existent container (#6605)
@humitos: Use proper path to download/install readthedocs-ext (#6603)
@stsewd: Don’t assume build isn’t None in a docker build env (#6599)
@ericholscher: Fix issue with pip 20.0 breaking on install (#6598)
@agjohnson: Revert “Update celery requirements to its latest version” (#6596)
@Blackcipher101: Changed documentation of Api v3 (#6574)
@ericholscher: Use our standard auth mixin for proxito downloads (#6572)
@humitos: Move common docker compose configs to common repository (#6539)
Version 3.11.5
- Date
January 29, 2020
@humitos: Avoid infinite redirect on El Proxito on 404 (#6606)
@humitos: Use proper path to download/install readthedocs-ext (#6603)
@stsewd: Don’t assume build isn’t None in a docker build env (#6599)
@ericholscher: Fix issue with pip 20.0 breaking on install (#6598)
@agjohnson: Revert “Update celery requirements to its latest version” (#6596)
@agjohnson: Release 3.11.4 again (#6594)
@agjohnson: Release 3.11.4 (#6593)
@ericholscher: Use our standard auth mixin for proxito downloads (#6572)
Version 3.11.4
- Date
January 28, 2020
@humitos: Disable django debug toolbar in El Proxito (#6591)
@humitos: Merge pull request #6588 from readthedocs/humitos/support-ext (#6588)
@ericholscher: Use our standard auth mixin for proxito downloads (#6572)
@ericholscher: Fix /en/latest redirects (#6564)
@stsewd: Merge pull request #6561 from stsewd/move-method (#6561)
@ericholscher: Fix proxito redirects breaking without a / (#6558)
@stsewd: Don’t use an instance of VCS when isn’t needed (#6548)
@saadmk11: Add GitHub OAuth App Permission issue to PR Builder Troubleshooting docs (#6547)
@humitos: Move common docker compose configs to common repository (#6539)
@preetmishra: Update Transifex Integration details in Internationalization page. (#6531)
@Parth1811: Fixes #5388 – Added Documentation for constraint while using Conda (#6509)
@humitos: Show debug toolbar when running docker compose (#6488)
@dibyaaaaax: Add python examples for API v3 Documentation (#6487)
Version 3.11.3
- Date
January 21, 2020
@ericholscher: Pass proper path to redirect code (#6555)
@Daniel-Mietchen: Fixing a broken link (#6550)
@humitos: Add netcat and telnet for celery debugging with rdb (#6518)
@dibyaaaaax: Add www to the broken link (#6513)
@davidfischer: Don’t allow empty tags (#6512)
@Parth1811: Fixes #6510 – Removed the
show_analyticschecks from the template (#6511)@stsewd: Don’t pass build to environment when doing a sync (#6503)
@ericholscher: Release 3.11.2 (#6502)
@Blackcipher101: Added “dirhtml” target (#6500)
@humitos: Use CELERY_APP_NAME to call the proper celery app (#6499)
@stsewd: Copy path from host only when using a LocalBuildEnviroment (#6482)
@stsewd: Set env variables in the same way for DockerBuildEnvironment and Loc… (#6481)
@stsewd: Use environment variable per run, not per container (#6480)
@humitos: Update celery requirements to its latest version (#6448)
@stsewd: Execute checkout step respecting docker setting (#6436)
@humitos: Serve non-html at documentation domain though El Proxito (#6419)
Version 3.11.2
- Date
January 08, 2020
@ericholscher: Fix link to my blog post breaking https (#6495)
@humitos: Use a fixed IP for NGINX under docker-compose (#6491)
@humitos: Add ‘index.html’ to the path before using storage.url(path) (#6476)
@agjohnson: Release 3.11.1 (#6473)
@humitos: Use tasks from common (including docker ones) (#6471)
@humitos: Use django storage to build URL returned by El Proxito (#6466)
@ericholscher: Handle GitHub Push events with
deleted: truein the JSON (#6465)@segevfiner: Remove a stray backtick from import-guide.rst (#6362)
Version 3.11.1
- Date
December 18, 2019
@humitos: Use django storage to build URL returned by El Proxito (#6466)
@ericholscher: Handle GitHub Push events with
deleted: truein the JSON (#6465)@ericholscher: Update troubleshooting steps for PR builder (#6463)
@ericholscher: Add DOCKER_NORELOAD to compose settings (#6461)
@keshavvinayak01: Fixed remove_search_analytics issue (#6447)
@saadmk11: Fix logic to build internal/external versions on update_repos management command (#6442)
@humitos: Refactor get_downloads to make one query for default_version (#6441)
@humitos: Do not expose env variables on external versions (#6440)
@humitos: Bring Azure storage backend classes to this repository (#6433)
@stsewd: Show predefined match on automation rules admin (#6432)
@humitos: inv tasks to use when developing with docker (#6418)
@piyushpalawat99: Fix #6395 (#6402)
@ericholscher: Add an “Edit Versions” listing to the Admin menu (#6110)
@saadmk11: Extend webhook notifications with build status (#5621)
Version 3.11.0
- Date
December 03, 2019
@davidfischer: Use media availability instead of querying the filesystem (#6428)
@stsewd: Remove beta note about sharing by password and header auth (#6426)
@humitos: Use trigger_build for update_repos command (#6422)
@humitos: Add AuthenticationMiddleware to El Proxito tests (#6416)
@humitos: Use WORKDIR to cd into a directory in Dockerfile (#6409)
@humitos: Use /data inside Azurite container to persist data (#6407)
@humitos: Serve non-html files from nginx (X-Accel-Redirect) (#6404)
@humitos: Allow to extend El Proxito views from commercial (#6397)
@humitos: Migrate El Proxito views to class-based views (#6396)
@agjohnson: Fix CSS and how we were handling html in automation rule UI (#6394)
@ericholscher: Release 3.10.0 (#6391)
@ericholscher: Redirect index files in proxito instead of serving (#6387)
@saadmk11: Refactor Subproject validation to use it for Forms and API (#6285)
Version 3.10.0
- Date
November 19, 2019
@ericholscher: Redirect index files in proxito instead of serving (#6387)
@stsewd: Use github actions to trigger tests in corporate (#6376)
@saadmk11: Show only users projects in the APIv3 browsable form (#6374)
@davidfischer: Pin the node dependencies with a package-lock (#6370)
@ericholscher: Small optimization to not compute the highest version when it isn’t displayed (#6360)
@pyup-bot: pyup: Scheduled weekly dependency update for week 44 (#6347)
@ericholscher: Port additional features to proxito (#6286)
Version 3.9.0
- Date
November 12, 2019
@davidfischer: Pin the node dependencies with a package-lock (#6370)
@humitos: Force PUBLIC_DOMAIN_USES_HTTPS on version compare tests (#6367)
@segevfiner: Remove a stray backtick from import-guide.rst (#6362)
@stsewd: Don’t compare inactive or non build versions (#6361)
@ericholscher: Change the default of proxied_api_host to api_host (#6355)
@pyup-bot: pyup: Scheduled weekly dependency update for week 43 (#6334)
@KartikKapil: added previous year gsoc projects (#6333)
@stsewd: Remove files from storage and delete indexes from ES when no longer needed (#6323)
@humitos: Revert “Adding RTD prefix for docker only in setting.py and all… (#6315)
@anindyamanna: Fixed Broken links (#6300)
@sciencewhiz: Fix missing word in wipe guide (#6294)
@jaferkhan: Removed unused code from view and template (#6250) (#6288)
@davidfischer: Store version media availability (#6278)
@davidfischer: Link to the terms of service (#6277)
@humitos: Default to None when using the Serializer as Form for Browsable… (#6266)
@ericholscher: Fix inactive version list not showing when no results returned (#6264)
@ericholscher: Downgrade django-storges. (#6263)
@ericholscher: Release 3.8.0 (#6262)
@davidfischer: Allow project badges for private version (#6252)
@saadmk11: Allow only post requests for delete views (#6242)
@Iamshankhadeep: Changing created to modified time (#6234)
@ericholscher: Initial stub of proxito (#6226)
@saadmk11: Add Better error message for lists in config file (#6200)
@dojutsu-user: Optimize json parsing (#6160)
@tapaswenipathak: Added missing i18n for footer api (#6144)
@dojutsu-user: Remove ‘highlight’ URL param from search results (#6087)
@Iamshankhadeep: Adding RTD prefix for docker only in setting.py and all other places where is needed (#6040)
Version 3.8.0
- Date
October 09, 2019
@davidfischer: Allow project badges for private version (#6252)
@pyup-bot: pyup: Scheduled weekly dependency update for week 40 (#6251)
@humitos: Do not use –cache-dir for pip if CLEAN_AFTER_BUILD is enabled (#6239)
@ericholscher: Initial stub of proxito (#6226)
@davidfischer: Improve the version listview (#6224)
@stsewd: Override production media artifacts on test (#6220)
@davidfischer: Customize default build media storage for the FS (#6215)
@agjohnson: Release 3.7.5 (#6214)
@saadmk11: Only Build Active Versions from Build List Page Form (#6205)
@Iamshankhadeep: moved expandable_fields to meta class (#6198)
@dojutsu-user: Remove pie-chart from search analytics page (#6192)
@humitos: Create subproject relationship via APIv3 endpoint (#6176)
@davidfischer: Add terms of service (#6174)
@davidfischer: Document connected account permissions (#6172)
@dojutsu-user: Optimize json parsing (#6160)
@humitos: APIv3 endpoint: allow to modify a Project once it’s imported (#5952)
Version 3.7.5
- Date
September 26, 2019
@davidfischer: Remove if storage blocks (#6191)
@davidfischer: Update security docs (#6179)
@davidfischer: Add the private spamfighting module to INSTALLED_APPS (#6177)
@davidfischer: Document connected account permissions (#6172)
@pyup-bot: pyup: Scheduled weekly dependency update for week 36 (#6158)
@saadmk11: Remove PR Builder Project Idea from RTD GSoC Docs (#6147)
@ericholscher: Serialize time in search queries properly (#6142)
@dojutsu-user: Add Search Guide (#6101)
@dojutsu-user: Record search queries smartly (#6088)
@dojutsu-user: Remove ‘highlight’ URL param from search results (#6087)
Version 3.7.4
- Date
September 05, 2019
@ericholscher: Remove paid support callout (#6140)
@ericholscher: Fix IntegrationAdmin with raw_id_fields for Projects (#6136)
@ericholscher: Fix link to html_extra_path (#6135)
@stsewd: Move out authorization from FooterHTML view (#6133)
@agjohnson: Add setting for always cleaning the build post-build (#6132)
@pyup-bot: pyup: Scheduled weekly dependency update for week 35 (#6129)
@ericholscher: Use raw_id_fields in the TokenAdmin (#6116)
@davidfischer: Fixed footer ads supported on all themes (#6115)
@dojutsu-user: Record search queries smartly (#6088)
@dojutsu-user: Index more domain data into elasticsearch (#5979)
Version 3.7.3
- Date
August 27, 2019
@davidfischer: Small improvements to the SEO guide (#6105)
@davidfischer: Update intersphinx mapping with canonical sources (#6085)
@davidfischer: Fix lingering 500 issues (#6079)
@davidfischer: Technical docs SEO guide (#6077)
@saadmk11: GitLab Build Status Reporting for PR Builder (#6076)
@davidfischer: Update ad details docs (#6074)
@davidfischer: Gold makes projects ad-free again (#6073)
@saadmk11: Auto Sync and Re-Sync for Manually Created Integrations (#6071)
@pyup-bot: pyup: Scheduled weekly dependency update for week 32 (#6067)
@davidfischer: Send media downloads to analytics (#6063)
@davidfischer: IPv6 in X-Forwarded-For fix (#6062)
@humitos: Remove warning about beta state of conda support (#6056)
@saadmk11: Update GitLab Webhook creating to enable merge request events (#6055)
@ericholscher: Release 3.7.2 (#6054)
@dojutsu-user: Update feature flags docs (#6053)
@saadmk11: Add indelx.html filename to the external doc url (#6051)
@dojutsu-user: Search analytics improvements (#6050)
@stsewd: Sort versions taking into consideration the vcs type (#6049)
@humitos: Avoid returning invalid domain when using USE_SUBDOMAIN=True in dev (#6026)
@dojutsu-user: Search analytics (#6019)
@tapaswenipathak: Remove django-guardian model (#6005)
@stsewd: Add manager and description field to AutomationRule model (#5995)
@davidfischer: Cleanup project tags (#5983)
@davidfischer: Search indexing with storage (#5854)
@wilvk: fix sphinx startup guide to not to fail on rtd build as per #2569 (#5753)
Version 3.7.2
- Date
August 08, 2019
@dojutsu-user: Update feature flags docs (#6053)
@saadmk11: Add indelx.html filename to the external doc url (#6051)
@dojutsu-user: Search analytics improvements (#6050)
@stsewd: Sort versions taking into consideration the vcs type (#6049)
@ericholscher: When called via SyncRepositoryTaskStep this doesn’t exist (#6048)
@davidfischer: Fix around community ads with an explicit ad placement (#6047)
@ericholscher: Release 3.7.1 (#6045)
@saadmk11: Do not delete media storage files for external version (#6035)
@tapaswenipathak: Remove django-guardian model (#6005)
@davidfischer: Cleanup project tags (#5983)
@davidfischer: Search indexing with storage (#5854)
Version 3.7.1
- Date
August 07, 2019
@pyup-bot: pyup: Scheduled weekly dependency update for week 31 (#6042)
@agjohnson: Fix issue with save on translation form (#6037)
@saadmk11: Do not delete media storage files for external version (#6035)
@saadmk11: Do not show wipe version message on build details page for External versions (#6034)
@saadmk11: Send site notification on Build status reporting failure and follow DRY (#6033)
@davidfischer: Use Read the Docs for Business everywhere (#6029)
@davidfischer: Remove project count on homepage (#6028)
@ericholscher: Update get_absolute_url for External Versions (#6020)
@dojutsu-user: Search analytics (#6019)
@saadmk11: Fix issues around remote repository for sending Build status reports (#6017)
@ericholscher: Expand the scope between
before_vcsandafter_vcs(#6015)@davidfischer: Handle .x in version sorting (#6012)
@tapaswenipathak: Update note (#6008)
@davidfischer: Link to Read the Docs for Business docs from relevant sections (#6004)
@davidfischer: Note RTD for Biz requires SSL for custom domains (#6003)
@davidfischer: Allow searching in the Django Admin for gold (#6001)
@dojutsu-user: Fix logic involving creation of Sphinx Domains (#5997)
@dojutsu-user: Fix: no highlighting of matched keywords in search results (#5994)
@saadmk11: Do not copy external version artifacts twice (#5992)
@humitos: Missing list.extend line when appending conda dependencies (#5986)
@dojutsu-user: Use try…catch block with underscore.js template. (#5984)
@davidfischer: Cleanup project tags (#5983)
@ericholscher: Release 3.7.0 (#5982)
@dojutsu-user: Search Fix:
section_subtitle_linkis not defined (#5980)@pyup-bot: pyup: Scheduled weekly dependency update for week 29 (#5975)
@davidfischer: Community only ads for more themes (#5973)
@humitos: Append core requirements to Conda environment file (#5956)
Version 3.7.0
- Date
July 23, 2019
@dojutsu-user: Search Fix:
section_subtitle_linkis not defined (#5980)@davidfischer: Community only ads for more themes (#5973)
@kittenking: Fix typos across readthedocs.org repository (#5971)@dojutsu-user: Fix:
parse_jsonalso including html in titles (#5970)@saadmk11: update external version check for notification task (#5969)
@pranay414: Improve error message for invalid submodule URLs (#5957)
@humitos: Append core requirements to Conda environment file (#5956)
@Abhi-khandelwal: Exclude Spam projects count from total_projects count (#5955)
@ericholscher: Release 3.6.1 (#5953)
@ericholscher: Missed a couple places to set READTHEDOCS_LANGUAGE (#5951)
@dojutsu-user: Hotfix: Return empty dict when no highlight dict is present (#5950)
@humitos: Use a cwd where the user has access inside the container (#5949)
@ericholscher: Integrate indoc search into our prod docs (#5946)
@ericholscher: Explicitly delete SphinxDomain objects from previous versions (#5945)
@ericholscher: Properly return None when there’s no highlight on a hit. (#5944)
@ericholscher: Add READTHEDOCS_LANGUAGE to the environment during builds (#5941)
@ericholscher: Merge the GSOC 2019 in-doc search changes (#5919)
@saadmk11: Add check for external version in conf.py.tmpl for warning banner (#5900)
@Abhi-khandelwal: Point users to commercial solution for their private repositories (#5849)
@ericholscher: Merge initial work from Pull Request Builder GSOC (#5823)
Version 3.6.1
- Date
July 17, 2019
@ericholscher: Missed a couple places to set READTHEDOCS_LANGUAGE (#5951)
@dojutsu-user: Hotfix: Return empty dict when no highlight dict is present (#5950)
@humitos: Use a cwd where the user has access inside the container (#5949)
@ericholscher: Explicitly delete SphinxDomain objects from previous versions (#5945)
@ericholscher: Properly return None when there’s no highlight on a hit. (#5944)
@ericholscher: Release 3.6.0 (#5943)
@ericholscher: Bump the Sphinx extension to 1.0 (#5942)
@ericholscher: Add READTHEDOCS_LANGUAGE to the environment during builds (#5941)
@dojutsu-user: Small search doc fix (#5940)
@dojutsu-user: Indexing speedup (#5939)
@dojutsu-user: Small improvement in parse_json (#5938)
@dojutsu-user: Use
attrgetterin sorted function (#5936)@dojutsu-user: Fix spacing between the results and add highlight url param (#5932)
@ericholscher: Merge the GSOC 2019 in-doc search changes (#5919)
@dojutsu-user: Add tests for section-linking (#5918)
@humitos: APIv3 endpoint to manage Environment Variables (#5913)
@saadmk11: Add check for external version in conf.py.tmpl for warning banner (#5900)
@humitos: Update APIv3 documentation with latest changes (#5895)
Version 3.6.0
- Date
July 16, 2019
@ericholscher: Bump the Sphinx extension to 1.0 (#5942)
@ericholscher: Add READTHEDOCS_LANGUAGE to the environment during builds (#5941)
@dojutsu-user: Small search doc fix (#5940)
@dojutsu-user: Indexing speedup (#5939)
@dojutsu-user: Small improvement in parse_json (#5938)
@dojutsu-user: Use
attrgetterin sorted function (#5936)@dojutsu-user: Fix spacing between the results and add highlight url param (#5932)
@Abhi-khandelwal: remove the usage of six (#5930)
@dojutsu-user: Fix count value of docsearch REST api (#5926)
@ericholscher: Merge the GSOC 2019 in-doc search changes (#5919)
@dojutsu-user: Add tests for section-linking (#5918)
@humitos: APIv3 endpoint to manage Environment Variables (#5913)
@saadmk11: Add Feature Flag to Enable External Version Building (#5910)
@ericholscher: Pass the build_pk to the task instead of the build object itself (#5904)
@saadmk11: Exclude external versions from get_latest_build (#5901)
@humitos: Update APIv3 documentation with latest changes (#5895)
@stsewd: Add tests for version and project querysets (#5894)
@davidfischer: Rework on documentation guides (#5893)
@davidfischer: Fix spaces in email subject link (#5891)
@saadmk11: Build only HTML and Save external version artifacts in different directory (#5886)
@ericholscher: Add config to Build and Version admin (#5877)
@pyup-bot: pyup: Scheduled weekly dependency update for week 26 (#5874)
@pranay414: Change rtfd to readthedocs (#5871)
@saadmk11: Send Build Status Report Using GitHub Status API (#5865)
@dojutsu-user: Add section linking for the search result (#5829)
Version 3.5.3
- Date
June 19, 2019
@davidfischer: Treat docs warnings as errors (#5825)
@davidfischer: Fix some unclear verbiage (#5820)
@davidfischer: Rework documentation index page (#5819)
@davidfischer: Upgrade intersphinx to Django 1.11 (#5818)
@pyup-bot: pyup: Scheduled weekly dependency update for week 24 (#5817)
@humitos: Disable changing domain when editing the object (#5816)
@saadmk11: Update docs with sitemap sort order change (#5815)
@davidfischer: Optimize requests to APIv3 (#5803)
@ericholscher: Show build length in the admin (#5802)
@ericholscher: A few small improvements to help with search admin stuff (#5800)
@humitos: Use a real SessionBase object on FooterNoSessionMiddleware (#5797)
@davidfischer: Mention security issue in the changelog (#5790)
@stsewd: Use querysets from the class not from an instance (#5783)
@saadmk11: Add Build managers and Update Build Querysets. (#5779)
@davidfischer: Project advertising page/form update (#5777)
@davidfischer: Update docs around opt-out of ads (#5776)
@dojutsu-user: [Design Doc] In Doc Search UI (#5707)
@humitos: Support single version subprojects URLs to serve from Django (#5690)
@agjohnson: Add a contrib Dockerfile for local build image on Linux (#4608)
Version 3.5.2
This is a quick hotfix to the previous version.
- Date
June 11, 2019
@ericholscher: Fix version of our sphinx-ext we’re installing (#5789)
Version 3.5.1
This version contained a security fix for an open redirect issue. The problem has been fixed and deployed on readthedocs.org. For users who depend on the Read the Docs code line for a private instance of Read the Docs, you are encouraged to update to 3.5.1 as soon as possible.
- Date
June 11, 2019
@saadmk11: Validate dict when parsing the mkdocs.yml file (#5775)
@davidfischer: Domain UI improvements (#5764)
@ericholscher: Try to fix Elastic connection pooling issues (#5763)
@pyup-bot: pyup: Scheduled weekly dependency update for week 22 (#5762)
@ericholscher: Try to fix Elastic connection pooling issues (#5760)
@davidfischer: Escape variables in mkdocs data (#5759)
@humitos: Serve 404/index.html file for htmldir Sphinx builder (#5754)
@wilvk: fix sphinx startup guide to not to fail on rtd build as per #2569 (#5753)
@agjohnson: Clarify latexmk option usage (#5745)
@ericholscher: Hotfix latexmx builder to ignore error codes (#5744)
@ericholscher: Hide the Code API search in the UX for now. (#5743)
@davidfischer: Add init.py under readthedocs/api (#5742)
@dojutsu-user: Fix design docs missing from toctree (#5741)
@ericholscher: Release 3.5.0 (#5740)
@davidfischer: Fix the sidebar ad color (#5731)
@humitos: Move version “Clean” button to details page (#5706)
@gorshunovr: Update flags documentation (#5701)
@davidfischer: Storage updates (#5698)
@davidfischer: Optimizations and UX improvements to the dashboard screen (#5637)
@chrisjsewell: Use
--upgradeinstead of--force-reinstallfor pip installs (#5635)@stsewd: Move file validations out of the config module (#5627)
@shivanshu1234: Add link to in-progress build from dashboard. (#5431)
Version 3.5.0
- Date
May 30, 2019
@pyup-bot: pyup: Scheduled weekly dependency update for week 21 (#5737)
@humitos: Update feature flags exposed to user in docs (#5734)
@davidfischer: Fix the sidebar ad color (#5731)
@davidfischer: Create a funding file (#5729)
@davidfischer: Small commercial hosting page rework (#5728)
@mattparrilla: Add note about lack of support for private repos (#5726)
@cclauss: Identity is not the same thing as equality in Python (#5713)
@pyup-bot: pyup: Scheduled weekly dependency update for week 20 (#5712)
@humitos: Move version “Clean” button to details page (#5706)
@ericholscher: Explicitly mention a support email (#5703)
@davidfischer: Storage updates (#5698)
@pyup-bot: pyup: Scheduled weekly dependency update for week 19 (#5692)
@saadmk11: Warning about using sqlite 3.26.0 for development (#5681)
@davidfischer: Configure the security middleware (#5679)
@pyup-bot: pyup: Scheduled weekly dependency update for week 18 (#5667)
@saadmk11: pylint fix for notifications, restapi and config (#5664)
@humitos: Upgrade docker python package to latest release (#5654)
@pyup-bot: pyup: Scheduled weekly dependency update for week 17 (#5645)
@saadmk11: Sitemap hreflang syntax invalid for regional language variants fix (#5638)
@davidfischer: Optimizations and UX improvements to the dashboard screen (#5637)
@davidfischer: Redirect project slugs with underscores (#5634)
@saadmk11: Standardizing the use of settings directly (#5632)
@saadmk11: Note for Docker image size in Docker instructions (#5630)
@davidfischer: UX improvements around SSL certificates (#5629)
@davidfischer: Gold project sponsorship changes (#5628)
@davidfischer: Make sure there’s a contact when opting out of advertising (#5626)
@dojutsu-user: hotfix: correct way of getting environment variables (#5622)
@pyup-bot: pyup: Scheduled weekly dependency update for week 16 (#5619)
@ericholscher: Release 3.4.2 (#5613)
@ericholscher: Add explicit egg version to unicode-slugify (#5612)
@dojutsu-user: Remove ProxyMiddleware (#5607)
@dojutsu-user: Remove ‘Versions’ tab from Admin Dashboard. (#5600)
@dojutsu-user: Notify the user when deleting a superproject (#5596)
@saadmk11: Handle 401, 403 and 404 when setting up webhooks (#5589)
@saadmk11: Unify usage of settings and remove the usage of getattr for settings (#5588)
@saadmk11: Validate docs dir before writing custom js (#5569)
@shivanshu1234: Specify python3 in installation instructions. (#5552)
@davidfischer: Write build artifacts to (cloud) storage from build servers (#5549)
@saadmk11: “Default branch: latest” does not exist Fix. (#5547)
@dojutsu-user: Update
readthedocs-environment.jsonfile when env vars are added/deleted (#5540)@ericholscher: Add search for DomainData objects (#5290)
@gorshunovr: Change version references to :latest tag (#5245)
@dojutsu-user: Fix buttons problems in ‘Change Email’ section. (#5219)
Version 3.4.2
- Date
April 22, 2019
@ericholscher: Add explicit egg version to unicode-slugify (#5612)
@saadmk11: Update Environmental Variable character limit (#5597)
@davidfischer: Add meta descriptions to top documentation (#5593)
@pyup-bot: pyup: Scheduled weekly dependency update for week 14 (#5580)
@davidfischer: Fix for Firefox to close the ad correctly (#5571)
@davidfischer: Non mobile fixed footer ads (#5567)
@ericholscher: Release 3.4.1 (#5566)
@dojutsu-user: Update
readthedocs-environment.jsonfile when env vars are added/deleted (#5540)@saadmk11: Sitemap assumes that all versions are translated Fix. (#5535)
@saadmk11: Remove Header Login button from login page (#5534)
@davidfischer: Optimize database performance of the footer API (#5530)
@stsewd: Don’t depend of enabled pdf/epub to show downloads (#5502)
@saadmk11: Don’t allow to create subprojects with same alias (#5404)
@saadmk11: Improve project translation listing Design under admin tab (#5380)
Version 3.4.1
- Date
April 03, 2019
@pyup-bot: pyup: Scheduled weekly dependency update for week 13 (#5558)
@pyup-bot: pyup: Scheduled weekly dependency update for week 12 (#5536)
@saadmk11: Sitemap assumes that all versions are translated Fix. (#5535)
@saadmk11: Remove Header Login button from login page (#5534)
@stevepiercy: Add pylons-sphinx-themes to list of supported themes (#5533)
@davidfischer: Optimize database performance of the footer API (#5530)
@davidjb: Update contributing docs for RTD’s own docs (#5522)
@davidfischer: Guide users to the YAML config from the build detail page (#5519)
@stsewd: Link to the docdir of the remote repo in non-rtd themes for mkdocs (#5513)
@stevepiercy: Tidy up grammar, promote Unicode characters (#5511)
@stsewd: Catch specific exception for config not found (#5510)
@dojutsu-user: Use ValueError instead of InvalidParamsException (#5509)
@stsewd: Don’t depend of enabled pdf/epub to show downloads (#5502)
@ericholscher: Remove search & API from robots.txt (#5501)
@rshrc: Added note warning about using sqlite 3.26.0 in development (#5491)
@ericholscher: Fix bug that caused search objects not to delete (#5487)
@ericholscher: Release 3.4.0 (#5486)
@davidfischer: Promote the YAML config (#5485)
@pyup-bot: pyup: Scheduled weekly dependency update for week 11 (#5483)
@davidfischer: Enable Django Debug Toolbar in development (#5464)
@davidfischer: Optimize the version list screen (#5460)
@dojutsu-user: Remove asserts from code. (#5452)
@davidfischer: Optimize the repos API query (#5451)
@stsewd: Always update the commit of the stable version (#5421)
@orlnub123: Fix pip installs (#5386)
@davidfischer: Add an application form for community ads (#5379)
Version 3.4.0
- Date
March 18, 2019
@davidfischer: Promote the YAML config (#5485)
@davidfischer: Enable Django Debug Toolbar in development (#5464)
@davidfischer: Optimize the version list screen (#5460)
@dojutsu-user: Update links to point to
stableversion. (#5455)@dojutsu-user: Fix inconsistency in footer links (#5454)
@davidfischer: Optimize the repos API query (#5451)
@pyup-bot: pyup: Scheduled weekly dependency update for week 10 (#5432)
@shivanshu1234: Remove invalid example from v2.rst (#5430)
@stsewd: Always update the commit of the stable version (#5421)
@agarwalrounak: Document that people can create a version named stable (#5417)
@agarwalrounak: Update installation guide to include submodules (#5416)
@humitos: Communicate the project slug can be changed by requesting it (#5403)
@pyup-bot: pyup: Scheduled weekly dependency update for week 09 (#5395)
@dojutsu-user: Trigger build on default branch when saving a project (#5393)
@orlnub123: Fix pip installs (#5386)
@ericholscher: Be extra explicit about the CNAME (#5382)
@ericholscher: Release 3.3.1 (#5376)
@ericholscher: Add a GSOC section for openAPI (#5375)
@dojutsu-user: Make ‘default_version` field as readonly if no active versions are found. (#5374)
@ericholscher: Be more defensive with our storage uploading (#5371)
@ericholscher: Check for two paths for each file (#5370)
@ericholscher: Don’t show projects in Sphinx Domain Admin sidebar (#5367)
@davidfischer: Remove the v1 API (#5293)
Version 3.3.1
- Date
February 28, 2019
@ericholscher: Be more defensive with our storage uploading (#5371)
@ericholscher: Check for two paths for each file (#5370)
@ericholscher: Don’t show projects in Sphinx Domain Admin sidebar (#5367)
@ericholscher: Fix sphinx domain models and migrations (#5363)
@ericholscher: Release 3.3.0 (#5361)
@ericholscher: Fix search bug when an empty list of objects_id was passed (#5357)
@dojutsu-user: Add admin methods for reindexing versions from project and version admin. (#5343)
@stsewd: Cleanup a little of documentation_type from footer (#5315)
@ericholscher: Add modeling for intersphinx data (#5289)
@ericholscher: Revert “Merge pull request #4636 from readthedocs/search_upgrade” (#4716)
@safwanrahman: [GSoC 2018] All Search Improvements (#4636)
@stsewd: Add schema for configuration file with yamale (#4084)
Version 3.3.0
- Date
February 27, 2019
@ericholscher: Fix search bug when an empty list of objects_id was passed (#5357)
@agjohnson: Update UI translations (#5354)
@ericholscher: Update GSOC page to mention we’re accepted. (#5353)
@pyup-bot: pyup: Scheduled weekly dependency update for week 08 (#5352)
@dojutsu-user: Increase path’s max_length for ImportedFile model to 4096 (#5345)
@dojutsu-user: Add admin methods for reindexing versions from project and version admin. (#5343)
@dojutsu-user: Remove deprecated code (#5341)
@stsewd: Don’t depend on specific data when catching exception (#5326)
@regisb: Fix “clean_builds” command argument parsing (#5320)
@stsewd: Cleanup a little of documentation_type from footer (#5315)
@humitos: Warning note about running ES locally for tests (#5314)
@humitos: Update documentation on running test for python environment (#5313)
@ericholscher: Release 3.2.3 (#5312)
@ericholscher: Add basic auth to the generic webhook API. (#5311)
@ericholscher: Fix an issue where we were not properly filtering projects (#5309)
@rexzing: Incompatible dependency for prospector with pylint-django (#5306)
@davidfischer: Allow extensions to control URL structure (#5296)
@ericholscher: Add modeling for intersphinx data (#5289)
@saadmk11: #4036 Updated build list to include an alert state (#5222)
@humitos: Use unicode-slugify to generate Version.slug (#5186)
@dojutsu-user: Add admin functions for wiping a version (#5140)
@davidfischer: Store ePubs and PDFs in media storage (#4947)
@ericholscher: Revert “Merge pull request #4636 from readthedocs/search_upgrade” (#4716)
@safwanrahman: [GSoC 2018] All Search Improvements (#4636)
Version 3.2.3
- Date
February 19, 2019
@ericholscher: Add basic auth to the generic webhook API. (#5311)
@ericholscher: Fix an issue where we were not properly filtering projects (#5309)
@rexzing: Incompatible dependency for prospector with pylint-django (#5306)
@pyup-bot: pyup: Scheduled weekly dependency update for week 07 (#5305)
@davidfischer: Allow extensions to control URL structure (#5296)
Version 3.2.2
- Date
February 13, 2019
@ericholscher: Support old jquery where responseJSON doesn’t exist (#5285)
@dojutsu-user: Fix error of travis (rename migration file) (#5282)
@discdiver: clarify github integration needs
https://prepended (#5273)@davidfischer: Add note about security issue (#5263)
@ericholscher: Don’t delay search delete on project delete (#5262)
@agjohnson: Automate docs version from our setup.cfg (#5259)
@agjohnson: Add admin actions for building versions (#5255)
@ericholscher: Give the 404 page a title. (#5252)
@humitos: Make our SUFFIX default selection py2/3 compatible (#5251)
@ericholscher: Release 3.2.1 (#5248)
@ericholscher: Remove excluding files on search. (#5246)
@gorshunovr: Change version references to :latest tag (#5245)
@stsewd: Allow to override trigger_build from demo project (#5236)
@ericholscher: Change some info logging to debug to clean up build output (#5233)
@EJEP: Clarify ‘more info’ link in admin settings page (#5180)
Version 3.2.1
- Date
February 07, 2019
@ericholscher: Remove excluding files on search. (#5246)
@ericholscher: Don’t update search on HTMLFile save (#5244)
@ericholscher: Be more defensive in our 404 handler (#5243)
@humitos: Install sphinx-notfound-page for building 404.html custom page (#5242)
@ericholscher: Release 3.2.0 (#5240)
Version 3.2.0
- Date
February 06, 2019
@ericholscher: Support passing an explicit
index_namefor search indexing (#5239)@davidfischer: Tweak some ad styles (#5237)
@ericholscher: Update our GSOC page for 2019 (#5210)
@humitos: Do not allow to merge ‘Status: blocked’ PRs (#5205)
@ericholscher: Remove approvals requirement from mergeable (#5200)
@agjohnson: Update project notification copy to past tense (#5199)
@ericholscher: Refactor search code (#5197)
@dojutsu-user: Change badge style (#5189)
@humitos: Upgrade all packages removing py2 compatibility (#5179)
@dojutsu-user: Small docs fix (#5176)
@stsewd: Sync all services even if one social accoun fails (#5171)
@ericholscher: Release 3.1.0 (#5170)
@stsewd: Remove logic for guessing slug from an unregistered domain (#5143)
@dojutsu-user: Docs for feature flag (#5043)
@stsewd: Remove usage of project.documentation_type in tasks (#4896)
@ericholscher: Reapply the Elastic Search upgrade to
master(#4722)
Version 3.1.0
This version greatly improves our search capabilities, thanks to the Google Summer of Code. We’re hoping to have another version of search coming soon after this, but this is a large upgrade moving to the latest Elastic Search.
- Date
January 24, 2019
@ericholscher: Fix docs build (#5164)
@ericholscher: Release 3.0.0 (#5163)
@dojutsu-user: Sort versions smartly everywhere (#5157)
@dojutsu-user: Implement get objects or log (#4900)
@stsewd: Remove usage of project.documentation_type in tasks (#4896)
@ericholscher: Reapply the Elastic Search upgrade to
master(#4722)
Version 3.0.0
Read the Docs now only supports Python 3.6+. This is for people running the software on their own servers, builds continue to work across all supported Python versions.
- Date
January 23, 2019
@dojutsu-user: Sort versions smartly everywhere (#5157)
@ericholscher: Fix Sphinx conf.py inserts (#5150)
@ericholscher: Upgrade recommonmark to latest and fix integration (#5146)
@ericholscher: Fix local-docs-build requirements (#5136)
@humitos: Configuration file for ProBot Mergeable Bot (#5132)
@xavfernandez: docs: fix integration typos (#5128)
@Hamdy722: Update LICENSE (#5125)@humitos: Validate mkdocs.yml config on values that we manipulate (#5119)
@ericholscher: Check that the repo exists before trying to get a git commit (#5115)
@ericholscher: Release 2.8.5 (#5111)
@stsewd: Use the python path from virtualenv in Conda (#5110)
@humitos: Feature flag to use
readthedocs/build:testingimage (#5109)@stsewd: Use python from virtualenv’s bin directory when executing commands (#5107)
@dojutsu-user: Split requirements/pip.txt (#5100)
@humitos: Do not list banned projects under /projects/ (#5097)
@davidfischer: Fire a signal for domain verification (eg. for SSL) (#5071)
@dojutsu-user: Use default settings for Config object (#5056)
@agjohnson: Allow large form posts via multipart encoded forms to command API (#5000)
@dojutsu-user: Validate url from webhook notification (#4983)
@dojutsu-user: Display error, using inbuilt notification system, if primary email is not verified (#4964)
@dojutsu-user: Implement get objects or log (#4900)
@humitos: CRUD for EnvironmentVariables from Project’s admin (#4899)
@stsewd: Remove usage of project.documentation_type in tasks (#4896)
@dojutsu-user: Fix the failing domain deletion task (#4891)
@humitos: Appropriate logging when a LockTimeout for VCS is reached (#4804)
@bansalnitish: Added a link to open new issue with prefilled details (#3683)
Version 2.8.5
- Date
January 15, 2019
@stsewd: Use the python path from virtualenv in Conda (#5110)
@humitos: Feature flag to use
readthedocs/build:testingimage (#5109)@stsewd: Use python from virtualenv’s bin directory when executing commands (#5107)
@agjohnson: Fix common pieces (#5095)
@rainwoodman: Suppress progress bar of the conda command. (#5094)
@humitos: Remove unused suggestion block from 404 pages (#5087)
@humitos: Remove header nav (Login/Logout button) on 404 pages (#5085)
@agjohnson: Split up deprecated view notification to GitHub and other webhook endpoints (#5083)
@davidfischer: Fire a signal for domain verification (eg. for SSL) (#5071)
@agjohnson: Update copy on notifications for github services deprecation (#5067)
@dojutsu-user: Reduce logging to sentry (#5054)
@discdiver: fixed missing apostrophe for possessive “project’s” (#5052)
@dojutsu-user: Template improvements in “gold/subscription_form.html” (#5049)
@stephenfin: Add temporary method for disabling shallow cloning (#5031) (#5036)
@dojutsu-user: Change default_branch value from Version.slug to Version.identifier (#5034)
@humitos: Convert an IRI path to URI before setting as NGINX header (#5024)
@safwanrahman: index project asynchronously (#5023)
@ericholscher: Release 2.8.4 (#5011)
@davidfischer: Tweak sidebar ad priority (#5005)
@stsewd: Replace git status and git submodules status for gitpython (#5002)
@davidfischer: Backport jquery 2432 to Read the Docs (#5001)
@dojutsu-user: Make $ unselectable in docs (#4990)
@dojutsu-user: Remove deprecated “models.permalink” (#4975)
@dojutsu-user: Add validation for tags of length greater than 100 characters (#4967)
@dojutsu-user: Add test case for send_notifications on VersionLockedError (#4958)
@dojutsu-user: Remove trailing slashes on svn checkout (#4951)
@humitos: CRUD for EnvironmentVariables from Project’s admin (#4899)
@humitos: Notify users about the usage of deprecated webhooks (#4898)
@dojutsu-user: Disable django guardian warning (#4892)
@humitos: Handle 401, 403 and 404 status codes when hitting GitHub for webhook (#4805)
Version 2.8.4
- Date
December 17, 2018
@davidfischer: Tweak sidebar ad priority (#5005)
@davidfischer: Backport jquery 2432 to Read the Docs (#5001)
@ericholscher: Remove codecov comments and project coverage CI status (#4996)
@dojutsu-user: Link update on FAQ page (#4988)
@ericholscher: Only use remote branches for our syncing. (#4984)
@humitos: Sanitize output and chunk it at DATA_UPLOAD_MAX_MEMORY_SIZE (#4982)
@humitos: Modify DB field for container_time_limit to be an integer (#4979)
@dojutsu-user: Remove deprecated imports from “urlresolvers” (#4976)
@davidfischer: Workaround for a django-storages bug (#4963)
@ericholscher: Release 2.8.3 (#4961)
@dojutsu-user: Validate profile form fields (#4910)
@davidfischer: Calculate actual ad views (#4885)
@humitos: Allow all /api/v2/ CORS if the Domain is known (#4880)
@dojutsu-user: Disable django.security.DisallowedHost from logging (#4879)
@dojutsu-user: Remove ‘Sphinx Template Changes’ From Docs (#4878)
@dojutsu-user: Make form for adopting project a choice field (#4841)
@dojutsu-user: Add ‘Branding’ under the ‘Business Info’ section and ‘Guidelines’ on ‘Design Docs’ (#4830)
@dojutsu-user: Raise 404 at SubdomainMiddleware if the project does not exist. (#4795)
@dojutsu-user: Add help_text in the form for adopting a project (#4781)
@dojutsu-user: Remove /embed API endpoint (#4771)
@dojutsu-user: Improve unexpected error message when build fails (#4754)
@dojutsu-user: Change the way of using login_required decorator (#4723)
@dojutsu-user: Fix the form for adopting a project (#4721)
Version 2.8.3
- Date
December 05, 2018
@humitos: Pin redis to the current stable and compatible version (#4956)
@ericholscher: Release 2.8.2 (#4931)
@dojutsu-user: Validate profile form fields (#4910)
@davidfischer: Calculate actual ad views (#4885)
@stsewd: Sync versions when creating/deleting versions (#4876)
@dojutsu-user: Remove unused project model fields (#4870)
Version 2.8.2
- Date
November 28, 2018
@safwanrahman: Tuning Elasticsearch for search improvements (#4909)
@edmondchuc: Fixed some typos. (#4906)
@humitos: Upgrade stripe Python package to the latest version (#4904)
@humitos: Retry on API failure when connecting from builders (#4902)
@humitos: Expose environment variables from database into build commands (#4894)
@ericholscher: Use python to expand the cwd instead of environment variables (#4882)
@dojutsu-user: Disable django.security.DisallowedHost from logging (#4879)
@dojutsu-user: Remove ‘Sphinx Template Changes’ From Docs (#4878)
@ericholscher: Unbreak the admin on ImportedFile by using raw_id_fields (#4874)
@stsewd: Check if latest exists before updating identifier (#4873)
@ericholscher: Release 2.8.1 (#4872)
@dojutsu-user: Update django-guardian settings (#4871)
@dojutsu-user: Change ‘VerisionLockedTimeout’ to ‘VersionLockedError’ in comment. (#4859)
@humitos: Appropriate logging when a LockTimeout for VCS is reached (#4804)
@stsewd: Remove support for multiple configurations in one file (#4800)
@invinciblycool: Redirect to build detail post manual build (#4622)
@davidfischer: Enable timezone support and set timezone to UTC (#4545)
@chirathr: Webhook notification URL size validation check (#3680)
Version 2.8.1
- Date
November 06, 2018
@ericholscher: Fix migration name on modified date migration (#4867)
@dojutsu-user: Change ‘VerisionLockedTimeout’ to ‘VersionLockedError’ in comment. (#4859)
@ericholscher: Shorten project name to match slug length (#4856)
@stsewd: Generic message for parser error of config file (#4853)
@ericholscher: Add modified_date to ImportedFile. (#4850)
@ericholscher: Use raw_id_fields so that the Feature admin loads (#4849)
@benjaoming: Version compare warning text (#4842)
@dojutsu-user: Make form for adopting project a choice field (#4841)
@humitos: Do not send notification on VersionLockedError (#4839)
@ericholscher: Add all migrations that are missing from model changes (#4837)
@ericholscher: Add docstring to DrfJsonSerializer so we know why it’s there (#4836)
@ericholscher: Show the project’s slug in the dashboard (#4834)
@ericholscher: Allow filtering builds by commit. (#4831)
@dojutsu-user: Add ‘Branding’ under the ‘Business Info’ section and ‘Guidelines’ on ‘Design Docs’ (#4830)
@davidfischer: Migrate old passwords without “set_unusable_password” (#4829)
@humitos: Do not import the Celery worker when running the Django app (#4824)
@invinciblycool: Add MkDocsYAMLParseError (#4814)
@humitos: Feature flag to make
readthedocstheme default on MkDocs docs (#4802)@ericholscher: Allow use of
file://urls in repos during development. (#4801)@ericholscher: Release 2.7.2 (#4796)
@dojutsu-user: Raise 404 at SubdomainMiddleware if the project does not exist. (#4795)
@dojutsu-user: Add help_text in the form for adopting a project (#4781)
@sriks123: Remove logic around finding config file inside directories (#4755)
@dojutsu-user: Improve unexpected error message when build fails (#4754)
@stsewd: Don’t build latest on webhook if it is deactivated (#4733)
@dojutsu-user: Change the way of using login_required decorator (#4723)
@invinciblycool: Remove unused views and their translations. (#4632)
@invinciblycool: Redirect to build detail post manual build (#4622)
@anubhavsinha98: Issue #4551 Changed mock docks to use sphinx (#4569)
@Alig1493: Fix for issue #4092: Remove unused field from Project model (#4431)
@xrmx: make it easier to use a different default theme (#4278)
@humitos: Document alternate domains for business site (#4271)
@xrmx: restapi/client: don’t use DRF parser for parsing (#4160)
@julienmalard: New languages (#3759)
@Alig1493: [Fixed #872] Filter Builds according to commit (#3544)
Version 2.8.0
- Date
October 30, 2018
Major change is an upgrade to Django 1.11.
@humitos: Feature flag to make
readthedocstheme default on MkDocs docs (#4802)@humitos: Pin missing dependency for the MkDocs guide compatibility (#4798)
@ericholscher: Release 2.7.2 (#4796)
@humitos: Do not log as error a webhook with an invalid branch name (#4779)
@ericholscher: Run travis on release branches (#4763)
@ericholscher: Remove Eric & Anthony from ADMINS & MANAGERS settings (#4762)
@davidfischer: Django 1.11 upgrade (#4750)
@stsewd: Remove hardcoded constant from config module (#4704)
Version 2.7.2
- Date
October 23, 2018
@humitos: Validate the slug generated is valid before importing a project (#4780)
@humitos: Do not log as error a webhook with an invalid branch name (#4779)
@ericholscher: Add an index page to our design docs. (#4775)
@dojutsu-user: Remove /embed API endpoint (#4771)
@ericholscher: Remove Eric & Anthony from ADMINS & MANAGERS settings (#4762)
@humitos: Do not re-raise the exception if the one that we are checking (#4761)
@humitos: Do not fail when unlinking an non-existing path (#4760)
@humitos: Allow to extend the DomainForm from outside (#4752)
@davidfischer: Fixes an OSX issue with the test suite (#4748)
@davidfischer: Make storage syncers extend from a base class (#4742)
@ericholscher: Revert “Upgrade theme media to 0.4.2” (#4735)
@ericholscher: Upgrade theme media to 0.4.2 (#4734)
@stsewd: Extend install option from config file (v2, schema only) (#4732)
@ericholscher: Fix get_vcs_repo by moving it to the Mixin (#4727)
@humitos: Guide explaining how to keep compatibility with mkdocs (#4726)
@ericholscher: Release 2.7.1 (#4725)
@dojutsu-user: Fix the form for adopting a project (#4721)
@ericholscher: Remove logging verbosity on syncer failure (#4717)
@davidfischer: Improve the getting started docs (#4676)
@stsewd: Strict validation in configuration file (v2 only) (#4607)
Version 2.7.1
- Date
October 04, 2018
@ericholscher: Revert “Merge pull request #4636 from readthedocs/search_upgrade” (#4716)
@ericholscher: Reduce the logging we do on CNAME 404 (#4715)
@davidfischer: Minor redirect admin improvements (#4709)
@humitos: Define the doc_search reverse URL from inside the __init__ on test (#4703)
@ericholscher: Revert “auto refresh false” (#4701)
@browniebroke: Remove unused package nilsimsa (#4697)
@safwanrahman: Tuning elasticsearch shard and replica (#4689)
@ericholscher: Fix bug where we were not indexing Sphinx HTMLDir projects (#4685)
@ericholscher: Fix the queryset used in chunking (#4683)
@ericholscher: Fix python 2 syntax for getting first key in search index update (#4682)
@ericholscher: Release 2.7.0 (#4681)
@davidfischer: Increase footer ad text size (#4678)
@davidfischer: Fix broken docs links (#4677)
@ericholscher: Remove search autosync from tests so local tests work (#4675)
@davidfischer: Ad customization docs (#4659)
@davidfischer: Fix a typo in the privacy policy (#4658)
@davidfischer: Create an explicit ad placement (#4647)
@agjohnson: Use collectstatic on
media/, without collecting user files (#4502)@agjohnson: Add docs on our roadmap process (#4469)
@humitos: Send notifications when generic/unhandled failures (#3864)
Version 2.7.0
- Date
September 29, 2018
Reverted, do not use
Version 2.6.6
- Date
September 25, 2018
@davidfischer: Fix a markdown test error (#4663)
@davidfischer: Ad customization docs (#4659)
@davidfischer: Fix a typo in the privacy policy (#4658)
@agjohnson: Put search step back into project build task (#4655)
@davidfischer: Create an explicit ad placement (#4647)
@safwanrahman: [Fix #4247] deleting old search code (#4635)
@davidfischer: Make ads more obvious that they are ads (#4628)
@agjohnson: Change mentions of “CNAME” -> custom domain (#4627)
@invinciblycool: Use validate_dict for more accurate error messages (#4617)
@safwanrahman: fixing the indexing (#4615)
@agjohnson: Add cwd to subprocess calls (#4611)
@agjohnson: Make restapi URL additions conditional (#4609)
@agjohnson: Ability to use supervisor from python 2.7 and still run Python 3 (#4606)
@humitos: Return 404 for inactive versions and allow redirects on them (#4599)
@davidfischer: Fixes an issue with duplicate gold subscriptions (#4597)
@davidfischer: Fix ad block nag project issue (#4596)
@humitos: Run all our tests with Python 3.6 on Travis (#4592)
@humitos: Sanitize command output when running under DockerBuildEnvironment (#4591)
@humitos: Force resolver to use PUBLIC_DOMAIN over HTTPS if not Domain.https (#4579)
@davidfischer: Updates and simplification for mkdocs (#4556)
@humitos: Docs for hiding “On …” section from versions menu (#4547)
@safwanrahman: [Fix #4268] Adding Documentation for upgraded Search (#4467)
@humitos: Clean CC sensible data on Gold subscriptions (#4291)
@stsewd: Update docs to match the new triague guidelines (#4260)
@xrmx: Make the STABLE and LATEST constants overridable (#4099)
Version 2.6.5
- Date
August 29, 2018
@agjohnson: Respect user language when caching homepage (#4585)
@humitos: Add start and termination to YAML file regex (#4584)
@safwanrahman: [Fix #4576] Do not delete projects which have multiple users (#4577)
Version 2.6.4
- Date
August 29, 2018
@davidfischer: Add a flag to disable docsearch (#4570)
@davidfischer: Add a note about specifying the version of build tools (#4562)
@davidfischer: Serve badges directly from local filesystem (#4561)
@humitos: Sanitize BuildCommand.output by removing NULL characters (#4552)
@davidfischer: Fix changelog for 2.6.3 (#4548)
@ericholscher: Remove hiredis (#4542)
@davidfischer: Use the STATIC_URL for static files to avoid redirection (#4522)
@StefanoChiodino: Allow for period as a prefix and yaml extension for config file (#4512)
@AumitLeon: Update information on mkdocs build process (#4508)
@humitos: Fix Exact Redirect to work properly when using $rest keyword (#4501)
@humitos: Mark some BuildEnvironmentError exceptions as Warning and do not log them (#4495)
@xrmx: projects: don’t explode trying to update UpdateDocsTaskStep state (#4485)
@humitos: Note with the developer flow to update our app translations (#4481)
@humitos: Add
trimmedto all multilinesblocktranstags (#4480)@humitos: Example and note with usage of trimmed option in blocktrans (#4479)
@humitos: Update Transifex resources for our documentation (#4478)
@stsewd: Port https://github.com/readthedocs/readthedocs-build/pull/38/ (#4461)
@humitos: Skip tags that point to blob objects instead of commits (#4442)
@stsewd: Document python.use_system_site_packages option (#4422)
@humitos: More tips about how to reduce resources usage (#4419)
@xrmx: projects: user in ProjectQuerySetBase.for_admin_user is mandatory (#4417)
Version 2.6.3
- Date
August 18, 2018
Release to Azure!
@davidfischer: Add Sponsors list to footer (#4424)
@xrmx: templates: mark missing string for translation on project edit (#4518)
@ericholscher: Performance improvement: cache version listing on the homepage (#4526)
@agjohnson: Remove mailgun from our dependencies (#4531)
@davidfischer: Improved ad block detection (#4532)
@agjohnson: Revert “Remove SelectiveFileSystemFolder finder workaround” (#4533)
@davidfischer: Slight clarification on turning off ads for a project (#4534)
@davidfischer: Fix the sponsor image paths (#4535)
@agjohnson: Update build assets (#4537)
Version 2.6.2
- Date
August 14, 2018
@davidfischer: Custom domain clarifications (#4514)
@davidfischer: Support ads on pallets themes (#4499)
@davidfischer: Only use HostHeaderSSLAdapter for SSL/HTTPS connections (#4498)
@keflavich: Very minor English correction (#4497)
@davidfischer: All static media is run through “collectstatic” (#4489)
@nijel: Document expected delay on CNAME change and need for CAA (#4487)
@davidfischer: Allow enforcing HTTPS for custom domains (#4483)
@davidfischer: Add some details around community ad qualifications (#4436)
@davidfischer: Updates to manifest storage (#4430)
@davidfischer: Update alt domains docs with SSL (#4425)
@agjohnson: Add SNI support for API HTTPS endpoint (#4423)
@davidfischer: API v1 cleanup (#4415)
@davidfischer: Allow filtering versions by active (#4414)
@safwanrahman: [Fix #4407] Port Project Search for Elasticsearch 6.x (#4408)
@davidfischer: Add client ID to Google Analytics requests (#4404)
@xrmx: projects: fix filtering in projects_tag_detail (#4398)
@davidfischer: Fix a proxy model bug related to ad-free (#4390)
@davidfischer: Do not access database from builds to check ad-free (#4387)
@stsewd: Set full
source_filepath for default configuration (#4379)@humitos: Make
get_versionusable from a specified path (#4376)@humitos: Check for ‘options’ in update_repos command (#4373)
@safwanrahman: [Fix #4333] Implement asynchronous search reindex functionality using celery (#4368)
@davidfischer: Remove the UID from the GA measurement protocol (#4347)
@agjohnson: Show subprojects in search results (#1866)
Version 2.6.1
- Date
July 17, 2018
Version 2.6.0
- Date
July 16, 2018
Adds initial support for HTTPS on custom domains
@stsewd: Revert “projects: serve badge with same protocol as site” (#4353)
@davidfischer: Do not overwrite sphinx context variables feature (#4349)
@stsewd: Calrify docs about how rtd select the stable version (#4348)
@davidfischer: Remove the UID from the GA measurement protocol (#4347)
@davidfischer: Improvements for the build/version admin (#4344)
@safwanrahman: [Fix #4265] Porting frontend docsearch to work with new API (#4340)
@davidfischer: Warning about theme context implementation status (#4335)
@davidfischer: Disable the ad block nag for ad-free projects (#4329)
@safwanrahman: [fix #4265] Port Document search API for Elasticsearch 6.x (#4309)
@stsewd: Refactor configuration object to class based (#4298)
Version 2.5.3
- Date
July 05, 2018
@davidfischer: Add a flag for marking a project ad-free (#4313)
@davidfischer: Use “npm run lint” from tox (#4312)
@davidfischer: Fix issues building static assets (#4311)
@safwanrahman: [Fix #2457] Implement exact match search (#4292)
@davidfischer: API filtering improvements (#4285)
@annegentle: Remove self-referencing links for webhooks docs (#4283)
@safwanrahman: [Fix #2328 #2013] Refresh search index and test for case insensitive search (#4277)
@xrmx: doc_builder: clarify sphinx backend append_conf docstring (#4276)
@davidfischer: Add documentation for APIv2 (#4274)
@ericholscher: Fix our use of
--use-wheelin pip. (#4269)@agjohnson: Revert “Merge pull request #4206 from FlorianKuckelkorn/fix/pip-breaking-change” (#4261)
@humitos: Fix triggering a build for a skipped project (#4255)
@davidfischer: Allow staying logged in for longer (#4236)
@safwanrahman: Upgrade Elasticsearch to version 6.x (#4211)
Version 2.5.2
- Date
June 18, 2018
@davidfischer: Add a page detailing ad blocking (#4244)
@xrmx: projects: serve badge with same protocol as site (#4228)
@FlorianKuckelkorn: Fixed breaking change in pip 10.0.0b1 (2018-03-31) (#4206)
@StefanoChiodino: Document that readthedocs file can now have yaml extension (#4129)
@humitos: Downgrade docker to 3.1.3 because of timeouts in EXEC call (#4241)
@humitos: Handle revoked oauth permissions by the user (#4074)
@humitos: Allow to hook the initial build from outside (#4033)
Version 2.5.1
- Date
June 14, 2018
@stsewd: Add feature to build json with html in the same build (#4229)
@davidfischer: Prioritize ads based on content (#4224)
@mostaszewski: #4170 - Link the version in the footer to the changelog (#4217)
@SuriyaaKudoIsc: Use the latest YouTube share URL (#4209)
@davidfischer: Allow staff to trigger project builds (#4207)
@davidfischer: Use autosectionlabel in the privacy policy (#4204)
@davidfischer: These links weren’t correct after #3632 (#4203)
@davidfischer: Release 2.5.0 (#4200)
@ericholscher: Fix Build: Convert md to rst in docs (#4199)
@ericholscher: Updates to #3850 to fix merge conflict (#4198)
@ericholscher: Build on top of #3881 and put docs in custom_installs. (#4196)
@davidfischer: Increase the max theme version (#4195)
@ericholscher: Remove maxcdn reqs (#4194)
@ericholscher: Add missing gitignore item for ES testing (#4193)
@xrmx: locale: update and build the english translation (#4187)
@humitos: Upgrade celery to avoid AtributeError:async (#4185)
@stsewd: Prepare code for custo mkdocs.yaml location (#4184)
@agjohnson: Updates to our triage guidelines (#4180)
@davidfischer: Server side analytics (#4131)
@stsewd: Add schema for configuration file with yamale (#4084)
@davidfischer: Ad block nag to urge people to whitelist (#4037)
@benjaoming: Add Mexican Spanish as a project language (#3588)
Version 2.5.0
- Date
June 06, 2018
@ericholscher: Fix Build: Convert md to rst in docs (#4199)
@ericholscher: Remove maxcdn reqs (#4194)
@ericholscher: Add missing gitignore item for ES testing (#4193)
@xrmx: locale: update and build the english translation (#4187)
@safwanrahman: Test for search functionality (#4116)
@davidfischer: Update mkdocs to the latest (#4041)
@davidfischer: Ad block nag to urge people to whitelist (#4037)
@davidfischer: Decouple the theme JS from readthedocs.org (#3968)
@fenilgandhi: Add support for different badge styles (#3632)
@benjaoming: Add Mexican Spanish as a project language (#3588)
@stsewd: Wrap versions’ list to look more consistent (#3445)
@agjohnson: Move CDN code to external abstraction (#2091)
Version 2.4.0
- Date
May 31, 2018
This fixes assets that were generated against old dependencies in 2.3.14
@agjohnson: Fix issues with search javascript (#4176)
@davidfischer: Update the privacy policy date (#4171)
@davidfischer: Note about state and metro ad targeting (#4169)
@ericholscher: Add another guide around fixing memory usage. (#4168)
@stsewd: Add “edit” and “view docs” buttons to subproject list (#3572)
@kennethlarsen: Remove outline reset to bring back outline (#3512)
Version 2.3.14
- Date
May 30, 2018
@ericholscher: Remove CSS override that doesn’t exist. (#4165)
@davidfischer: Include a DMCA request template (#4164)
@davidfischer: No CSRF cookie for docs pages (#4153)
@davidfischer: Small footer rework (#4150)
@ericholscher: Remove deploy directory which is unused. (#4147)
@davidfischer: Add Intercom to the privacy policy (#4145)
@davidfischer: Fix with Lato Bold font (#4138)
@davidfischer: Release 2.3.13 (#4137)
@davidfischer: Build static assets (#4136)
@xrmx: oauth/services: correct error handling in paginate (#4134)
@cedk: Use quiet mode to retrieve branches from mercurial (#4114)
@humitos: Add
has_valid_cloneandhas_valid_webhookto ProjectAdminSerializer (#4107)@stsewd: Put the rtd extension to the beginning of the list (#4054)
@davidfischer: Do Not Track support (#4046)
@stsewd: Set urlconf to None after changing SUBDOMAIN setting (#4032)
@xrmx: templates: mark a few more strings for translations (#3869)
@ze: Make search bar in dashboard have a more clear message. (#3844)
@varunotelli: Pointed users to Python3.6 (#3817)
@ajatprabha: Ticket #3694: rename owners to maintainers (#3703)
@SanketDG: Refactor to replace old logging to avoid mangling (#3677)
@techtonik: Update Git on prod (#3615)
@cclauss: Modernize Python 2 code to get ready for Python 3 (#3514)
Version 2.3.13
- Date
May 23, 2018
@davidfischer: Build static assets (#4136)
@davidfischer: Use the latest Lato release (#4093)
@davidfischer: Update Gold Member marketing (#4063)
@davidfischer: Fix missing fonts (#4060)
@stsewd: Additional validation when changing the project language (#3790)
Version 2.3.12
- Date
May 21, 2018
@davidfischer: Display feature flags in the admin (#4108)
@humitos: Set valid clone in project instance inside the version object also (#4105)
@davidfischer: Use the latest theme version in the default builder (#4096)
@humitos: Use next field to redirect user when login is done by social (#4083)
@humitos: Update the
documentation_typewhen it’s set to ‘auto’ (#4080)@brainwane: Update link to license in philosophy document (#4059)
@agjohnson: Update local assets for theme to 0.3.1 tag (#4047)
@davidfischer: Subdomains use HTTPS if settings specify (#3987)
@davidfischer: Draft Privacy Policy (#3978)
@humitos: Allow import Gitlab repo manually and set a webhook automatically (#3934)
@davidfischer: Enable ads on the readthedocs mkdocs theme (#3922)
@bansalnitish: Fixes #2953 - Url resolved with special characters (#3725)
Version 2.3.11
- Date
May 01, 2018
@agjohnson: Update local assets for theme to 0.3.1 tag (#4047)
@davidfischer: Detail where ads are shown (#4031)
@ericholscher: Make email verification optional for dev (#4024)
@davidfischer: Support sign in and sign up with GH/GL/BB (#4022)
@agjohnson: Remove old varnish purge utility function (#4019)
@agjohnson: Remove build queue length warning on build list page (#4018)
@stsewd: Don’t check order on assertQuerysetEqual on tests for subprojects (#4016)
@davidfischer: MkDocs projects use RTD’s analytics privacy improvements (#4013)
@davidfischer: Remove typekit fonts (#3982)
@stsewd: Move dynamic-fixture to testing requirements (#3956)
Version 2.3.10
- Date
April 24, 2018
Version 2.3.9
- Date
April 20, 2018
@agjohnson: Fix recursion problem more generally (#3989)
Version 2.3.8
- Date
April 20, 2018
@agjohnson: Give TaskStep class knowledge of the underlying task (#3983)
@humitos: Resolve domain when a project is a translation of itself (#3981)
Version 2.3.7
- Date
April 19, 2018
@humitos: Fix server_error_500 path on single version (#3975)
@davidfischer: Fix bookmark app lint failures (#3969)
@humitos: Use latest setuptools (39.0.1) by default on build process (#3967)
@ericholscher: Fix exact redirects. (#3965)
@humitos: Make
resolve_domainwork when a project is subproject of itself (#3962)@humitos: Remove django-celery-beat and use the default scheduler (#3959)
@davidfischer: Add advertising details docs (#3955)
@davidfischer: Small change to Chinese language names (#3947)
@agjohnson: Don’t share state in build task (#3946)
@davidfischer: Fixed footer ad width fix (#3944)
@humitos: Allow extend Translation and Subproject form logic from corporate (#3937)
@humitos: Resync valid webhook for project manually imported (#3935)
@humitos: Mention RTD in the Project URL of the issue template (#3928)
@davidfischer: Correctly report mkdocs theme name (#3920)
@davidfischer: Show an adblock admonition in the dev console (#3894)
@xrmx: templates: mark a few more strings for translations (#3869)
@aasis21: Documentation for build notifications using webhooks. (#3671)
@mashrikt: [#2967] Scheduled tasks for cleaning up messages (#3604)
@marcelstoer: Doc builder template should check for mkdocs_page_input_path before using it (#3536)
Version 2.3.6
- Date
April 05, 2018
@agjohnson: Drop readthedocs- prefix to submodule (#3916)
@agjohnson: This fixes two bugs apparent in nesting of translations in subprojects (#3909)
@humitos: Use a proper default for
dockerattribute on UpdateDocsTask (#3907)@davidfischer: Handle errors from publish_parts (#3905)
@agjohnson: Drop pdbpp from testing requirements (#3904)
@humitos: Save Docker image data in JSON file only for DockerBuildEnvironment (#3897)
@davidfischer: Single analytics file for all builders (#3896)
Version 2.3.5
- Date
April 05, 2018
@agjohnson: Drop pdbpp from testing requirements (#3904)
@agjohnson: Resolve subproject correctly in the case of single version (#3901)
@davidfischer: Fixed footer ads again (#3895)
@davidfischer: Fix an Alabaster ad positioning issue (#3889)
@humitos: Save Docker image hash in RTD environment.json file (#3880)
@agjohnson: Add ref links for easier intersphinx on yaml config page (#3877)
@rajujha373: Typo correction in docs/features.rst (#3872)
@gaborbernat: add description for tox tasks (#3868)
@davidfischer: Another CORS hotfix for the sustainability API (#3862)
@agjohnson: Fix up some of the logic around repo and submodule URLs (#3860)
@davidfischer: Fix linting errors in tests (#3855)
@agjohnson: Use gitpython to find a commit reference (#3843)
@davidfischer: Remove pinned CSS Select version (#3813)
@davidfischer: Use JSONP for sustainability API (#3789)
@rajujha373: #3718: Added date to changelog (#3788)
@xrmx: tests: mock test_conf_file_not_found filesystem access (#3740)
Version 2.3.4
Release for static assets
Version 2.3.3
@davidfischer: Fix linting errors in tests (#3855)
@humitos: Update instance and model when
record_as_success(#3831)@ericholscher: Reorder GSOC projects, and note priority order (#3823)
@agjohnson: Add temporary method for skipping submodule checkout (#3821)
@davidfischer: Remove pinned CSS Select version (#3813)
@humitos: Use readthedocs-common to share linting files across different repos (#3808)
@davidfischer: Use JSONP for sustainability API (#3789)
@humitos: Define useful celery beat task for development (#3762)
@humitos: Auto-generate conf.py compatible with Py2 and Py3 (#3745)
@humitos: Documentation for RTD context sent to the Sphinx theme (#3490)
Version 2.3.2
This version adds a hotfix branch that adds model validation to the repository URL to ensure strange URL patterns can’t be used.
Version 2.3.1
@humitos: Update instance and model when
record_as_success(#3831)@agjohnson: Bump docker -> 3.1.3 (#3828)
@himanshutejwani12: Update index.rst (#3824)
@ericholscher: Reorder GSOC projects, and note priority order (#3823)
@agjohnson: Autolint cleanup for #3821 (#3822)
@agjohnson: Add temporary method for skipping submodule checkout (#3821)
@varunotelli: Update install.rst dropped the Python 2.7 only part (#3814)
@xrmx: Update machine field when activating a version from project_version_detail (#3797)
@humitos: Allow members of “Admin” Team to wipe version envs (#3791)
@ericholscher: Add sustainability api to CORS (#3782)
@durwasa-chakraborty: Fixed a grammatical error (#3780)
@humitos: Trying to solve the end line character for a font file (#3776)
@bansalnitish: Added eslint rules (#3768)
@davidfischer: Use sustainability api for advertising (#3747)
@davidfischer: Add a sustainability API (#3672)
@humitos: Upgrade django-pagination to a “maintained” fork (#3666)
@davidfischer: Anonymize IP addresses for Google Analytics (#3626)
@humitos: Upgrade docker-py to its latest version (docker==3.1.1) (#3243)
Version 2.3.0
Warning
Version 2.3.0 includes a security fix for project translations. See Release 2.3.0 for more information
@berkerpeksag: Fix indentation in docs/faq.rst (#3758)
@rajujha373: #3741: replaced Go Crazy text with Search (#3752)
@humitos: Log in the proper place and add the image name used (#3750)
@shubham76: Changed ‘Submit’ text on buttons with something more meaningful (#3749)
@agjohnson: Fix tests for Git submodule (#3737)
@bansalnitish: Add eslint rules and fix errors (#3726)
@davidfischer: Prevent bots indexing promos (#3719)
@agjohnson: Add argument to skip errorlist through knockout on common form (#3704)
@ajatprabha: Fixed #3701: added closing tag for div element (#3702)
@bansalnitish: Fixes internal reference (#3695)
@humitos: Always record the git branch command as success (#3693)
@ericholscher: Show the project slug in the project admin (to make it more explicit what project is what) (#3681)
@agjohnson: Hotfix for adding logging call back into project sync task (#3657)
@agjohnson: Fix issue with missing setting in oauth SyncRepo task (#3656)
@ericholscher: Remove error logging that isn’t an error. (#3650)
@aasis21: formatting buttons in edit project text editor (#3633)
@humitos: Filter by my own repositories at Import Remote Project (#3548)
@funkyHat: check for matching alias before subproject slug (#2787)
Version 2.2.1
Version 2.2.1 is a bug fix release for the several issues found in
production during the 2.2.0 release.
@agjohnson: Hotfix for adding logging call back into project sync task (#3657)
@agjohnson: Fix issue with missing setting in oauth SyncRepo task (#3656)
@humitos: Send proper context to celery email notification task (#3653)
@ericholscher: Remove error logging that isn’t an error. (#3650)
@davidfischer: Update RTD security docs (#3641)
@humitos: Ability to override the creation of the Celery App (#3623)
Version 2.2.0
@humitos: Send proper context to celery email notification task (#3653)
@davidfischer: Fix a 500 when searching for files with API v1 (#3645)
@davidfischer: Update RTD security docs (#3641)
@humitos: Fix SVN initialization for command logging (#3638)
@humitos: Ability to override the creation of the Celery App (#3623)
@mohitkyadav: Add venv to .gitignore (#3620)
@Angeles4four: Grammar correction (#3596)@davidfischer: Fix an unclosed tag (#3592)
@davidfischer: Force a specific ad to be displayed (#3584)
@stsewd: Docs about preference for tags over branches (#3582)
@davidfischer: Rework homepage (#3579)
@stsewd: Don’t allow to create a subproject of a project itself (#3571)
@davidfischer: Fix for build screen in firefox (#3569)
@davidfischer: Analytics fixes (#3558)
@davidfischer: Upgrade requests version (#3557)
@ericholscher: Add a number of new ideas for GSOC (#3552)
@davidfischer: Send custom dimensions for mkdocs (#3550)
@davidfischer: Promo contrast improvements (#3549)
@humitos: Allow git tags with
/in the name and properly slugify (#3545)@humitos: Allow to import public repositories on corporate site (#3537)
@davidfischer: Switch to universal analytics (#3495)
@agjohnson: Add docs on removing edit button (#3479)
@davidfischer: Convert default dev cache to local memory (#3477)
@agjohnson: Fix lint error (#3402)
@techtonik: Fix Edit links if version is referenced by annotated tag (#3302)
@jaraco: Fixed build results page on firefox (part two) (#2630)
Version 2.1.6
@davidfischer: Promo contrast improvements (#3549)
@humitos: Refactor run command outside a Build and Environment (#3542)
@AnatoliyURL: Project in the local read the docs don’t see tags. (#3534)
@johanneskoester: Build failed without details (#3531)
@danielmitterdorfer: “Edit on Github” points to non-existing commit (#3530)
@lk-geimfari: No such file or directory: ‘docs/requirements.txt’ (#3529)
@davidfischer: Switch to universal analytics (#3495)
@davidfischer: Convert default dev cache to local memory (#3477)
@nlgranger: Github service: cannot unlink after deleting account (#3374)
@andrewgodwin: “stable” appearing to track future release branches (#3268)
@chummels: RTD building old “stable” docs instead of “latest” when auto-triggered from recent push (#2351)
@gigster99: extension problem (#1059)
Version 2.1.5
@ericholscher: Add GSOC 2018 page (#3518)
@RichardLitt: Docs: Rename “Good First Bug” to “Good First Issue” (#3505)
@ericholscher: Check to make sure changes exist in BitBucket pushes (#3480)
@andrewgodwin: “stable” appearing to track future release branches (#3268)
@Yaseenh: building project does not generate new pdf with changes in it (#2758)
@chummels: RTD building old “stable” docs instead of “latest” when auto-triggered from recent push (#2351)
@KeithWoods: GitHub edit link is aggressively stripped (#1788)
Version 2.1.4
@davidfischer: Add programming language to API/READTHEDOCS_DATA (#3499)
@ericholscher: Remove our mkdocs search override (#3496)
@davidfischer: Small formatting change to the Alabaster footer (#3491)
@ericholscher: Add David to dev team listing (#3485)
@ericholscher: Check to make sure changes exist in BitBucket pushes (#3480)
@ericholscher: Use semvar for readthedocs-build to make bumping easier (#3475)
@davidfischer: Add programming languages (#3471)
@humitos: Remove TEMPLATE_LOADERS since it’s the default (#3469)
@ericholscher: Fix git (#3441)
@ericholscher: Properly slugify the alias on Project Relationships. (#3440)
@stsewd: Don’t show “build ideas” to unprivileged users (#3439)
@humitos: Do not use double quotes on git command with –format option (#3437)
@ericholscher: Hack in a fix for missing version slug deploy that went out a while back (#3433)
@humitos: Check versions used to create the venv and auto-wipe (#3432)
@ericholscher: Upgrade psycopg2 (#3429)
@ericholscher: Add celery theme to supported ad options (#3425)
@humitos: Link to version detail page from build detail page (#3418)
@humitos: Show/Hide “See paid advertising” checkbox depending on USE_PROMOS (#3412)
@benjaoming: Strip well-known version component origin/ from remote version (#3377)
@ericholscher: Add docker image from the YAML config integration (#3339)
@humitos: Show proper error to user when conf.py is not found (#3326)
@techtonik: Fix Edit links if version is referenced by annotated tag (#3302)
@Riyuzakii: changed <strong> from html to css (#2699)
Version 2.1.3
- date
Dec 21, 2017
@ericholscher: Upgrade psycopg2 (#3429)
@ericholscher: Add celery theme to supported ad options (#3425)
@ericholscher: Only build travis push builds on master. (#3421)
@ericholscher: Add concept of dashboard analytics code (#3420)
@humitos: Use default avatar for User/Orgs in OAuth services (#3419)
@humitos: Link to version detail page from build detail page (#3418)
@bieagrathara: 019 497 8360 (#3416)
@bieagrathara: rew (#3415)
@humitos: Show/Hide “See paid advertising” checkbox depending on USE_PROMOS (#3412)
@humitos: Pin pylint to 1.7.5 and fix docstring styling (#3408)
@agjohnson: Update style and copy on abandonment docs (#3406)
@agjohnson: Update changelog more consistently (#3405)
@agjohnson: Update prerelease invoke command to call with explicit path (#3404)
@ericholscher: Fix changelog command (#3403)
@agjohnson: Fix lint error (#3402)
@julienmalard: Recent builds are missing translated languages links (#3401)
@humitos: Show connect buttons for installed apps only (#3394)
@agjohnson: Fix display of build advice (#3390)
@agjohnson: Don’t display the build suggestions div if there are no suggestions (#3389)
@ericholscher: Pass more data into the redirects. (#3388)
@ericholscher: Fix issue where you couldn’t edit your canonical domain. (#3387)
@benjaoming: Strip well-known version component origin/ from remote version (#3377)
@JavaDevVictoria: Updated python.setup_py_install to be true (#3357)
@humitos: Use default avatars for GitLab/GitHub/Bitbucket integrations (users/organizations) (#3353)
@jonrkarr: Error in YAML configuration docs: default value for
python.setup_py_installshould betrue(#3334)@humitos: Show proper error to user when conf.py is not found (#3326)
@MikeHart85: Badges aren’t updating due to being cached on GitHub. (#3323)
@techtonik: Fix Edit links if version is referenced by annotated tag (#3302)
@dialex: Build passed but I can’t see the documentation (maze screen) (#3246)
@makixx: Account is inactive (#3241)@agjohnson: Cleanup misreported failed builds (#3230)
@agjohnson: Remove copyright application (#3199)
@shacharoo: Unable to register after deleting my account (#3189)
@gtalarico: 3 week old Build Stuck Cloning (#3126)
@agjohnson: Regressions with conf.py and error reporting (#2963)
@agjohnson: Can’t edit canonical domain (#2922)
@Riyuzakii: changed <strong> from html to css (#2699)
@tjanez: Support specifying ‘python setup.py build_sphinx’ as an alternative build command (#1857)
Version 2.1.2
@agjohnson: Update changelog more consistently (#3405)
@agjohnson: Update prerelease invoke command to call with explicit path (#3404)
@agjohnson: Fix lint error (#3402)
@humitos: Show connect buttons for installed apps only (#3394)
@agjohnson: Don’t display the build suggestions div if there are no suggestions (#3389)
@jonrkarr: Error in YAML configuration docs: default value for
python.setup_py_installshould betrue(#3334)@agjohnson: Cleanup misreported failed builds (#3230)
@agjohnson: Remove copyright application (#3199)
Version 2.1.1
Release information missing
Version 2.1.0
@ericholscher: Revert “Merge pull request #3336 from readthedocs/use-active-for-stable” (#3368)
@agjohnson: Revert “Do not split before first argument (#3333)” (#3366)
@ericholscher: Remove pitch from ethical ads page, point folks to actual pitch page. (#3365)
@agjohnson: Add changelog and changelog automation (#3364)
@ericholscher: Fix mkdocs search. (#3361)
@ericholscher: Email sending: Allow kwargs for other options (#3355)
@ericholscher: Try and get folks to put more tags. (#3350)
@ericholscher: Suggest wiping your environment to folks with bad build outcomes. (#3347)
@jimfulton: Draft policy for claiming existing project names. (#3314)
@agjohnson: More logic changes to error reporting, cleanup (#3310)
@safwanrahman: [Fix #3182] Better user deletion (#3214)
@ericholscher: Better User deletion (#3182)
@RichardLitt: Add
Needed: replicationlabel (#3138)@josejrobles: Replaced usage of deprecated function get_fields_with_model with new … (#3052)
@ericholscher: Don’t delete the subprojects directory on sync of superproject (#3042)
@andrew: Pass query string when redirecting, fixes #2595 (#3001)
@destroyerofbuilds: Setup GitLab Web Hook on Project Import (#1443)@takotuesday: Add GitLab Provider from django-allauth (#1441)
Version 2.0
@ericholscher: Email sending: Allow kwargs for other options (#3355)
@ericholscher: Try and get folks to put more tags. (#3350)
@ericholscher: Small changes to email sending to enable from email (#3349)
@dplanella: Duplicate TOC entries (#3345)
@ericholscher: Small tweaks to ethical ads page (#3344)
@agjohnson: Fix python usage around oauth pagination (#3342)
@ericholscher: Change stable version switching to respect
active(#3336)@ericholscher: Allow superusers to pass admin & member tests for projects (#3335)
@humitos: Take preferece of tags over branches when selecting the stable version (#3331)
@andrewgodwin: “stable” appearing to track future release branches (#3268)
@jakirkham: Specifying conda version used (#2076)
@agjohnson: Document code style guidelines (#1475)
Previous releases
Starting with version 2.0, we will be incrementing the Read the Docs version
based on semantic versioning principles, and will be automating the update of
our changelog.
Below are some historical changes from when we have tried to add information here in the past
July 23, 2015
Django 1.8 Support Merged
Code Notes
Updated Django from
1.6.11to1.8.3.Removed South and ported the South migrations to Django’s migration framework.
Updated django-celery from
3.0.23to3.1.26as django-celery 3.0.x does not support Django 1.8.Updated Celery from
3.0.24to3.1.18because we had to update django-celery. We need to test this extensively and might need to think about using the new Celery API directly and dropping django-celery. See release notes: https://docs.celeryproject.org/en/3.1/whatsnew-3.1.htmlUpdated tastypie from
0.11.1to current master (commit1e1aff3dd4dcd21669e9c68bd7681253b286b856) as 0.11.x is not compatible with Django 1.8. No surprises expected but we should ask for a proper release, see release notes: https://github.com/django-tastypie/django-tastypie/blob/master/docs/release_notes/v0.12.0.rstUpdated django-oauth from
0.16.1to0.21.0. No surprises expected, see release notes in the docs and finer grained in the repoUpdated django-guardian from
1.2.0to1.3.0to gain Django 1.8 support. No surprises expected, see release notes: https://github.com/lukaszb/django-guardian/blob/devel/CHANGESUsing
django-formtoolsinstead of removeddjango.contrib.formtoolsnow. Based on the Django release notes, these modules are the same except of the package name.Updated pytest-django from
2.6.2to2.8.0. No tests required, but running the testsuite :smile:Updated psycopg2 from 2.4 to 2.4.6 as 2.4.5 is required by Django 1.8. No trouble expected as Django is the layer between us and psycopg2. Also it’s only a minor version upgrade. Release notes: http://initd.org/psycopg/docs/news.html#what-s-new-in-psycopg-2-4-6
Added
django.setup()toconf.pyto load django properly for doc builds.Added migrations for all apps with models in the
readthedocs/directory
Deployment Notes
After you have updated the code and installed the new dependencies, you need to run these commands on the server:
python manage.py migrate contenttypes
python manage.py migrate projects 0002 --fake
python manage.py migrate --fake-initial
Locally I had trouble in a test environment that pip did not update to the specified commit of tastypie. It might be required to use pip install -U -r requirements/deploy.txt during deployment.
Development Update Notes
The readthedocs developers need to execute these commands when switching to this branch (or when this got merged into main):
Before updating please make sure that all migrations are applied:
python manage.py syncdb python manage.py migrate
Update the codebase:
git pullYou need to update the requirements with
pip install -r requirements.txtNow you need to fake the initial migrations:
python manage.py migrate contenttypes python manage.py migrate projects 0002 --fake python manage.py migrate --fake-initial
About Read the Docs
Read the Docs is a C Corporation registered in Oregon. Our bootstrapped company is owned and fully controlled by the founders, and fully funded by our customers and advertisers. This allows us to focus 100% on our users.
We have two main sources of revenue:
Read the Docs for Business - where we provide a valuable paid service to companies.
Read the Docs Community - where we provide a free service to the open source community, funded via EthicalAds.
We believe that having both paying customers and ethical advertising is the best way to create a sustainable platform for our users. We have built something that we expect to last a long time, and we are able to make decisions based only on the best interest of our community and customers.
All of the source code for Read the Docs is open source. You are welcome to contribute the features you want or run your own instance. We should note that we generally only support our hosted versions as a matter of our philosophy.
We owe a great deal to the open source community that we are a part of, so we provide free ads via our community ads program. This allows us to give back to the communities and projects that we support and depend on.
We are proud about the way we manage our company and products, and are glad to have you on board with us in this great documentation journey.
Read the Docs Team
readthedocs.org is the largest open source documentation hosting service. Today we:
Serve over 55 million pages of documentation a month
Serve over 40 TB of documentation a month
Host over 80,000 open source projects and support over 100,000 users
Read the Docs is provided as a free service to the open source community, and we hope to maintain a reliable and stable hosting platform for years to come.
Staff
The members of the Staff work full time on the service, and we are also honored to have several external contributors.
We mainly fund our operations through advertising and corporate-hosted documentation with Read the Docs for Business, and we are supported by a number of generous sponsors.
|
|
|---|---|
All teams |
All teams |
|
|
Backend, Operations, Support |
Backend, Operations, Support |
|
|
Backend, Operations, Support |


Teams
The Backend Team folks develop the Django code that powers the backend of the project.
The members of the Frontend Team care about UX, CSS, HTML, and JavaScript, and they maintain the project UI as well as the Sphinx theme.
As part of operating the site, members of the Operations Team maintain a 24/7 on-call rotation. This means that folks have to be available and have their phone in service.
The members of the Advocacy Team spread the word about all the work we do, and seek to understand the users priorities and feedback.
The Support Team helps our thousands of users using the service, addressing tasks like resetting passwords, enable experimental features, or troubleshooting build errors.
Note
Please don’t email us personally for support on Read the Docs. You can use our support form for any issues you may have.
Major Contributors
The code that powers the Read the Docs platform, as well as many other related projects in our GitHub organization, are open source, and therefore anybody can contribute.
Our platform code has over a hundred contributors, which makes us extremely proud and thankful. In addition, several contributors have performed ongoing maintenance on several subprojects over the years:
We know that we’re missing a large number of people who have contributed in major ways to our various projects. Please let us know if you feel that you should be on this list, and aren’t!
Read the Docs Open Source Philosophy
Read the Docs is open source software. We have licensed the code base as MIT, which provides almost no restrictions on the use of the code.
However, as a project there are things that we care about more than others. We built Read the Docs to support documentation in the open source community. The code is open for people to contribute to, so that they may build features into https://readthedocs.org that they want. We also believe sharing the code openly is a valuable learning tool, especially for demonstrating how to collaborate and maintain an enormous website.
Official Support
The time of the core developers of Read the Docs is limited. We provide official support for the following things:
Local development on the Python code base
Usage of https://readthedocs.org for open source projects
Bug fixes in the code base, as it applies to running it on https://readthedocs.org
Unsupported
There are use cases that we don’t support, because it doesn’t further our goal of promoting documentation in the open source community.
We do not support:
Specific usage of Sphinx and Mkdocs, that don’t affect our hosting
Custom installations of Read the Docs at your company
Installation of Read the Docs on other platforms
Any installation issues outside of the Read the Docs Python Code
Rationale
Read the Docs was founded to improve documentation in the open source community. We fully recognize and allow the code to be used for internal installs at companies, but we will not spend our time supporting it. Our time is limited, and we want to spend it on the mission that we set out to originally support.
If you feel strongly about installing Read the Docs internal to a company, we will happily link to third party resources on this topic. Please open an issue with a proposal if you want to take on this task.
The Story of Read the Docs
Documenting projects is hard, hosting them shouldn’t be. Read the Docs was created to make hosting documentation simple.
Read the Docs was started with a couple main goals in mind. The first goal was to encourage people to write documentation, by removing the barrier of entry to hosting. The other goal was to create a central platform for people to find documentation. Having a shared platform for all documentation allows for innovation at the platform level, allowing work to be done once and benefit everyone.
Documentation matters, but its often overlooked. We think that we can help a documentation culture flourish. Great projects, such as Django and SQLAlchemy, and projects from companies like Mozilla, are already using Read the Docs to serve their documentation to the world.
The site has grown quite a bit over the past year. Our look back at 2013 shows some numbers that show our progress. The job isn’t anywhere near done yet, but it’s a great honor to be able to have such an impact already.
We plan to keep building a great experience for people hosting their docs with us, and for users of the documentation that we host.
Advertising
Advertising is the single largest source of funding for Read the Docs. It allows us to:
Serve over 35 million pages of documentation per month
Serve over 40 TB of documentation per month
Host over 80,000 open source projects and support over 100,000 users
Pay a small team of dedicated full-time staff
Many advertising models involve tracking users around the internet, selling their data, and privacy intrusion in general. Instead of doing that, we built an Ethical Advertising model that respects user privacy.
We recognize that advertising is not for everyone. You may opt out of paid advertising although you will still see community ads. You can go ad-free by becoming a Gold member or a Supporter of Read the Docs. Gold members can also remove advertising from their projects for all visitors.
For businesses looking to remove advertising, please consider Read the Docs for Business.
EthicalAds
Read the Docs is a large, free web service. There is one proven business model to support this kind of site: Advertising. We are building the advertising model we want to exist, and we’re calling it EthicalAds.
EthicalAds respect users while providing value to advertisers. We don’t track you, sell your data, or anything else. We simply show ads to users, based on the content of the pages you look at. We also give 10% of our ad space to community projects, as our way of saying thanks to the open source community.
We talk a bit below about our worldview on advertising, if you want to know more.
Are you a marketer?
We built a whole business around privacy-focused advertising. If you’re trying to reach developers, we have a network of hand-approved sites (including Read the Docs) where your ads are shown.
Feedback
We’re a community, and we value your feedback. If you ever want to reach out about this effort, feel free to shoot us an email.
You can opt out of having paid ads on your projects, or seeing paid ads if you want. You will still see community ads, which we run for free that promote community projects.
Our Worldview
We’re building the advertising model we want to exist:
We don’t track you
We don’t sell your data
We host everything ourselves, no third-party scripts or images
We’re doing newspaper advertising, on the internet. For a hundred years, newspapers put an ad on the page, some folks would see it, and advertisers would pay for this. This is our model.
So much ad tech has been built to track users. Following them across the web, from site to site, showing the same ads and gathering data about them. Then retailers sell your purchase data to try and attribute sales to advertising. Now there is an industry in doing fake ad clicks and other scams, which leads the ad industry to track you even more intrusively to know more about you. The current advertising industry is in a vicious downward spiral.
As developers, we understand the massive downsides of the current advertising industry. This includes malware, slow site performance, and huge databases of your personal data being sold to the highest bidder.
The trend in advertising is to have larger and larger ads. They should run before your content, they should take over the page, the bigger, weirder, or flashier the better.
We opt out
We don’t store personal information about you.
We only keep track of views and clicks.
We don’t build a profile of your personality to sell ads against.
We only show high quality ads from companies that are of interest to developers.
We are running a single, small, unobtrusive ad on documentation pages. The products should be interesting to you. The ads won’t flash or move.
We run the ads we want to have on our site, in a way that makes us feel good.
Additional details
We have additional documentation on the technical details of our advertising including our Do Not Track policy and our use of analytics.
We have an advertising FAQ written for advertisers.
We have gone into more detail about our views in our blog post about this topic.
Eric Holscher, one of our co-founders talks a bit more about funding open source this way on his blog.
After proving our ad model as a way to fund open source and building our ad serving infrastructure, we launched the EthicalAds network to help other projects be sustainable.
Join us
We’re building the advertising model we want to exist. We hope that others will join us in this mission:
If you’re a developer, talk to your marketing folks about using advertising that respects your privacy.
If you’re a marketer, vote with your dollars and support us in building the ad model we want to exist. Get more information on what we offer.
Community Ads
There are a large number of projects, conferences, and initiatives that we care about in the software and open source ecosystems. A large number of them operate like we did in the past, with almost no income. Our Community Ads program will highlight some of these projects.
There are a few qualifications for our Community Ads program:
Your organization and the linked site should not be trying to entice visitors to buy a product or service. We make an exception for conferences around open source projects if they are run not for profit and soliciting donations for open source projects.
A software project should have an OSI approved license.
We will not run a community ad for an organization tied to one of our paid advertisers.
We’ll show 10% of our ad inventory each month to support initiatives that we care about. Please complete an application to be considered for our Community Ads program.
Opting Out
We have added multiple ways to opt out of the advertising on Read the Docs.
You can go completely ad-free by becoming a Gold member or a Supporter. Additionally, Gold members may remove advertising from their projects for all visitors.
You can opt out of seeing paid advertisements on documentation pages:
Go to the drop down user menu in the top right of the Read the Docs dashboard and clicking Settings (https://readthedocs.org/accounts/edit/).
On the Advertising tab, you can deselect See paid advertising.
You will still see community ads for open source projects and conferences.
Project owners can also opt out of paid advertisements for their projects. You can change these options:
Go to your project page (
/projects/<slug>/)Go to Admin > Advertising
Change your advertising settings
If you are part of a company that uses Read the Docs to host documentation for a commercial product, we offer Read the Docs for Business that offers a completely ad-free experience, additional build resources, and other great features like CDN support and private documentation.
If you would like to completely remove advertising from your open source project, but our commercial plans don’t seem like the right fit, please get in touch to discuss alternatives to advertising.
Advertising Details
Read the Docs largely funds our operations and development through advertising. However, we aren’t willing to compromise our values, document authors, or site visitors simply to make a bit more money. That’s why we created our ethical advertising initiative.
We get a lot of inquiries about our approach to advertising which range from questions about our practices to requests to partner. The goal of this document is to shed light on the advertising industry, exactly what we do for advertising, and how what we do is different. If you have questions or comments, send us an email or open an issue on GitHub.
Other ad networks’ targeting
Some ad networks build a database of user data in order to predict the types of ads that are likely to be clicked. In the advertising industry, this is called behavioral targeting. This can include data such as:
sites a user has visited
a user’s search history
ads, pages, or stories a user has clicked on in the past
demographic information such as age, gender, or income level
Typically, getting a user’s page visit history is accomplished by the use of trackers (sometimes called beacons or pixels). For example, if a site uses a tracker from an ad network and a user visits that site, the site can now target future advertising to that user – a known past visitor – with that network. This is called retargeting.
Other ad predictions are made by grouping similar users together based on user data using machine learning. Frequently this involves an advertiser uploading personal data on users (often past customers of the advertiser) to an ad network and telling the network to target similar users. The idea is that two users with similar demographic information and similar interests would like the same products. In ad tech, this is known as lookalike audiences or similar audiences.
Understandably, many people have concerns about these targeting techniques. The modern advertising industry has built enormous value by centralizing massive amounts of data on as many people as possible.
Our targeting details
Read the Docs doesn’t use the above techniques. Instead, we target based solely upon:
Details of the page where the advertisement is shown including:
The name, keywords, or programming language associated with the project being viewed
Content of the page (eg. H1, title, theme, etc.)
Whether the page is being viewed from a mobile device
General geography
We allow advertisers to target ads to a list of countries or to exclude countries from their advertising. For ads targeting the USA, we also support targeting by state or by metro area (DMA specifically).
We geolocate a user’s IP address to a country when a request is made.
Where ads are shown
We can place ads in:
the sidebar navigation
the footer of the page
on search result pages
a small footer fixed to the bottom of the viewport
on 404 pages (rare)
We show no more than one ad per page so you will never see both a sidebar ad and a footer ad on the same page.
Do Not Track Policy
Read the Docs supports Do Not Track (DNT) and respects users’ tracking preferences. For more details, see the Do Not Track section of our privacy policy.
Ad serving infrastructure
Our entire ad server is open source, so you can inspect how we’re doing things. We believe strongly in open source, and we practice what we preach.
Analytics
Analytics are a sensitive enough issue that they require their own section. In the spirit of full transparency, Read the Docs uses Google Analytics (GA). We go into a bit of detail on our use of GA in our Privacy Policy.
GA is a contentious issue inside Read the Docs and in our community. Some users are very sensitive and privacy conscious to usage of GA. Some authors want their own analytics on their docs to see the usage their docs get. The developers at Read the Docs understand that different users have different priorities and we try to respect the different viewpoints as much as possible while also accomplishing our own goals.
We have taken steps to address some of the privacy concerns surrounding GA. These steps apply both to analytics collected by Read the Docs and when authors enable analytics on their docs.
Users can opt-out of analytics by using the Do Not Track feature of their browser.
Read the Docs instructs Google to anonymize IP addresses sent to them.
The cookie set by GA is a session (non-persistent) cookie rather than the default 2 years.
Project maintainers can completely disable analytics on their own projects. Follow the steps in Disabling Google Analytics on your project.
Why we use analytics
Advertisers ask us questions that are easily answered with an analytics solution like “how many users do you have in Switzerland browsing Python docs?”. We need to be able to easily get this data. We also use data from GA for some development decisions such as what browsers to support (or not) or how much usage a particular page or feature gets.
Alternatives
We are always exploring our options with respect to analytics. There are alternatives but none of them are without downsides. Some alternatives are:
Run a different cloud analytics solution from a provider other than Google (eg. Parse.ly, Matomo Cloud, Adobe Analytics). We priced a couple of these out based on our load and they are very expensive. They also just substitute one problem of data sharing with another.
Send data to GA (or another cloud analytics provider) on the server side and strip or anonymize personal data such as IPs before sending them. This would be a complex solution and involve additional infrastructure, but it would have many advantages. It would result in a loss of data on “sessions” and new vs. returning visitors which are of limited value to us.
Run a local JavaScript based analytics solution (eg. Matomo community). This involves additional infrastructure that needs to be always up. Frequently there are very large databases associated with this. Many of these solutions aren’t built to handle Read the Docs’ load.
Run a local analytics solution based on web server log parsing. This has the same infrastructure problems as above while also not capturing all the data we want (without additional engineering) like the programming language of the docs being shown or whether the docs are built with Sphinx or something else.
Ad blocking
Ad blockers fulfill a legitimate need to mitigate the significant downsides of advertising from tracking across the internet, security implications of third-party code, and impacting the UX and performance of sites.
At Read the Docs, we specifically didn’t want those things. That’s why we built the our Ethical Ad initiative with only relevant, unobtrusive ads that respect your privacy and don’t do creepy behavioral targeting.
Advertising is the single largest source of funding for Read the Docs. To keep our operations sustainable, we ask that you either allow our EthicalAds or go ad-free.
Allowing EthicalAds
If you use AdBlock or AdBlockPlus and you allow acceptable ads or privacy-friendly acceptable ads then you’re all set. Advertising on Read the Docs complies with both of these programs.
If you prefer not to allow acceptable ads but would consider allowing ads that benefit open source, please consider subscribing to either the wider Open Source Ads list or simply the Read the Docs Ads list.
Note
Because of the way Read the Docs is structured where docs are hosted on many different domains, adding a normal ad block exception will only allow that single domain not Read the Docs as a whole.
Going ad-free
Users can go completely ad-free when logged in by becoming a Gold member or a Supporter. Gold members may also completely remove advertising for all visitors to their projects. Thank you for supporting Read the Docs.
Statistics and data
It can be really hard to find good data on ad blocking. In the spirit of transparency, here is the data we have on ad blocking at Read the Docs.
Of those, a little over 50% allow acceptable ads
Read the Docs users running ad blockers click on ads at about the same rate as those not running an ad blocker.
Comparing with our server logs, roughly 28% of our hits did not register a Google Analytics (GA) pageview due to an ad blocker, privacy plugin, disabling JavaScript, or another reason.
Of users who do not block GA, about 6% opt out of analytics on Read the Docs by enabling Do Not Track.
Sponsors of Read the Docs
Running Read the Docs isn’t free, and the site wouldn’t be where it is today without generous support of our sponsors. Below is a list of all the folks who have helped the site financially, in order of the date they first started supporting us.
Current sponsors
AWS - They cover all of our hosting expenses every month. This is a pretty large sum of money, averaging around $5,000/mo.
Cloudflare - Cloudflare is providing us with an enterprise plan of their SSL for SaaS Providers product that enables us to provide SSL certificates for custom domains.
Chan Zuckerberg Initiative - Through their “Essential Open Source Software for Science” programme, they fund our ongoing efforts to improve scientific documentation and make Read the Docs a better service for scientific projects.
You? (Email us at hello@readthedocs.org for more info)
Past sponsors
Sponsorship Information
As part of increasing sustainability, Read the Docs is testing out promoting sponsors on documentation pages. We have more information about this in our blog post about this effort.
Sponsor Us
Contact us at rev@readthedocs.org for more information on sponsoring Read the Docs.
Legal Documents and Policies
Here is some of the fine print used by Read the Docs Community and Read the Docs for Business:
Read the Docs Terms of Service
Effective date: September 30, 2019
Thank you for using Read the Docs! We’re happy you’re here. Please read this Terms of Service agreement carefully before accessing or using Read the Docs. Because it is such an important contract between us and our users, we have tried to make it as clear as possible. For your convenience, we have presented these terms in a short non-binding summary followed by the full legal terms.
Table of contents
Definitions
Short version: We use these basic terms throughout the agreement, and they have specific meanings. You should know what we mean when we use each of the terms. There’s not going to be a test on it, but it’s still useful information.
The “Agreement” refers, collectively, to all the terms, conditions, notices contained or referenced in this document (the “Terms of Service” or the “Terms”) and all other operating rules, policies (including our Privacy Policy) and procedures that we may publish from time to time on our sites.
Our “Service” or “Services” refers to the applications, software, products, and services provided by Read the Docs (see Our services).
The “Website” or “Websites” refers to Read the Docs’ websites located at readthedocs.org, readthedocs.com, Documentation Sites, and all content, services, and products provided by Read the Docs at or through those Websites.
“The User,” “You,” and “Your” refer to the individual person, company, or organization that has visited or is using ours Websites or Services; that accesses or uses any part of the Account; or that directs the use of the Account in the performance of its functions. A User must be at least 13 years of age.
“Read the Docs,” “We,” and “Us” refer to Read the Docs, Inc., as well as our affiliates, directors, subsidiaries, contractors, licensors, officers, agents, and employees.
“Content” refers to content featured or displayed through the Websites, including without limitation text, data, articles, images, photographs, graphics, software, applications, designs, features, and other materials that are available on our Websites or otherwise available through our Services. “Content” also includes Services. “User-Generated Content” is Content, written or otherwise, created or uploaded by our Users. “Your Content” is Content that you create or own.
An “Account” represents your legal relationship with Read the Docs. A “User Account” represents an individual User’s authorization to log in to and use the Service and serves as a User’s identity on Read the Docs. “Organizations” are shared workspaces that may be associated with a single entity or with one or more Users where multiple Users can collaborate across many projects at once. A User Account can be a member of any number of Organizations.
“User Personal Information” is any information about one of our users which could, alone or together with other information, personally identify him or her. Information such as a user name and password, an email address, a real name, and a photograph are examples of User Personal Information. Our Privacy Policy goes into more details on User Personal Information, what data Read the Docs collects, and why we collect it.
Our services
Read the Docs is made up of the following Websites:
- readthedocs.org (“Read the Docs Community”)
This Website is used by documentation authors and project maintainers for writing and distributing technical documentation.
- readthedocs.com (“Read the Docs for Business”)
This Website is a commercial hosted offering for hosting private documentation for corporate clients.
- readthedocs.io, readthedocs-hosted.com, and other domains (“Documentation Sites”)
These Websites are where Read the Docs hosts User-Generated Content on behalf of documentation authors.
Account terms
Short version: User Accounts and Organizations have different administrative controls; a human must create your Account; you must be 13 or over; and you must provide a valid email address. You alone are responsible for your Account and anything that happens while you are signed in to or using your Account. You are responsible for keeping your Account secure.
Account controls
- Users
Subject to these Terms, you retain ultimate administrative control over your User Account and the Content within it.
- Organizations
The “owner” of an Organization that was created under these Terms has ultimate administrative control over that Organization and the Content within it. Within our Services, an owner can manage User access to the Organization’s data and projects. An Organization may have multiple owners, but there must be at least one User Account designated as an owner of an Organization. If you are the owner of an Organization under these Terms, we consider you responsible for the actions that are performed on or through that Organization.
Required information
You must provide a valid email address in order to complete the signup process. Any other information requested, such as your real name, is optional, unless you are accepting these terms on behalf of a legal entity (in which case we need more information about the legal entity) or if you opt for a paid Account, in which case additional information will be necessary for billing purposes.
Account requirements
We have a few simple rules for User Accounts on Read the Docs’ Services.
You must be a human to create an Account. Accounts registered by “bots” or other automated methods are not permitted. We do permit machine accounts:
A machine account is an Account set up by an individual human who accepts the Terms on behalf of the Account, provides a valid email address, and is responsible for its actions. A machine account is used exclusively for performing automated tasks. Multiple users may direct the actions of a machine account, but the owner of the Account is ultimately responsible for the machine’s actions.
You must be age 13 or older. While we are thrilled to see brilliant young developers and authors get excited by learning to program, we must comply with United States law. Read the Docs does not target our Services to children under 13, and we do not permit any Users under 13 on our Service. If we learn of any User under the age of 13, we will have to close your account. If you are a resident of a country outside the United States, your country’s minimum age may be older; in such a case, you are responsible for complying with your country’s laws.
You may not use Read the Docs in violation of export control or sanctions laws of the United States or any other applicable jurisdiction. You may not use Read the Docs if you are or are working on behalf of a Specially Designated National (SDN) or a person subject to similar blocking or denied party prohibitions administered by a U.S. government agency. Read the Docs may allow persons in certain sanctioned countries or territories to access certain Read the Docs services pursuant to U.S. government authorizations.
User Account security
You are responsible for keeping your Account secure while you use our Service.
You are responsible for all content posted and activity that occurs under your Account.
You are responsible for maintaining the security of your Account and password. Read the Docs cannot and will not be liable for any loss or damage from your failure to comply with this security obligation.
You will promptly notify Read the Docs if you become aware of any unauthorized use of, or access to, our Services through your Account, including any unauthorized use of your password or Account.
Additional terms
In some situations, third parties’ terms may apply to your use of Read the Docs. For example, you may be a member of an organization on Read the Docs with its own terms or license agreements; or you may download an application that integrates with Read the Docs. Please be aware that while these Terms are our full agreement with you, other parties’ terms govern their relationships with you.
Acceptable use
Short version: Read the Docs hosts a wide variety of collaborative projects from all over the world, and that collaboration only works when our users are able to work together in good faith. While using the service, you must follow the terms of this section, which include some restrictions on content you can post, conduct on the service, and other limitations. In short, be excellent to each other.
Your use of our Websites and Services must not violate any applicable laws, including copyright or trademark laws, export control or sanctions laws, or other laws in your jurisdiction. You are responsible for making sure that your use of the Service is in compliance with laws and any applicable regulations.
User-Generated Content
Short version: You own content you create, but you allow us certain rights to it, so that we can display and share the content and documentation you post. You still have control over your content, and responsibility for it, and the rights you grant us are limited to those we need to provide the service. We have the right to remove content or close Accounts if we need to.
Responsibility for User-Generated Content
You may create or upload User-Generated Content while using the Service. You are solely responsible for the content of, and for any harm resulting from, any User-Generated Content that you post, upload, link to or otherwise make available via the Service, regardless of the form of that Content. We are not responsible for any public display or misuse of your User-Generated Content.
Read the Docs may remove Content
We do not pre-screen User-Generated Content, but we have the right (though not the obligation) to refuse or remove any User-Generated Content that, in our sole discretion, violates any Read the Docs terms or policies.
Ownership of Content, right to post, and license grants
You retain ownership of and responsibility for Your Content. If you’re posting anything you did not create yourself or do not own the rights to, you agree that you are responsible for any Content you post; that you will only submit Content that you have the right to post; and that you will fully comply with any third party licenses relating to Content you post.
Because you retain ownership of and responsibility for Your Content, we need you to grant us — and other Read the Docs Users — certain legal permissions, listed below (in License grant to us, License grant to other users and Moral rights). These license grants apply to Your Content. If you upload Content that already comes with a license granting Read the Docs the permissions we need to run our Service, no additional license is required. You understand that you will not receive any payment for any of the rights granted. The licenses you grant to us will end when you remove Your Content from our servers.
License grant to us
We need the legal right to do things like host Your Content, publish it, and share it. You grant us and our legal successors the right to store, parse, and display Your Content, and make incidental copies as necessary to render the Website and provide the Service. This includes the right to do things like copy it to our database and make backups; show it to you and other users; parse it into a search index or otherwise analyze it on our servers; share it with other users; and perform it, in case Your Content is something like music or video.
This license does not grant Read the Docs the right to sell Your Content or otherwise distribute or use it outside of our provision of the Service.
License grant to other users
Any User-Generated Content you post publicly may be viewed by others. By setting your projects to be viewed publicly, you agree to allow others to view your Content.
On Read the Docs Community, all Content is public.
Moral rights
You retain all moral rights to Your Content that you upload, publish, or submit to any part of our Services, including the rights of integrity and attribution. However, you waive these rights and agree not to assert them against us, to enable us to reasonably exercise the rights granted in License grant to us, but not otherwise.
To the extent this agreement is not enforceable by applicable law, you grant Read the Docs the rights we need to use Your Content without attribution and to make reasonable adaptations of Your Content as necessary to render our Websites and provide our Services.
Private projects
Short version: You may connect Read the Docs for Business to your private repositories or host documentation privately. We treat the content of these private projects as confidential, and we only access it for support reasons, with your consent, or if required to for security reasons.
Confidentiality of private projects
Read the Docs considers the contents of private projects to be confidential to you. Read the Docs will protect the contents of private projects from unauthorized use, access, or disclosure in the same manner that we would use to protect our own confidential information of a similar nature and in no event with less than a reasonable degree of care.
Access
Read the Docs employees may only access the content of your private projects in the following situations:
With your consent and knowledge, for support reasons. If Read the Docs accesses a private project for support reasons, we will only do so with the owner’s consent and knowledge.
When access is required for security reasons, including when access is required to maintain ongoing confidentiality, integrity, availability and resilience of Read the Docs’ systems and Services.
Exclusions
If we have reason to believe the contents of a private project are in violation of the law or of these Terms, we have the right to access, review, and remove them. Additionally, we may be compelled by law to disclose the contents of your private projects.
Copyright infringement and DMCA policy
If you believe that content on our website violates your copyright or other rights, please contact us in accordance with our Digital Millennium Copyright Act Policy. There may be legal consequences for sending a false or frivolous takedown notice. Before sending a takedown request, you must consider legal uses such as fair use and licensed uses.
We will terminate the Accounts of repeat infringers of this policy.
Intellectual property notice
Short version: We own the Service and all of our Content. In order for you to use our Content, we give you certain rights to it, but you may only use our Content in the way we have allowed.
Read the Docs’ rights to content
Read the Docs and our licensors, vendors, agents, and/or our content providers retain ownership of all intellectual property rights of any kind related to our Websites and Services. We reserve all rights that are not expressly granted to you under this Agreement or by law.
Read the Docs trademarks and logos
If you’d like to use Read the Docs’s trademarks, you must follow all of our trademark guidelines.
API terms
Short version: You agree to these Terms of Service, plus this Section, when using any of Read the Docs’ APIs (Application Provider Interface), including use of the API through a third party product that accesses Read the Docs.
No abuse or overuse of the API
Abuse or excessively frequent requests to Read the Docs via the API may result in the temporary or permanent suspension of your Account’s access to the API. Read the Docs, in our sole discretion, will determine abuse or excessive usage of the API. We will make a reasonable attempt to warn you via email prior to suspension.
You may not share API tokens to exceed Read the Docs’ rate limitations.
You may not use the API to download data or Content from Read the Docs for spamming purposes, including for the purposes of selling Read the Docs users’ personal information, such as to recruiters, headhunters, and job boards.
All use of the Read the Docs API is subject to these Terms of Service and our Privacy Policy.
Read the Docs may offer subscription-based access to our API for those Users who require high-throughput access or access that would result in resale of Read the Docs’ Service.
Additional terms for Documentation Sites
Short version: Documentation Sites on Read the Docs are subject to certain rules, in addition to the rest of the Terms.
Documentation Sites
Each Read the Docs Account comes with the ability to host Documentation Sites. This hosting service is intended to host static web pages for All Users. Documentation Sites are subject to some specific bandwidth and usage limits, and may not be appropriate for some high-bandwidth uses or other prohibited uses.
Third party applications
Short version: You need to follow certain rules if you create an application for other Users.
Creating applications
If you create a third-party application or other developer product that collects User Personal Information or User-Generated Content and integrates with the Service through Read the Docs’ API, OAuth mechanism, or otherwise (“Developer Product”), and make it available for other Users, then you must comply with the following requirements:
You must comply with this Agreement and our Privacy Policy.
Except as otherwise permitted, such as by law or by a license, you must limit your usage of the User Personal Information or User-Generated Content you collect to that purpose for which the User has authorized its collection.
You must take all reasonable security measures appropriate to the risks, such as against accidental or unlawful destruction, or accidental loss, alteration, unauthorized disclosure or access, presented by processing the User Personal Information or User-Generated Content.
You must not hold yourself out as collecting any User Personal Information or User-Generated Content on Read the Docs’ behalf, and provide sufficient notice of your privacy practices to the User, such as by posting a privacy policy.
You must provide Users with a method of deleting any User Personal Information or User-Generated Content you have collected through Read the Docs after it is no longer needed for the limited and specified purposes for which the User authorized its collection, except where retention is required by law or otherwise permitted, such as through a license.
Advertising on Documentation Sites
Short version: We do not generally prohibit use of Documentation Sites for advertising. However, we expect our users to follow certain limitations, so Read the Docs does not become a spam haven. No one wants that.
Our advertising
We host advertising on Documentation Sites on Read the Docs Community. This advertising is first-party advertising hosted by Read the Docs. We do not run any code from advertisers and all ad images are hosted on Read the Docs’ servers. For more details, see our document on Advertising Details.
Acceptable advertising on Documentation Sites
We offer Documentation Sites primarily as a showcase for personal and organizational projects. Some project monetization efforts are permitted on Documentation Sites, such as donation buttons and crowdfunding links.
Spamming and inappropriate use of Read the Docs
Advertising Content, like all Content, must not violate the law or these Terms of Use, for example through excessive bulk activity such as spamming. We reserve the right to remove any projects that, in our sole discretion, violate any Read the Docs terms or policies.
Payment
Short version: You are responsible for any fees associated with your use of Read the Docs. We are responsible for communicating those fees to you clearly and accurately, and letting you know well in advance if those prices change.
Pricing
Our pricing and payment terms are available at https://readthedocs.com/pricing/. If you agree to a subscription price, that will remain your price for the duration of the payment term; however, prices are subject to change at the end of a payment term.
Upgrades, downgrades, and changes
We will immediately bill you when you upgrade from the free plan to any paying plan (either Read the Docs for Business or a Gold membership).
If you change from a monthly billing plan to a yearly billing plan, Read the Docs will bill you for a full year at the next monthly billing date.
If you upgrade to a higher level of service, we will bill you for the upgraded plan immediately.
You may change your level of service at any time by going into your billing settings. If you choose to downgrade your Account, you may lose access to Content, features, or capacity of your Account.
Billing schedule; no refunds
For monthly or yearly payment plans, the Service is billed in advance on a monthly or yearly basis respectively and is non-refundable. There will be no refunds or credits for partial months of service, downgrade refunds, or refunds for months unused with an open Account; however, the service will remain active for the length of the paid billing period.
Exceptions to these rules are at Read the Docs’ sole discretion.
Responsibility for payment
You are responsible for all fees, including taxes, associated with your use of the Service. By using the Service, you agree to pay Read the Docs any charge incurred in connection with your use of the Service. If you dispute the matter, contact us. You are responsible for providing us with a valid means of payment for paid Accounts. Free Accounts are not required to provide payment information.
Cancellation and termination
Short version: You may close your Account at any time. If you do, we’ll treat your information responsibly.
Account cancellation
It is your responsibility to properly cancel your Account with Read the Docs. You can cancel your Account at any time by going into your Settings in the global navigation bar at the top of the screen. We are not able to cancel Accounts in response to an email or phone request.
Upon cancellation
We will retain and use your information as necessary to comply with our legal obligations, resolve disputes, and enforce our agreements, but barring legal requirements, we will delete your full profile and the Content of your repositories within 90 days of cancellation or termination. This information can not be recovered once your Account is cancelled.
Read the Docs may terminate
Read the Docs has the right to suspend or terminate your access to all or any part of the Website at any time, with or without cause, with or without notice, effective immediately. Read the Docs reserves the right to refuse service to anyone for any reason at any time.
Survival
All provisions of this Agreement which, by their nature, should survive termination will survive termination – including, without limitation: ownership provisions, warranty disclaimers, indemnity, and limitations of liability.
Communications with Read the Docs
Short version: We use email and other electronic means to stay in touch with our users.
Electronic communication required
For contractual purposes, you:
Consent to receive communications from us in an electronic form via the email address you have submitted or via the Service
Agree that all Terms of Service, agreements, notices, disclosures, and other communications that we provide to you electronically satisfy any legal requirement that those communications would satisfy if they were on paper. This section does not affect your non-waivable rights.
Legal notice to Read the Docs must be in writing
Communications made through email or Read the Docs’ support system will not constitute legal notice to Read the Docs or any of its officers, employees, agents or representatives in any situation where notice to Read the Docs is required by contract or any law or regulation. Legal notice to Read the Docs must be in writing.
No phone support
Read the Docs only offers support via email, in-Service communications, and electronic messages. We do not offer telephone support.
Disclaimer of warranties
Short version: We provide our service as is, and we make no promises or guarantees about this service. Please read this section carefully; you should understand what to expect.
Read the Docs provides the Website and the Service “as is” and “as available,” without warranty of any kind. Without limiting this, we expressly disclaim all warranties, whether express, implied or statutory, regarding the Website and the Service including without limitation any warranty of merchantability, fitness for a particular purpose, title, security, accuracy and non-infringement.
Read the Docs does not warrant that the Service will meet your requirements; that the Service will be uninterrupted, timely, secure, or error-free; that the information provided through the Service is accurate, reliable or correct; that any defects or errors will be corrected; that the Service will be available at any particular time or location; or that the Service is free of viruses or other harmful components. You assume full responsibility and risk of loss resulting from your downloading and/or use of files, information, content or other material obtained from the Service.
Limitation of liability
Short version: We will not be liable for damages or losses arising from your use or inability to use the Service or otherwise arising under this agreement. Please read this section carefully; it limits our obligations to you.
You understand and agree that we will not be liable to you or any third party for any loss of profits, use, goodwill, or data, or for any incidental, indirect, special, consequential or exemplary damages, however arising, that result from:
the use, disclosure, or display of your User-Generated Content;
your use or inability to use the Service;
any modification, price change, suspension or discontinuance of the Service;
the Service generally or the software or systems that make the Service available;
unauthorized access to or alterations of your transmissions or data;
statements or conduct of any third party on the Service;
any other user interactions that you input or receive through your use of the Service; or
any other matter relating to the Service.
Our liability is limited whether or not we have been informed of the possibility of such damages, and even if a remedy set forth in this Agreement is found to have failed of its essential purpose. We will have no liability for any failure or delay due to matters beyond our reasonable control.
Release and indemnification
Short version: You are responsible for your use of the service. If you harm someone else or get into a dispute with someone else, we will not be involved.
If you have a dispute with one or more Users, you agree to release Read the Docs from any and all claims, demands and damages (actual and consequential) of every kind and nature, known and unknown, arising out of or in any way connected with such disputes.
You agree to indemnify us, defend us, and hold us harmless from and against any and all claims, liabilities, and expenses, including attorneys’ fees, arising out of your use of the Website and the Service, including but not limited to your violation of this Agreement, provided that Read the Docs:
Promptly gives you written notice of the claim, demand, suit or proceeding
Gives you sole control of the defense and settlement of the claim, demand, suit or proceeding (provided that you may not settle any claim, demand, suit or proceeding unless the settlement unconditionally releases Read the Docs of all liability)
Provides to you all reasonable assistance, at your expense.
Changes to these terms
Short version: We want our users to be informed of important changes to our terms, but some changes aren’t that important — we don’t want to bother you every time we fix a typo. So while we may modify this agreement at any time, we will notify users of any changes that affect your rights and give you time to adjust to them.
We reserve the right, at our sole discretion, to amend these Terms of Service at any time and will update these Terms of Service in the event of any such amendments. We will notify our Users of material changes to this Agreement, such as price changes, at least 30 days prior to the change taking effect by posting a notice on our Website. For non-material modifications, your continued use of the Website constitutes agreement to our revisions of these Terms of Service.
We reserve the right at any time and from time to time to modify or discontinue, temporarily or permanently, the Website (or any part of it) with or without notice.
Miscellaneous
Governing law
Except to the extent applicable law provides otherwise, this Agreement between you and Read the Docs and any access to or use of our Websites or our Services are governed by the federal laws of the United States of America and the laws of the State of Oregon, without regard to conflict of law provisions.
Non-assignability
Read the Docs may assign or delegate these Terms of Service and/or our Privacy Policy, in whole or in part, to any person or entity at any time with or without your consent, including the license grant in License grant to us. You may not assign or delegate any rights or obligations under the Terms of Service or Privacy Policy without our prior written consent, and any unauthorized assignment and delegation by you is void.
Section headings and summaries
Throughout this Agreement, each section includes titles and brief summaries of the following terms and conditions. These section titles and brief summaries are not legally binding.
Severability, no waiver, and survival
If any part of this Agreement is held invalid or unenforceable, that portion of the Agreement will be construed to reflect the parties’ original intent. The remaining portions will remain in full force and effect. Any failure on the part of Read the Docs to enforce any provision of this Agreement will not be considered a waiver of our right to enforce such provision. Our rights under this Agreement will survive any termination of this Agreement.
Amendments; complete agreement
This Agreement may only be modified by a written amendment signed by an authorized representative of Read the Docs, or by the posting by Read the Docs of a revised version in accordance with Changes to these terms. These Terms of Service, together with our Privacy Policy, represent the complete and exclusive statement of the agreement between you and us. This Agreement supersedes any proposal or prior agreement oral or written, and any other communications between you and Read the Docs relating to the subject matter of these terms including any confidentiality or nondisclosure agreements.
Questions
Questions about the Terms of Service? Get in touch.
Privacy Policy
Effective date: September 30, 2019
Welcome to Read the Docs. At Read the Docs, we believe in protecting the privacy of our users, authors, and readers.
The short version
We collect your information only with your consent; we only collect the minimum amount of personal information that is necessary to fulfill the purpose of your interaction with us; we don’t sell it to third parties; and we only use it as this Privacy Policy describes.
Of course, the short version doesn’t tell you everything, so please read on for more details!
Our services
Read the Docs is made up of:
- readthedocs.org (“Read the Docs Community”)
This is a website aimed at documentation authors and project maintainers writing and distributing technical documentation. This Privacy Policy applies to this site in full without reservation.
- readthedocs.com (“Read the Docs for Business”)
This website is a commercial hosted offering for hosting private documentation for corporate clients. This Privacy Policy applies to this site in full without reservation.
- readthedocs.io, readthedocs-hosted.com, and other domains (“Documentation Sites”)
These websites are where Read the Docs hosts documentation (”User-Generated Content”) on behalf of documentation authors. A best effort is made to apply this Privacy Policy to these sites but the documentation may contain content and files created by documentation authors.
All use of Read the Docs is subject to this Privacy Policy, together with our Terms of service.
What information Read the Docs collects and why
Information from website browsers
If you’re just browsing the website, we collect the same basic information that most websites collect. We use common internet technologies, such as cookies and web server logs. We collect this basic information from everybody, whether they have an account or not.
The information we collect about all visitors to our website includes:
the visitor’s browser type
language preference
referring site
the date and time of each visitor request
We also collect potentially personally-identifying information like Internet Protocol (IP) addresses.
We collect this information to better understand how our website visitors use Read the Docs, and to monitor and protect the security of the website.
Information from users with accounts
If you create an account, we require some basic information at the time of account creation. You will create your own user name and password, and we will ask you for a valid email account. You also have the option to give us more information if you want to, and this may include “User Personal Information.”
“User Personal Information” is any information about one of our users which could, alone or together with other information, personally identify him or her. Information such as a user name and password, an email address, a real name, and a photograph are examples of “User Personal Information.”
User Personal Information does not include aggregated, non-personally identifying information. We may use aggregated, non-personally identifying information to operate, improve, and optimize our website and service.
We need your User Personal Information to create your account, and to provide the services you request.
We use your User Personal Information, specifically your user name, to identify you on Read the Docs.
We use it to fill out your profile and share that profile with other users.
We will use your email address to communicate with you but it is not shared publicly.
We limit our use of your User Personal Information to the purposes listed in this Privacy Statement. If we need to use your User Personal Information for other purposes, we will ask your permission first. You can always see what information we have in your user account.
What information Read the Docs does not collect
We do not intentionally collect sensitive personal information, such as social security numbers, genetic data, health information, or religious information.
Documentation Sites hosted on Read the Docs are public, anyone (including us) may view their contents. If you have included private or sensitive information in your Documentation Site, such as email addresses, that information may be indexed by search engines or used by third parties.
Read the Docs for Business may host private projects which we treat as confidential and we only access them for support reasons, with your consent, or if required to for security reasons
If you’re a child under the age of 13, you may not have an account on Read the Docs. Read the Docs does not knowingly collect information from or direct any of our content specifically to children under 13. If we learn or have reason to suspect that you are a user who is under the age of 13, we will unfortunately have to close your account. We don’t want to discourage you from writing software documentation, but those are the rules.
How Read the Docs secures your information
Read the Docs takes all measures reasonably necessary to protect User Personal Information from unauthorized access, alteration, or destruction; maintain data accuracy; and help ensure the appropriate use of User Personal Information. We follow generally accepted industry standards to protect the personal information submitted to us, both during transmission and once we receive it.
No method of transmission, or method of electronic storage, is 100% secure. Therefore, we cannot guarantee its absolute security.
Read the Docs’ global privacy practices
Information that we collect will be stored and processed in the United States in accordance with this Privacy Policy. However, we understand that we have users from different countries and regions with different privacy expectations, and we try to meet those needs.
We provide the same standard of privacy protection to all our users around the world, regardless of their country of origin or location, Additionally, we require that if our vendors or affiliates have access to User Personal Information, they must comply with our privacy policies and with applicable data privacy laws.
In particular:
Read the Docs provides clear methods of unambiguous, informed consent at the time of data collection, when we do collect your personal data.
We collect only the minimum amount of personal data necessary, unless you choose to provide more. We encourage you to only give us the amount of data you are comfortable sharing.
We offer you simple methods of accessing, correcting, or deleting the data we have collected.
We also provide our users a method of recourse and enforcement.
Resolving Complaints
If you have concerns about the way Read the Docs is handling your User Personal Information, please let us know immediately by emailing us at privacy@readthedocs.org.
How we respond to compelled disclosure
Read the Docs may disclose personally-identifying information or other information we collect about you to law enforcement in response to a valid subpoena, court order, warrant, or similar government order, or when we believe in good faith that disclosure is reasonably necessary to protect our property or rights, or those of third parties or the public at large.
In complying with court orders and similar legal processes, Read the Docs strives for transparency. When permitted, we will make a reasonable effort to notify users of any disclosure of their information, unless we are prohibited by law or court order from doing so, or in rare, exigent circumstances.
How you can access and control the information we collect
If you’re already a Read the Docs user, you may access, update, alter, or delete your basic user profile information by editing your user account.
Data retention and deletion
Read the Docs will retain User Personal Information for as long as your account is active or as needed to provide you services.
We may retain certain User Personal Information indefinitely, unless you delete it or request its deletion. For example, we don’t automatically delete inactive user accounts, so unless you choose to delete your account, we will retain your account information indefinitely.
If you would like to delete your User Personal Information, you may do so in your user account. We will retain and use your information as necessary to comply with our legal obligations, resolve disputes, and enforce our agreements, but barring legal requirements, we will delete your full profile.
Our web server logs for Read the Docs Community, Read the Docs for Business, and Documentation Sites are deleted after 10 days barring legal obligations.
Changes to our Privacy Policy
We reserve the right to revise this Privacy Policy at any time. If we change this Privacy Policy in the future, we will post the revised Privacy Policy and update the “Effective Date,” above, to reflect the date of the changes.
Contacting Read the Docs
Questions regarding Read the Docs’ Privacy Policy or information practices should be directed to privacy@readthedocs.org.
Security Policy
Read the Docs adheres to the following security policies and procedures with regards to development, operations, and managing infrastructure. You can also find information on how we handle specific user data in our Privacy Policy.
Our engineering team monitors several sources for security threats and responds accordingly to security threats and notifications.
We monitor 3rd party software included in our application and in our infrastructure for security notifications. Any relevant security patches are applied and released immediately.
We monitor our infrastructure providers for signs of attacks or abuse and will respond accordingly to threats.
Infrastructure
Read the Docs infrastructure is hosted on Amazon Web Services (AWS). We also use Cloudflare services to mitigate attacks and abuse.
Data and data center
All user data is stored in the USA in multi-tenant datastores in Amazon Web Services data centers. Physical access to these data centers is secured with a variety of controls to prevent unauthorized access.
Application
- Encryption in transit
All documentation, application dashboard, and API access is transmitted using SSL encryption. We do not support unencrypted requests, even for public project documentation hosting.
- Temporary repository storage
We do not store or cache user repository data, temporary storage is used for every project build on Read the Docs.
- Authentication
Read the Docs supports SSO with GitHub, GitLab, Bitbucket, and Google Workspaces (formerly G Suite).
- Payment security
We do not store or process any payment details. All payment information is stored with our payment provider, Stripe – a PCI-certified level 1 payment provider.
Engineering and Operational Practices
- Immutable infrastructure
We don’t make live changes to production code or infrastructure. All changes to our application and our infrastructure go through the same code review process before being applied and released.
- Continuous integration
We are constantly testing changes to our application code and operational changes to our infrastructure.
- Incident response
Our engineering team is on a rotating on-call schedule to respond to security or availability incidents.
Data Processing Agreement
Note
This agreement can be included with any subscription on Read the Docs for Business. Contact us at privacy@readthedocs.com to include this in your subscription agreement.
This Data Processing Agreement (“DPA”) is an addendum to the Master Services Agreement (“Agreement”) between Read the Docs, Inc., along with our affiliates and subsidiaries (collectively, “Read the Docs,” “us,” or “we”) and the organization subscribing to our Services (“Organization”). This DPA takes effect on the date Organization signs up for Services, and governs the collection, processing, or receipt of Personal Data by Read the Docs on behalf of the Organization in the course of providing the Services. Terms not defined herein shall have the meaning as set forth in the Agreement. If you have questions or would like to receive a signed copy of this DPA, please contact us at privacy@readthedocs.com.
1. Definitions
“Applicable Laws” means all laws, rules, regulations, and orders applicable to the subject matter herein, including without limitation Data Protection Laws.
“California Personal Information” means Personal Data that is subject to the protection of the CCPA.
“CCPA” means California Civil Code Sec. 1798.100 et seq. (also known as the California Consumer Privacy Act of 2018).
“Consumer”, “Business”, “Sell”, and “Service Provider” shall have the meanings given to them in the CCPA.
“Controller”, “Data Subject”, “Processing”, and “Processor” shall have the meanings given to them in the General Data Protection Regulation (Regulation (EU) 2016/679 of the European Parliament and of the Council together with any subordinate legislation or regulation implementing the General Data Protection Regulation) or “GDPR.”
“Controller-to-Processor SCCs” means the Standard Contractual Clauses (Processors) in the Annex to the European Commission Decision of February 5, 2010, as may be amended or replaced from time to time by the European Commission.
“Organization Data” means all Personal Data, including without limitation California Personal Information and European Personal Data, Processed by Read the Docs on behalf of Organization pursuant to the Agreement.
“Data Protection Laws” means all applicable worldwide legislation relating to data protection and privacy that apply to the respective Party in its role of Processing Personal Data in question under the Agreement, including without limitation European Data Protection Laws and the CCPA; in each case as amended, superseded, or replaced from time to time.
“Data Subject” means the Consumer or other individual to whom Personal Data relates.
“European Data” means Personal Data that is subject to the protection of European Data Protection Laws.
“European Data Protection Laws” means data protection laws applicable in Europe, including: (i) Regulation 2016/679 of the European Parliament and of the Council on the protection of natural persons with regard to the processing of personal data and on the free movement of such data (GDPR); (ii) Directive 2002/58/EC concerning the processing of personal data and the protection of privacy in the electronic communications sector; and (iii) applicable national implementations of (i) and (ii); or (iii) in respect of the United Kingdom, any applicable national legislation that replaces or converts in domestic law the GDPR or any other law relating to data and privacy as a consequence of the United Kingdom leaving the European Union; and (iv) Swiss Federal Data Protection Act on 19 June 1992 and its Ordinance; in each case, as may be amended, superseded or replaced.
“Instructions” means the written, documented instructions issued by Organization to Read the Docs, and directing Read the Docs to perform a specific or general action regarding Personal Data for the purpose of providing the Services to Organization. The Parties agree that the Agreement (including this DPA), together with Organization’s use of the Services in accordance with the Agreement, constitute Organization’s complete and final Instructions to Read the Docs in relation to the Processing of Organization Data, and additional Instructions outside the scope of the Instructions shall require prior written agreement between Read the Docs and Organization.
“Personal Data” means any information relating to an identified or identifiable individual where such information is contained within Organization Data and is protected similarly as personal data, personal information, or personally identifiable information under applicable Data Protection Laws.
“Personal Data Breach” means a breach of security leading to the accidental or unlawful destruction, loss, alteration, unauthorized disclosure of, or access to, Personal Data transmitted, stored, or otherwise Processed by Read the Docs and/or its Sub-Processors in connection with the provision of the Services. Personal Data Breach does not include unsuccessful attempts or activities that do not compromise the security of Personal Data, including unsuccessful log-in attempts, pings, port scans, denial of service attacks, and other network attacks on firewalls or networked systems.
“Sub-Processor” means any entity that provides processing services to Read the Docs in furtherance of Read the Docs’s processing of Organization Data.
2. Nature, Purpose, and Subject Matter
The nature, purpose, and subject matter of Read the Docs’s data processing activities performed as part of the Services are set out in the Agreement. The Organization Data that may be processed may relate to Data Subjects, such as the Organization’s users, employees, and individual users of Read the Docs’s website or other Services (each a “User”). Categories of Personal Data Processed may include identifiers, internet activity, education or employment-related information, commercial information, and any other Personal Data that may be processed pursuant to the Agreement.
3. Duration
The term of this DPA shall follow the term of the Agreement. Read the Docs will Process Personal Data for the duration of the Agreement, unless otherwise agreed in writing.
4. Processing of Organization Data
Read the Docs shall process Organization Data only for the purposes described in the Agreement (including this DPA) or as otherwise agreed within the scope of Organization’s lawful Instructions, except where and to the extent otherwise required by Applicable Law. If Read the Docs is collecting Personal Data from Users on behalf of Organization, Read the Docs shall follow Organization’s Instructions regarding such Personal Data collection. Read the Docs shall inform Organization without delay if, in Read the Docs’s opinion, an Instruction violates applicable Data Protection Laws and, where necessary, cease all Processing until Organization issues new Instructions with which Read the Docs is able to comply. If this provision is invoked, Read the Docs will not be liable to Organization under the Agreement for any failure to perform the Services until such time as Organization issues new lawful Instructions.
5. Confidentiality
Read the Docs shall ensure that any personnel who Read the Docs authorizes to Process Organization Data on its behalf is subject to appropriate confidentiality obligations (whether a contractual or statutory duty) with respect to that Organization Data. Additionally, Read the Docs shall take reasonable steps to ensure that (i) persons employed by Read the Docs and (ii) other persons engaged to perform on Read the Docs’s behalf comply with the terms of the Agreement.
6. Organization Responsibilities
Within the scope of the Agreement (including this DPA) and in Organization’s use of the Services, Organization shall take sole responsibility for: (i) the accuracy, quality, and legality of Organization Data and the means by which Organization acquired Personal Data; (ii) complying with all necessary transparency and lawfulness requirements under applicable Data Protection Laws for the collection and use of the Personal Data, including obtaining any necessary consents and authorizations; (iii) ensuring Organization has the right to transfer, or provide access to, the Personal Data to Read the Docs for Processing in accordance with the terms of the Agreement (including this DPA); (iv) ensuring that Organization’s Instructions to Read the Docs regarding the Processing of Organization Data comply with Applicable Laws; and (v) complying with all Applicable Laws (including Data Protection Laws) applicable to Organization’s use of the Services, including without limitation Applicable Laws relating to Organization’s Processing of Personal Data, providing notice and obtaining consents, and the Instructions it issues to Read the Docs. Organization shall inform Read the Docs without undue delay if it is not able to comply with this section or applicable Data Protection Laws. For the avoidance of doubt, Read the Docs is not responsible for compliance with any Data Protection Laws applicable to Organization or Organization’s industry that are not generally applicable to Read the Docs.
7. Sub-Processors
Organization agrees that Read the Docs may engage Sub-Processors to Process Organization Data. Where Read the Docs engages Sub-Processors, Read the Docs will impose data protection terms on the Sub-Processors that provide at least the same level of protection for Personal Data as those in this DPA, to the extent applicable to the nature of the services provided by such Sub-Processors. Read the Docs will remain responsible for each Sub-Processor’s compliance with the obligations of this DPA and for any acts or omissions of such Sub-Processor that cause Read the Docs to breach any of its obligations under this DPA. Read the Docs will maintain a current list of the Sub-processors engaged to Process Organization Data (“Sub-Processor List”), which Read the Docs shall make available to Organization upon written request.
Sub-Processor List
- Effective
April 16, 2021
- Last updated
April 16, 2021
Read the Docs for Business uses services from the following sub-processors to provide documentation hosting services. This document supplements our Data Processing Agreement and may be separately updated on a periodic basis. A sub-processor is a third party data processor who has or potentially will have access to or will process personal data.
See also
Previous versions of this document, as well as the change history to this document, are available on GitHub
- Amazon Web Services, Inc.
Cloud infrastructure provider.
- Elasticsearch B.V.
Hosted ElasticSearch services for documentation search. Search indexes do not include user data.
- Sendgrid, Inc.
Provides email delivery to dashboard and admin users for site notifications and other generated messages. The body of notification emails can include user information, including email address.
- Google Analytics
Website analtyics for dashboard and documentation sites.
- Stripe Inc.
Subscription payment provider. Data collected can include user data necessary to process payment transactions, however this data is not processed directly by Read the Docs.
- New Relic
Application performance analytics. Data collected can include user data and visitor data used within application code.
- Sentry
Error analytics service used to log and track application errors. Error reports can include arguments passed to application code, which can include user and visitor data.
- Intercom, Inc.
Dashboard user reporting and analytics. Data collected can include user information like email address and IP address. This is only used on our application dashboard and is not used on documentation sites.
- FrontApp, Inc.
Customer email support service. Can have access to user data, including user email and IP address, and stores communications related to user data.
See also
Read the Docs Sub-Processor List for an up-to-date list of the sub-processors we use for hosting services.
8. Security
Taking into account the state of the art, the costs of implementation and the nature, scope, context and purposes of Processing as well as the risk of varying likelihood and severity for the rights and freedoms of natural persons, Read the Docs shall, in relation to the Organization Data, maintain appropriate technical and organizational security measures designed to protect against unauthorized or accidental access, loss, alteration, disclosure or destruction of Organization Data. In assessing the appropriate level of security, Read the Docs shall take specifically into account the risks that are presented by Processing, in particular from a Personal Data Breach. Upon request, Read the Docs shall provide Organization with a summary of Read the Docs’s security policies applicable to the Services.
9. Data Transfers
Organization acknowledges and agrees that Read the Docs may access and Process Personal Data on a global basis as necessary to provide the Services in accordance with the Agreement, and in particular that Personal Data will be transferred to and Processed by Read the Docs in the United States and to other jurisdictions where Read the Docs’s Sub-Processors have operations.
10. Personal Data Breaches
If Read the Docs becomes aware of any Personal Data Breach involving Organization Data, Read the Docs will promptly, and in no case more than five calendar days after becoming aware, notify Organization in writing of the Personal Data Breach. Following such notification, to the extent required by applicable Data Protection Laws, Read the Docs will: (a) provide Organization with timely information relating to such Personal Data Breach as it becomes known or is reasonably requested by Organization; and (b) upon Organization’s request, provide Organization with commercially reasonable assistance as necessary to enable Organization to notify authorities and/or affected Data Subjects. Each Party shall be solely responsible for all costs, damages, and liabilities incurred as the result of a Personal Data Breach of the Party’s own information system and shall, at the other Party’s request and cost, provide the other Party with reasonable assistance to investigate, respond to, and mitigate the effects of a Breach of the other Party’s information system.
11. Data Subject Requests
As part of the Services, Read the Docs provides Organization and with certain controls by which the Organization may access, correct, delete, or restrict Organization Data, which Organization may use to assist it in connection with its obligations under Data Protection Laws, including its obligations relating to responding to requests from Data Subjects to exercise their rights under applicable Data Protection Laws (”Data Subject Requests”). To the extent that Organization is unable to independently address a Data Subject Request through the Services, then upon Organization’s written request Read the Docs shall provide reasonable assistance to Organization to respond to any Data Subject Requests or requests from data protection authorities relating to the Processing of Organization Data under the Agreement. Organization shall reimburse Read the Docs for the commercially reasonable costs arising from this assistance. If a Data Subject Request or other communication regarding the Processing of Organization Data under the Agreement is made directly to Read the Docs, Read the Docs will promptly inform Organization and will advise the Data Subject to submit their request to Organization. Organization shall be solely responsible for responding substantively to any such Data Subject Requests or communications involving Personal Data.
12. Data Protection Impact Assessment and Prior Consultation
To the extent Read the Docs is required under Data Protection Law, Read the Docs shall (at Organization’s expense) provide reasonably requested information regarding Read the Docs’s processing of Organization Data under the Agreement to enable Organization to carry out data protection impact assessments or prior consultations with data protection authorities as required by law.
13. Deletion or Return of Personal Data
Upon termination or expiration of the Agreement, Read the Docs will delete or return all Organization Data Processed pursuant to this DPA in accordance with Organization’s reasonable Instructions. The requirements of this section shall not apply to the extent that Read the Docs is required by Applicable Law to retain some or all of the Organization Data, or to Organization Data Read the Docs has archived on back-up systems, which data Read the Docs shall securely isolate and protect from any further Processing and delete in accordance with Read the Docs’s deletion practices.
14. Demonstration of Compliance
Upon Organization’s written request, Read the Docs shall make available to Organization (on a confidential basis) all information reasonably necessary, and allow for and contribute to audits, to demonstrate Read the Docs’s compliance with this DPA, provided Organization shall not exercise this right more than once per year. Organization shall take all reasonable measures to limit any impact on Read the Docs by combining several information and/or audit requests carried out on behalf of Organization in one single audit.
15. European Data
This Section 15 applies only with respect to Processing of European Data by Read the Docs.
Roles of the Parties. When Processing European Data under the Agreement, the Parties acknowledge and agree that Organization is the Controller and Read the Docs is the Processor.
Sub-Processors. In addition to the provisions of Section 7, Read the Docs will notify Organization of any changes to Sub-processors engaged to Process European Data by updating the Sub-Processor List and posting the changes for Organization’s review. Organization may object to the engagement of a new Sub-Processor on reasonable grounds relating to the protection of Personal Data within 30 days after posting the updated Sub-Processor List. If Organization so objects, the Parties will discuss Organization’s concerns in good faith with a view to achieving a commercially reasonable resolution. If no such resolution can be reached, Read the Docs will, at its sole discretion, either not appoint the new Sub-Processor, or permit Organization to suspend or terminate the Agreement without liability to either party (but without prejudice to any fees incurred by Organization prior to suspension or termination).
Data Transfers. In addition to Section 9, for transfers of European Personal Data to Read the Docs for processing by Read the Docs in a jurisdiction other than a jurisdiction in the EU, the EEA, or the European Commission-approved countries providing “adequate” data protection, Read the Docs agrees it will (i) use the form of the Controller-to-Processor SCCs or (ii) provide at least the same level of privacy protection for European Personal Data as required under the U.S.-EU and U.S.-Swiss Privacy Shield frameworks, as applicable. If such data transfers rely on Controller-to-Processor SCCs to enable the lawful transfer of European Personal Data, as set forth in the preceding sentence, the Parties agree that Data Subjects for whom Read the Docs Processes European Personal Data are third-party beneficiaries under the Controller-to-Processor SCCs. If Read the Docs is unable or becomes unable to comply with these requirements, then (a) Read the Docs shall notify Organization of such inability and (b) any movement of European Personal Data to a non-EU country requires the prior written consent of Organization.
Data Protection Impact Assessments and Consultation with Supervisory Authorities. To the extent that the required information is reasonably available to Read the Docs, and Organization does not otherwise have access to the required information, Read the Docs will provide reasonable assistance to Organization with any data protection impact assessments, and prior consultations with supervisory authorities or other competent data privacy authorities to the extent required by European Data Protection Laws.
16. California Personal Information
This Section 16 applies only with respect to Processing of California Personal Information by Read the Docs in Read the Docs’s capacity as a Service Provider.
Roles of the Parties. When Processing California Personal Information in accordance with Organization’s Instructions, the Parties acknowledge and agree that Organization is a Business and Read the Docs is the Service Provider for the purposes of the CCPA. Additionally, for the purposes of interpreting this DPA with respect to Processing of California Personal Information, the term “Controller” is replaced with “Business” and “Processor” is replaced with “Service Provider” wherever those terms appear in Sections 2 through 14 and Section 17 of this DPA.
Responsibilities. The Parties agree that Read the Docs will process Users’ California Personal Information as a Service Provider strictly for the business purpose of performing the Services under the Agreement and as set forth in Read the Docs’s Privacy Policy. The Parties agree that Read the Docs shall not (i) “sell” or “share” Users’ California Personal Information (as those terms are defined in the CCPA); (ii) retain, use, or disclose Users’ California Personal Information for a commercial purpose other than for such business purpose or as otherwise permitted by the CCPA; or (iii) retain, use, or disclose Users’ California Personal Information outside of the direct business relationship between Organization and Read the Docs.
Certification. Read the Docs hereby certifies that it understands and will comply with the restrictions of Section 16(b).
No CCPA Sale. The Parties agree that Organization does not sell California Personal Information to Read the Docs because, as a Service Provider, Read the Docs may only use California Personal Information for the purposes of providing the Services to Organization.
17. General
Organization represents that it is authorized to, and hereby agrees to, enter into and be bound by this DPA for and on behalf of itself and each of its affiliates and subsidiaries, thereby establishing a separate DPA between Read the Docs and Organization and each of Organization’s affiliates and subsidiaries subject to the Agreement, as applicable. The relationship between Parties is that of independent contractors, and nothing herein shall be interpreted to constitute the Parties as partners, joint venturers, principal-agent, or otherwise participants in a common undertaking, or, except as expressly provided herein, allow either Party to create or assume any obligation on behalf of the other for any purpose whatsoever. The limitations of liability set forth in the Agreement shall apply to Read the Docs’s liability arising out of or relating to this DPA and the Standard Contractual Clauses (where applicable), taken in the aggregate along with the Agreement and any other agreement between the Parties. In case of any conflict or inconsistency with the terms of the Agreement, this DPA shall take precedence over the terms of the Agreement to the extent of such conflict or inconsistency. If any individual provisions of this DPA are determined to be invalid or unenforceable, the validity and enforceability of the other provisions of this DPA shall not be affected. We periodically update this Agreement. If you are a current Organization, you will be informed of any modification by email, alert on the Organization dashboard or portal or by other means.
- Read the Docs Terms of Service
The terms of service for using Read the Docs Community and Read the Docs for Business. You may instead have a master services agreement for your subscription if you have a custom or enterprise contract.
- Privacy Policy
Our policy on collecting, storing, and protecting user and visitor data.
- Security Policy
Our policies around application and infrastructure security.
- Data Processing Agreement
For GDPR and CCPA compliance, we provide a data privacy agreement for Read the Docs for Business customers.
Glossary
- dashboard
Main page where you can see all your projects with their build status and import a new project.
Menu displayed on the documentation, readily accessible for readers, containing the list active versions, links to static downloads, and other useful links. Read more in our Flyout Menu page.
- pre-defined build jobs
Commands executed by Read the Docs when performing the build process. They cannot be overwritten by the user.
- profile page
Page where you can see the projects of a certain user.
- project home
Page where you can access all the features of Read the Docs, from having an overview to browsing the latest builds or administering your project.
- project page
Another name for project home.
- slug
A unique identifier for a project or version. This value comes from the project or version name, which is reduced to lowercase letters, numbers, and hypens. You can retreive your project or version slugs from our API.
- root URL
Home URL of your documentation without the
/<lang>and/<version>segments. For projects without custom domains, the one ending in.readthedocs.io/(for example,https://docs.readthedocs.ioas opposed tohttps://docs.readthedocs.io/en/latest).- user-defined build jobs
Commands defined by the user that Read the Docs will execute when performing the build process.
Google Summer of Code
Warning
Read the Docs will not be participating in the Google Summer of Code in 2020. We hope to return to the program in the future, and appreciate the interest everyone has shown.
Thanks for your interest in Read the Docs! Please follow the instructions in Getting Started, as a good place to start. Contacting us will not increase your chance of being accepted, but opening pull requests with docs and tests will.
You can see our Projects from previous years for the work that students have done in the past.
Skills
Incoming students will need the following skills:
Intermediate Python & Django programming
Familiarity with Markdown, reStructuredText, or some other plain text markup language
Familiarity with git, or some other source control
Ability to set up your own development environment for Read the Docs
Basic understanding of web technologies (HTML/CSS/JS)
An interest in documentation and improving open source documentation tools!
We’re happy to help you get up to speed, but the more you are able to demonstrate ability in advance, the more likely we are to choose your application!
Getting Started
The Development Installation doc is probably the best place to get going. It will walk you through getting a basic environment for Read the Docs setup.
Then you can look through our Contributing to Read the Docs doc for information on how to get started contributing to RTD.
People who have a history of submitting pull requests will be prioritized in our Summer of Code selection process.
Want to get involved?
If you’re interested in participating in GSoC as a student, you can apply during the normal process provided by Google. We are currently overwhelmed with interest, so we are not able to respond individually to each person who is interested.
Mentors
Currently we have a few folks signed up:
Eric Holscher
Manuel Kaufmann
Anthony Johnson
Safwan Rahman
Warning
Please do not reach out directly to anyone about the Summer of Code. It will not increase your chances of being accepted!
Project Ideas
We have written our some loose ideas for projects to work on here. We are also open to any other ideas that students might have.
These projects are sorted by priority. We will consider the priority on our roadmap as a factor, along with the skill of the student, in our selection process.
Collections of Projects
This project involves building a user interface for groups of projects in Read the Docs (Collections).
Users would be allowed to create, publish, and search a Collection of projects that they care about.
We would also allow for automatic creation of Collections based on a project’s setup.py or requirements.txt.
Once a user has a Collection,
we would allow them to do a few sets of actions on them:
Search across all the projects in the
Collectionwith one search dialogDownload all the project’s documentation (PDF, HTMLZip, Epub) for offline viewing
Build a landing page for the collection that lists out all the projects, and could even have a user-editable description, similar to our project listing page.
There is likely other ideas that could be done with Collections over time.
Integration with OpenAPI/Swagger
Integrate the existing tooling around OpenAPI & Swagger into Sphinx and Read the Docs. This will include building some extensions that generate reStructuredText, and backend Django code that powers the frontend Javascript.
This could include:
Building a live preview for testing an API in the documentation
Taking a swagger YAML file and generating HTML properly with Sphinx
Integration with our existing API to generate Swagger output
Build a new Sphinx theme
Sphinx v2 will introduce a new format for themes, supporting HTML5 and new markup. We are hoping to build a new Sphinx theme that supports this new structure.
This project would include:
A large amount of design, including working with CSS & SASS
Iterating with the community to build something that works well for a number of use cases
This is not as well defined as the other tasks, so would require a higher level of skill from an incoming student.
Better MkDocs integration
Currently we don’t have a good integration with MkDocs as we do with Sphinx. And it’s hard to maintain compatibility with new versions.
This project would include:
Integrated Redirects
Right now it’s hard for users to rename files. We support redirects, but don’t create them automatically on file rename, and our redirect code is brittle.
We should rebuild how we handle redirects across a number of cases:
Detecting a file change in git/hg/svn and automatically creating a redirect
Support redirecting an entire domain to another place
Support redirecting versions
There will also be a good number of things that spawn from this, including version aliases and other related concepts, if this task doesn’t take the whole summer.
Improve Translation Workflow
Currently we have our documentation & website translated on Transifex, but we don’t have a management process for it. This means that translations will often sit for months before making it back into the site and being available to users.
This project would include putting together a workflow for translations:
Communicate with existing translators and see what needs they have
Help formalize the process that we have around Transifex to make it easier to contribute to
Improve our tooling so that integrating new translations is easier
Support for additional build steps for linting and testing
Currently we only build documentation on Read the Docs, but we’d also like to add additional build steps that lets users perform more actions. This would likely take the form of wrapping some of the existing Sphinx builders, and giving folks a nice way to use them inside Read the Docs.
It would be great to have wrappers for the following as a start:
Link Check (http://www.sphinx-doc.org/en/stable/builders.html#sphinx.builders.linkcheck.CheckExternalLinksBuilder)
Spell Check (https://pypi.python.org/pypi/sphinxcontrib-spelling/)
Doctest (http://www.sphinx-doc.org/en/stable/ext/doctest.html#module-sphinx.ext.doctest)
Coverage (http://www.sphinx-doc.org/en/stable/ext/coverage.html#module-sphinx.ext.coverage)
The goal would also be to make it quite easy for users to contribute third party build steps for Read the Docs, so that other useful parts of the Sphinx ecosystem could be tightly integrated with Read the Docs.
Additional Ideas
We have some medium sized projects sketched out in our issue tracker with the tag Feature. Looking through these issues is a good place to start. You might also look through our milestones on GitHub, which provide outlines on the larger tasks that we’re hoping to accomplish.
Projects from previous years
Thanks
This page was heavily inspired by Mailman’s similar GSOC page. Thanks for the inspiration.